Quiet Activity for Toddlers
Make this whale page to keep the kids busy anytime and anywhere!
Makes 1
Equipment
- Cricut EasyPress
- Sewing machine
What You Will Need
- Cricut felt
- Heat transfer vinyl in white and black
- Thread
- Cricut cut file
- Zipper
- Iron-on protective sheet or parchment paper
Instructions
Cut the Pieces with Your Cricut
- Cut all of the pieces with your Cricut machine. You can find the cut file here. The circles should be cut from heat transfer vinyl. Other pieces should all be cut from felt. You can change up the colors on this project if you wish.
Add Heat Transfer Vinyl
- Start by adding the eyes to the felt whale. Add the white portions of the eyes first. Preheat the felt for a few seconds. I always use an iron-on protective sheet or parchment paper to cover felt. Then add the white of the eyes in the correct location.
- Press with the EasyPress for the recommended time and temperature. You can find these settings on the Cricut heat guide. I am using my EasyPress mini but any EasyPress or even an iron would work.
- Peel back the protective liner on the white portion then put the black heat transfer vinyl into place. Be sure to replace the carrier sheet on the white iron-on to help protect it for pressing.
- Then press once again with the EasyPress.
Sew Your Quiet Page
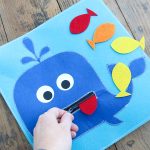
- Peel back the protective liners from both the black and white. Your whale now has eyes. Next, it is time to add his zipper mouth. I am using a really long zipper but will cut off the excess later.
- Sew all the way around the outside of the mouth opening with the zipper in place. Note: I used my zipper foot for this and a wide zig-zag stitch.
- Trim off any excess zipper with scissors. Then sew your whale to one of the large rectangle pieces. Go all the way around the outer edge with a smaller zig-zag stitch.
- You want a clean back on your project to give it more of a finished appearance. Do this by sewing the second rectangle on the back of the first. Just go around the outer edge with the same zig-zag stitch.
- Now all that is left is to unzip the mouth and add in the felt fish.