How to Use Mosaic Vinyl from Cricut
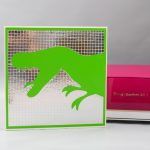
Make this dinosaur wall art with the new Cricut mosaic vinyl.
Makes 1
Equipment
What You Will Need
- White paint
- 10x10 wood panel
- Vinyl in the color of your choice
- Mosaic vinyl in the shape and color of your choice
- Transfer tape
- Paintbrush
- Cricut cut file for the dinosaur art
- Weeding tools
Instructions
- Paint the wood panel. One coat of this paint was enough for me but you may need to coats. Just be sure to allow to dry in between coats. You will also want to let the panel dry completely before adding any vinyl.
How to Cut Mosaic Vinyl from Cricut
- While the paint dries, you can cut your project. If you want to use the dinosaur art from this project, click here to access the Cricut cut file. There is no need to mirror your design when using any type of vinyl including mosaic vinyl. You will need to be sure to pick mosaic vinyl from the menu when cutting. You will want to set the dial to custom if you are using the Cricut Explore series.
- Then use the fine point blade to cut both the mosaic and regular vinyl for the dinosaur art project.
Weeding Mosaic Vinyl from Cricut
- Weeding regular vinyl and mosaic is basically the same. You will want to weed away all of the excess around your design leaving only the part you want to be transferred to your project. Weeding tools make weeding any vinyl a bit easier.
- I weeded my regular vinyl first then moved on to my mosaic.
- There is not a ton of difference between weeding regular and traditional adhesive vinyl. The mosaic vinyl from Cricut is actually like a sheet of clear vinyl with shapes printed on it. I do find the version I used to be pretty stiff. So you may want to trim it away in small pieces as you weed. It is similar to weeding a holographic vinyl if you have ever used it.
- Once you have both pieces of your dinosaur art weeded, it is time to assemble your project.
Using Transfer Tape on Mosaic Vinyl
- Now, you will need to use transfer tape to put your design on your project. If you have never used transfer tape before, this basic tutorial might help.
- Add the transfer tape to the regular vinyl first. Press down well and remove the backing from the vinyl. Then peel away from the backing paper. Apply this first layer to your white wood panel. Press it down well.
- Then just peel back the transfer tape to reveal your design.
- You can use the same transfer tape for the mosaic vinyl. It actually transfers in the same way. Just apply the transfer tape to the design and press down well. Remove the mosaic vinyl from the backing paper then add to your design on the wood panel. Just be sure to line up with the design we just put on above.
- Press it down well and start peeling back the transfer tape to reveal your completed project!
- Be sure to burnish both pieces of vinyl down well at the very end to make sure everything adheres well.