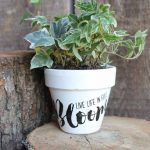
Flower Pot Painting with Chalk Couture Paint
Flower pot painting has never been easier! Create colorful, fun flower pots using Chalk Couture paint that lasts long and looks great.
What You Will Need
- Clay pots painted with two coats of white outdoor paint
- Live Life in Full Bloom Transfer
- Couture Ink in Black
- Squeegee
- Stir Stick
- Painter’s tape optional
- Clorox wipes
- Water
- Magic eraser optional
- Scissors
- Towel
Instructions
Instructions for flower pot painting with Chalk Couture:
- Start with flower pots that have had a few coats of a good quality outdoor paint. Look for paint that is intended for use on terra cotta to get maximum coverage.
- Be sure to allow your paint to cure about 24 hours before adding the transfer to make sure it is really on that pot!
- Cut your Live Life in Full Bloom Transfer into pieces along the cut lines.
- Then remove the transfer from the backing paper. Be sure to pull top to bottom or side to side and not diagonally.
- Put the transfer on a bath towel to fuzz the back.
- Stick to your flower pot wherever you want your design.
- Then use a squeegee to make sure it is stuck well and to remove any air bubbles.
- You may also want to add painter’s tape around the edge of your transfer as the ink is permanent anywhere that you get it on your pot.
- Then dollop the ink on one side of the transfer.
- Use the squeegee to pull it across and ensure that you cover all areas of the transfer.
- Remove as much of the ink as possible and put it back into the container for use on another project.
- Then remove the painter’s tape and discard.
- Remove your transfer from the flower pot. Again pull top to bottom or side to side.
- DO NOT let your ink dry on the transfer. Put in a shallow pan of water if you cannot wash right away.
- Clean up any mistakes on your flower pot while the ink is still wet. A q-tip works great for this.
- Then set your flower pot aside to dry.
- Clean up your transfer with a Clorox wipe on the front and back. Note that the ink does have a tendency to stain the transfer. You can use a magic eraser to remove a majority of this staining if desired but it is not required. The staining will not hurt future uses of the transfer.
- Allow your transfer to dry completely with the sticky side up then return to the shiny side of the backing paper for use again. Remember that the company guarantees use for 12 projects but you can use these transfers so many more times!
- You will need to heat set the ink in on your flower pot to make it permanent. Do that by baking in a 350 degree F oven for about 30 minutes. Then your project is complete and ready for a plant!
