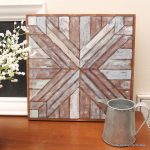
How to Make a Knock-Off DIY Wood Quilt Square
Make your own Pottery Barn-inspired wood quilt square for a fraction of the price with this DIY tutorial!
Makes 1 square
What You Will Need
- Americana Chalky Finish Paint Yesteryear
- Americana Chalky Finish Paint Primitive
- Americana Chalky Finish Paint Refreshing
- Americana Chalky Finish Paint Everlasting
- Americana Chalky Finish Paint Serene
- Americana Gel Stains Walnut
- Deco Art Crackle Medium
- Unfinshed Wood Wall Panel 12 by 12 by 1-Inch
- Ruler
- Pencil
- Woodburner Value Pen
Instructions
Step 1: Draw the quilt design on each wood panel
- We are going to begin by drawing the design onto the wood panel. Using your ruler and pencil draw a line ¼ of an inch around the perimeter of the board. Then draw two lines down the center in both the horizontal and vertical direction.
- I then did a one inch and two inch square in each corner.
- Using a long ruler or yard stick, connect those squares. Be sure to stop at your center lines.
- So the center line starts at the point of your 2 inch square. The other two lines start at the corners of your 1 inch square. If you mess up at all just erase the lines and try again. That is why we are using pencil.
- Then each of the remaining open areas should be filled with lines. I used the width of the ruler I was using actually. It fit almost perfectly. Fill each of the four remaining open areas.
Step 2: Following your outline, burn the lines into the wood
- Now it is time to break out a wood burning tool! Don't be intimidated! It is seriously as easy as using a pencil. Just a VERY hot pencil. Be very cautious and burn on each pencil line we have just drawn. This almost makes the project look like it is made from individual pieces of wood. But we did not have to cut anything y'all!
Step 3: Stain the wood board
- Now we are going to stain our board with Americana Gel Stain. I used Walnut because I love the darker color.
- Just apply the stain and let it sit for few minutes. Wipe away any excess with a rag or paper towel. Allow to dry completely.
- Add a layer of crackle medium over the surface. I skipped the 1/4 inch edge around my design. I am going to leave that portion unpainted but you can decide how you want your piece to look. Allow this to dry completely before continuing. The crackle medium will make the project even more rustic. If you wanted a more modern look to it, then feel free to skip this step.
Step 4: Choose the paint colors for your wood quilt square, then paint!
- I chose the Americana Décor Chalky Paint colors that go with my home décor. Feel free to change up the colors to any that you love.
- Start with any color and in any area. Paint each inlay area with a color. I did some heavier with paint then others.
- The thicker the coat the more crackle you will get. The lighter the coat the more it will look like worn or aged wood. I used both techniques to get a variety of looks. For an extremely light coat, apply paint to your brush then wipe most of it away. Use the dry brush to swiftly most across your area. There are no rules here y'all. Just grab a color and do what looks and feels best. It will look amazing in the end!
- Continue around your piece until all of the strips are painted. Allow to dry at least 2 hours before applying the varnish over the top.
- Once your varnish has dried, your knock off is ready for display. Now you have a piece in your home that looks like an expensive catalog item and you made it for a fraction of the price!