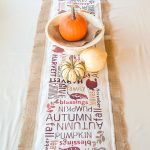
DIY Burlap Table Runner
Make this stenciled burlap table runner for your Thanksgiving table in minutes.
What You Will Need
- muslin 12 inches wide
- craft paints
- burlap 16 inches wide
- paintbrushes
- Cricut machine
- white cardstock
- tape
- sewing machine
Instructions
Making a Stencil with Your Cricut
- For this project, I broke out one of my other fave products -- my Cricut. I made my subway art using different fonts, sizes, and directions plus stock images in Cricut Design Space. I made the stencil about 8 inches square. If you make your stencil square that allows for you to turn it as you work your way down the table runner. It looks a little less like you just used the same stencil all the way (even though you do). Paint it this way then turn it 1/4 turn. Paint it again. Then turn it 1/4 turn. Make sense?
- My secret for stencils -- I take the middles of the letters and tape them in with scotch tape. After I paint in this area, I would remove the stencil and go back by hand and paint in the areas masked by the tape.
How to Make a Stenciled Burlap Table Runner
- I custom mixed my own paints. I did them in small amounts on a paper plate. So as you go down the runner, the orange may look different as I had to mix a new batch. I wanted this look. I did not want the runner to be exactly the same all the way. For me, the slight differences in color add interest.
- Plus when I painted I used different colors. Just dip your brush in say a little red before dipping it into the brown. You will be amazed at the effects you can create.
- I stretched my runner out on the floor with a newspaper underneath it. Then I painted all of my subway art all the way down. I did it in two sessions cause it totally hurt my back! But I finished it...then I let that dry.
Sewing this Thanksgiving Table Runner
- I took my burlap and cut it to be about 4 inches wider than my runner (2 inches on both sides). I then sewed the muslin to the burlap on both sides and on the ends. You do want to leave about 2 inches all the way around of the burlap. I left all of my edges raw cause I heart frayed edges. You can run some fray checker on the edges to make sure it does not fray more than you want it to.