Twine Pumpkins
Learn how to wrap fall pumpkins in baker's twine for your autumn decor.
What You Will Need
- Baker’s Twine – in the color of your choice
- Paper Mache Pumpkins
- Small Pumpkins
- Mod Podge
Instructions
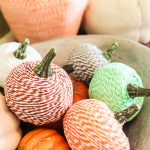
- Begin on either the top or the bottom of your pumpkin. I actually started on the top of the small pumpkins and the bottom of the large one. Coat a small area in Mod Podge and begin to wrap in twine. This craft is messy as you will get Mod Podge on your hands but I found it was the best adhesive for the baker’s twine.
- Keep wrapping and wrapping and wrapping. Be sure to put your twine tight as you wrap so you don’t get any gaps. Using lots of Mod Podge worked best because the surface is bumpy and can be hard to work the twine around. Push your twine down next to the row before it as you work your way up.
- On the smaller pumpkins, I actually left the stem alone. The end of the twine can be tucked under the stem on this end. I really liked the natural appearance of the stem on these.
- The larger pumpkin got a green baker’s twine stem as well as the orange on the body. The larger pumpkins especially take a while. Pop in a movie before you start on this project.