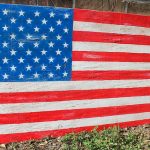
DIY Distressed Wooden American Flag
Deck your home with American flag decor with this easy distressed wooden American flag craft! Perfect for summer decorating on the 4th of July.
What You Will Need
- Plywood my piece was about 2 foot by 3 1/2 foot as it was a scrap
- Craft paint in red white, and blue (be sure to use outdoor paint if you are going to use outdoors)
- Paintbrushes
- Foam roller optional
- Ruler
- Pencil
- Paint pen
- Cricut machine
- White cardstock
- Sandpaper
- Wood stain
Instructions
Painting the Flag:
- First, paint the entire board white. I have a super easy secret weapon. I just discovered these fancy bottle tops from Plaid. They are available in the craft section at Walmart. Just screw it onto your paint bottle and you have a paint roller! I covered this board in no time flat using this little trick!
- I did one coat of paint on the plywood. Yes, there were still some poorly covered areas. It will help later with our rustic look. Allow this to dry completely before continuing.
- Do some measurements and come up with a layout that will work then draw it on the wood in pencil.
- Then use your Cricut machine to cut a couple of rows of stars out of white card stock to use as a stencil. You can actually just cut out a couple of rows and repeat those to fill your space. Then just use your template to draw fifty stars into the upper left-hand rectangle. Again, the placement was developed by measuring.
- Here is a little hack for making the perfect DIY wooden American flag: trace your lines with an Elmer's Paint Marker. This gives you have tons more control over your lines and you don't have to be as steady with a paintbrush.
- After you finish, you have broader lines that are easy to paint around with a brush.
- Then just take your brush and fill in the white areas. Remember, we are going to be making this rustic so areas of light paint are okay.
- Painted your red stripes on your DIY wooden American flag with a brush. Then you can do some sanding.
Distressing for a Rustic Appearance:
- Break out some ROUGH sandpaper. I used 60 grit. Sand until you get bare spots. Make it look as rustic as you like.
- But those sanded areas don't look very "worn" or "old"? We are going to make them look that way! Mix equal parts water-based stain and water in a disposable bowl. Also, grab an old paint brush.
- Cover small areas with your stain mixture then wipe it right off with a rag.
- Use the stain mixture over the entire thing then let it dry. Your DIY wooden American flag is now ready! I would recommend if you are using this one outside, seal with a clear sealer to be on the safe side.