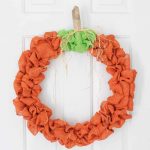
Fall Burlap Pumpkin Wreath
Make this adorable fall wreath to grace your front door and add that perfect fall color - in just 15 minutes!
Equipment
- hot glue and glue gun
What You Will Need
- 1 Orange burlap ribbon
- 1 Green burlap ribbon
- 1 Wire wreath form
- Floral Wire
- Raffia
- Driftwood piece
Instructions
- Grab your wire wreath form and your orange burlap. Cut a piece of floral wire.
- Put your floral wire piece through the end of the orange burlap ribbon and secure it by twisting it around a spot on the inside edge of the wreath frame.
- Bring the orange burlap forward from the back of the frame and up through the first segment of the wreath form.
- Use this piece of burlap to create a “bubble” but don't pull it all the way through.
- Go to your next segment and repeat the process by making another bubble. Repeat it one more time for the third segment.
- Make another bubble immediately next to your first one by twisting your burlap ribbon twice and going back through the first segment of the wreath frame.
- Repeat this process all the way around your wreath frame. Leave a small area at the top for a bit of green burlap ribbon.Add your green burlap at the top - see tip below on how to connect burlap ends together.
- Once you have added all your burlap, you can add the stem. Using hot glue, secure a piece of driftwood into the top of your wreath.
- Tie on raffia pieces to finish off your burlap pumpkin wreath.
Notes
Tips:
To start a second roll of ribbon when your roll comes to an end, overlap the two ends. Then add floral wire through both pieces. Secure to the wreath form by twisting the wire.
Floral wire should also be used to secure the ends of the burlap ribbon when you are done.