How to Make a Spooky DIY Halloween Tree
This spooky Halloween tree is easily made with some wire, a toilet paper roll, hot glue and some paint! With just a few simple supplies, you can make this fun and creepy DIY Halloween decoration!
Equipment
- Craft knife
- Pallet knives or small plastic knives
- Hot glue gun and glue sticks
What You Will Need
- Testors Dimension Craft Paste
- Testors Craft Paint
- Toilet paper roll
- Small cups
- Non-stick pad
- Tape
- Small piece of red tissue paper
- Black tissue paper
- 20 gauge wire
- Pliers
- Wire cutters
- Small LED light or battery operated candle
- Fake spider webbing
Instructions
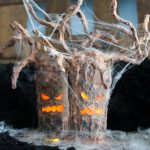
- Use a craft knife to cut a spooky face from the toilet paper roll as shown below. Always use caution when using a craft knife to avoid cutting your fingers.
- Place a small piece of red tissue paper over the face inside of the toilet paper roll. Use tape to secure into place.
- Then cut lengths of wire and form them into branch-like shapes. A pair of pliers is useful here but not required.
- Use hot glue to secure those wires inside of your toilet paper roll. I used four branches per tree. You also want to make sure that your wires or glue do not get onto your face as you want the light to be able to shine through.
- Wad up some black tissue paper and put it in the top to cover the hole.
- Now the branches are a little thin for a tree. Start adding hot glue to them to add some bulk. I went over the branches three times with hot glue building it up each time. Keep turning your project to avoid drips and use caution not to burn yourself.
- Then start adding a large amount of glue to the top of your tree to cover that tissue paper.
- It may drip down but that is okay! We are also adding some lines on the toilet paper roll with hot glue for additional texture. Again you do not want to cover the face with anything.
- Your tree will also need something to stand on so it is not top heavy. Place the tree on the non-stick mat and make "legs" with hot glue. Then just allow to cool completely and lift up.
- Now for the magic! Testors Dimensional Craft Paste is perfect for adding dimension to projects like these. When the paste is wet, it can be mixed 1:1 with an acrylic paint to give that paint a special thickening effect. The paste is lightweight, flexible, non-cracking and non-peeling. It is almost the texture of Cool Whip when it comes out of the jar. Mix it in small cups with as much or as little craft paint as you would like.
- I went with a dark brown, light brown, and dark grey.
- Then literally start slapping it on with a craft knife. You want TEXTURE! So it is okay to be messy with this step. If you are hosting a Testors Crafternoon, be sure to have the work surface well protected and small boxes for your attendees to add their projects to after this step. The product does need to dry for 24 hours so you want them to be able to take home their Halloween tree even though it is still wet.
- Apply the dark brown first and cover all exposed areas but use caution not to cover the face.
- Then just add highlights of the light brown and grey. Pull up with your pallet knife as you apply to create even more texture.
- Allow to dry for 24 hours.
- You can add on some fake spider webs if you want to add to the spooky. Then add in your light and you are ready to display your Halloween tree anywhere in your home.