Marbled Clay Trinket Dishes
Make these adorable oven-bake clay trinket dishes to hold any small trinkets you'd like! These trinket dishes are perfect as gifts or a treat for yourself.
What You Will Need
- Sculpey Souffle Clay in three colors
- Clay tools optional
- Testors Intense Glitter Brilliance
- Plaid Liquid Leaf
- Paint brush
- Oven
- Mason jar ring or small oven safe bowl
- Oven safe mat
Instructions
- If you loved play dough as a kid, you will love oven bake clay! Start with three colors of clay. About 1/3 of a block for the first color, 1/4 of the block for the second color, and a small pinch for the third. These measurements are not exact and you can play with the combination for your trinket dish.
- Then flatten these pieces into a round circle and stack.
- Flatten slightly then cut into four strips with the plastic knife tool. Stack these strips.
- Then roll this piece into a ball.
- This will get some marbling but you would need to repeat the process to get maximum marbling. Flatten again and cut into four strips. Stack the strips.
- Roll once again into a ball then flatten once more. This time flatten enough to get your circle to create the bowl. You can actually repeat once more if you need more marbling.
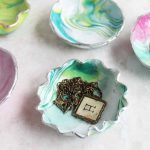
- To make a bowl with a ruffled edge, use a wide mouth mason jar ring. Use the outer edge to cut a circle. Take this circle and put into the inner ring making the ruffles as you go. Use the mason jar ring to hold the bowl in place as it bakes according to the package directions.
- To make a simple bowl shape with no ruffles, use the outer edge of a small oven safe bowl to cut a circle. Drape the circle over the back of the bowl and smooth out. Bake according to the package directions. NOTE: The picture below shows the clay bowl inside the bowl but I found that draped over the back works best.
- NOTE: Be sure to bake according to the package directions on an oven safe mat!
- Once baked and cooled, finish the inside of your bowl with one coat of the glitter paint.
- Then finish the edge if desired with the liquid leaf. Allow everything to dry and give as a gift or keep for yourself.