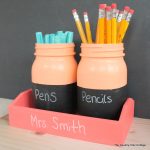
DIY Desk Organizer With Mason Jars
This easy tutorial shows you how to make a DIY desk organizer out of mason jars.
Makes 1 organizer
Equipment
- FrogTape Multi-Surface Painting Tape
- Paint Brush
- Regular chalk
What You Will Need
- 1 Pine Wood Serving Tray
- 2 pint Mason Jars
- 2 bottles Americana Multi Surface Paint any color
- 1 bottle Americana Gloss Enamels Chalkboard Paint
- 1 bottle DecoArt Clear Chalkboard Coating
- 1 Bistro Chalk Marker White
Instructions
- Paint the wood tray with a couple of coats of the Americana Multi Surface paint of your choice. Wait for the paint to fully dry before adding any additional coats.
- Mask off a little over half of your jars for painting. Keep your line straight at the top for this step.
- Clean your jars well with rubbing alcohol before painting.
- Paint the jars with a few coats of Americana Multi Surface paint.
- Once the tops of your jars have been painted, remove the painter’s tape. Allow the area to cure completely then add the painter’s tape so you can paint the bottom of the jar.
- Add two coats of Americana Glass Chalkboard Paint to the jars.
- Be sure you paint one vertical and one horizontal. Allow to dry in between coats as well.
- Remove the painter’s tape at the end of this step. Touch up the line in between colors if you need to.
- Add two coats of Americana Clear Chalkboard coating to the front of your tray.
- Again paint one vertical and one horizontal and allow to dry in between coats.
- Once everything is dry, be sure to let all of the products cure according to the package directions. You will need to condition all chalkboard surfaces by rubbing them with the side of a piece of chalk and then erasing.
Notes
Do not touch the surface after cleaning as your finger prints can cause the paint to lift.