Over-the-Door Gift Wrapping Organizer
This over-the-door gift wrap organizer is a great way to keep wrapping paper, gift bags, and other gift-wrapping items neat and tidy. Cut down the time it takes to wrap your next present! All you need is a shoe organizer and fabric to make this handy organizer.
What You Will Need
- Over-the-door shoe organizer
- Fabric of your choice
- Elastic
- Scissors
- Needle and thread
Instructions
Step 1: Make the gift bag pouch.
- Cut the fabric to measure three inches wider than the organizer. Then, trim down both sides at an angle so one end is the width of the organizer and one end is 3 inches wider than the organizer.
- This seems counterintuitive but will give you the right amount of fabric to work with when it’s time for the elastic.
- The length of the fabric is up to you but it should be big enough when folded in half to add your gift bags inside. I used one of my larger gift bags to determine how long I needed the pouch. Then, I added 4 more inches at the top for the seam.
- Fold the fabric in half so the fold is how you want the pouch situated on your organizer.
- Sew up both sides (left and right) making them even. The front of the pouch will be loose as it has 3 additional inches, but we will be adding elastic shortly, so don’t worry. Now, you should have a pouch with a raw top edge.
- Turn that raw edge down twice toward the inside of the pouch, so you have a finished edge on top and sew all the way around.
- Next, cut a wide piece of elastic 3 inches shorter than the width of your organizer. Sew this piece inside your pouch on the front edge. Stretch the elastic as you sew so that it goes from one side of the pouch to the other.
- This will gather the front edge of the pouch.
Step 2: Add grommets to attach the organizer and pouch.
- Now we are ready to attach the pouch to the shoe organizer. Use a Crop-A-Dile to insert grommets on the top right and top left corners of the pouch and into your organizer where you want the pouch to hang. You could also add grommets to the bottom of the pouch if you plan on adding heavier items.
- Attach the pouch to the organizer by tying ribbon through the grommets on the pouch and organizer. You can also use zip ties, shoestrings, or anything similar.
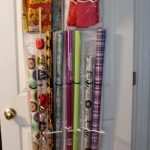
Step 3: Corral the wrapping paper and supplies.
- Keep wrapping paper rolls upright by adding small elastic loops between the third and fourth row of shoe bins. Make sure you space out your elastic loops so that a wrapping paper roll will fit inside the loop. Add grommets (total of 4) on that row so the elastic can be tied on.
- To hold ribbon, place the spools on a dowel and put the dowel into one of the wrapping paper slots.
Notes
My tissue paper and folded wrapping paper needed larger slots than the shoes would allow. So I made them larger by using a seam ripper to remove the stitches down the center. The plastic goes all the way underneath and you are left with a larger slot.