Easy Graduation Card Box
A graduation card box is a great way to collect a bunch of cards for the graduate! All you need is a simple basket to get started. This could easily be used for weddings and other occasions, too.
What You Will Need
- Picnic basket
- White spray paint
- White card stock
- Printed pictures
- Adhesive
- Cricut Kraftboard in Natural
- Black Cricut Pen with 0.4 tip
- Adhesive
- Cricut Cutting Machine
- Cricut cut file
- Ruler
- Scissors
- Burlap
- Hot glue and glue gun
- L-brackets optional
Instructions
- To begin, spray paint your basket and allow to dry while you make the other elements.
- Open a banner cut file in Cricut Design Space. Then cut it from kraftboard and use the Cricut machine to write on the lettering. Set aside.
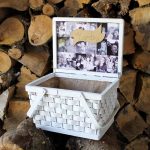
- Next, we will work with the printed pictures. You can print these however you choose but I used my HP Sprocket Plus. Measure the inside lid of your picnic basket and cut card stock to fit the opening. I had to use two pieces of card stock adhered together for this.
- Then, lay out your pictures onto the card stock and secure them into place. The HP Sprocket actually prints on self-adhesive paper so this step was super simple.
- Then, add the “cards” banner. I used a simple wooden shape from a craft store and wrote “cards” on the front. You could also use your Cricut for a fancy font or different look.
- To adhere the piece, I used dimensional adhesive dots for a 3D effect on my final project.
- Then, add the whole piece – photo collage and cards label – to the lid of the painted picnic basket and secure in place with hot glue.
- You can also add a couple of L-brackets to the lid to hold it open. (optional)
- Then, line the inside of your picnic basket with burlap for a rustic look. Simply cut the fabric to size with scissors and use hot glue to secure into place.