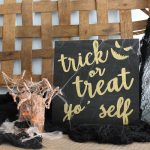
DIY Halloween Signs
This is an easy technique for making your own Halloween signs with our template or even with your own design. Gather your friends and make it a Testors Crafternoon.
What You Will Need
- Testors Acrylic Paint in black and metallic gold
- Testors Intense Glitter Paint in gold
- 12 ×12 wood panel
- White tracing paper
- Pencil
- Paintbrushes
- Tape
- Trick or treat sign template page 1
- Trick or treat sign template page 2
Instructions
- Start by painting the entire surface black. You can use one or two coats of paint. Just allow to dry in between coats.
- Then lay your white tracing paper over the sign with the shiny side down and tape into place. Add your template to the top and tape it into place. Trace with a pencil over all lines.
- Then peel back your tracing paper to reveal the white lines on your black sign.
- Fill in with the metallic gold paint then allow to dry completely.
- Note that these drying steps can be made quicker with the use of a hair dryer especially if you have several people for your Testors Crafternoons.
- Shake your intense glitter paint well then start applying right over your metallic gold paint.
- Allow all the paint to dry and then display.
Notes
Drying steps can be made quicker with the use of a hairdryer especially if you have several people for your Testors Crafternoons.
I did three coats of the intense glitter paint allowing each coat to dry before I added another.
I moved the apostrophe in the “yo” down, so I skipped that part while tracing the first time and moved the template before tracing again.