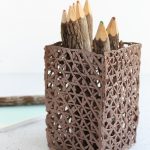
DIY Pencil Holder
Use this creative and ultra-easy technique to create a pencil holder using only hot glue and paint!
What You Will Need
- Hot glue gun
- Hot glue sticks
- Non-stick hot glue mat
- Square ruler
- Spray paint any color you desire
- Hot glue fingertips
Instructions
- Place your easy square under your non-stick hot glue mat then use your hot glue gun to create the outside edges of your pencil holder sides in the size you want. I made my pieces 3x5 inches.
- After you create the outside edges, go ahead and create horizontal, vertical, and diagonal (in opposite directions) lines in hot glue.Just add lines in one direction and then do the opposite direction immediately after. There's no need to wait for the glue to cool as you go.
- Once you have finished a side, let it cool completely and peel it away from your mat.Repeat the same hot gluing process three more times to get a total of four of these sides pieces.
- Now, make the bottom piece. I made a 3×3-inch square. I made the lines the same way as before but put them much closer together to create a tighter weave so that no pencils would fall through.
- Once all of your pieces have cooled, start assembling the pencil holder. Just use hot glue along all the seams and hold them in place until the glue cools.
- After you have assembled your pencil holder, it's time to spray paint it. Let the paint dry completely and your pencil holder is ready!
Notes
NOTES:
- Use hot glue fingertips to prevent burns as you glue the bottom and all sides together and hold them in place with your hands.
-
Complete this project on the non-stick mat to keep your project from sticking to your work surface.