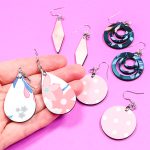
DIY Sublimation Earrings
Make your own earrings with a sublimation print and these MDF wood blanks.
What You Will Need
- Sublimation printer, ink, and paper you could also use Infusible Ink sheets instead!
- Printable designs (Floral Papers, Light Pink Marble Floral, and Polka Dot Papers)
- Cricut EasyPress or heat press
- Lint Roller
- Heat Resistant Tape
- Artesprix Protective Paper
- Heat Resistant Mat
- Heat resistant gloves
- MDF Wood Earrings
Instructions
- These are wood MDF earrings. The kit has earrings in various shapes as well as everything you need to assemble them.
- To sublimate on these, you can sublimate on both sides. You will need to remove the protective film. It will have a clear protective film on both sides of the earring. You'll just want to peel that and remove it from both sides.
- For each of these earrings, I've chosen a sublimation print and roughly cut it to size. I'm going to place it where I want my design to go. I just place it where I want it to be and then add a couple of pieces of tape just to hold it secure. I am going to do both sides of these - again, that's optional. You could just sublimate one side, put your print on similarly to the way we did the metal piece above, and it would be fine. For me, I would like both sides of this sublimated. You can trim some of the print away as you work with the tape. Make little packages with the earrings inside. I'm going to repeat for each set of earrings.
- Then, put each of the little packages on some protective paper. Fold it over so it's protecting the top and bottom.
- Press twice - once from the top, once from the bottom at 355 degrees for 60 seconds. Press down with light to medium pressure for the full time and then flip it and press again.
- Once it's done pressing the first time, use heat-resistant gloves and flip the entire package over. Press again at 355 degrees for 60 seconds, light to medium pressure. Once it's done this time, these are ready to be peeled back to reveal their design. These will be extremely hot, so you might want to let them cool a little bit before you peel back the sublimation print.
- Here are each of my designs with the sublimation print removed.
- For each of these, you want to pull apart the clasp on the end of the earring. I find using a pair of pliers helps a little bit. You just add the hole in the earring to the clasp and squeeze shut the clasp. You may have to use a pair of pliers to squeeze it to get it together and then you have a completed earring.