DIY Bean Bag Toss
A DIY bean bag toss is a great handmade gift idea for toddlers and preschoolers. Plus it is so easy to make with your Cricut Explore Air 2.
Makes 1 game
What You Will Need
- Cricut Explore Air 2
- Cricut EasyPress
- Bucket
- Cricut Felt
- Cricut Vinyl in light blue
- EasyPress Mat
- Cricut Mosaic Iron-on
- Cricut Everyday Iron-on in black
- Transfer paper
- Weeding tools
- Scraper
- Rocks rice, or beans
- Funnel
- Sewing machine
- Thread
- Needle
- Cricut cut file
Instructions
Make the Fish Shapes
- First, you will need to cut the pieces with your Cricut Explore Air 2. You can find the cut file linked above for making the exact project that I made.
- Add your felt to the mat and turn the dial to custom. Pick the felt setting and cut your pieces with the fine point blade. I varied the color of my fish but you can choose whatever color of felt you like.
Make the Fish Scales
- Unroll the Mosaic iron-on from the packaging and discard the white paper that is in the roll. Then you will need to put it good side down on the mat. The good side is the shiny side. The “back” will also be noticeable because you can feel the circles of iron-on. This side should be face up on the mat.
- Then you will need to mirror your mat in Cricut Design Space before cutting. Be sure to turn the dial to custom and pick mosaic iron-on from the menu. This is important because this iron-on is not like any other as it has a double liner.
- That double liner is for weeding purposes. Once cut, pick at one corner and separate one liner from the other. This allows you to weed away all of your excess without having to pick up each individual dot. Remove all excess with this second liner piece.
Make the Fish Eyes and Mouth
- Finally, you will need to cut the everyday iron-on that will be used for the eyes and mouths. Be sure to place shiny side down on your mat and mirror before cutting. Weed away all of the excess and you will be left with just the pieces for your project.
Adding Iron-on to Fish Pieces
- The fish need to be mirror images of each other. Lay out each fish shape and place the scales, eyes, and mouths on top.
- I used my EasyPress and EasyPress mat to press one fish at a time. Be sure to follow all time and temperature recommendations for felt using the Cricut heat guide. You will also want to preheat your felt before pressing to remove any moisture.
- Once pressed, you can peel back the liner while still warm. Remove the liner for the Everyday Iron-on first.
- Then peel back the liner on the mosaic. Remember it has a double liner. Most likely, these will peel separately. So peel back the first liner.
- Then peel back the second. Be sure you remove both liners. If the liners peel back at the same time, that is okay too.
- Then you will just need to repeat for each of your fish (front and back.)
Assembling the Fish Bean Bags
- Put two of the fish pieces together and use a sewing machine to sew around the outer edge, leaving a small gap open.
- Then, add some rocks, rice, or even beans to the inside with a funnel.
- Sew closed with either the sewing machine or a needle and thread. Repeat for each of your fish.
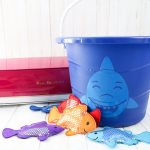
Making the Shark Bucket
- Cut the vinyl piece for the shark bucket. For this, you can use the dial and just set to vinyl or use custom and pick from the list.
- Once cut, you will need to weed away all excess from around your shark. I am using weeding tools but these are optional. Then just remove all excess from your design. You will also need to weed away the center of the design. You should be left with only what you want to add to your bucket.
- Apply transfer paper to the front of the vinyl. Be sure to use your squeegee over the top and press it down well.
- Then I like to flip it over and peel the backing paper from the vinyl.
- You are left with the shark vinyl on the transfer paper.
- Use the transfer paper to apply to the bucket. Press the vinyl down well with the squeegee then peel back the transfer paper.
- Burnish over the vinyl with your squeegee to make sure it is adhered well to the surface.
- Then all that is left is to wrap up your handmade gift for someone special on your gift-giving list.