
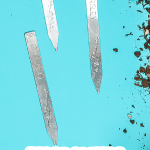
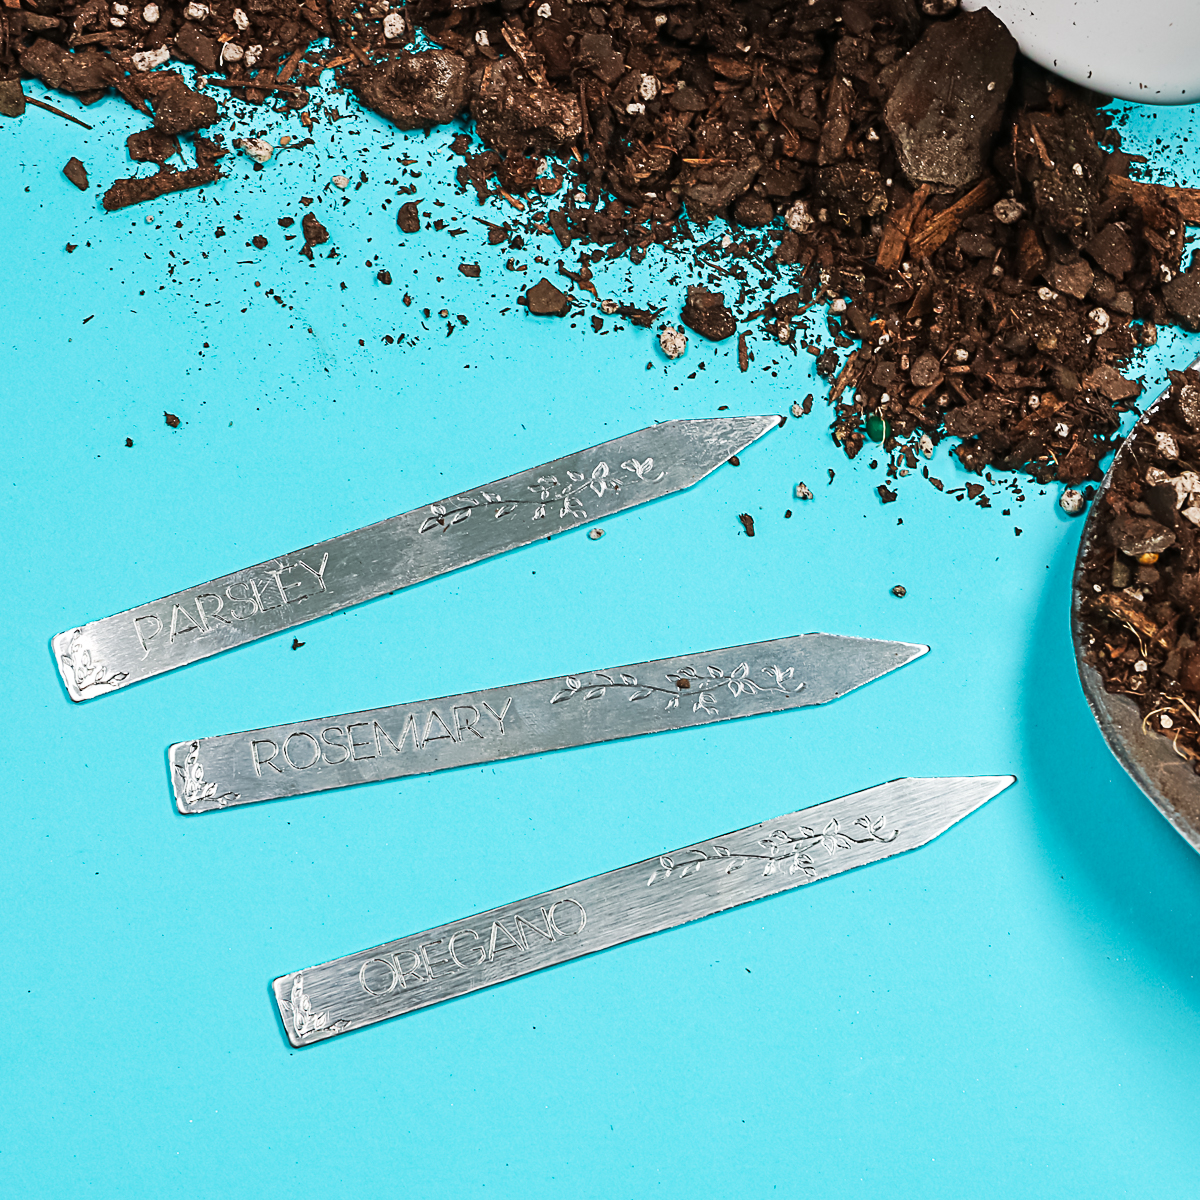
If you've been around here for a while, you know I'm kind of in love with engraving metal with my Cricut machine so I just had to try to make some DIY metal garden markers. I've been successful engraving metal with both the Cricut Explore series as well as the Cricut Maker. I thought these garden markers would be an amazing spring craft, as well as something you could give mom for Mother's Day.
DIY Metal Garden Markers
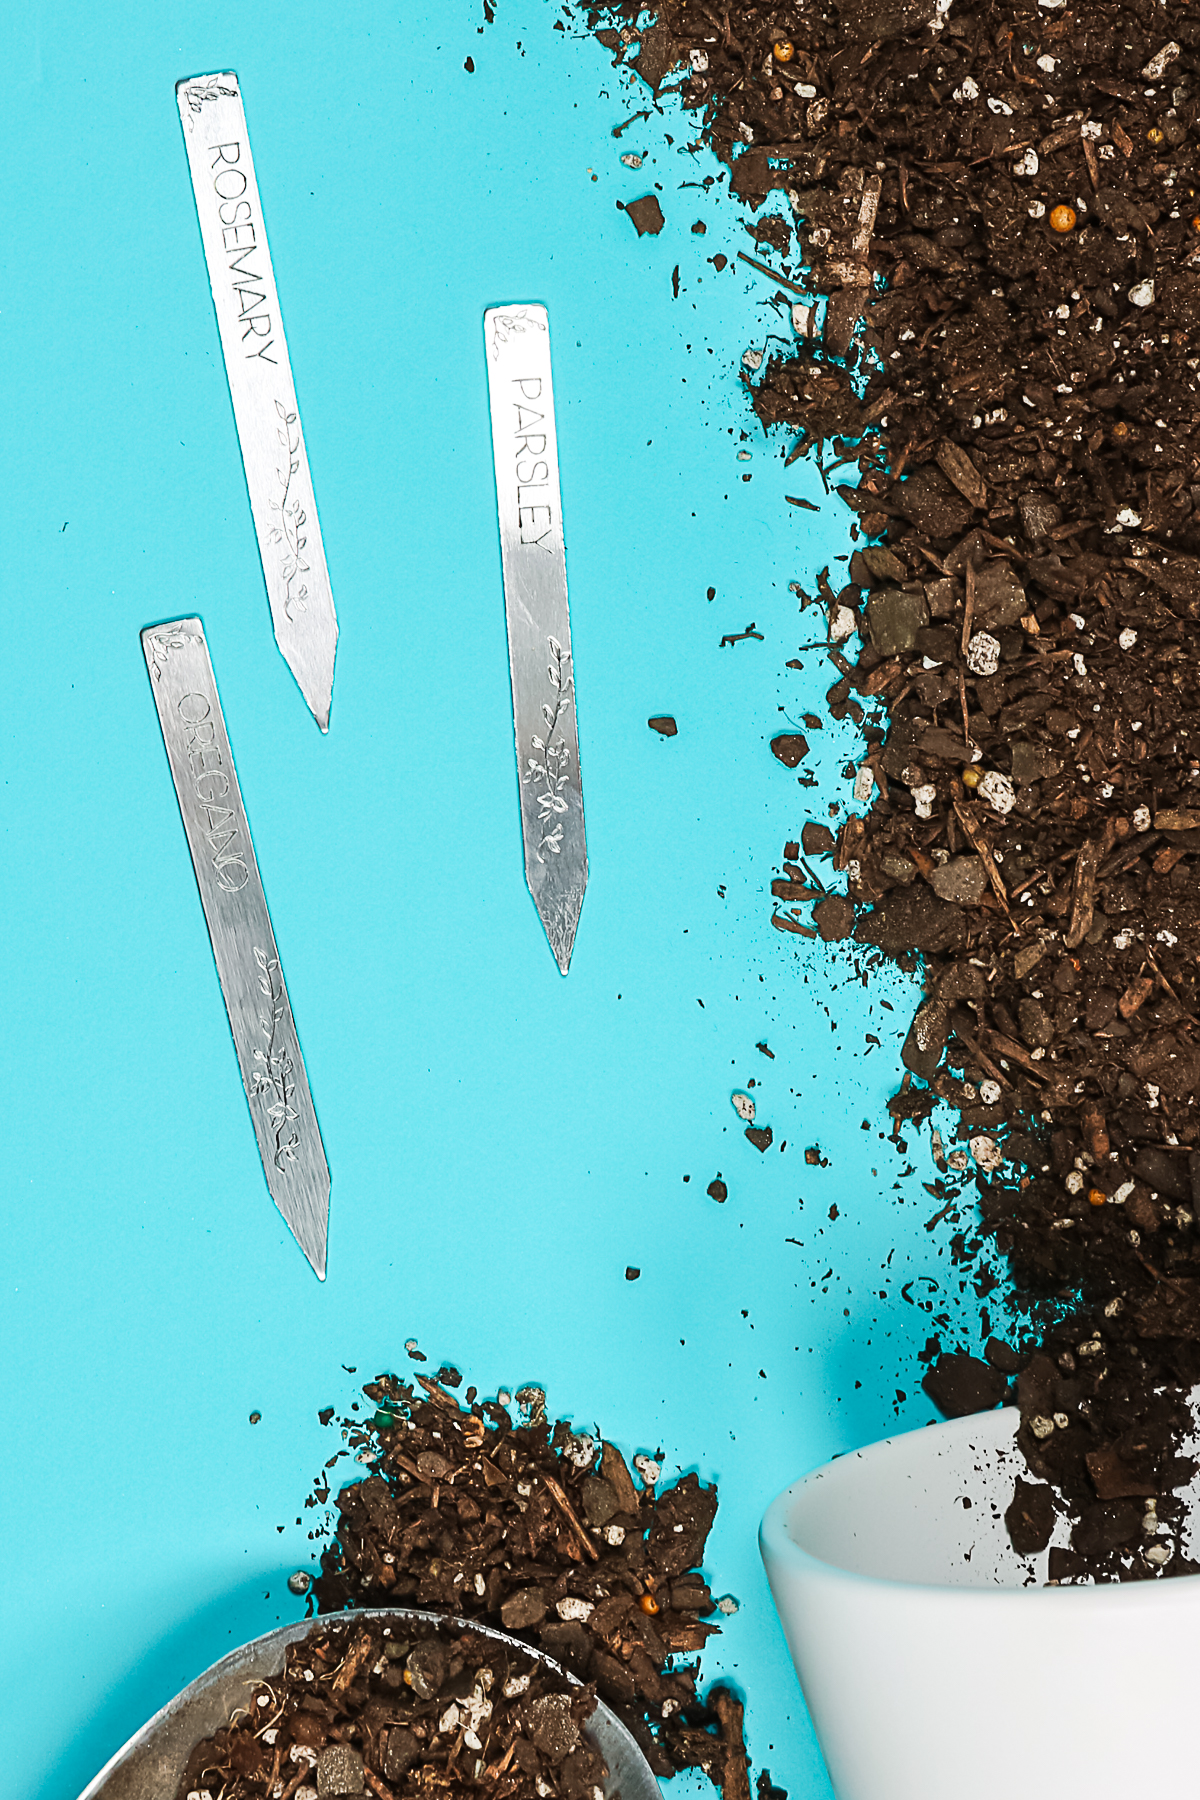
I am using an ImpressArt garden marker kit. It comes with six garden markers and they're the perfect blank for your Cricut machine. You can see me use my Maker machine to engrave these garden markers in the video below! Want to use your Explore? Try this post!
Can't watch the video or miss some of the information? Just keep reading below!
Supplies Needed
- Metal garden markers
- Cricut Maker Engraving Tool or Cricut Explore Metal Engraving Tool
- Cricut machine
- Strong grip mat
- Strong grip transfer tape
- Stamp enamel marker
- Brayer
- Paper towels
- This project is made with Design Space files. Click here for my profile. Once on my profile, find the image of the project you want to create, click it to open it up, and then you can make it yourself.
Making Your Design
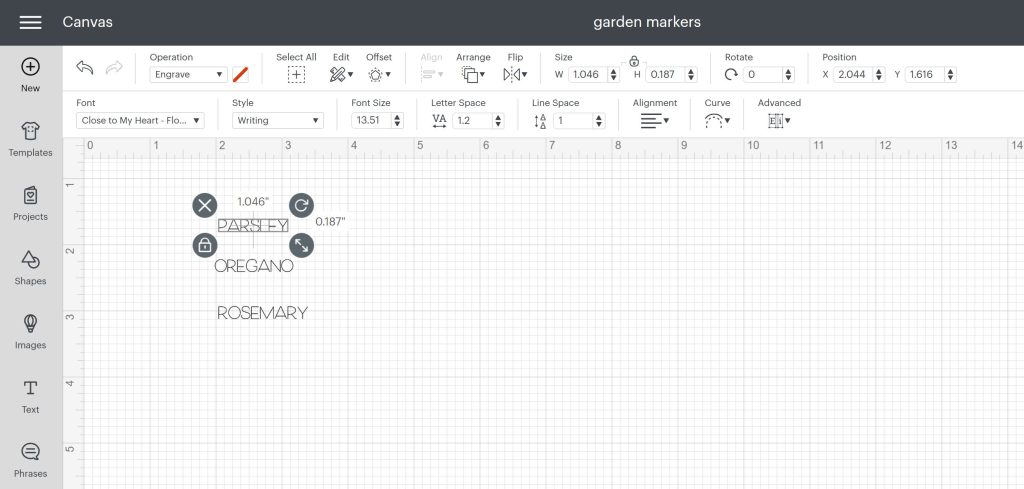
The first thing is to add your text to Design Space. The font I'm using is called Close to my Heart Flower Market 1. I found this font by searching Cricut fonts, clicking “filters”, and filtering for writing fonts. This will make fonts that are not an outline, but that actually draw with a pen, or in this case, the engraving tip. I put my three words onto my canvas, changed my machine to Maker 3, and changed the operation to engrave. Before you do this, make sure each word is the size you want it to be. I wanted mine to be .1875 tall and then whatever length they turned out to be. I made sure that both the length and the width would work on my garden markers.
Adding to a Mat
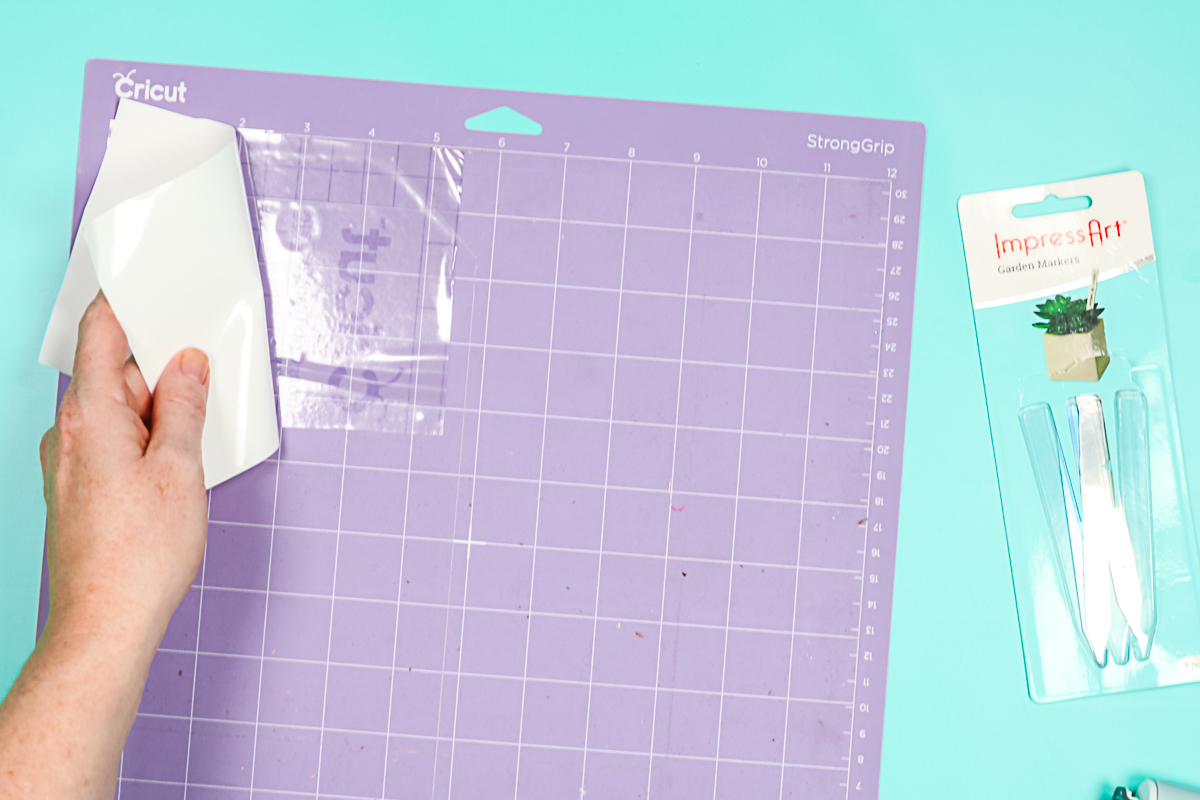
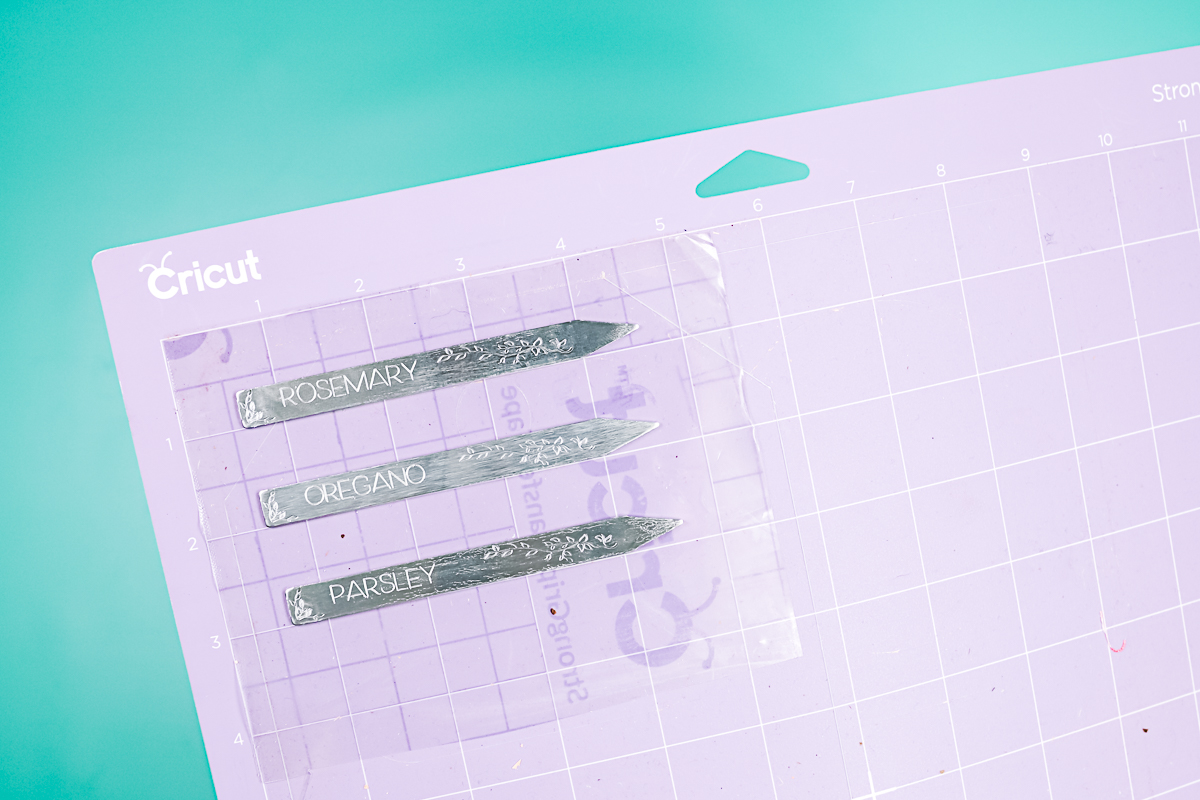
I'm going to use these metal garden markers from ImpressArt that come in a kit. They already come with some engraving on them which means you just need to add the words for whatever you're planting. Start by cutting a piece of strong grip transfer tape to where it'll fit the garden markers you want to engrave. Then, you're going to turn that down on your mat. Remember we're going to locate the blanks on this mat in the exact same location that they're located in Cricut Design Space. Put your transfer tape in the right spot, roll over that with a brayer to make sure it's down really well. Then, just peel away the backing, leaving the transfer tape on your mat.
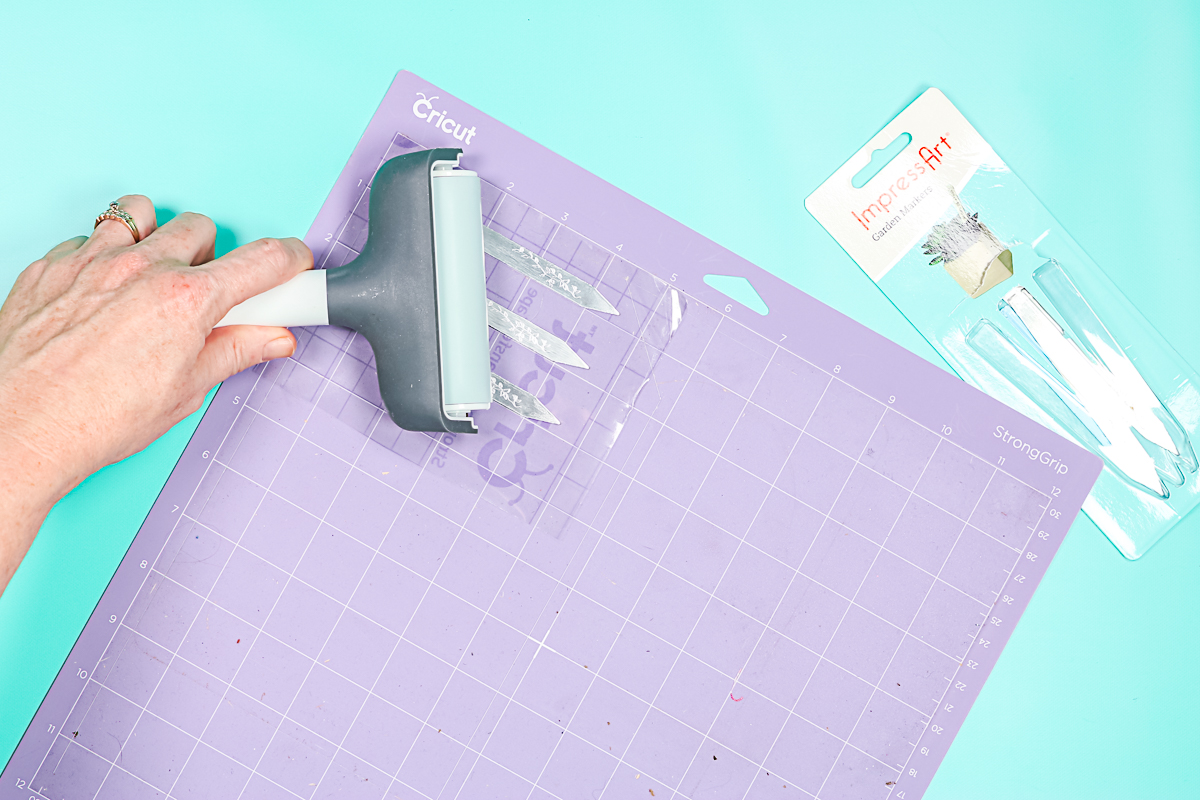
Remove any blue protective film on both sides of the blank. Put the blanks' engraving side up on your mat where the transfer tape is located. Use the white lines on the mat to line everything up. Use a brayer to press them down well.
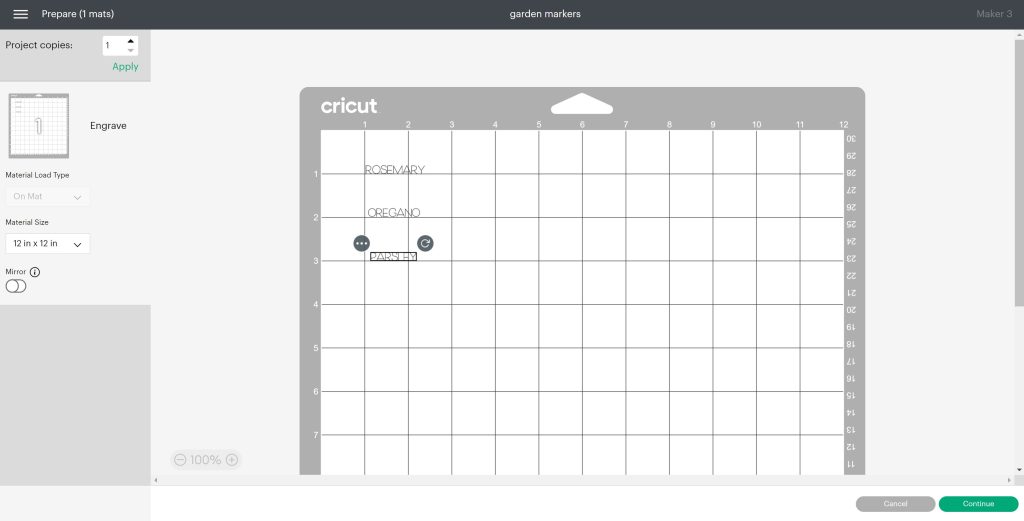
Now you want to locate the engraved words in Cricut Design Space. Click “make it” then move each around on the mat that is on your screen. Just click and drag each word until it is located in the same area as your blank that is on the actual mat. You can zoom in on this mat to help you locate it a little bit better. Once I have everything exactly the way I want it to look, I am going to click “continue”.
Engraving the Garden Markers
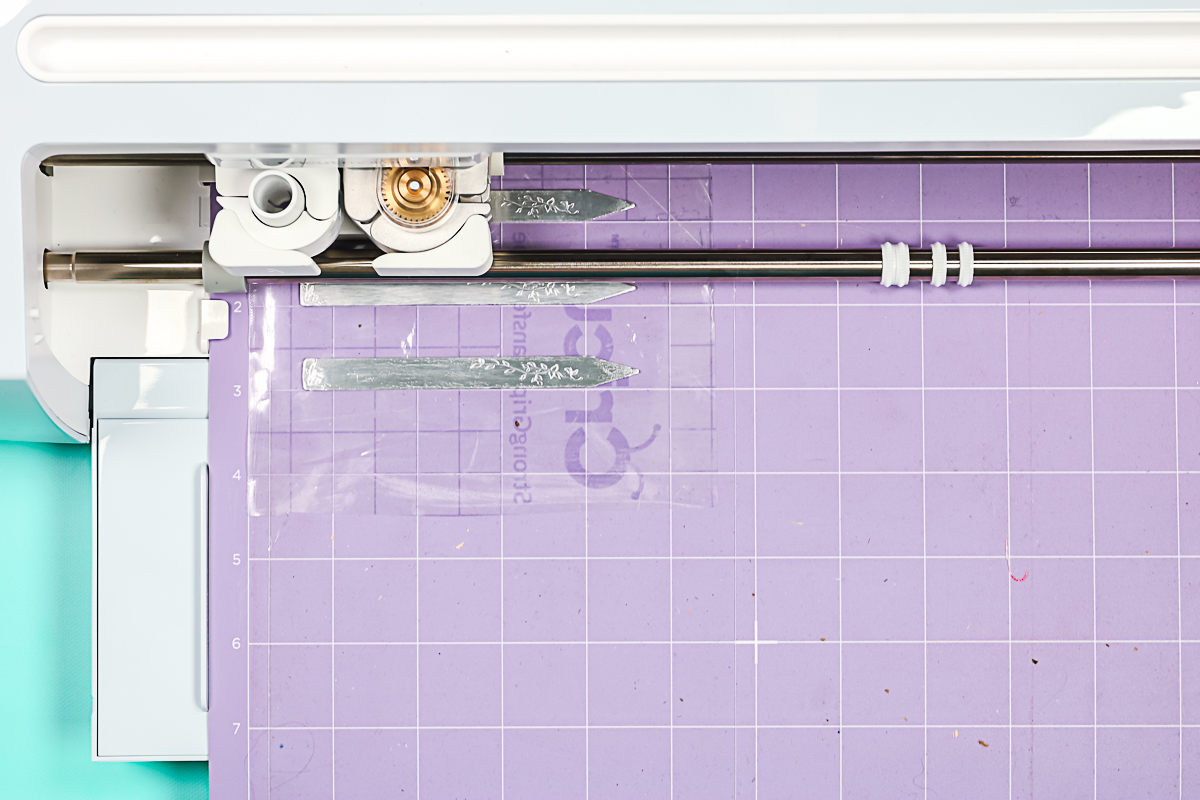
I picked stainless steel as my material. Move the white star wheels over to the right. They should not be on the transfer tape or the garden marker. Press your mat all the way to the left against the guides and press the arrow to load it. Then, you can press go to start engraving. Once it's done, you can unload your mat.
Finishing the Garden Markers
To finish these off, first, you want to remove them from the mat. I'm just going to pick up the transfer tape and remove the garden markers. You may notice a little bit of debris on the markers as the metal was etched. I like to pick that up with my transfer tape. Repeat for each of the garden markers.
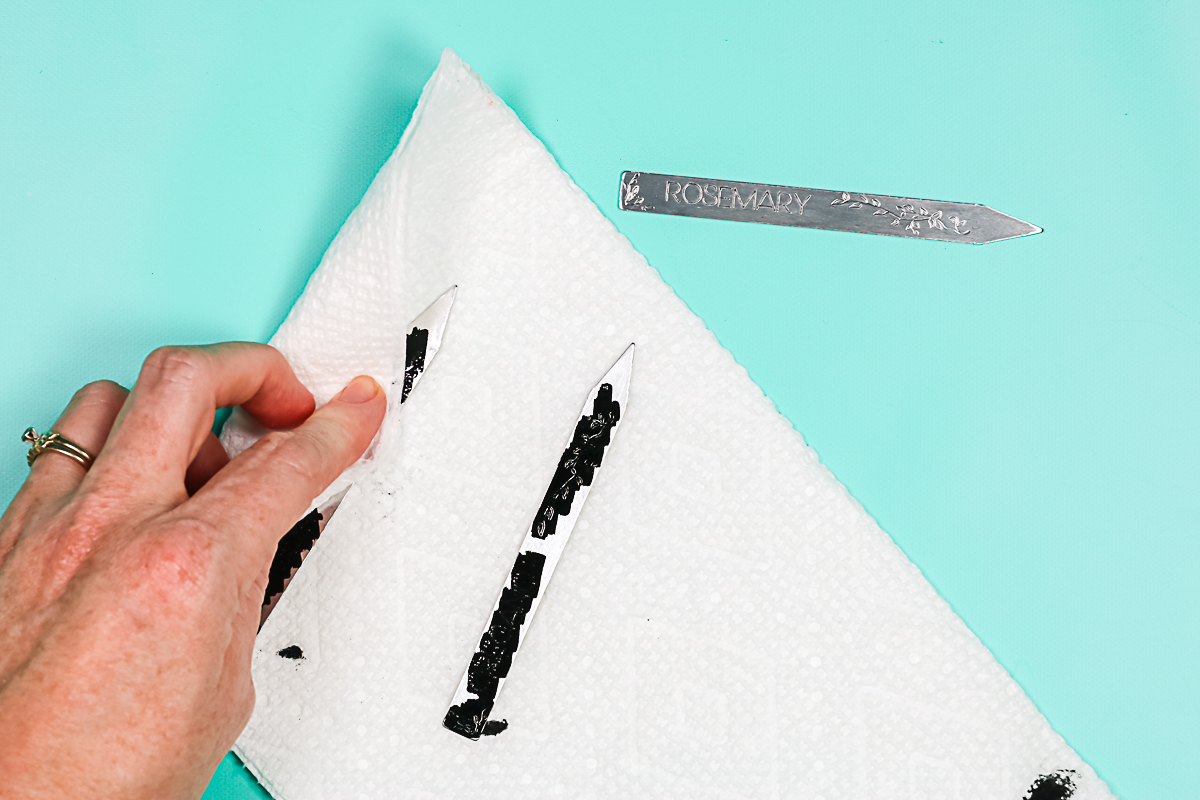
Once these are removed, it's time to make the engraving pop a little bit with a stamp enamel marker. I like to go over the engraving I just did as well as what's already on the marker. Use a stamp enamel marker in the color of your choice. Color all over the engraving and allow it to sit a few minutes.
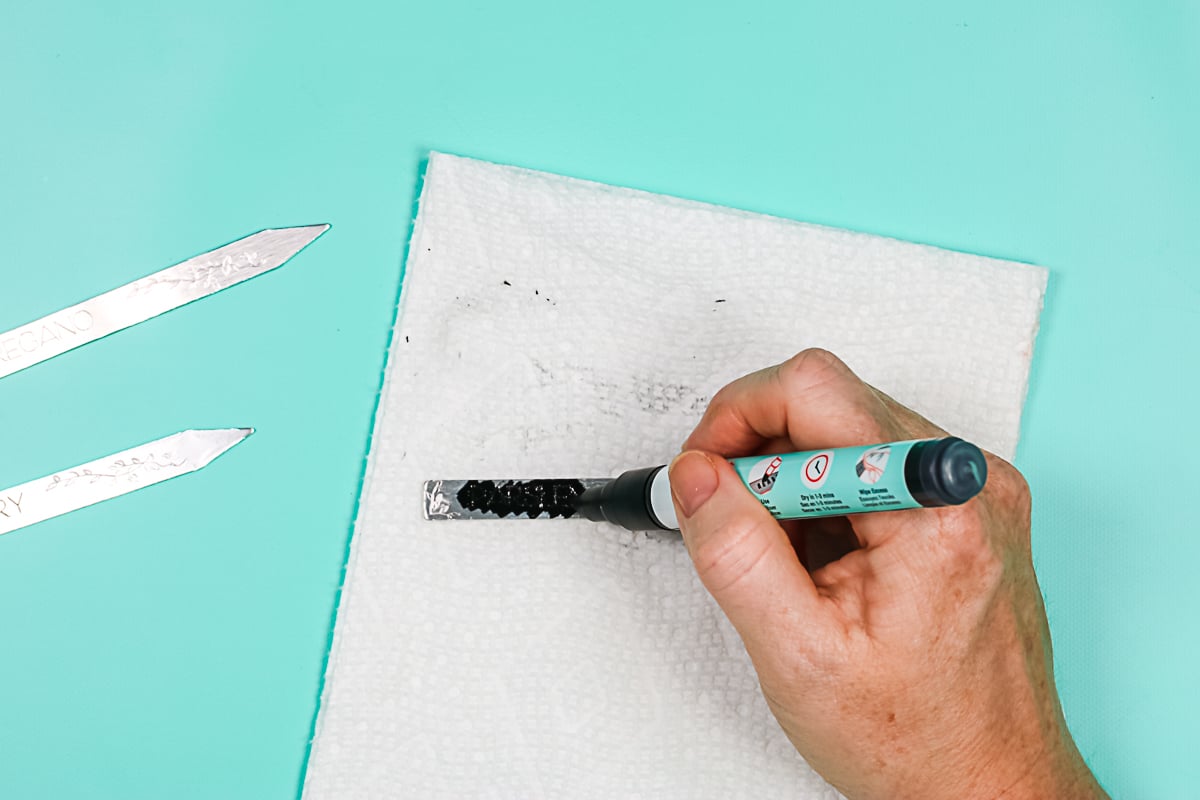
Wipe away the excess marker with a paper towel. This step is optional, but I personally love my stamp enamel markers.
One of the reasons I love engraved metal projects is because they're so simple. It was such an easy project, only took a few minutes, and now I have cute engraved garden markers to give as a gift or to keep for my own garden.
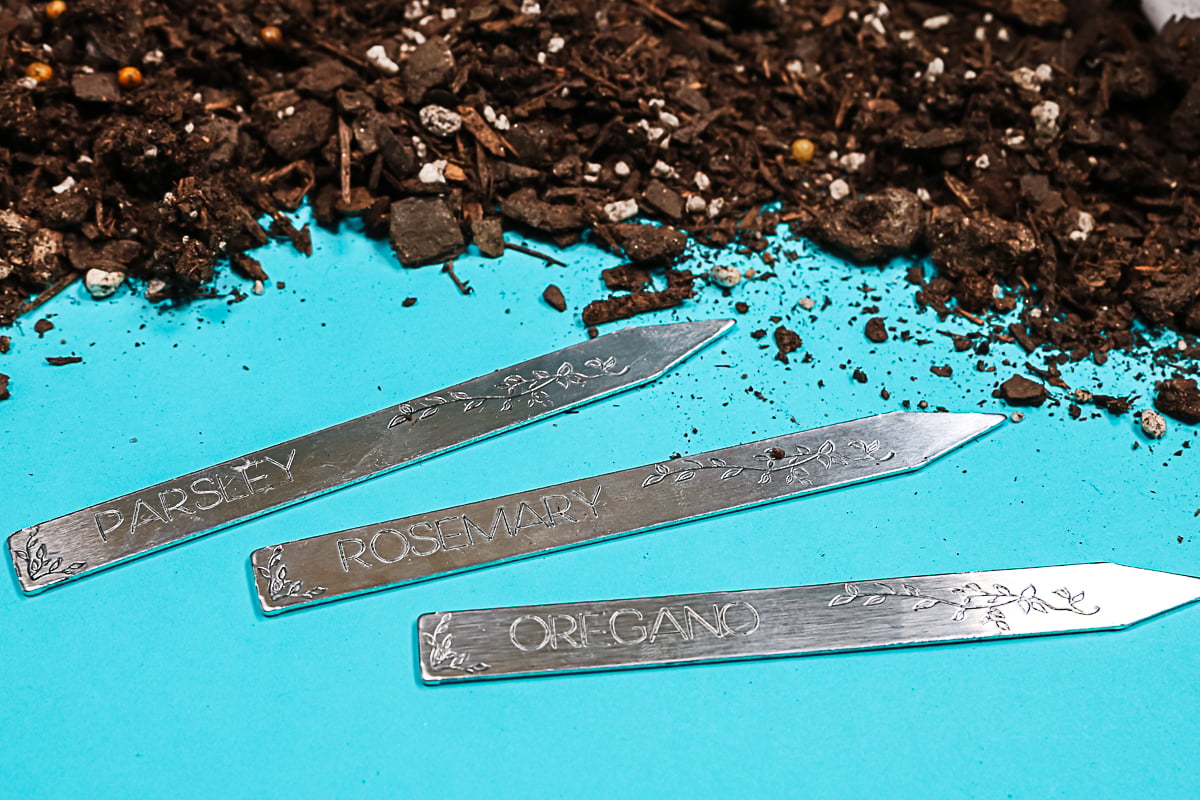
I love just how permanent these DIY metal garden markers are. That means I won't have to remake them year after year after year. They'll last a really long time, which is something I am so excited about.
If you're as excited as I am, be sure to pick up that ImpressArt kit with the six garden markers, your engraving tip for either the Maker or that engraving tool for the Explorer, and start engraving away on metals of all types, including DIY metal garden markers!
Love this Cricut project and want more? Try the links below as well!


Want to print the instructions for these DIY metal garden makers? Use the card below!

Supplies
- Metal garden markers
- Cricut Maker Engraving Tool or Cricut Explore Metal Engraving Tool
- Cricut machine
- Strong grip mat
- Strong grip transfer tape
- Stamp enamel marker
- Brayer
- Paper towels
Instructions
Making Your Design
- The first thing is to add your text to Design Space. The font I'm using is called Close to my Heart Flower Market 1. I found this font by searching Cricut fonts, clicking “filters”, and filtering for writing fonts. This will make fonts that are not an outline, but that actually draw with a pen, or in this case, the engraving tip. I put my three words onto my canvas, changed my machine to Maker 3, and changed the operation to engrave. Before you do this, make sure each word is the size you want it to be. I wanted mine to be .1875 tall and then whatever length they turned out to be. I made sure that both the length and the width would work on my garden markers.
Adding to a Mat
- I'm going to use these metal garden markers from ImpressArt that come in a kit. They already come with some engraving on them which means you just need to add the words for whatever you're planting. Start by cutting a piece of strong grip transfer tape to where it'll fit the garden markers you want to engrave. Then, you're going to turn that down on your mat. Remember we're going to locate the blanks on this mat in the exact same location that they're located in Cricut Design Space. Put your transfer tape in the right spot, roll over that with a brayer to make sure it's down really well. Then, just peel away the backing, leaving the transfer tape on your mat.
- Remove any blue protective film on both sides of the blank. Put the blanks' engraving side up on your mat where the transfer tape is located. Use the white lines on the mat to line everything up. Use a brayer to press them down well.
- Now you want to locate the engraved words in Cricut Design Space. Click “make it” then move each around on the mat that is on your screen. Just click and drag each word until it is located in the same area as your blank that is on the actual mat. You can zoom in on this mat to help you locate it a little bit better. Once I have everything exactly the way I want it to look, I am going to click “continue”.
Engraving the Garden Markers
- I picked stainless steel as my material. Move the white star wheels over to the right. They should not be on the transfer tape or the garden marker. Press your mat all the way to the left against the guides and press the arrow to load it. Then, you can press go to start engraving. Once it's done, you can unload your mat.
Finishing the Garden Markers
- To finish these off, first, you want to remove them from the mat. I'm just going to pick up the transfer tape and remove the garden markers. You may notice a little bit of debris on the markers as the metal was etched. I like to pick that up with my transfer tape. Repeat for each of the garden markers.
- Once these are removed, it's time to make the engraving pop a little bit with a stamp enamel marker. I like to go over the engraving I just did as well as what's already on the marker. Use a stamp enamel marker in the color of your choice. Color all over the engraving and allow it to sit a few minutes.
- Wipe away the excess marker with a paper towel. This step is optional, but I personally love my stamp enamel markers.


