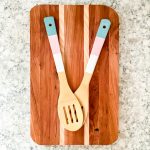
Painted Wooden Spoons
This easy DIY project is perfect for your kitchen or to give as a handmade gift.
What You Will Need
- 2 wooden spoons I got mine from Dollar Tree.
- Painters Tape
- White Chalk Paint
- Light Pink Chalk Paint
- Aqua Chalk Paint
- Sealer (optional but I will include notes below for those that want the added durability)
- Paintbrush
Instructions
- Start by tearing 7 pieces of painter's tape per spoon and wrapping them tightly around the wooden spoons. Make sure that the pieces of tape line up so that there isn’t any space in between them. This will get you the spacing for your stripes.
- Leave the two pieces of tape at the top and remove the 3rd and 4th piece of tape. You can change this up if you would like to get a different look. Use a different width of painter's tape or remove the tape in sections that are wider or thinner.
- Paint the unmasked area with light pink paint. I like to use two layers with chalk paint. Be sure to allow the first coat to dry before adding a second coat. I stood my spoons in a mason jar while drying so I was able to paint front and back at one time.
- Once completely dry, cover the pink section with the two pieces of tape. Make sure the tape is pressed firmly down so that when you paint the other sections, none seeps under the tape. TIP: You can paint a little bit of pink paint on each side of the painter's tape and allow it to dry. This will seal the area with pink paint and allow for really crisp paint lines.
- Once the light pink section is taped, paint the top part of the spoon with the aqua and the lower section with white. Leave the bottom strip of tape on while you are painting the white section so that you have a nice clean line for the bottom section. Again, you will want to use two coats of paint so be sure to allow to dry in between coats.
- Once all of the sections are dry, remove the tape! Notice how I kept the paint far away from the actual spoon end of the utensil. These paints are not food safe and should not be placed into contact with food.
Notes
Now that you have these gorgeous painted wooden spoons, how do you protect them? I have a few sealing options for you below to get a long life from your creations. Please note that these spoons are NOT dishwasher safe no matter what sealer you use!
- For the most durable finish, you could add a clear epoxy over the top of the handles. I did that with a tinted epoxy here.
- You can also add a brush-on sealer. My favorite is Polycrylic.
- Your third option is to spray your handles with a spray sealer. Again, I like the Polycrylic for my projects.