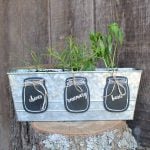
DIY Garden Markers In a Jar Shape
These rustic mason jar-shaped garden markers are the perfect way to add a touch of charm and character to any outdoor space. Not only do they look great, but they also make it much easier for you to remember which plant is which. Plus, making them yourself is an easy and fun craft project that can be completed in just a few simple steps. Read on for everything you need to know about creating your own DIY garden markers!
What You Will Need
- Galvanized metal planter
- Chalkboard jar tags
- Scissors
- Twine
- Outdoor vinyl
- Transfer tape
- Weeding tools optional
- Drill and drill bit
- Herb markers cut file click here to access
- Cricut machine click here to see the difference between the machines
Instructions
- Upload the herb marker file to the software for your Cricut machine.
- Once cut, start weeding the excess from the vinyl on each label. Weeding tools make this job a bit easier, but they are optional.
- Apply transfer tape to the vinyl and carefully remove the backing paper. Then, apply each word to your garden markers using the transfer tape.
- Repeat the steps above for as many garden markers as you like.
- If you want to attach them to a planter, use a drill and drill bit to drill holes where the holes are located in the wood mason jars. Then, clean up any sharp exposed edges with a grinder. Use caution, as the edges of the holes will be really sharp.
- Finally, just use twine to tie on your garden markers. Fill the planter with dirt and add in plants or start some herbs from seeds!
Notes
- I have more information on uploading files to Cricut Design Space here. Be sure to size the words correctly before cutting them to fit your tags. Cut from permanent vinyl!
- Need more help with Cricut Design Space? Download our beginner's guide here!
- Be sure to press the vinyl down well.