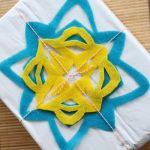
Easy DIY Gift Wrap Tutorial
Add a personalized touch to your gifts this holiday season with this easy DIY gift wrap tutorial. This DIY gift wrap tutorial is perfect for birthdays, Christmas, baby showers, and more!
Makes 1 gift wrap topper
Equipment
What You Will Need
- Felt
- Cricut Mat
Notes
1. Start by pulling up the cut file in Cricut Design Space.
Tip: If you are new to Cricut, click here to get my free guide for Cricut Design Space.
2. First, cut your felt using your Cricut into the shapes of your choice. I made mine roughly a square.
3. You will also want to weed away all of the excess from your iron-on.
Remove the outer pieces as well as any internal pieces that are not a part of the design. Weeding tools help with this but are not required.
4. Add your felt shapes to the top of your package or gift and tie with some baker’s twine and give to your recipient!
Yep it is that easy! You can make so many different shapes to add great embellishments for all your gifts!
Be sure to check out our easy gift wrapping tips to help you wrap like a professional, without spending all your money.
5. These DIY gift wrap toppers are just one part of the gift wrapping process to really make your gift stand out.
