


Making a DIY Christmas gnome is easier than you might think! In just a few steps, you can create a Scandinavian-inspired gnome that adds a whimsical, cozy touch to your holiday décor. Whether you display them on a mantel, shelf, or tabletop, they make a charming handmade accent that brings cozy holiday cheer to any space.
How To Make A Christmas Gnome
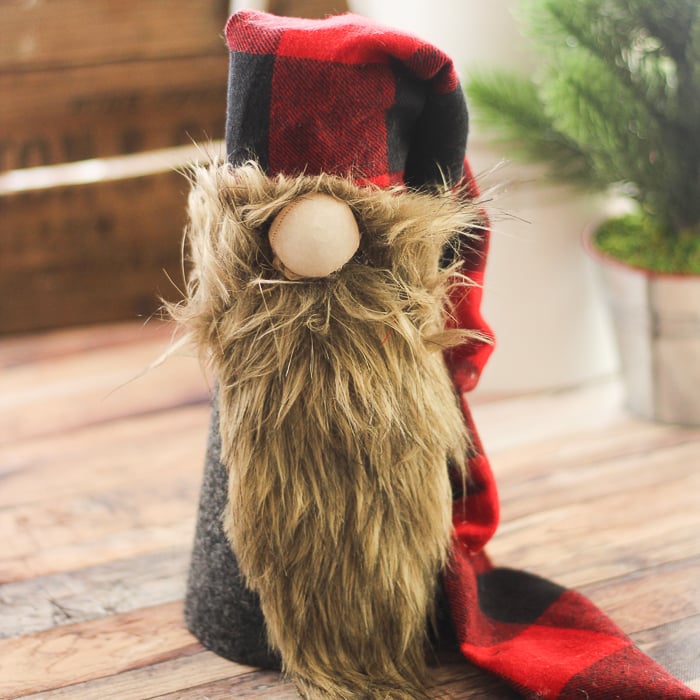
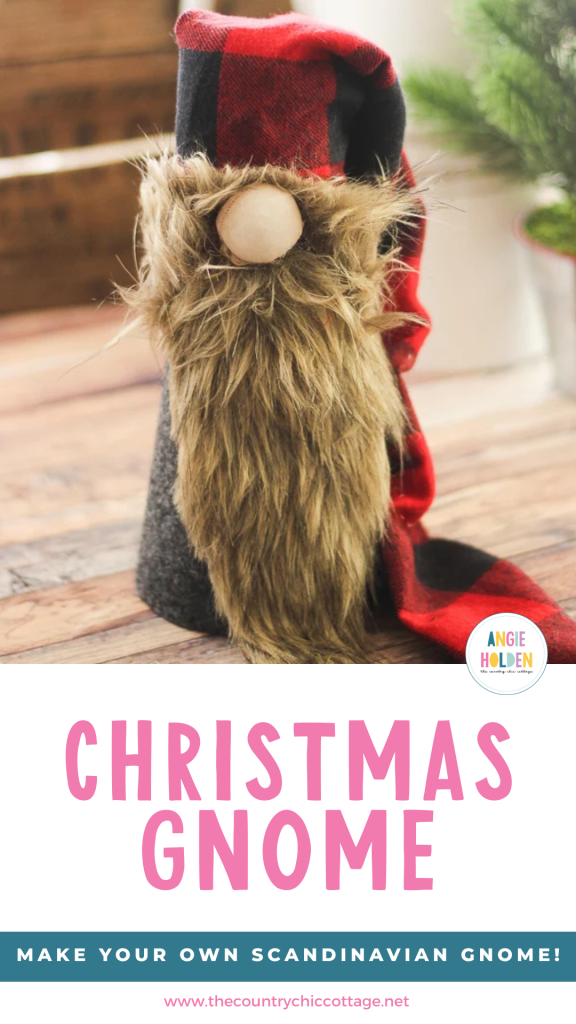
I absolutely love a sweet Christmas gnome—especially those classic Scandinavian gnomes that make their appearance during the holiday season. There’s just something irresistible about a cute little nose peeking out from a long, fluffy beard, topped with a big, bold hat that adds the perfect touch of whimsy. They fit beautifully with farmhouse décor, especially when they’re dressed in cozy buffalo check.
This year, I decided to make some DIY Christmas gnomes of my own, and I knew that I had to share the process with you. So, if you want to know how to make a gnome, just keep reading!
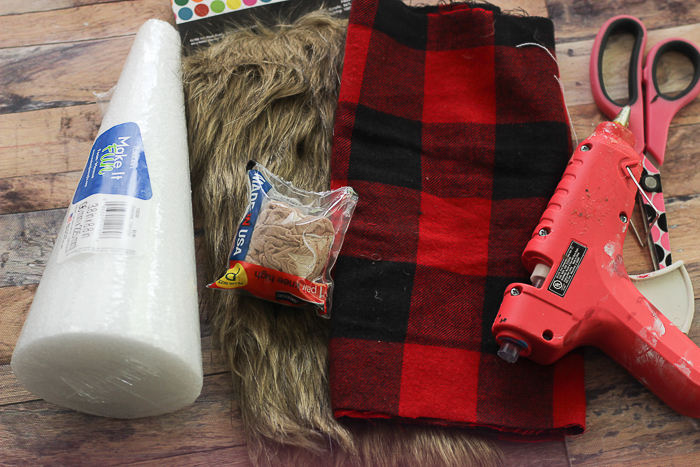
Supplies Needed To Make A Christmas Gnome
- A foam cone of any size
- Felt fabric
- Flannel fabric
- Faux fur
- Nylons
- A bit of stuffing
- Scissors
- Hot glue gun and glue sticks
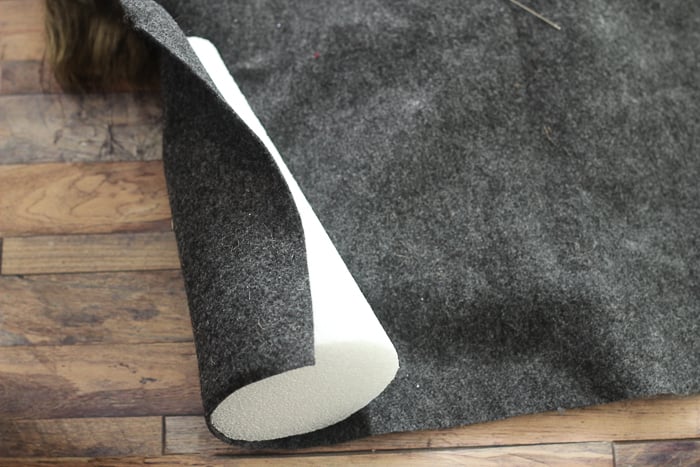
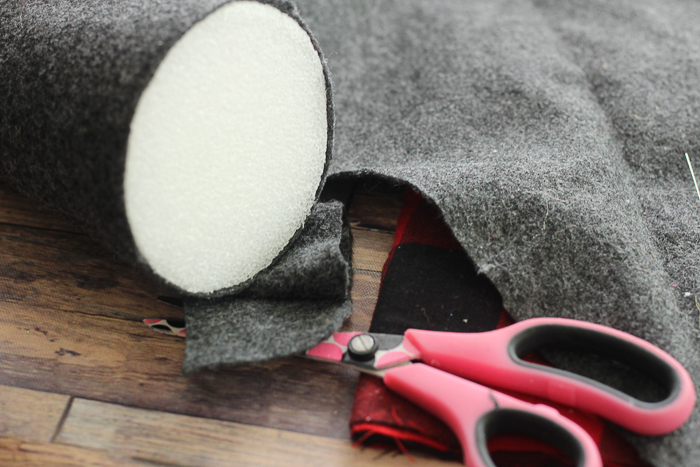
Step 1: Roll Felt Around Cone
First, roll the felt around your cone, pulling it tightly as you go, and be sure to cover it completely and overlap a little.
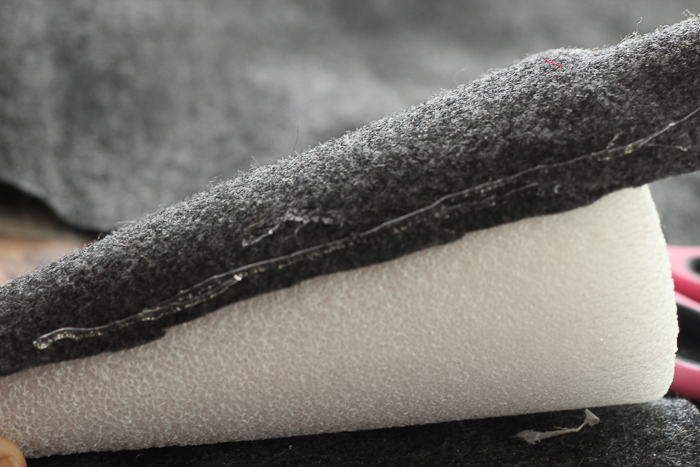
Step 2: Hot Glue Felt Around Cone
Add a generous bead of glue along one side of the seam where the felt overlaps. Press and hold until the glue sets.
Step 3: Cut Off Excess Felt From The Bottom
Once your glue is secure, cut off the excess felt along the bottom, keeping it as close to the edge as possible.
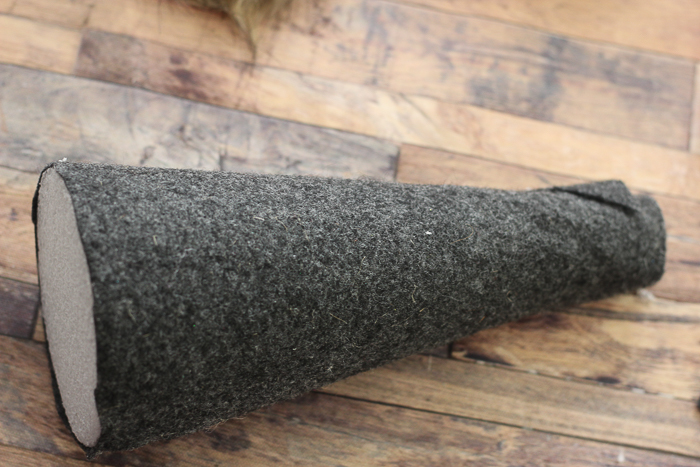
Step 4: Cut Off Excess Felt From The Top
You will also need to cut off excess at the top. This won't show, so you don’t have to keep it quite as neat, and now our little Christmas gnome is dressed.
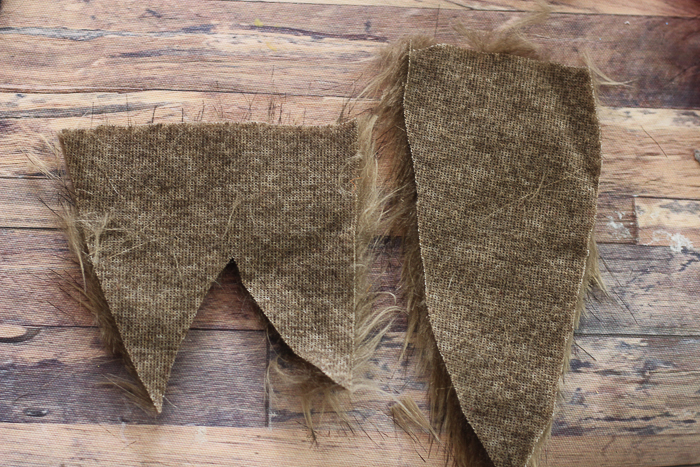
Step 5: Cut Out Beard & Mustache
Next, we are going to cut out the beard and mustache that make up so much of his cute little face!
Find where you want it to start on your cone; a little more than ⅔ of the way up is a good spot. Measure from there to 1”-2” beyond the bottom edge of the cone. You are going to cut a football shape that is flat along one end. The mustache is roughly the same shape, a little less than half of your length, a bit wider, and with a pie-shaped wedge cut out of the bottom. Be sure to cut the faux fur from the backside of the fabric to keep the fibers long and fluffy.
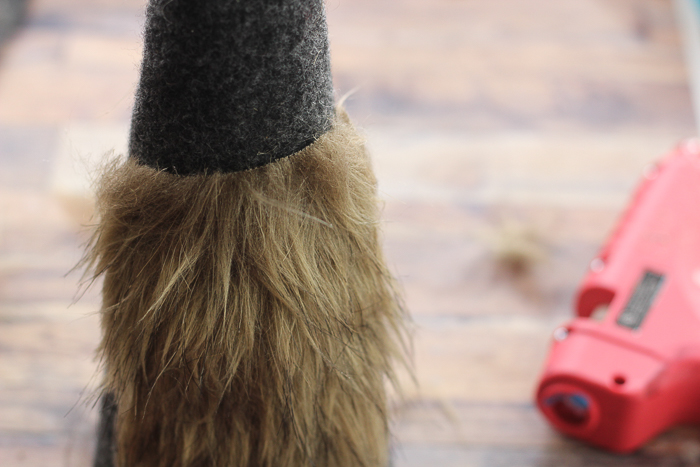
Step 6: Hot Glue The Beard To The Cone
Then, hot-glue the beard in place on your Christmas gnome, but leave the mustache for later.
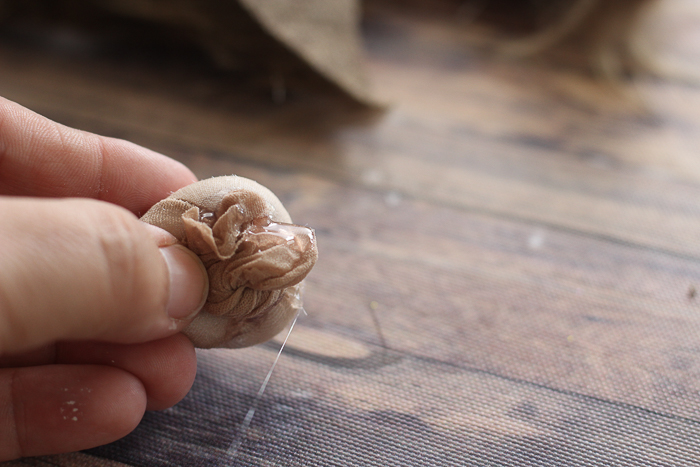
Step 7: Create Nose
For his nose, we just need a bit of nylon. So an old pair works fine, but if you don't have any (I couldn’t find a single pair in my drawer), you can grab a pair of cheap knee-highs at the Dollar Store. Cut off a 3” piece of the toe and add a bit of fill, twist the end, giving it a round shape. Add or take away filling until it is the size and shape you like.
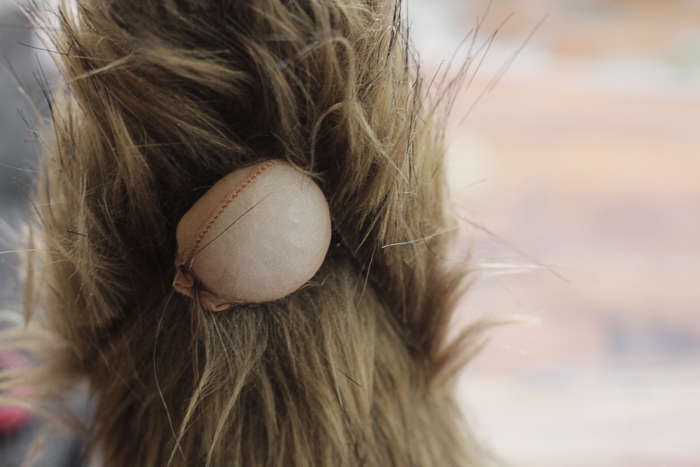
Step 8: Hot Glue Nose & Mustache To Beard
Hot glue the twist of nylon closed, then add hot glue above the beard and press your nose into place. When your nose is in place, you can add your mustache snugly above it, arranging it on either side.
Step 9: Create Hat
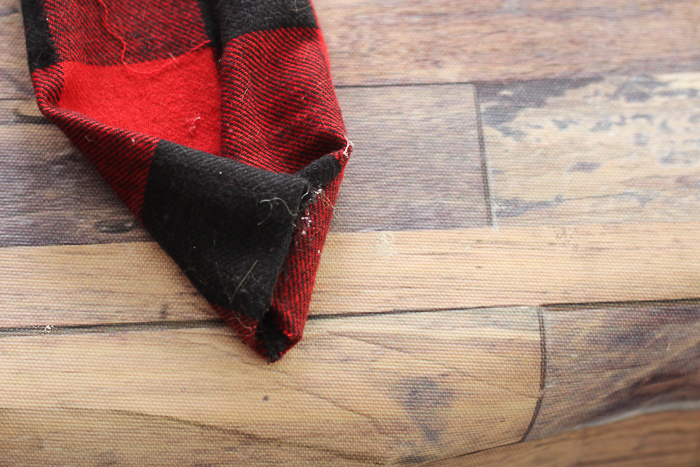
The last thing to do is add a big, snuggly hat. To do this, I cut a piece of flannel into a rectangle. The size of yours will depend on the size of your foam cone. Mine was a 10” cone, so I cut my fabric to 10” by 22”. Lay your fabric lengthwise and fold each side over towards the middle so that one side just overlaps the other. Glue the overlapping pieces together to make a tidy seam. Leave 4” of one end unglued to size the hat to your gnome's head. Fold the other end into a point to create the tip of the hat, and glue securely.
Step 10: Add Hat To Gnome
Slip the hat over your gnome's head, right down to his nose. Then, pull the fabric seam in the back tightly until it fits snugly and glue it in place.
Finally, arrange the hat down his back and around so the tip ends in front. Add glue here and there to keep it in place and to hide your back seam. If you are really ambitious, you can sew your hat before placing it on instead of using hot glue.
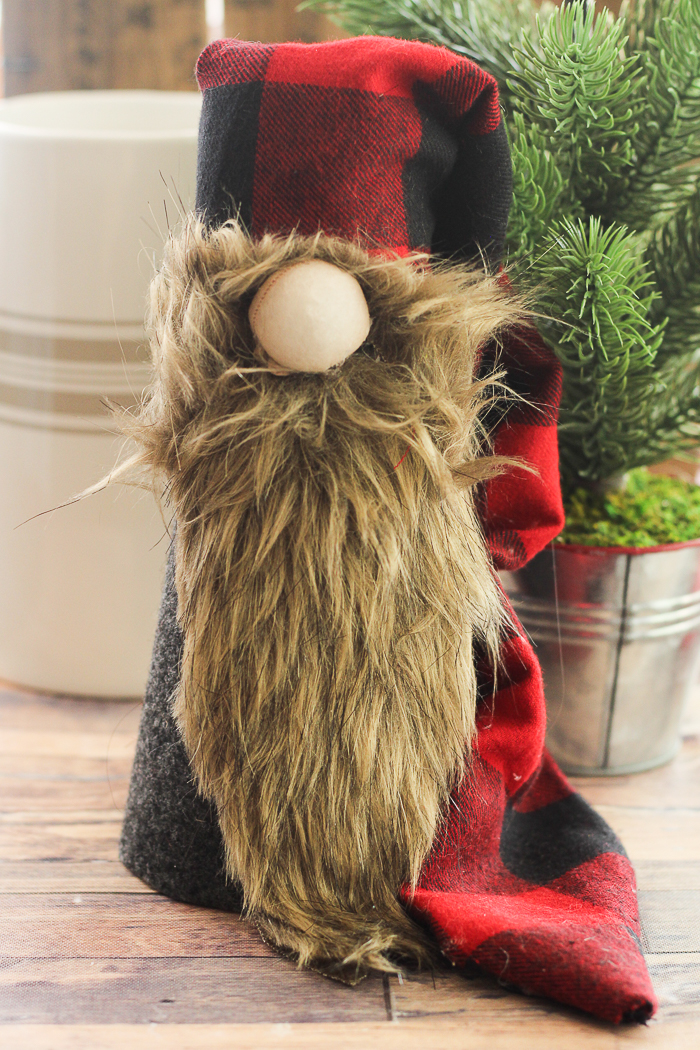
Your Christmas gnome is now complete and ready to put on display in your home! Now that you know how to make a gnome, you can add one to every room of your home this holiday season or add a fun collection as a table centerpiece or on your mantle.
If you love Scandinavian gnomes, this is one craft project you really must try. I love how this little guy turned out and can't wait to add him to my Christmas decor. Is it time to put that out yet?? Gather your supplies and make your own DIY Christmas gnomes this holiday season.

FAQs About Christmas Gnome
Here are answers to some of the most frequently asked questions I receive about making this Christmas gnome. If your question isn’t listed, feel free to drop it in the comments, and I’ll be happy to help!
Can I Make This Christmas Gnome Bigger?
Absolutely! The only thing to keep in mind is that if you make the Christmas gnome bigger, you will need a larger piece of felt or flannel. and faux fur.
Does The Mustache Go Above The Nose?
Yes! In this case, I added the mustache above the nose, but you can add it under the nose if you prefer that look.
Do You Have To Use A Hot Glue Gun For This Christmas Gnome?
Technically, no. For this project, you can use craft glue or fabric glue. However, I highly recommend using hot glue because it dries quickly, allowing you to complete this project more quickly.
How Can I Customize This Christmas Gnome?
You can customize this Christmas gnome in a variety of ways! Below are just a few ideas, but the possibilities are endless!
- Change the color of the cone base (aka the grey felt)
- Change the color of the beard
- Change the color of the nose
- Change the color of the fannel
5 More Gnome Crafts
If you loved learning how to make this Christmas gnome and want even more gnome crafts, then check out the projects below!
- How to Make a Christmas Gnome Banner + Free Gnome SVG File
- Scandinavian Christmas Gnomes From Socks
- Gnome Painted Garden Rocks
- Christmas Gnome SVG Bundle for Cricut & Silhouette
- DIY Wood Gnome Earrings


This gnome is so cute! Last Christmas we made a knitted gnome very similar to this one and I’m thinking this cute little guy would make a nice addition to my potential gnome collection.
Thanks very much for the idea.
Very, very cute! I love some plaid added to my Christmas decor! Thank you for sharing at Celebrate It!
So cute Angie, I have seen a lot of gnomes this year, but yours is the cutest!!
I love gnomes and this one is darling. I have a question, does the mustache go above or the nose? I may have misunderstood the directions. Thanks
Yep above the nose!
I was wondering about that myself. A mustache grows naturally UNDERNEATH the nose…but I suppose it’s all about what you personally find looks the best. Either way your gnome is adorable. Merry Christmas
I was wondering about that as well… a mustache grows naturally UNDERNEATH the nose, but I suppose it’s all about what you personally find looks the best. I think your gnome is absolutely adorable either way. Merry Christmas
I was wondering about that myself. A mustache grows naturally UNDERNEATH the nose…but I suppose it’s all about what you personally find looks the best. Either way your gnome is adorable. Merry Christmas
I’ve been loving the gnome trend for a couple of years and your DIY gnome is adorable! I tried making my own several years ago, but they didn’t turn out this cute! Thanks for sharing at Merry Monday party. I’ll be including your gnome in my Party Features next week. Have a great weekend!
Very cool idea!!