
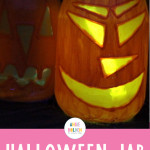
Get ready to set the spooky mood for your Halloween party! Mason jar pumpkins are an easy, affordable way to bring a spooky ambiance to your holiday. They look great and can be customized in any color you choose.
As Halloween approaches, it's time to add some spooky charm to your home decor. Why not let your creative spirits fly with these DIY mason jar pumpkins? With their warm, flickering glow, these lanterns are perfect for setting a ghostly Halloween scene. They're not just beautiful; they're also easy and fun to make!
Whether you place them on your porch to welcome trick-or-treaters or as a centerpiece for your Halloween party, these luminary lanterns will surely be a hit. So, let's roll up our sleeves and start crafting!

How To Make Mason Jar Pumpkins
Trying to think of a spooky-yet-festive way to decorate your home for Halloween? Look no further than luminary lanterns! These charming decorations are easy to make with a few mason jars and craft supplies.
Note: Have leftover jars? Use them to make a different set of Halloween Lanterns.
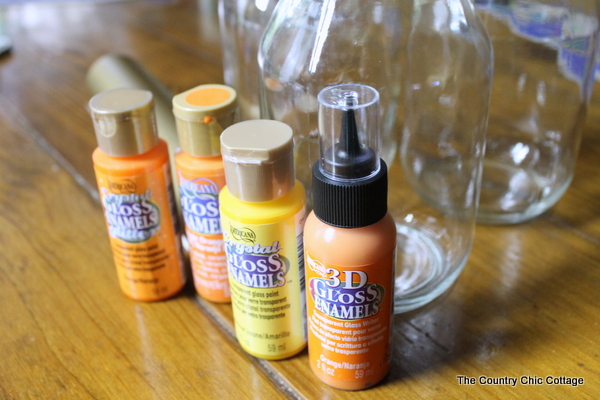
Supplies Needed To Make Mason Jar Pumpkins
Unfortunately, some of the paints used in this tutorial are no longer available. I linked to alternative paint options in the supply list below.
- Americana 2-oz. Bright Orange Gloss Enamel Paint
- Americana Crystal Gloss Enamel Glitter Paint, Orange
- Alternative Option: Deco Art DecoArt Galaxy Glitter, Orange
- Crystal Gloss Enamels Paint 2 Oz-Yellow
- Alternative Option: FolkArt Enamel Glass & Ceramic Paint, Yellow
- DecoArt 2-Ounce 3-D Gloss Enamel Writer, Orange
- Alternative Option: Gallery Glass, Pumpkin Orange Stained Glass
- Mason jars
- Contact paper or adhesive vinyl (painters or masking tape would work here in a pinch)
- Tea lights or glow sticks
- Scissors
- Paintbrush
Step 1: Prep Your Jars
Take a few minutes to remove the labels from your mason jars. You can do this easily by soaking the jars in hot, soapy water for a few minutes before wiping them clean.
Once you’ve removed all of the labels, rinse each jar and let it dry completely.
Step 2: Cut Out Halloween Face Stickers
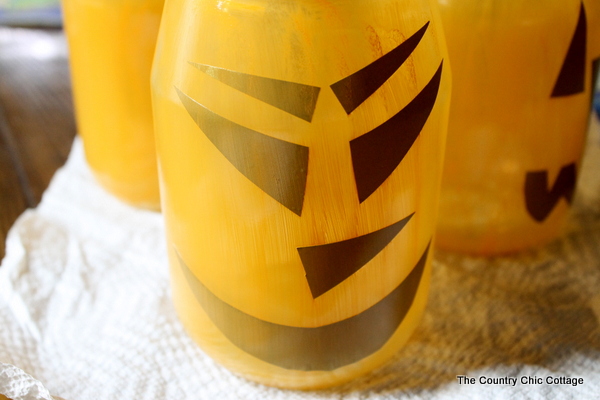
Next, it’s time to cut out some spooky faces for your luminary lanterns. For this step, you can either use contact paper or adhesive vinyl.
If you’re using contact paper, print out a template of the Halloween face designs that you want to use and trace them onto the back side of the contact paper. Cut the designs out of the contact paper and set them aside.
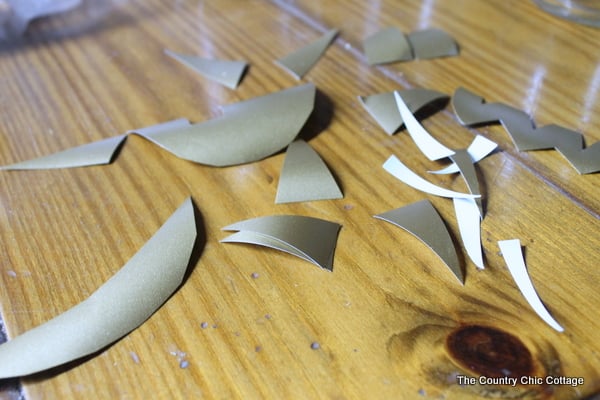
If you’re using adhesive vinyl, you can use your Cricut to cut your shapes, but you can also use scissors or a craft knife.
To make different faces on your jars, you will need various pumpkin eyes, noses, and mouths. Once you have decided on each jar's face, add those facial features to the jar.
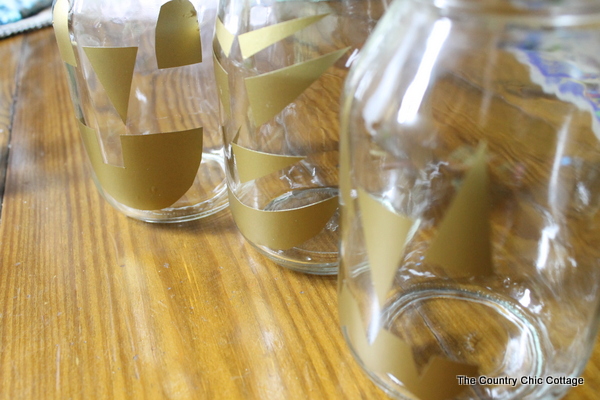
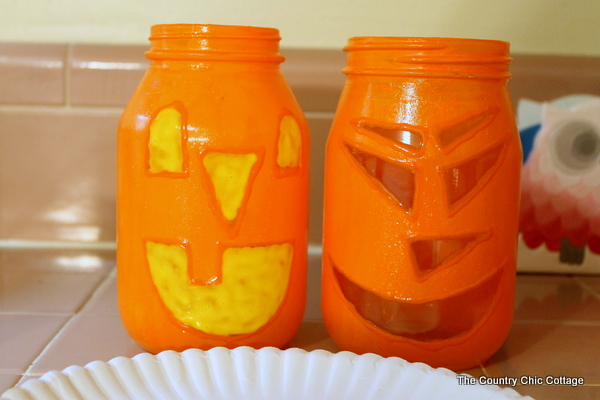
Step 3: Paint The Mason Jars
Now it’s time to give your mason jar pumpkins some personality!
To do this, apply a few coats of bright orange enamel paint to each jar. For an extra spooky effect, add a touch of glitter paint. You may need two or three coats before the paint is fully opaque.
Remove the vinyl with a craft knife once your mason jars are completely dry.
Note: You may need to cut around your vinyl to remove it from your jar.
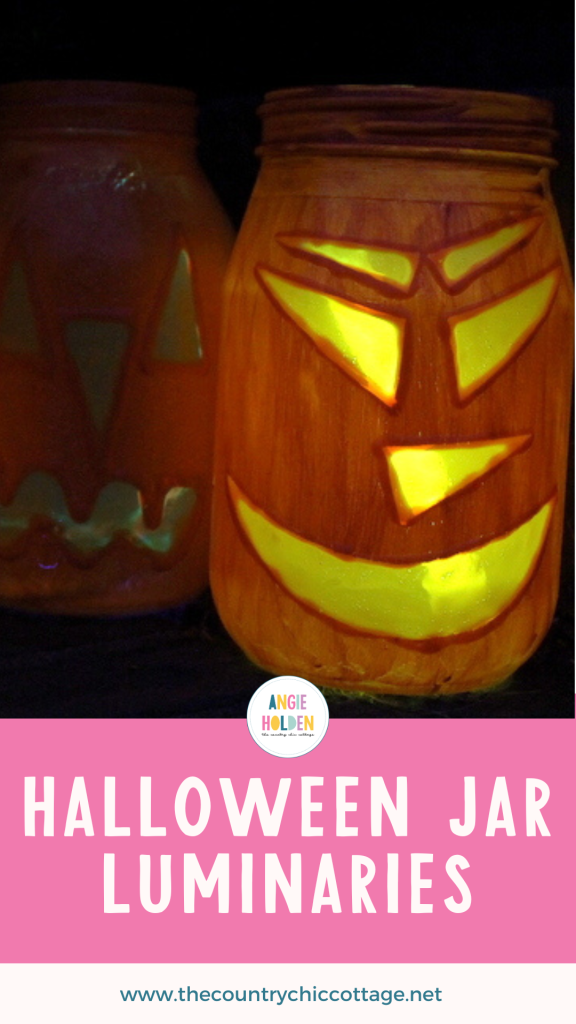
Step 4: Add Your Final Touches
Once your jars are dry, you can add the finishing touches. Start by adding the 3D Gloss Enamels Writer in orange around each opening. After this dries, fill each opening with Crystal Gloss Enamels in yellow.
Then, set your jars aside to dry.
Once your jars are dry, add a tea light or glow stick to each jar and place them around your home!

These are a fun way to light up your porch on Halloween night! Line a path to your door with these fun Halloween luminary lanterns, and make sure those trick-or-treaters know exactly which way to walk!
FAQs About Mason Jar Pumpkins
If you have questions about making these mason jar pumpkins, I have answers! If you don’t see your question answered below, please leave it in the comments.
How Did You Get The Original Labels Off Your Jars?
Good question! If you are using jars from your kitchen (like pickle jars, jam jars, etc.), there are several ways to remove the original label.
For my jars, I let them soak in warm, soapy water, then used a scraper to remove the label. This worked for me, but if you are dealing with a stubborn label, below are a few more things you can do.
- Pour hot water into the jar and let it sit. This will loosen the label on the outside.
- Create a mixture of dish soap and vinegar.
- Apply heat to the label using a hair dryer.
How Did You Get Sticky Residue Off Your Jars?
I used Goo Gone, soap, and water to remove any sticky residue from the jars. However, if you don’t like the smell of Goo Gone or need other options, below are a few ideas.
- Adhesive Removers (like 3M Adhesive Remover, Un-Du, etc.)
- White vinegar
- Nail Polish Remover
Can I Use Different Colors Other Than Orange And Yellow?
Absolutely! You can mix and match any colors you like or stick with the traditional Halloween colors to keep your decorations more traditional.
What Kind Of Tea Lights Should I Use?
You can use regular tea lights, battery-operated LED candles, or even glow sticks! Just be sure to keep your eyes open when using candles around kids.
How Long Do The Mason Jar Pumpkins Last?
If taken care of properly, these Halloween decorations will last for years. When not in use, store them in a cool, dry place away from direct sunlight to ensure they last as long as possible.
7 More Halloween Decor Crafts
Did you love these mason jar pumpkins and want more Halloween decor crafts? Then check out the ideas below!
- How to Paint Halloween Flower Pots
- Hand-stitched Halloween Pumpkin Tea Towel
- DIY Halloween Mason Jar Toppers with a Cricut
- Vintage Halloween Signs with the Glowforge
- Free Printable Halloween Labels
- Make Halloween Bats for Your Wall
- DIY Haunted House That Lights Up


I l♥ve everything you do. 🙂
I’ve been watching a lot of your pages and find you very inspiring lady. 🙂
Thank you so much for sharing all of your great ideas and absolutely fabulous tutoring.
Greetings from Helsinki, Finland