
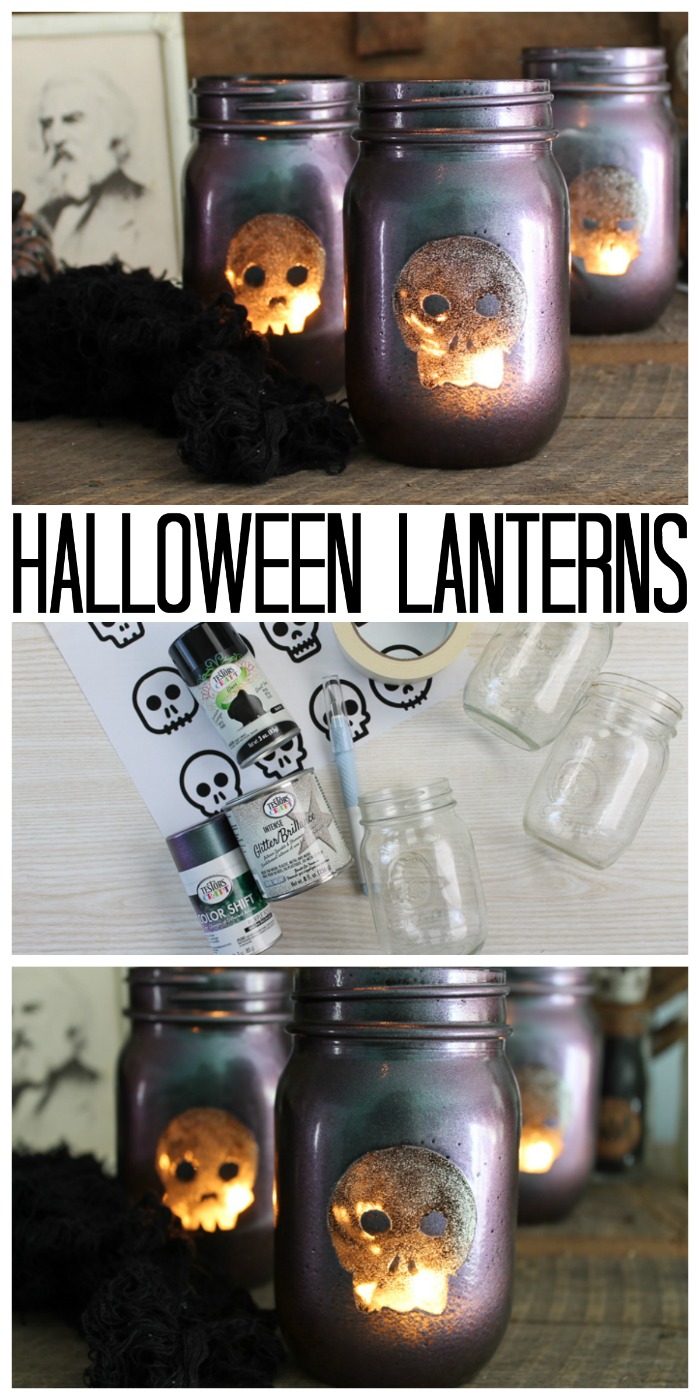
You can make these Halloween lanterns for your home with a fun Testors Crafternoons event with family and friends. These easy to make lanterns are perfect for adding a little fright to any room. Add in a candle for a gorgeous and slightly spooky glow. This post is sponsored by Testors Crafternoons, however, all projects and opinions are my own.
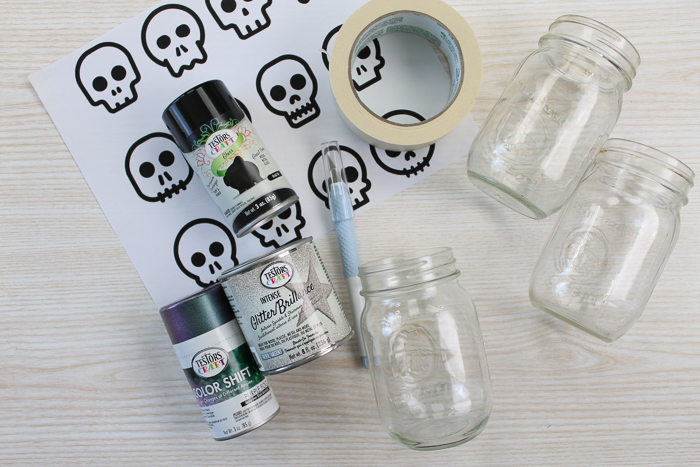
Supplies needed to make these Halloween lanterns:
- Mason jars (with at least one smooth side)
- Masking tape
- Craft knife
- Testors Color Shift in Purple Fog
- Testors Aerosol in Black
- Skull templates (print for free here)
- Testors Intense Glitter in silver
- Paint brush
- Scissors
- Tape
- Rubbing alcohol
How to Make Lanterns for Halloween
I have both a video as well as written instructions for you below to make these cute lanterns for your Halloween decor.
Video Tutorial:
Want to dive right in and just watch these being made? Watch the video below. Plus the only way to really see that color shift paint in action is in video. Trust me…you are going to love the effect! You can also follow along with the step by step instructions below the video if you want!
Step By Step Instructions:
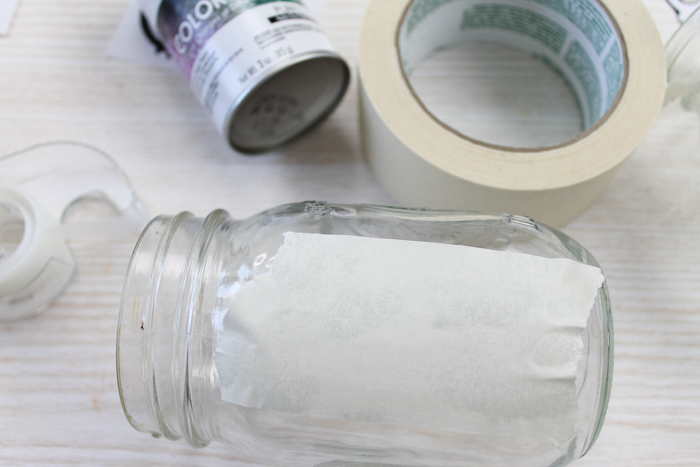
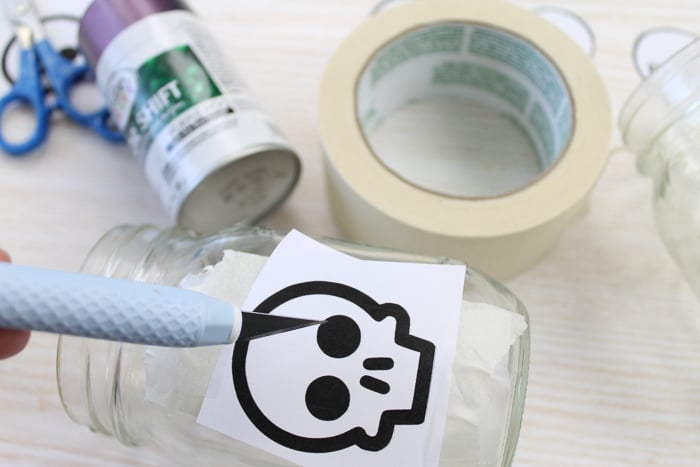
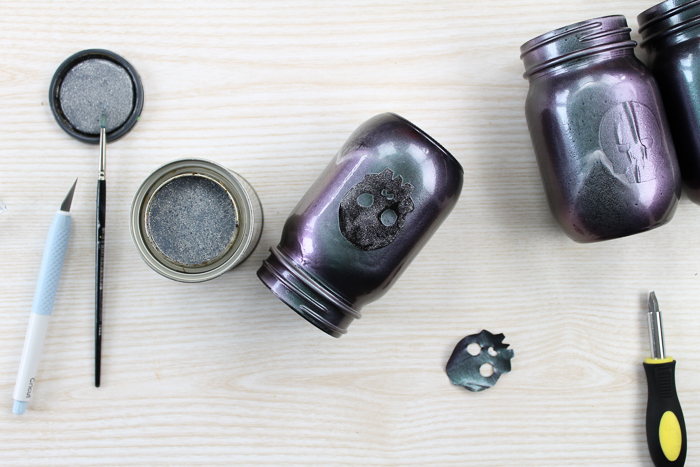
Start with a mason jar that has at least one side that is smooth with no emboss. You want to clean it well before you start. I find that rubbing alcohol works great. Just wipe it on and dry off before continuing. Add a strip of masking tape to the smooth side as shown below.
Print the skulls onto regular copy paper. Then determine which of the skull shapes you want to use. Cut it from the paper with scissors and use regular tape to secure it over the masking tape.
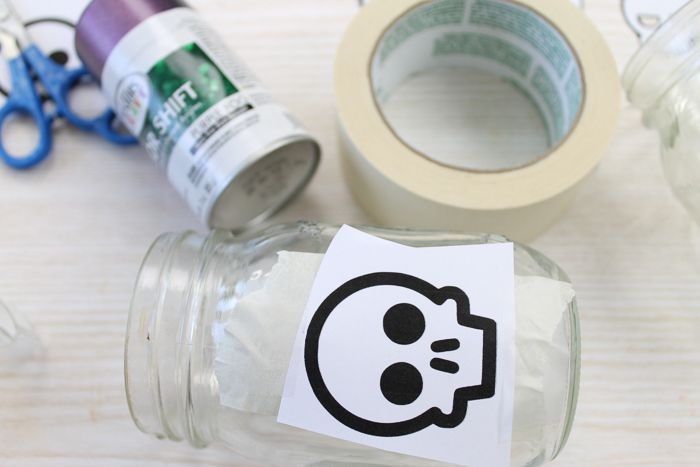
Use a craft knife to go all around the outer edge of the skull as well as the eyes and nose in the center. Be sure to cut through the paper template as well as the masking tape. Do any inner parts like the eyes first then do the outer parts.
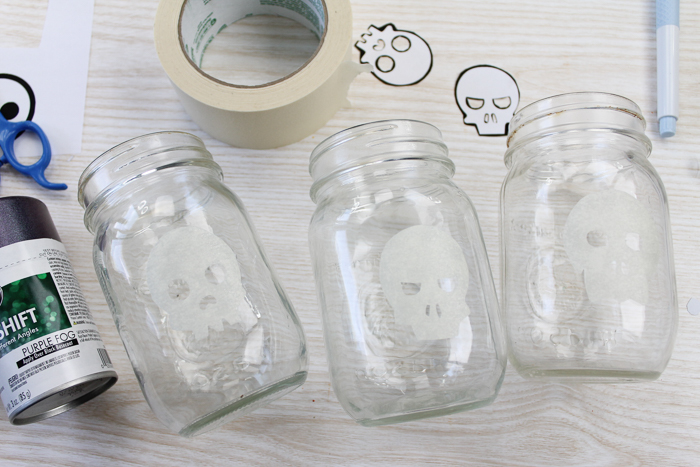
Remove the pieces that you cut and you are left with a skull shape on your mason jar. Repeat with as many jars as you would like. I did a different skull on each jar but you can definitely do the same on each one.
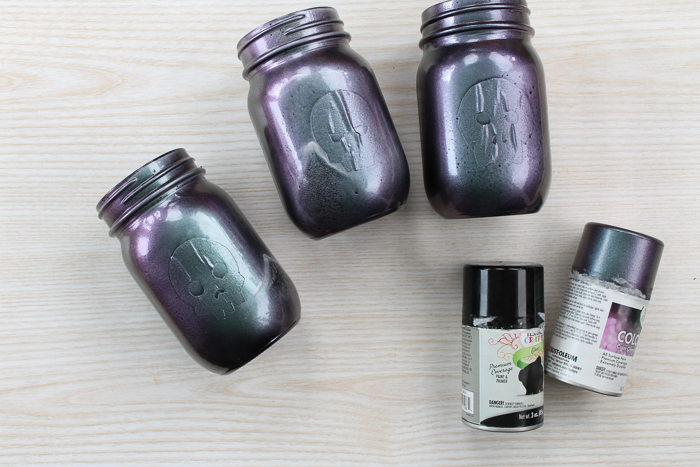
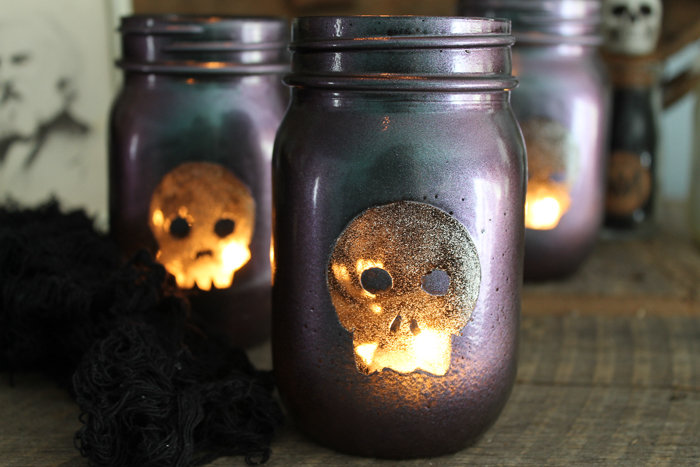
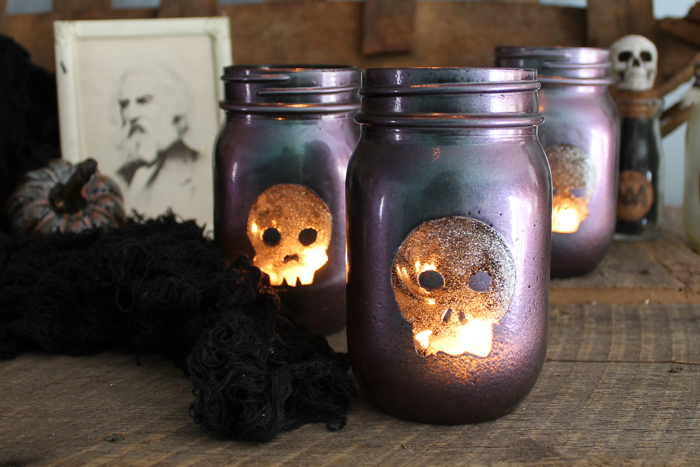
Then take your jars outside for some spray paint. Spray paint them black first. Allow to dry then go over the top with the purple fog color shift paint. Allow to dry before continuing.
Use your craft knife to help you get under your masking tape and lift the skull shape. You can also cut any paint that may try to peel away with your masking.
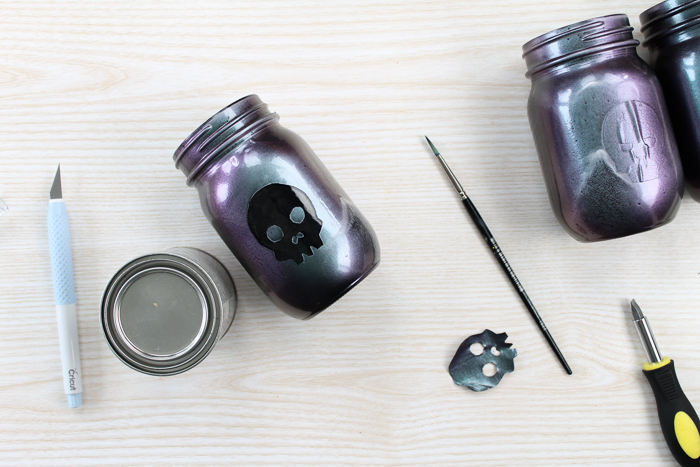
I feel that just about every project is better with a touch of glitter. This step is optional but I love the look it gives these Halloween lanterns. I used just one coat of Testors Intense Glitter paint just in the area where the paint was masked for the skull. Then just allow it to dry.
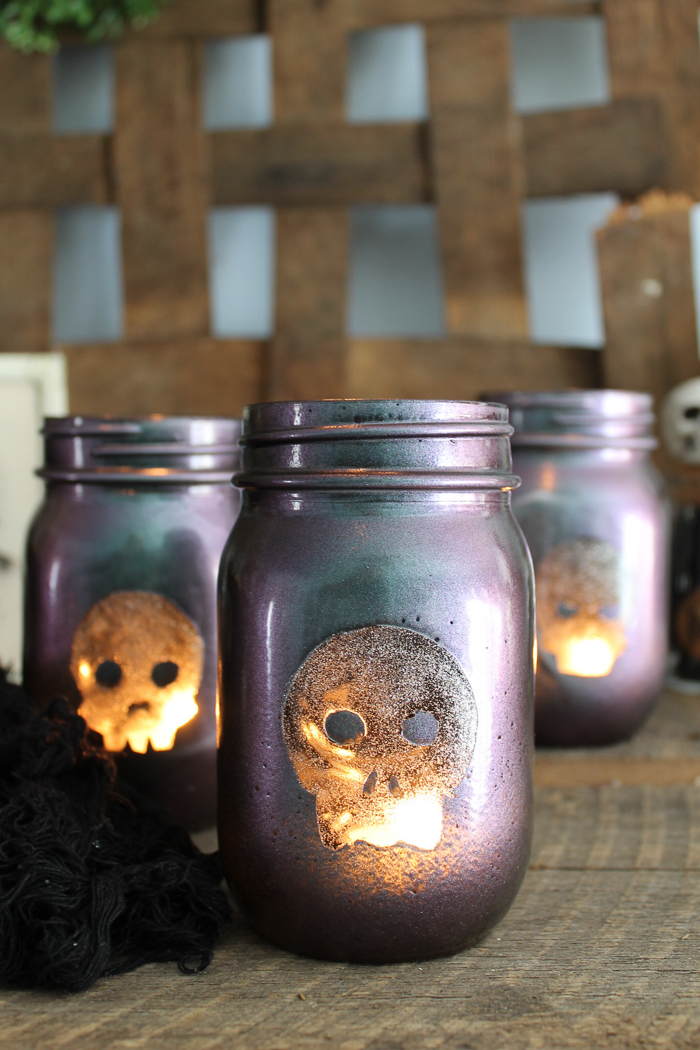
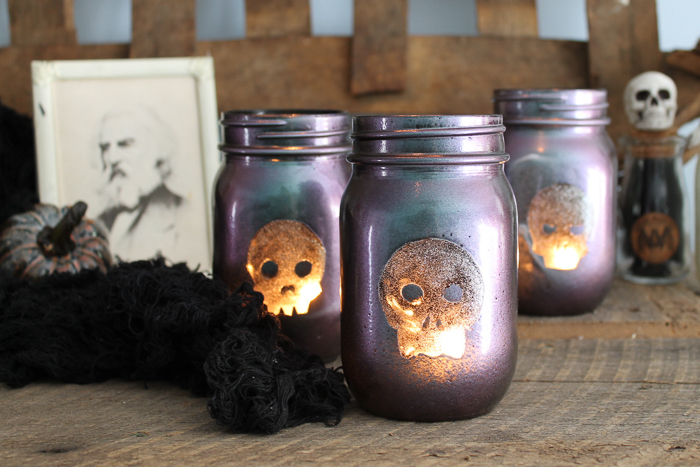
Pop in a candle and your Halloween lanterns are complete! I love the look of the glitter on the skull and how the light shines through!
Need to print the instructions for these Halloween mason jars?
Just use the card below to print the simple instructions for your party guests!

Supplies
- Mason jars with at least one smooth side
- Craft knifeTestors
- Testors Color Shift in Purple Fog
- Testors Aerosol in Black
- Masking tape
- Paintbrush
- Scissors
- Rubbing alcohol
- Testors Intense Glitter in silver
- Printable Skull Template
- Tape
Instructions
- Start with a mason jar that has at least one side that is smooth with no emboss. You want to clean it well before you start. I find that rubbing alcohol works great. Just wipe it on and dry off before continuing. Add a strip of masking tape to the smooth side.
- Print the skulls onto regular copy paper. Then determine which of the skull shapes you want to use. Cut it from the paper with scissors and use regular tape to secure it over the masking tape.
- Use a craft knife to go all around the outer edge of the skull as well as the eyes and nose in the center. Be sure to cut through the paper template as well as the masking tape. Do any inner parts like the eyes first then do the outer parts.
- Remove the pieces that you cut and you are left with a skull shape on your mason jar. Repeat with as many jars as you would like. I did a different skull on each jar but you can definitely do the same on each one.
- Then take your jars outside for some spray paint. Spray paint them black first. Allow to dry then go over the top with the purple fog color shift paint. Allow to dry before continuing.
- Use your craft knife to help you get under your masking tape and lift the skull shape. You can also cut any paint that may try to peel away with your masking.
- I feel that just about every project is better with a touch of glitter. This step is optional but I love the look it gives these Halloween lanterns. I used just one coat of Testors Intense Glitter paint just in the area where the paint was masked for the skull. Then just allow it to dry.
- Pop in a candle and your Halloween lanterns are complete! I love the look of the glitter on the skull and how the light shines through!
Now that you have a great project, what are you waiting for? Make these Halloween lanterns with your family and friends by hosting Testors Crafternoons. This fun party idea is perfect for those that love to make things!
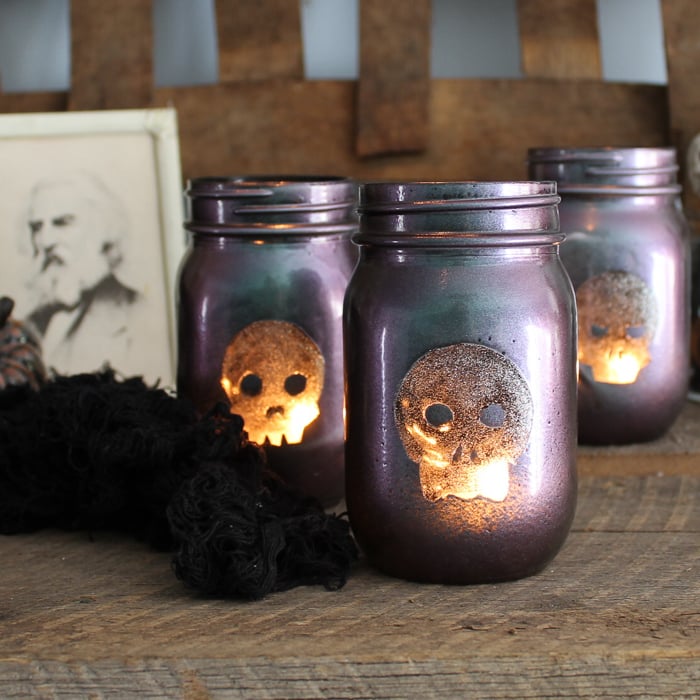
You may or may not be able to tell in these pictures, but that Testors Color Shift paint really changes color from different angles. I am in love with the effect and that you can get it right out of a spray paint can. It really makes these jars something special so be sure to add that even if you skip the glitter step.
Now, grab your supplies and plan your Testors Crafternoon today! Everyone will love making some Halloween crafts and you get some quality time with the ones you love! Plus you get to make these awesome Halloween lanterns so it is a win-win!


They really turned out neat:@)
Too darn cute. I love the way the glitter shines through too.
I bet my teen would love to do this project with me. Thanks for sharing at the Inspiration Spotlight party @dearcreatives Pinned and sharing.
Hi! Visiting from the Snickerdoodle Create and Make party. I love this idea – pinned (and making!)
These look spooky with the glow of the candle, the touch of glitter was a perfect idea! Thanks for sharing at Merry Monday!
I love the name Crafternoons! Such fun. I agree that the glitter is the perfect touch to the lantern. Thanks for sharing at #HomeMattersParty