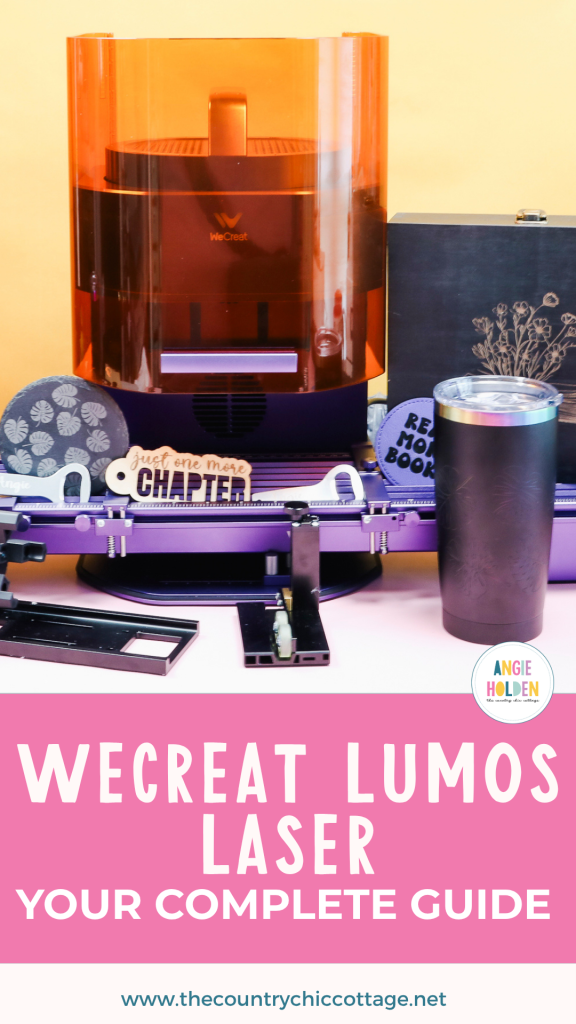
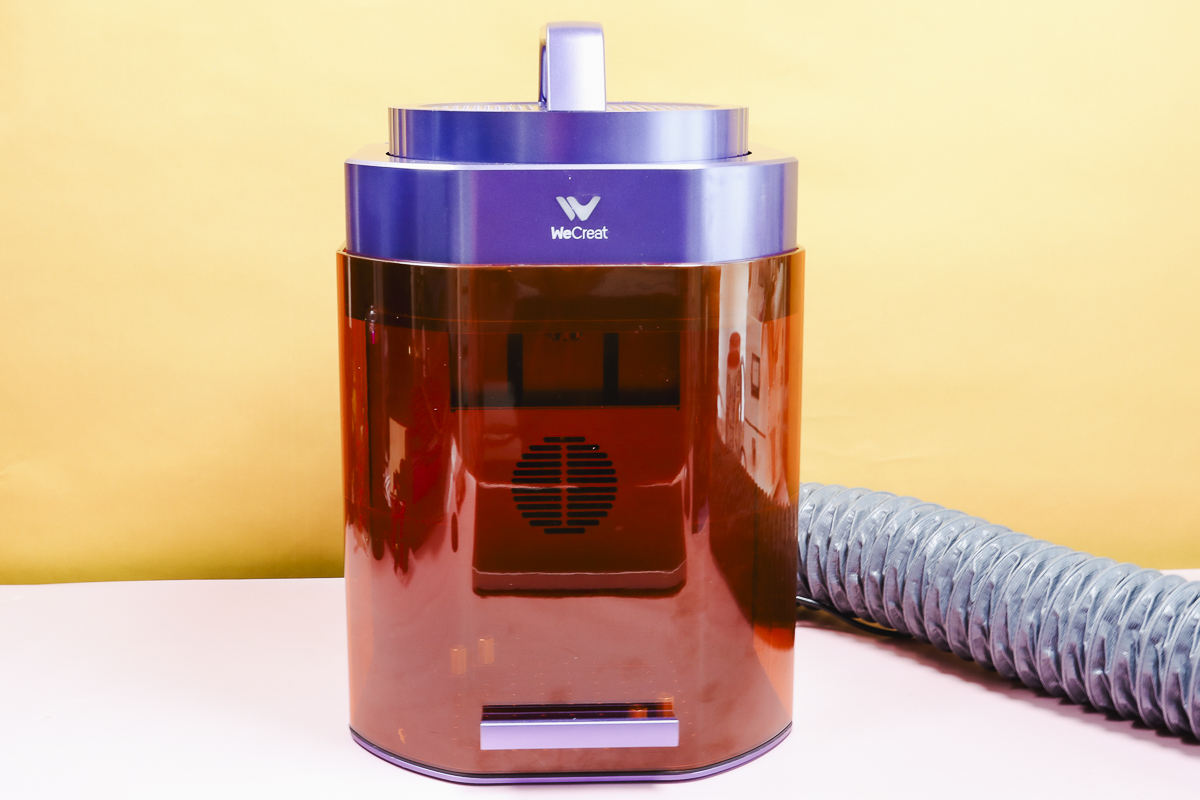
If you're looking for a new laser, make sure you check out the WeCreat Lumos. I am going to give you a closer look at the Lumos and all it can do. Then you can decide if this is the right laser for you.
The WeCreat Lumos is a galvo-style laser, which means the laser head doesn't move. I love that there are different accessories I can use with this laser, opening up a lot of different project options.

WeCreat Lumos has both a three-watt infrared and a 10-watt diode laser installed. Having both these laser heads means there are a lot of different blanks you can use with the laser.
You can watch me test out the Lumos and some of the different accessories by pressing play on the video below.
WeCreate Lumos Laser
I am unboxing and setting up my laser so follow along below to see what is included and how easy it is to set up!
What is In the Box
NOTE: While unboxing, make sure you open up all of the boxes and the laser itself. In my laser, there were items packaged inside the laser.
If you purchase the base model WeCreat Lumos inside the box, you'll find the following:
- USB Cord
- Power Cord
- Screwdriver and Hex Key
- Vent Hose and Adaptor
- 2 Laser Bases for cutting and engraving
- Wood Blanks for testing the laser
WeCreat Lumos Accessories
There are a few different bundles you can purchase; each will include different accessories. There are multiple add-on accessories, including:
- Rotary Accessory – used for projects that are cylindrical, like tumblers, mugs, etc.
- Slide Accessory – used to create larger projects, and you can use it to create multiple of the same projects at once.
- Air Filter – used if you don't have a window to vent the hose.
- Magnetic Protective Cone – allows you to use the laser on large projects, and I will show you that one below.
I'm going to test some of these accessories today, but not all of them. I have heard that there will be more accessories released in the future, so I'll be keeping an eye out for those.
NOTE: You can also combine the rotary and slide accessories. I am not doing that today, but think of projects like engraving baseball bats.
WeCreate Lumos Setup
First, I'm going to set the laser up in standard mode. This won't include any of the additional accessories.
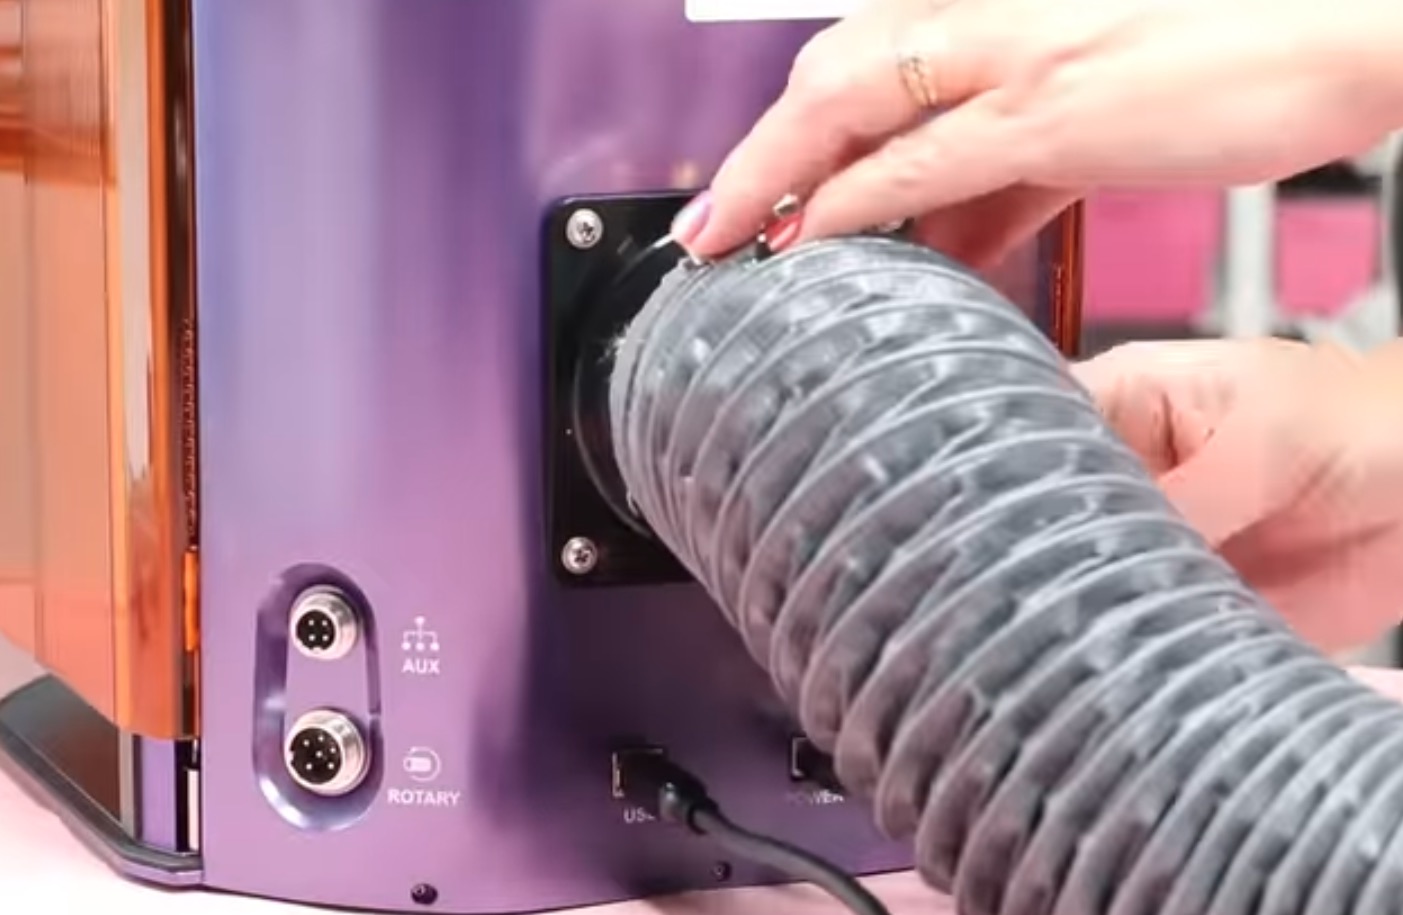
Plug the power cord into the back of the laser. Add the adaptor and attach the vent tube. Make sure to vent the other end of the vent tube out the window or connect it to the air filter accessory.
Next, plug in the USB cable to set up the laser. If you have a Mac, it does come with an adapter so you can hook it up to that, too.
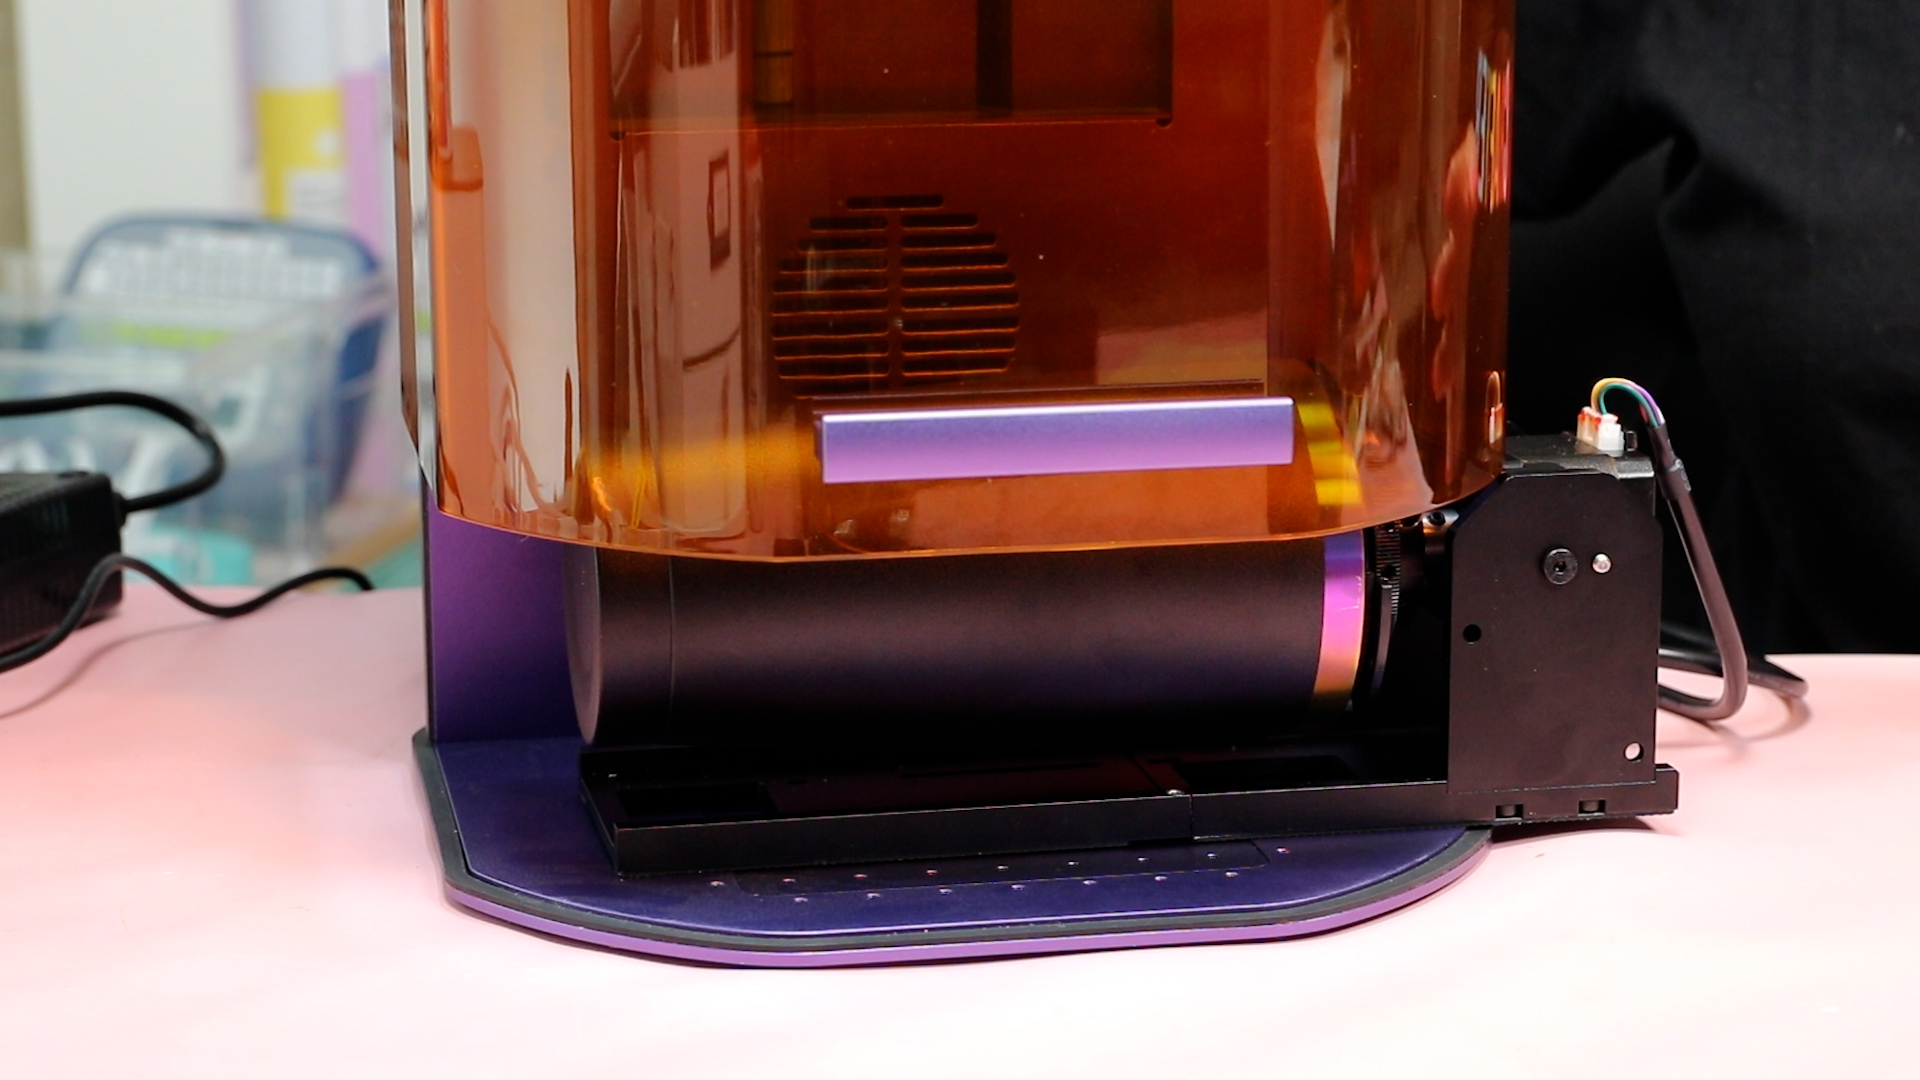
Ensure Laser is Fully Seated and Secure
There is a cap on the laser; remove it before operating the laser.
Also, the laser itself will pull out of the top of the Lumos. Make sure the laser is pushed down in there until it snaps in place, and then tighten the screw inside the enclosure to secure it in place.
You can use the Hex Key to tighten the screw. I was able to tighten it with my hand easily.
Connect the WeCreate Lumos to Your Computer
Connect the laser to your computer using the USB cable. You only need to use the USB one time; after that, you can add your WIFI information and connect via Bluetooth in the future.
Laser Safety
Laser safety is very important. The WeCreate Lumos has a door that you will keep closed while in use to protect your eyes.
If you're using the machine with a blank that requires you to keep the door open, make sure to use protective safety glasses when operating the laser.
Always use laser-safe materials when cutting or engraving. Some materials can be toxic when cut with a laser.
Please review my full laser safety tutorial before you begin your laser crafting journey.
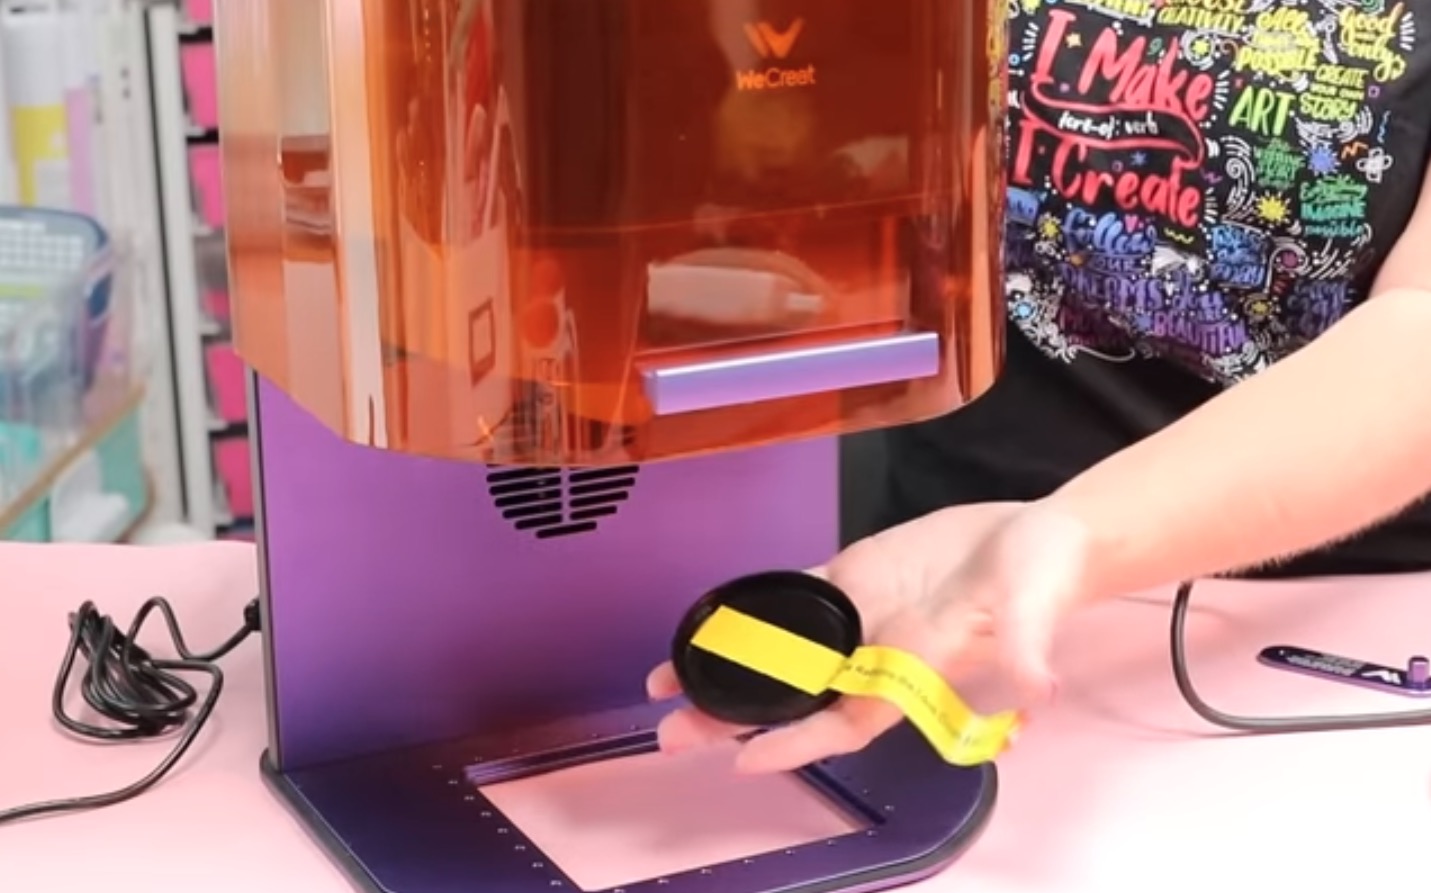
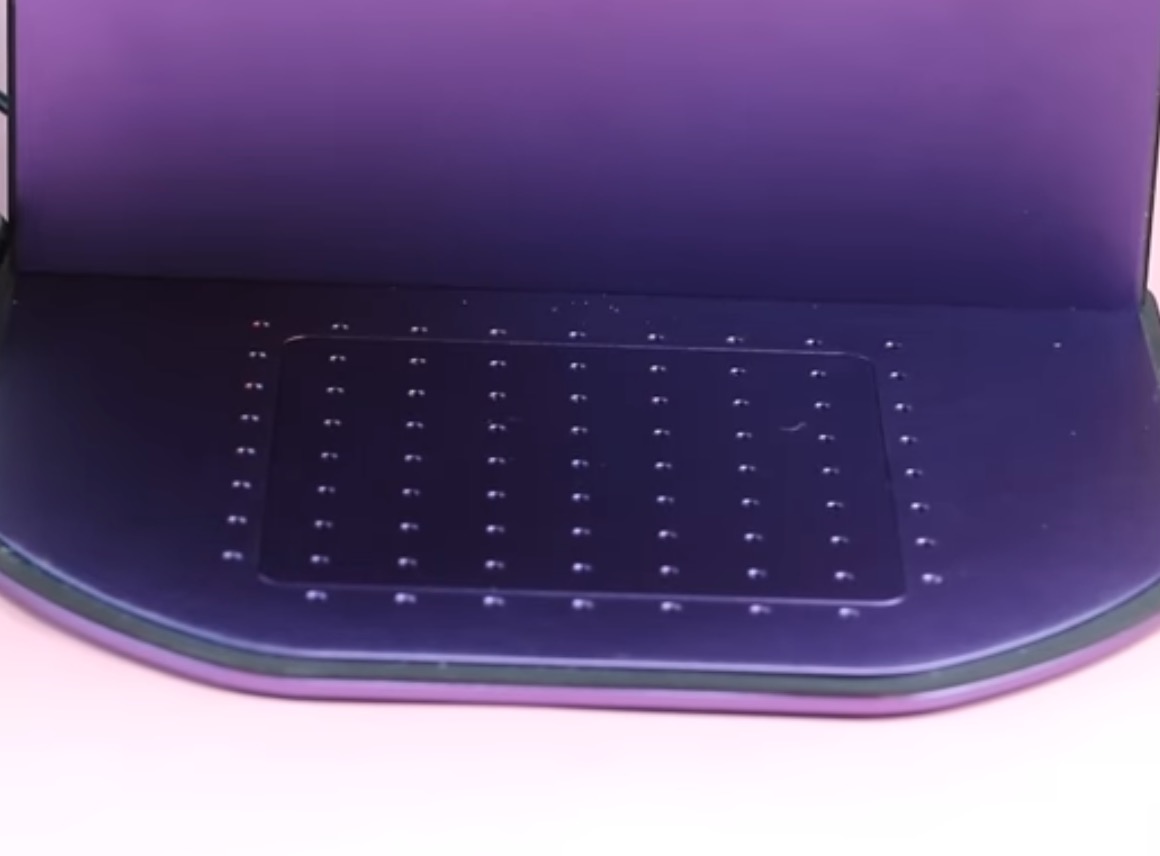
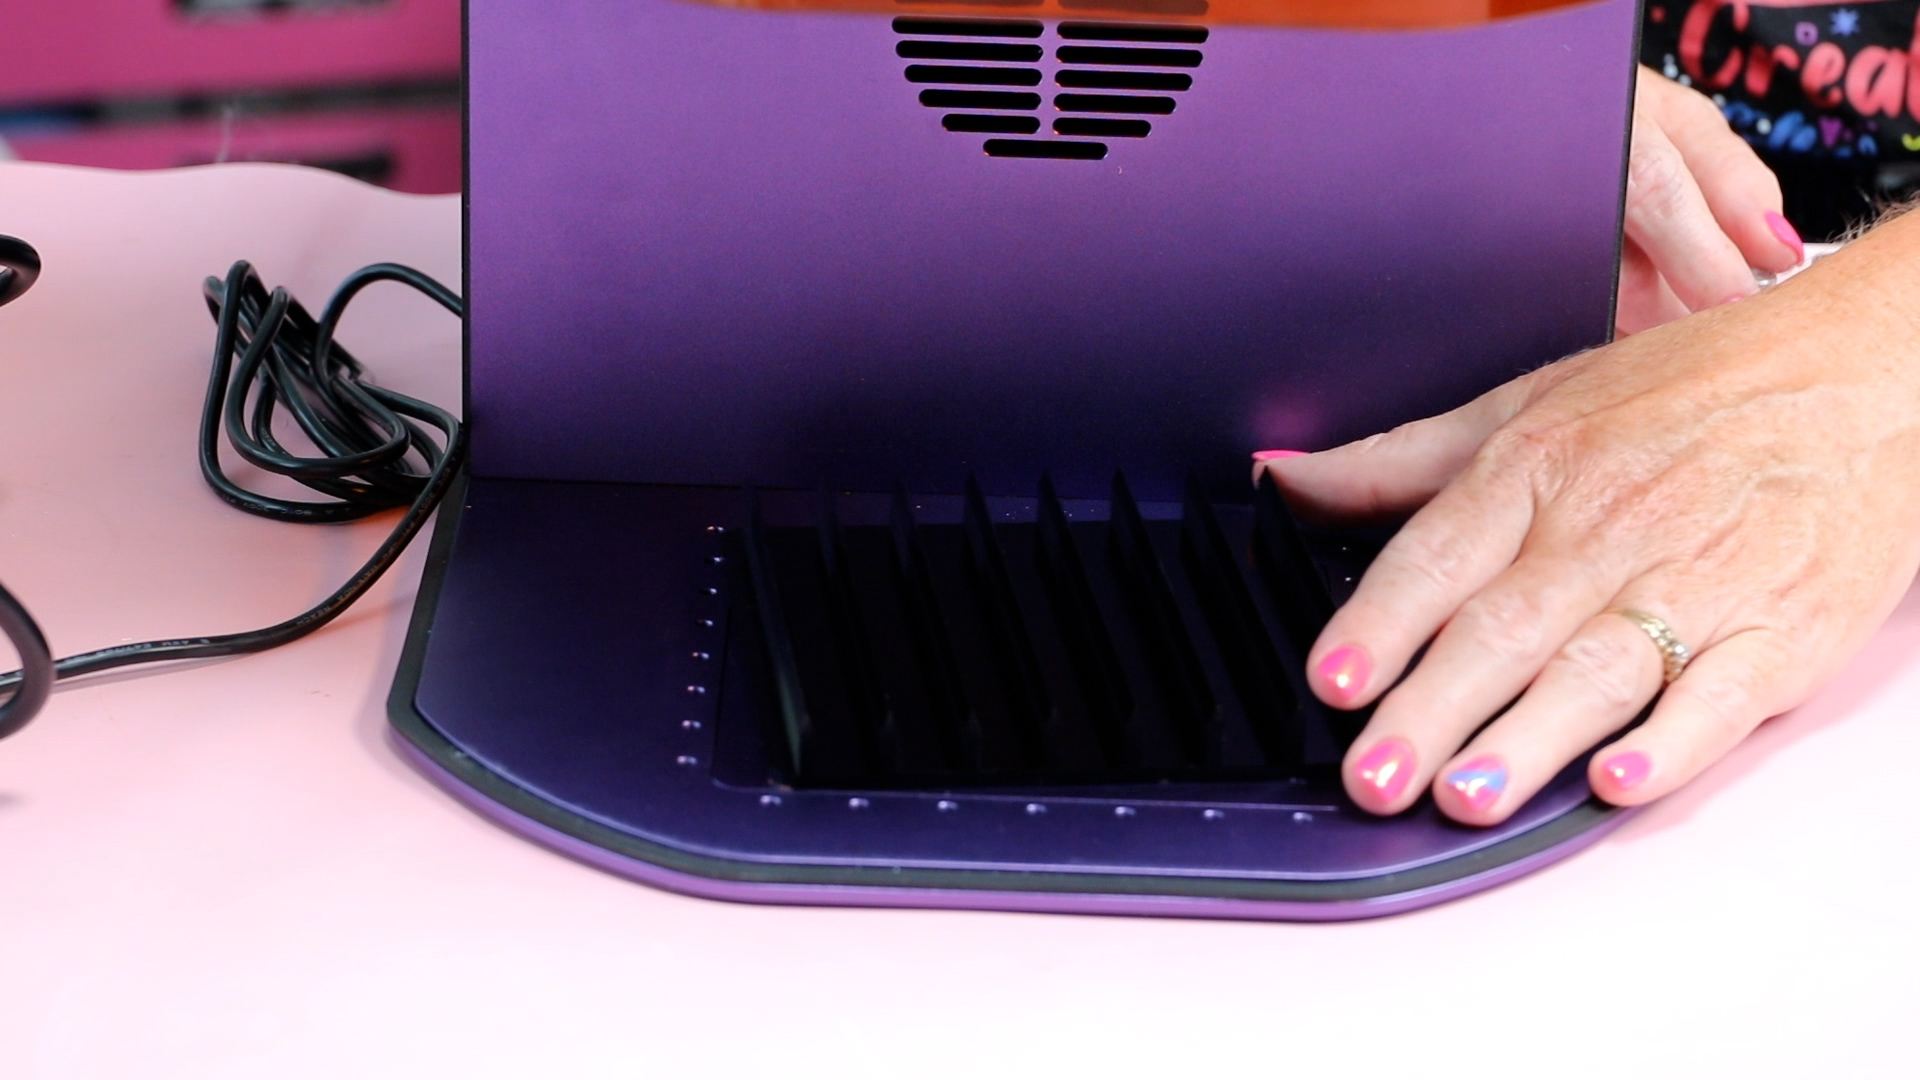
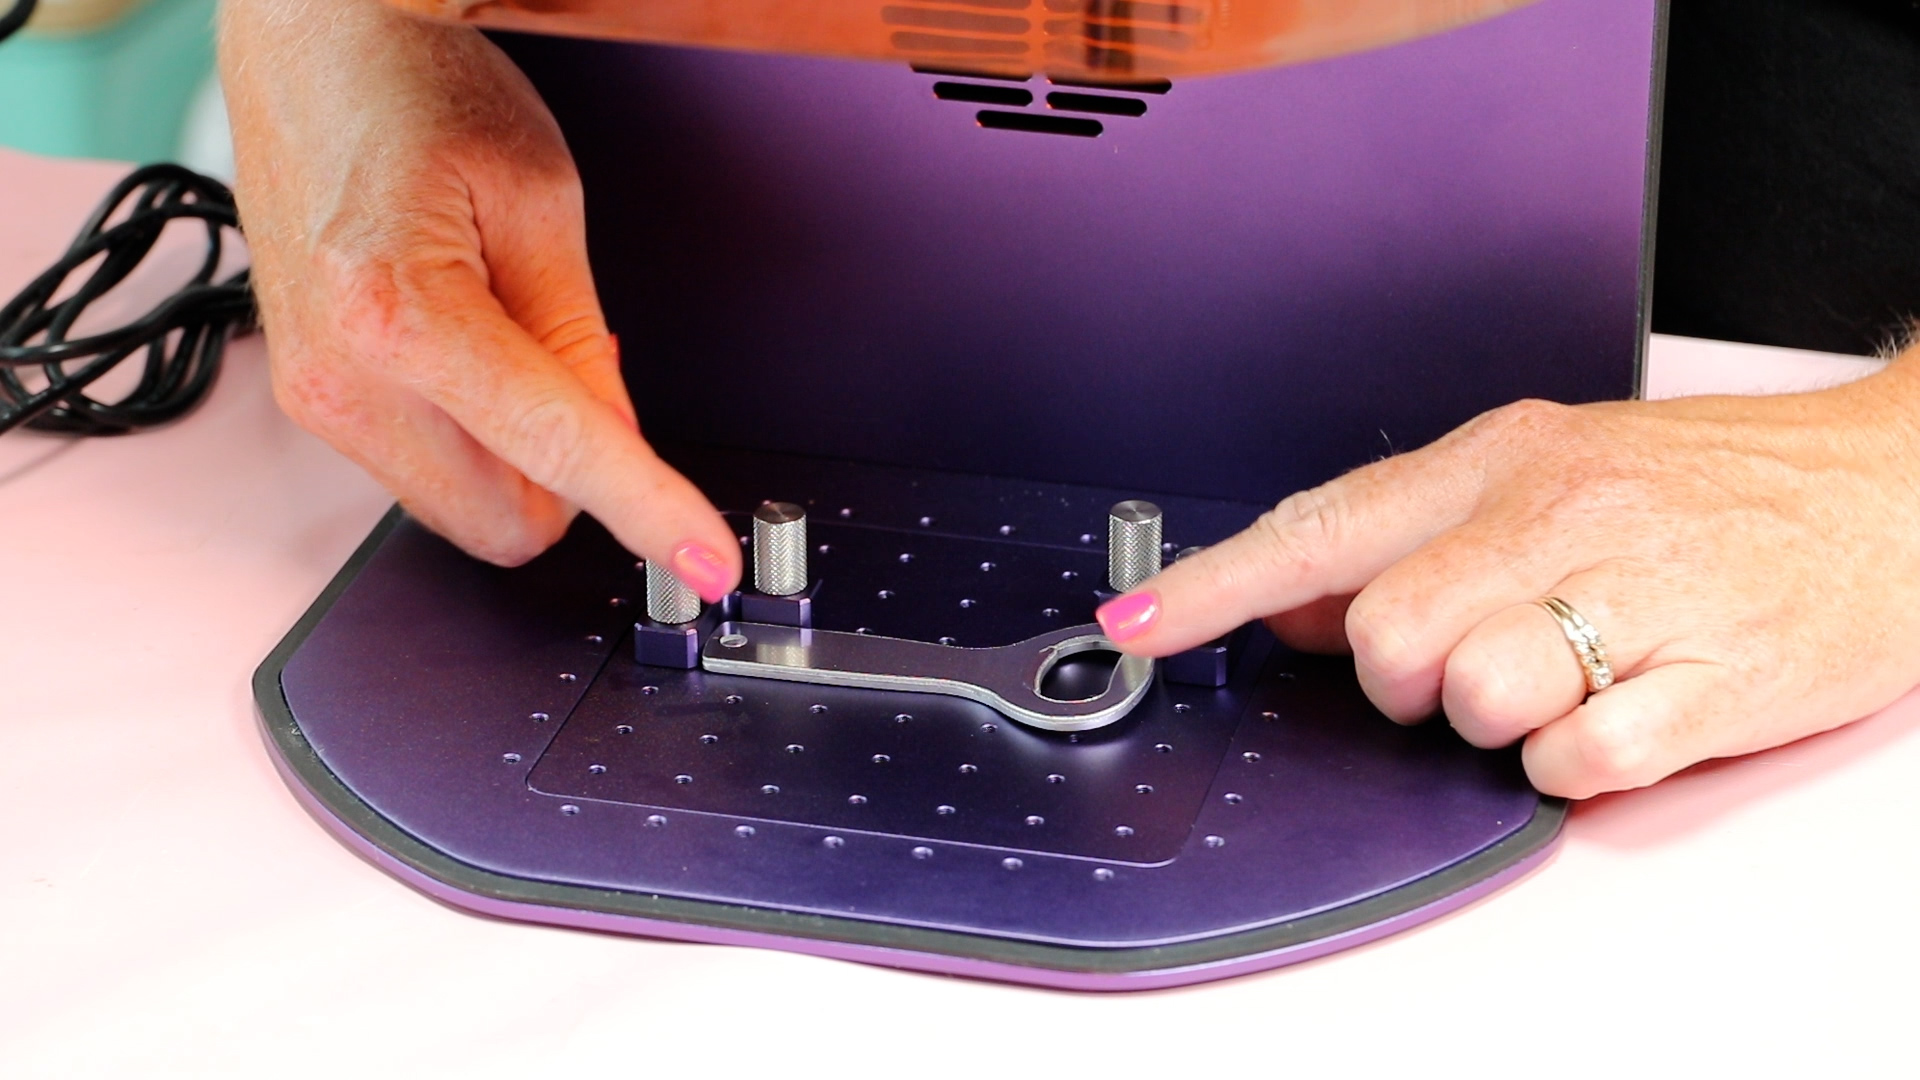
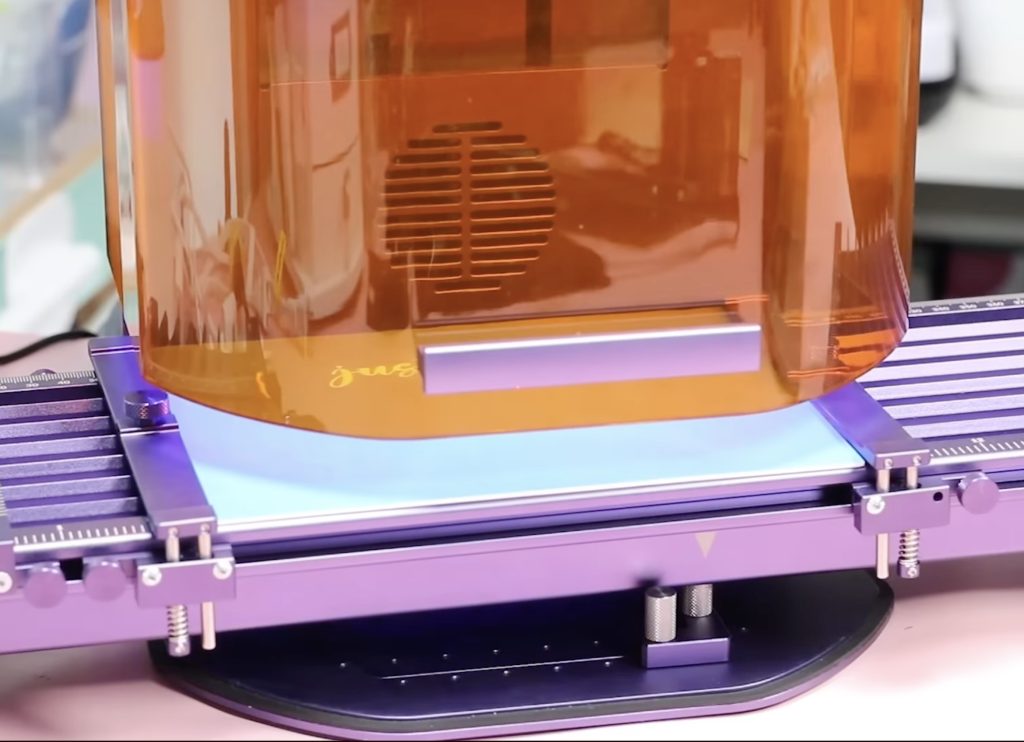
Laser Bed Options
There are multiple ways to use the WeCreate Lumos laser. The bottom of the laser is open, and you can leave it open if you want to engrave on large blanks like a board or a table.
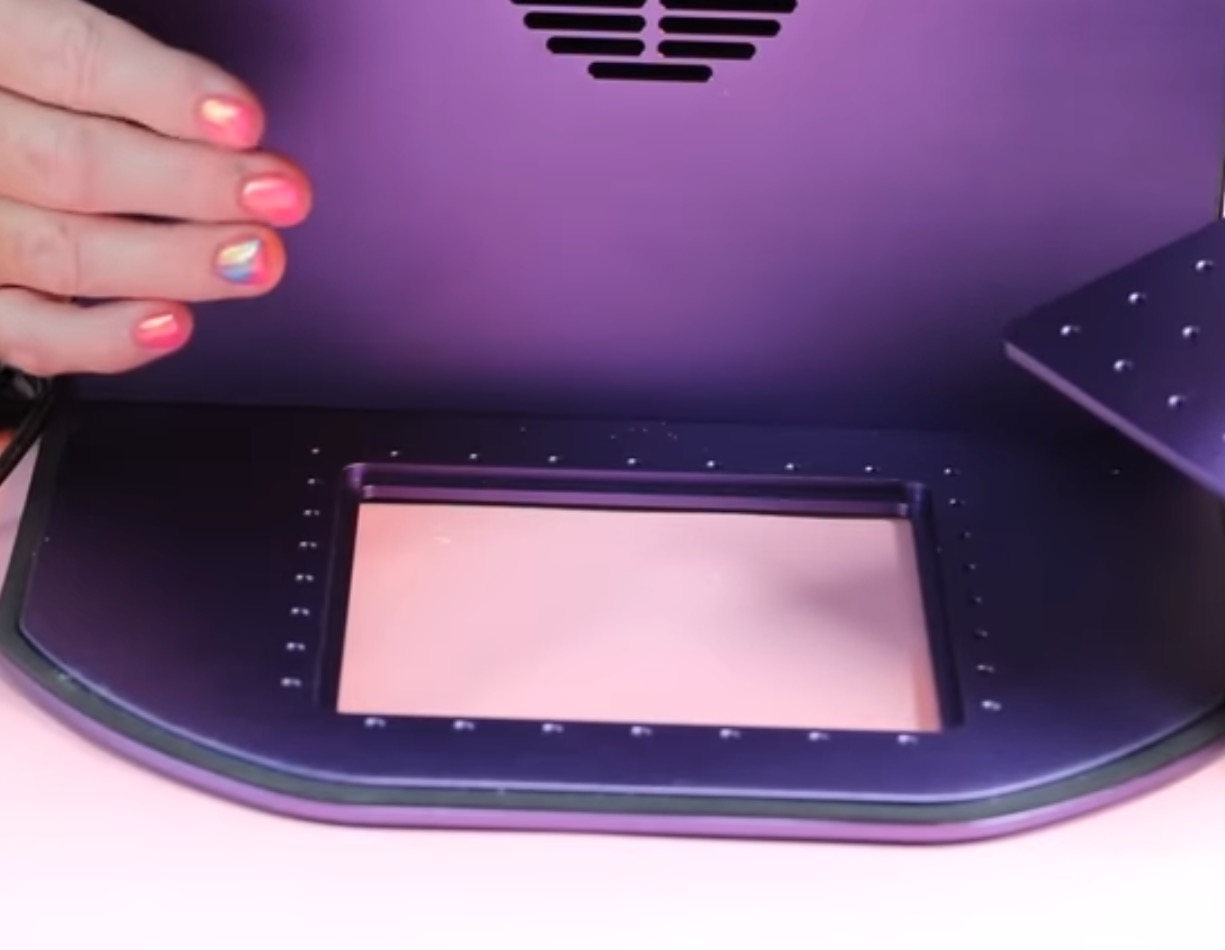
For engraving, add the purple metal piece that has holes in it.
You can also use the thumb screws, which will help you locate blanks so you can engrave multiple items all in the exact same place.

If you're using the laser to cut designs, add the raised bed on top of the engraving bed. Then you'd add your material on top and close the enclosure.
What is the Difference Between a Diode Laser and an Infrared Laser?
The Diode laser is a blue light laser that can cut and engrave a lot of different materials, including cast acrylic, wood, coated metals, and more. Diode lasers cannot cut clear acrylic or glass, and they may have issues with some light colored blanks
The Infrared laser is a red light laser that opens up a lot of engraving options. It engraves pretty deeply and very fast.
With these two laser heads, there are over 300 different materials the WeCreat Lumos laser can engrave and/or cut.
Unfortunately, I could never test all of those materials at once, so today we're going to test just a few of them.
Get my FREE Laser Ready course!
Learn everything you need to know about getting started with laser crafting with this free video and guide. We'll discuss the different laser options, how lasers work, and what types of materials you can use.
Making Projects with the WeCreat Lumos
I am making a few projects today to test this laser and let you see everything that it can do.
Supplies Used
- Book with Flowers File
- Monstera Leaf File
- Just One More Chapter File
- WeCreat Lumos
- Laser Safety Glasses
- Wood Box
- Leather Patch
- Holographic Tumbler
- Slate Coaster
- Metal Bottle Openers
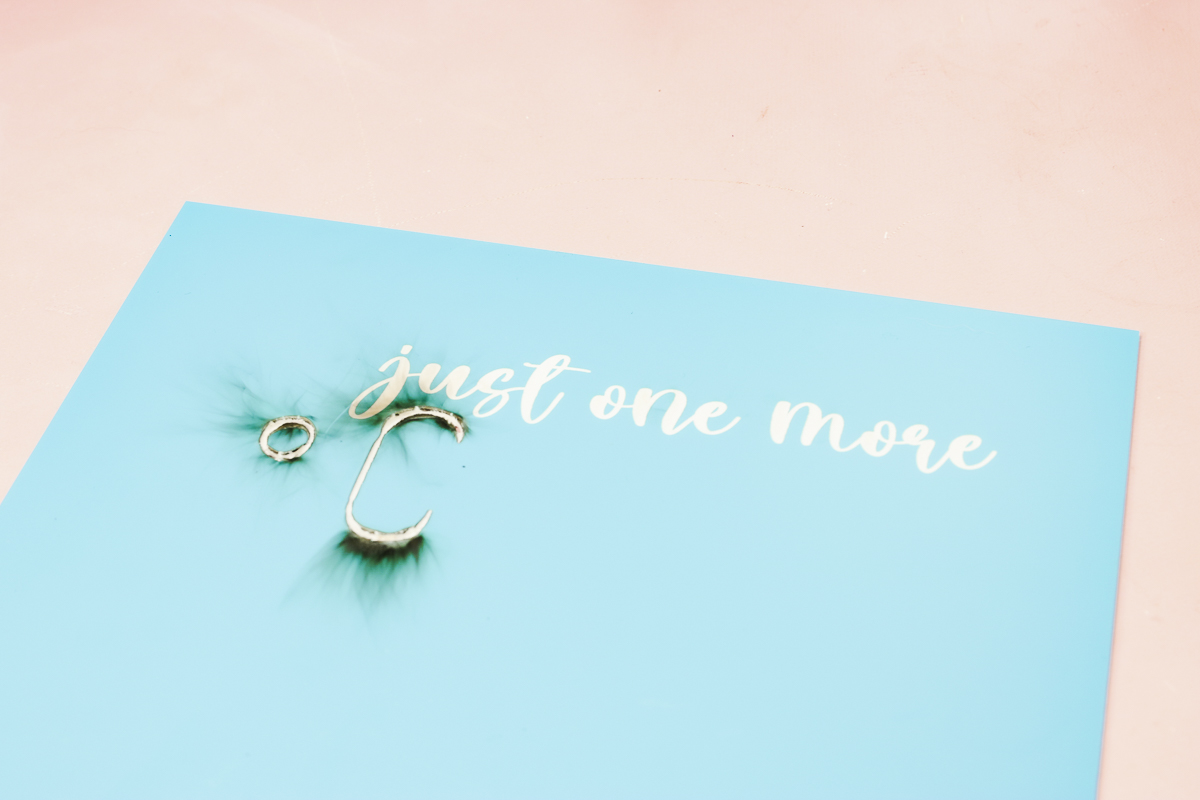
Step 1: Design File in WeCreat MakeIt
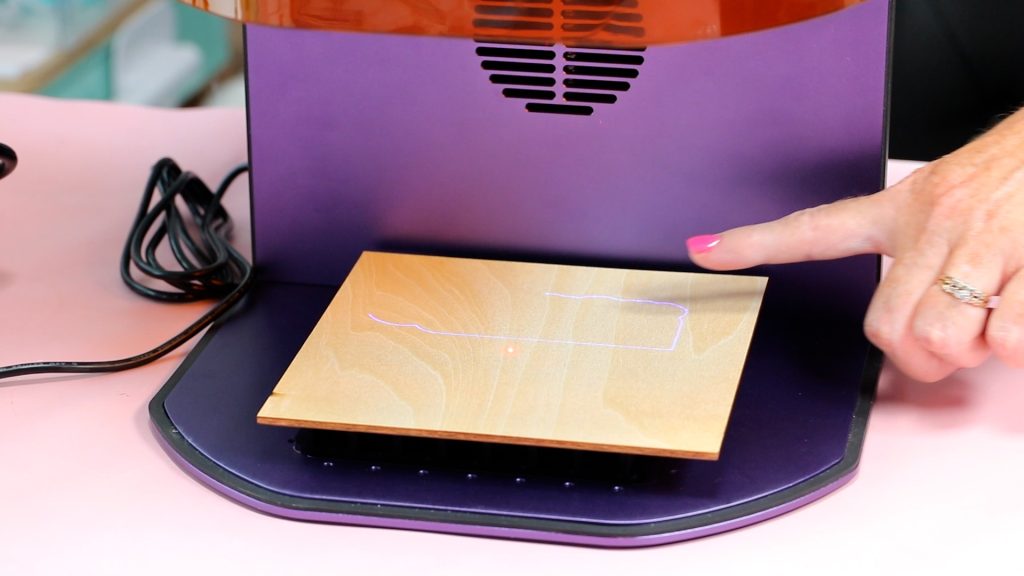
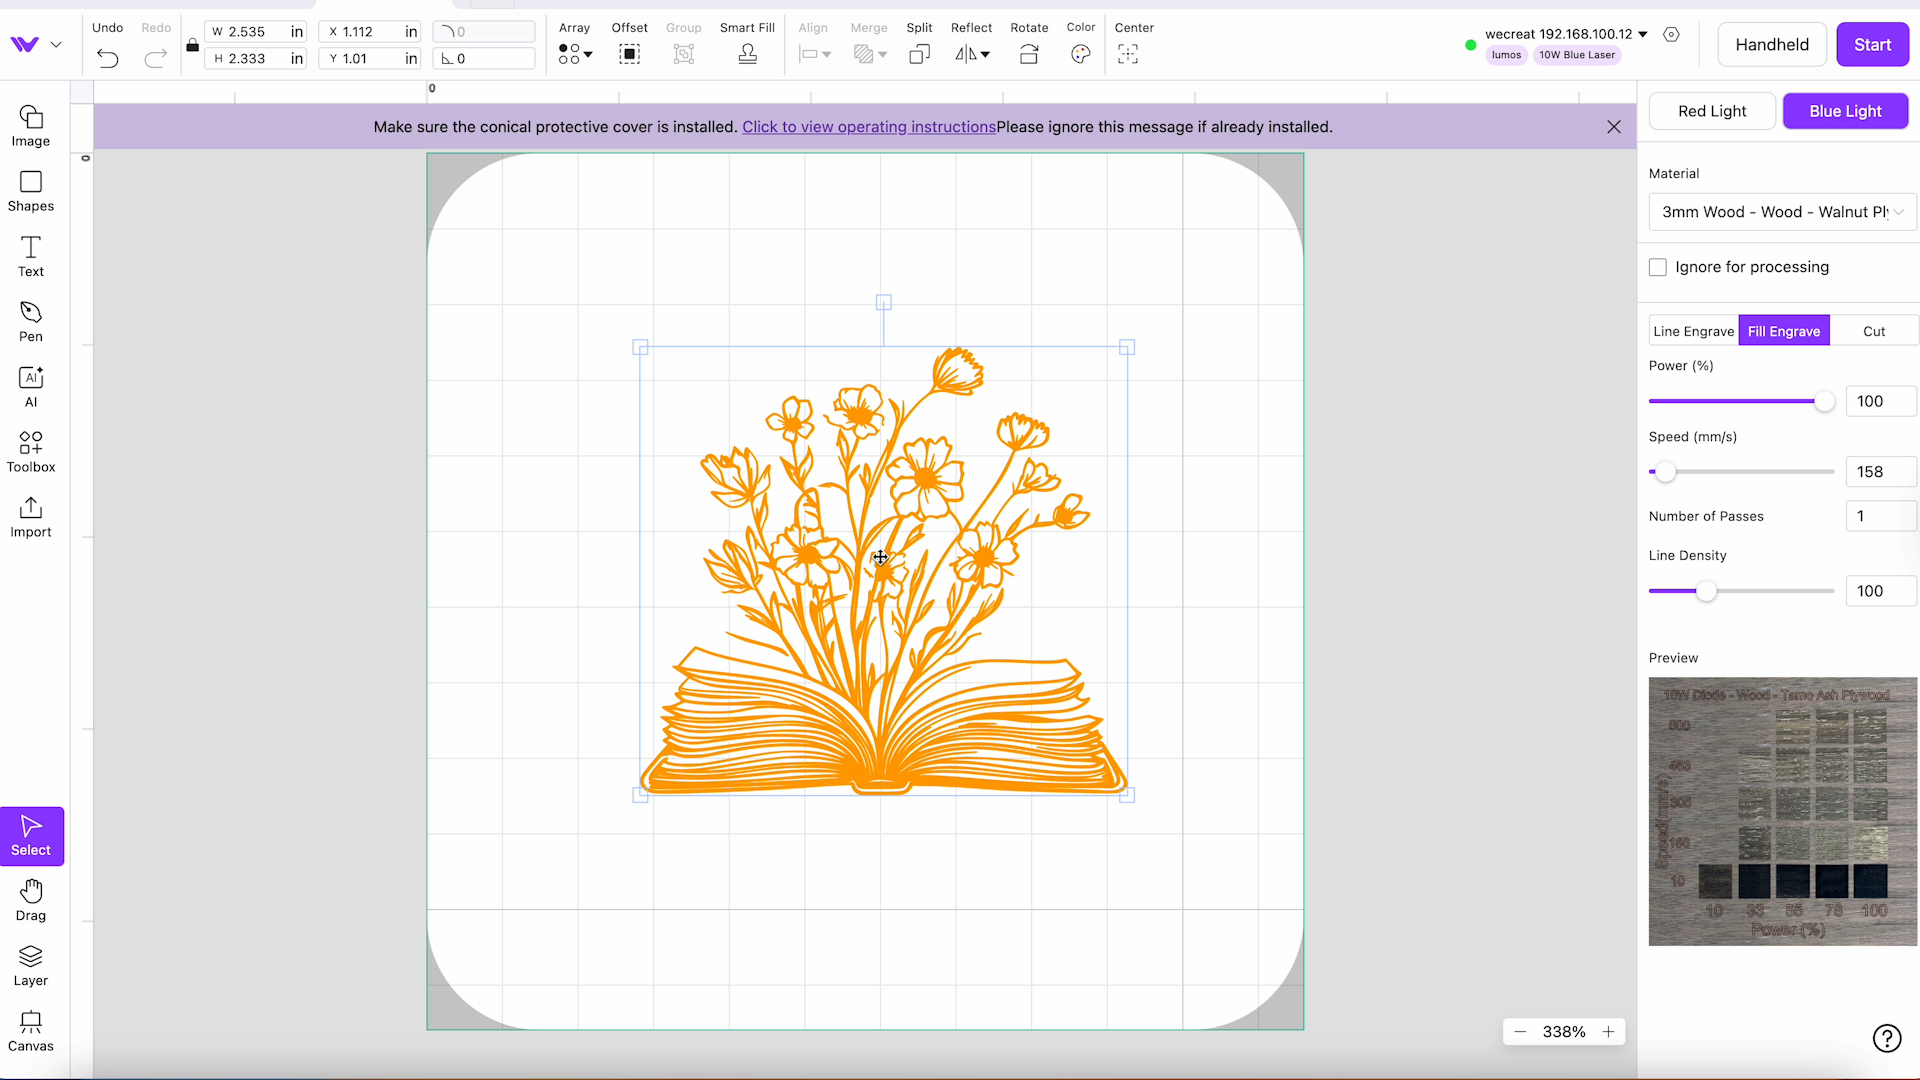
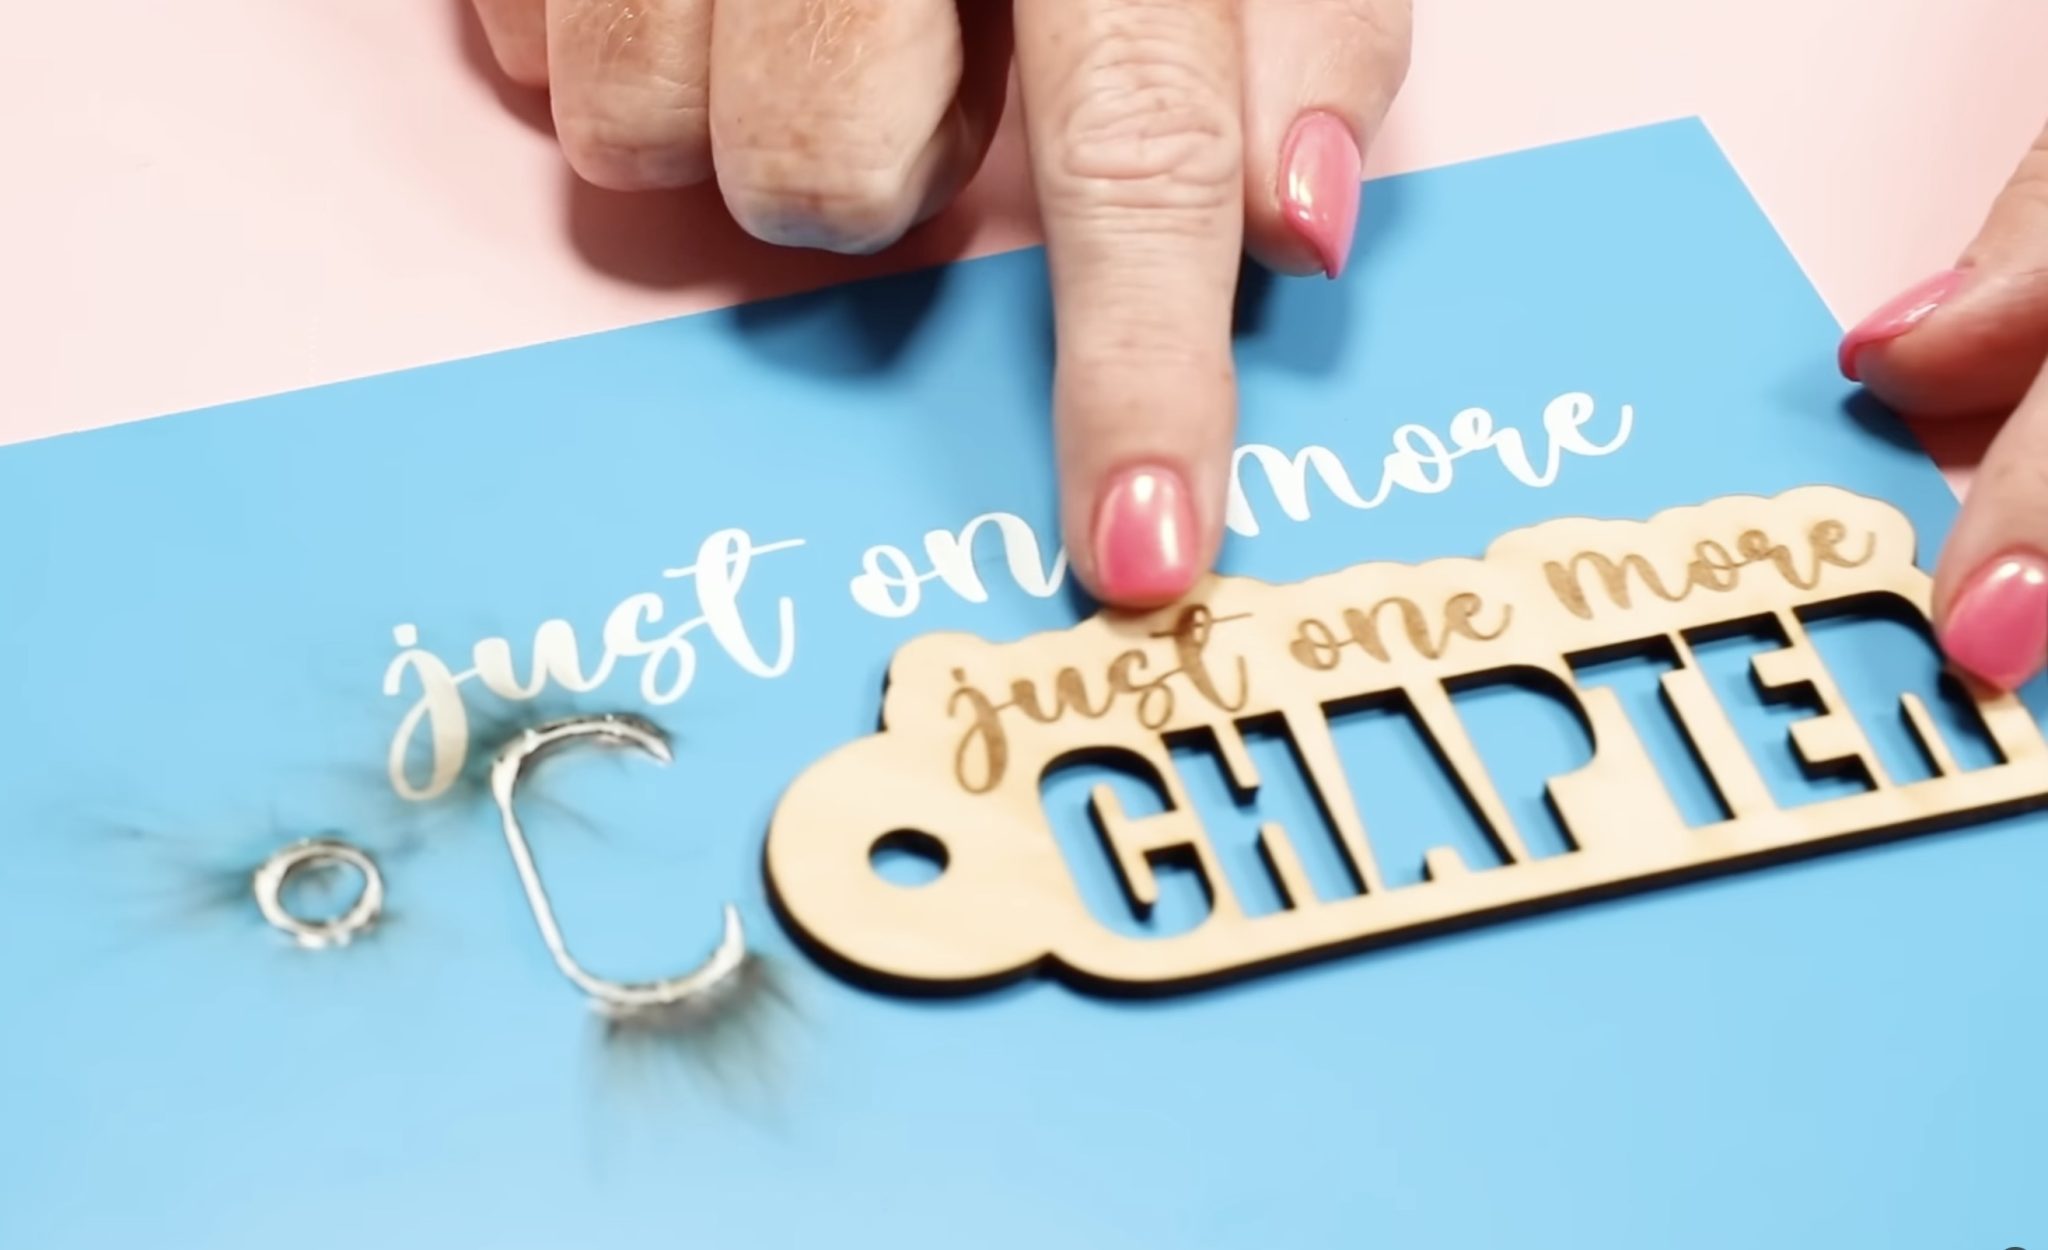
The first project I'm going to make is a bookmark, and I am going to have it cut and engrave the design.
Open WeCreate MakeIt! and click Import to import the file.
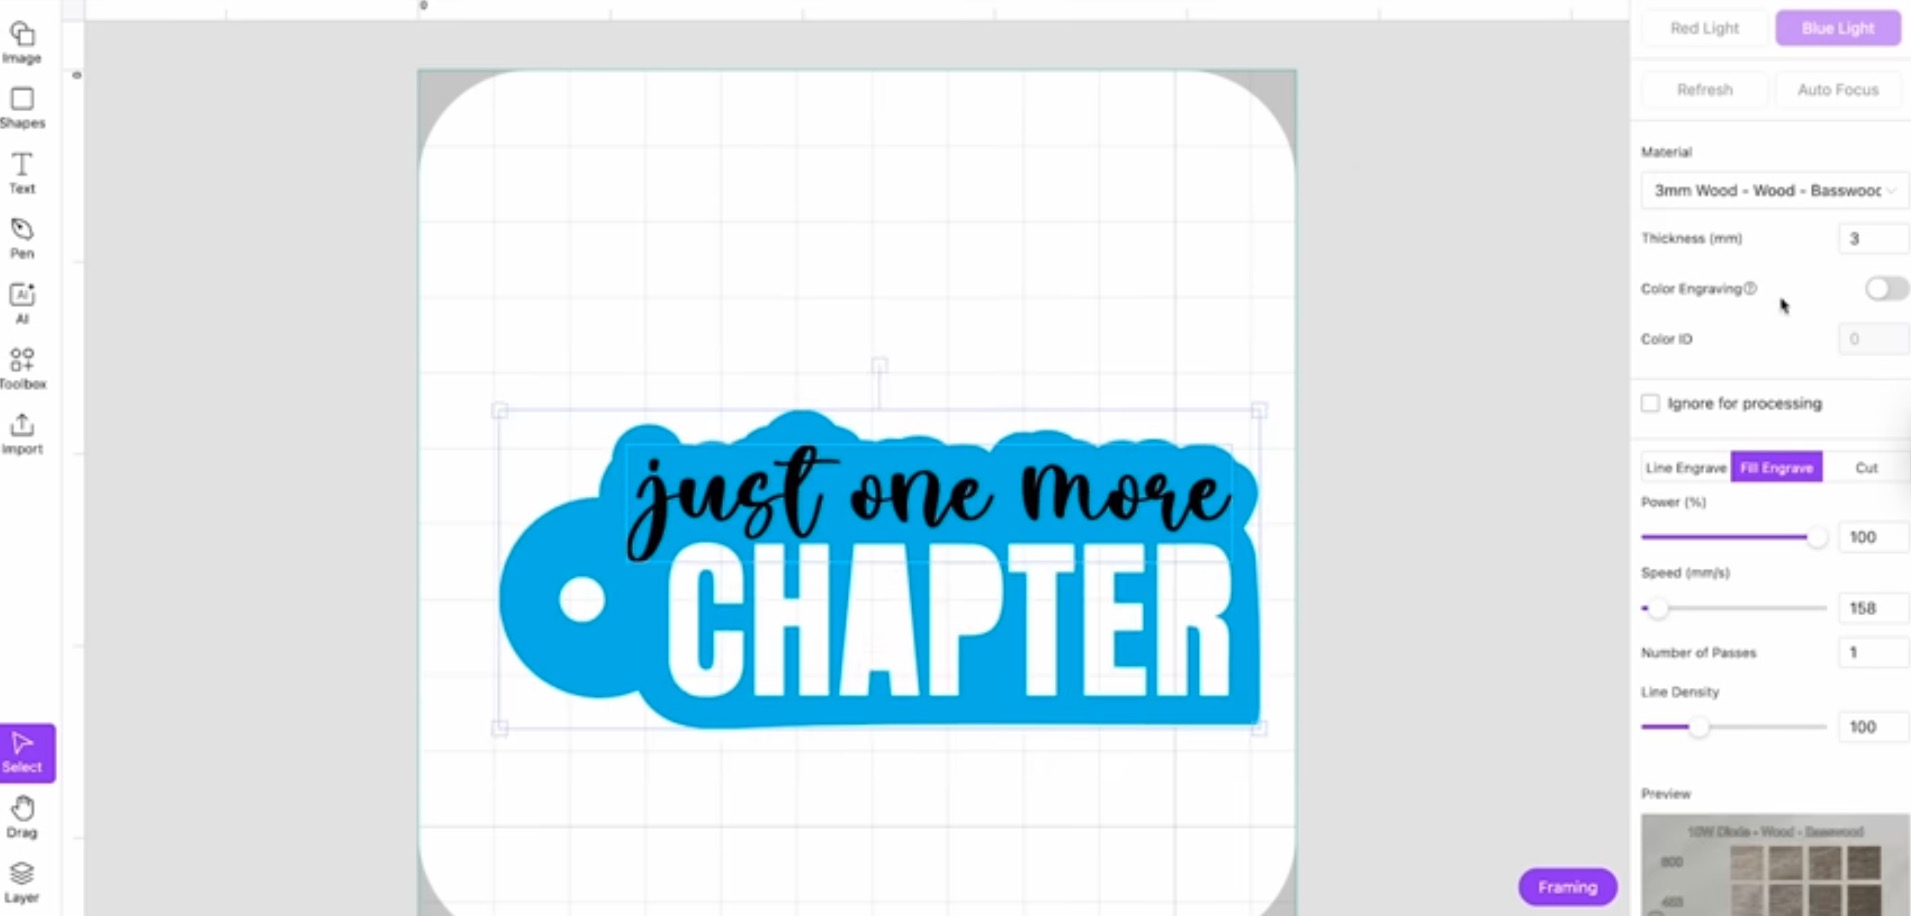
I set up my bookmark design so that Just One More will be engraved, and Chapter and the outer layer will be cut.
Now that we have our design set up, we're ready to cut out the bookmark.
Step 2: Add Material to Laser
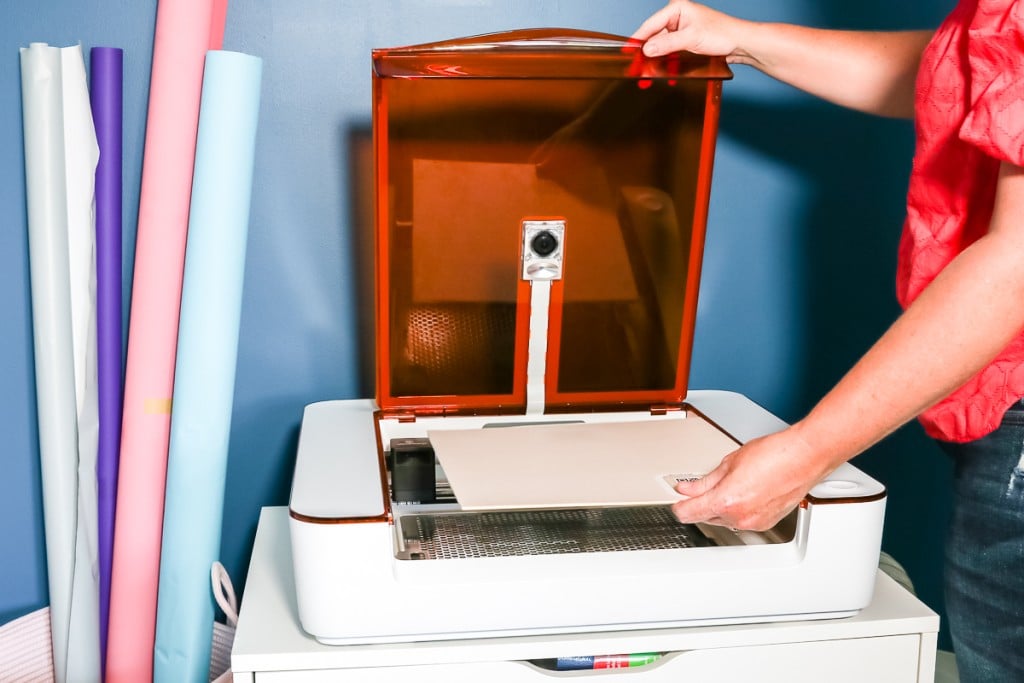
Add your material to the laser. Since I am engraving and cutting, I am using the raised bed and adding the wood on top of it.

With the wood in place, close the cover and turn the laser on using the button on the back. You'll hear the laser start up. It makes a loud noise when it starts, and there will be a noise while the laser is on and running.
Step 3: Focus the Laser
You can autofocus the laser by clicking Autofocus in the software or by holding down the AF button on the back of the laser.
You can also manually focus by using the knob to move the laser up and down. You'll see the two dots, and we want those to meet. Once the two dots overlap, the laser is focused.

Step 4: Locate Design on Material
With the laser focused, refresh, and you'll see the material that's in the laser. Now I can move the design around to make the most of my material.
You can also click the Framing button to help locate the design on the material.
There are two different framing options. The Rectangle Framing will show you where the design will be on the material with a light. This is very helpful. I can see where the material will cut and engrave, and if it's not in the right location, I can move it.
The other option is Outer Contour Framing. This tool shows you the actual outline of your design so you can see exactly where the outline will be cut.
Choose whichever framing tool you like best. The best tool may change depending on the project you're working on.
Step 5: Cut and Engrave Bookmark
With everything located correctly, shut the cover and click Start.
Because the material I'm using is basswood, I am using the diode laser.
After you click Start, you'll see the time estimate on the screen. This project will take about four minutes.
Click Send to send the command to the WeCreat Lumos. After you do that, you need to click the Start button on the top of the machine to start the process.
When the project is done, lift the cover and remove the finished project.
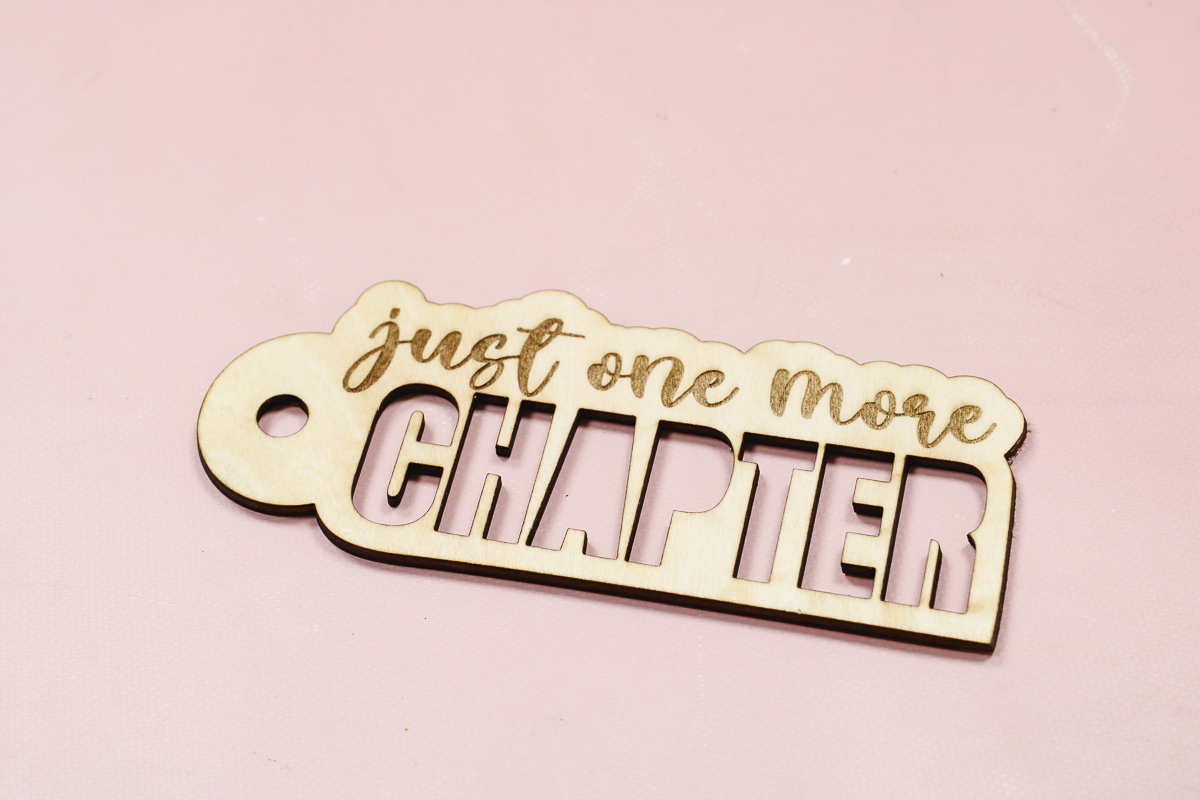
As you can see, this bookmark turned out awesome. It is engraved realy well and the cut lines are beautiful.
Other Flat Laser Projects
After finishing the bookmark, I made a few more projects with the same setup.
With the Standard setup, I was able to cut and engrave on wood, engrave on slate, and engrave on leather.

All of these projects were made with the blue light/diode laser.
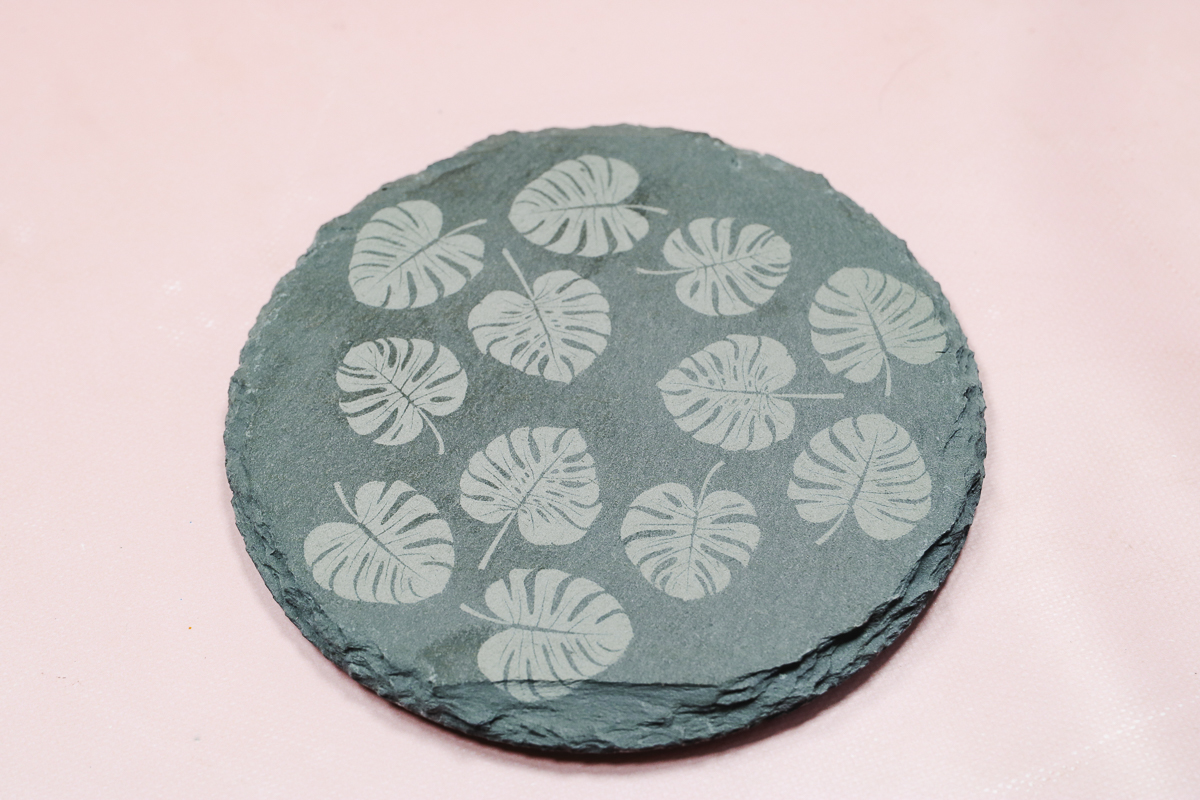
The engraving with the blue light laser worked really well on both the leather and the coaster. I'm really happy with those results.
How to Engrave on Metal with Infrared Laser
Next, I'm going to switch to the Infrared laser to do color engraving on metal. To do this, turn on Color Engraving in MakeIt!
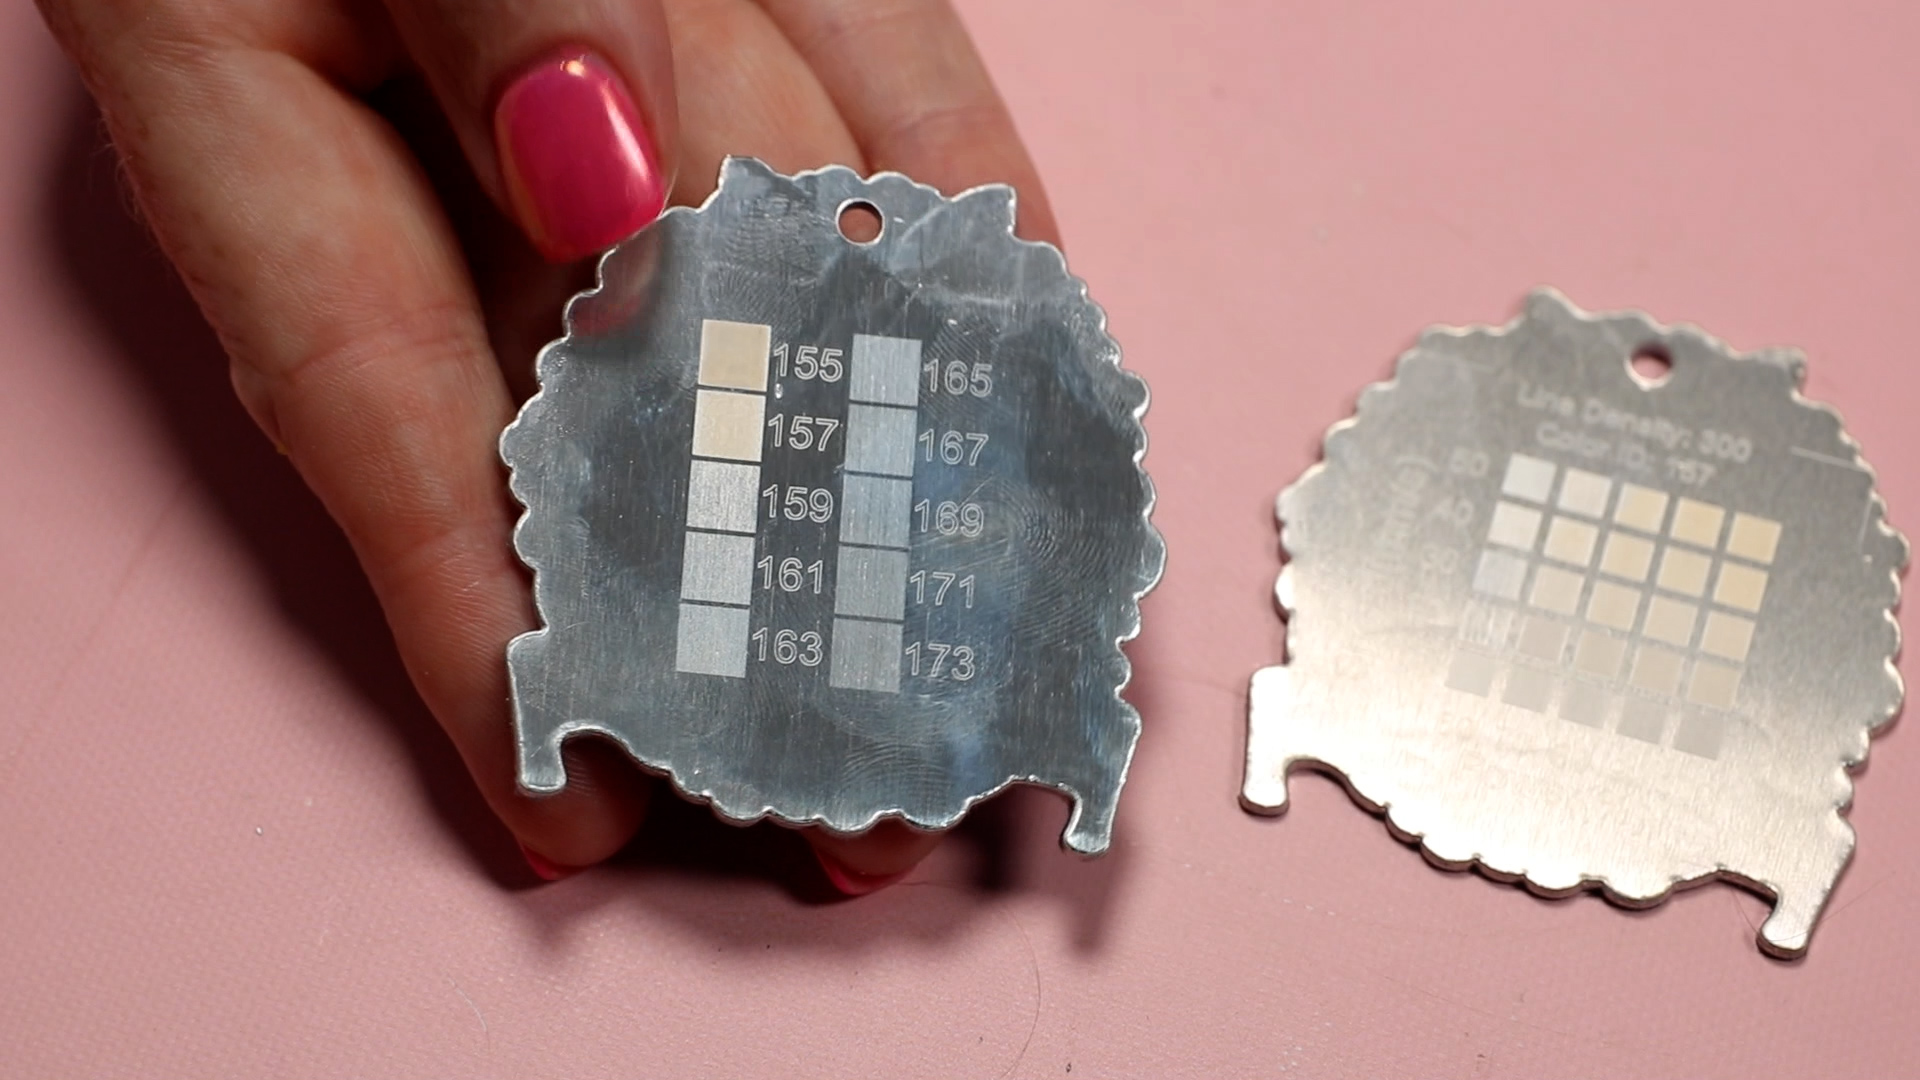
Step 1: Create the Color Engraving Test Pieces
The first time you turn on Color Engraving, it's going to have you run tests. Click Toolbox and Color Engraving Test. Follow the steps on the screen to create the test piece with the reference numbers so you can choose the setting you like best for your project.
For my project, I liked the yellow and orange best, so I chose the number that corresponded to the yellow. After selecting the yellow, I was prompted to engrave a second grid where I could choose the speed and power settings to get the color I wanted on my project.
Step 2: Add Metal Blank to the Laser Bed
Add the blank to the laser. I am using the guides so I can create multiple projects with the engraving in the same location every time.
You want the blank close to the center of the bed so your machine can measure the thickness with the focus tool.
Step 3: Engrave Metal Blank with Red Light Laser
With the metal blank on the bed, turn on the machine. I am going to engrave my name on the bottle opener.
I'm doing a Fill Engrave with the Infrared laser selected.
Next, I am going to add the Color ID and the settings indicated by the test grid.
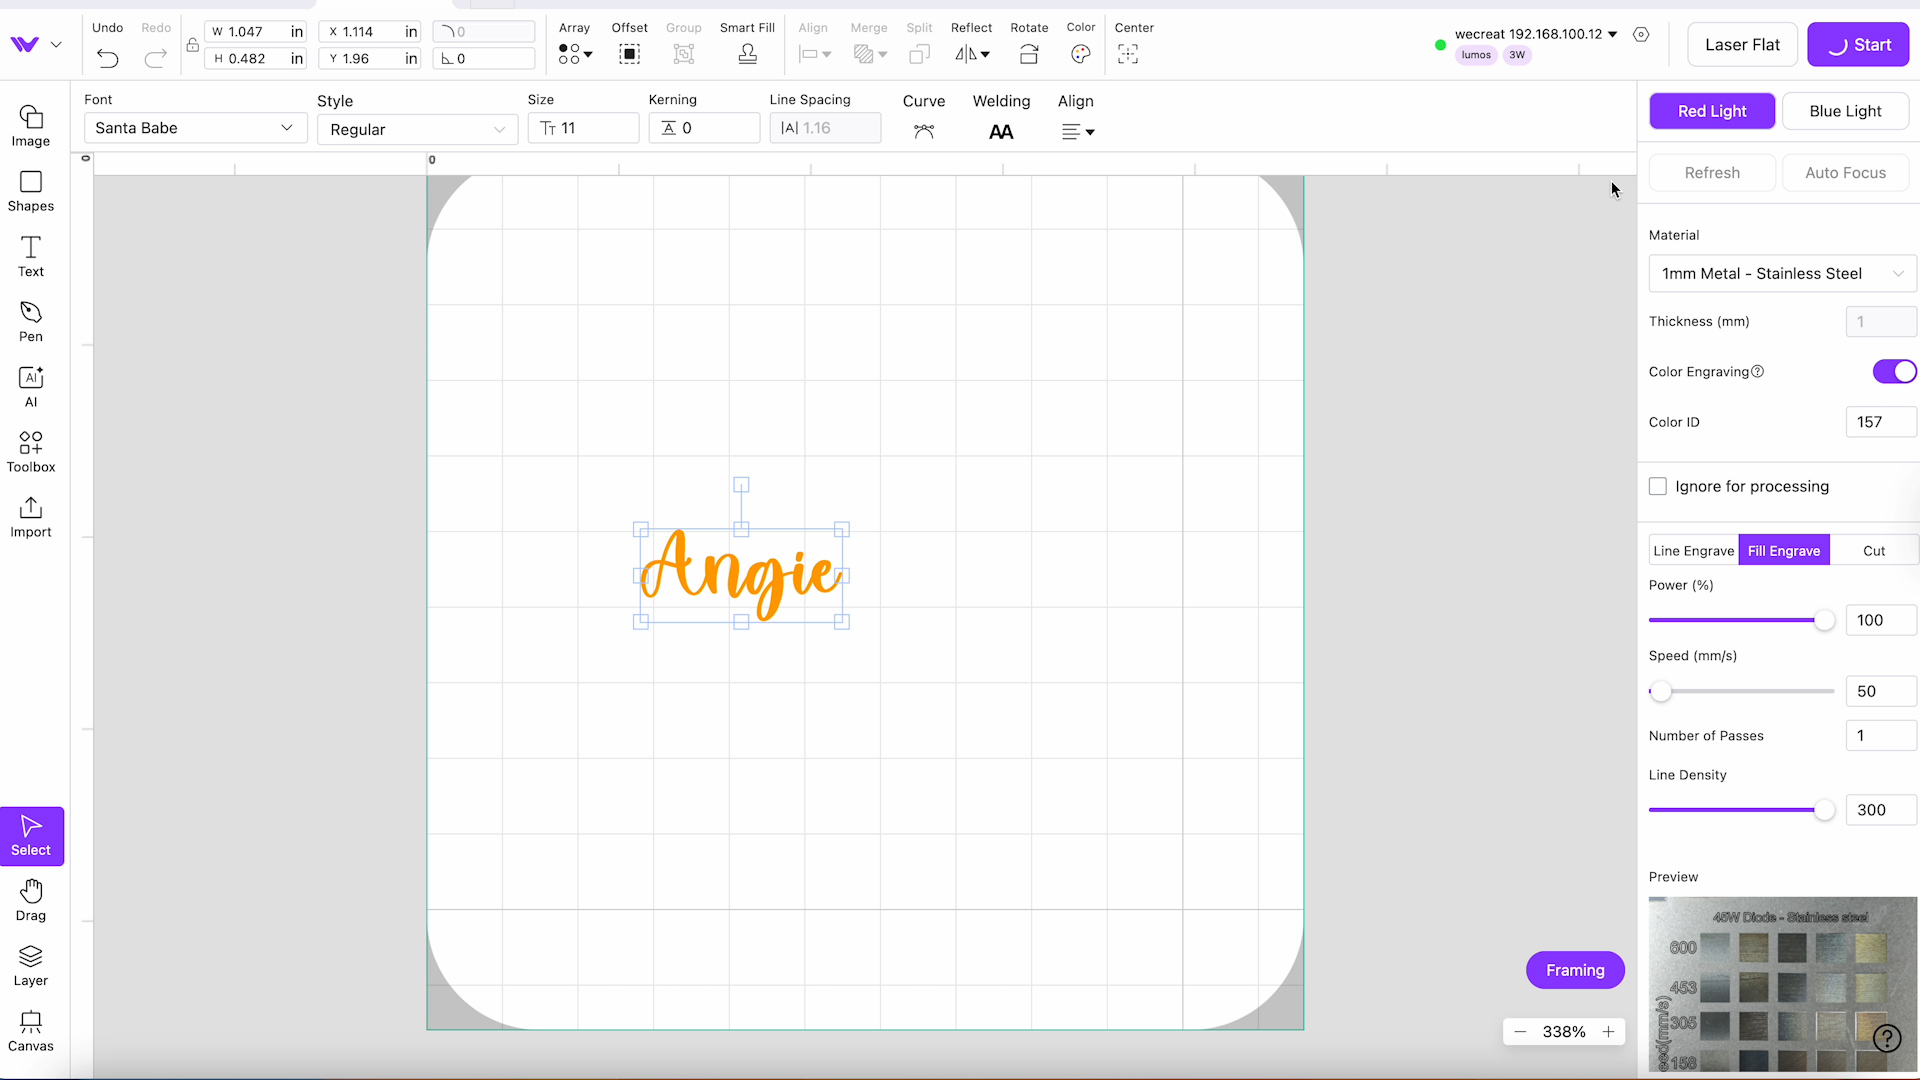
Click Framing and ensure everything is located where I want, and click Start. Once engraving is complete, remove your project from the laser.
Comparison of Engraved Metal Bottle Owners
The first project was made with regular metal settings. With these settings, the engraving looks very white.
On the second bottle opener, I used the color settings, and it resulted in an orange-yellow engraved look.

This is a really fun effect. You can change the settings to get different colors on different types of metal. I think you're really going to like this feature. I will be doing a future blog post with a more in-depth tutorial on this as well as a multi-color design!
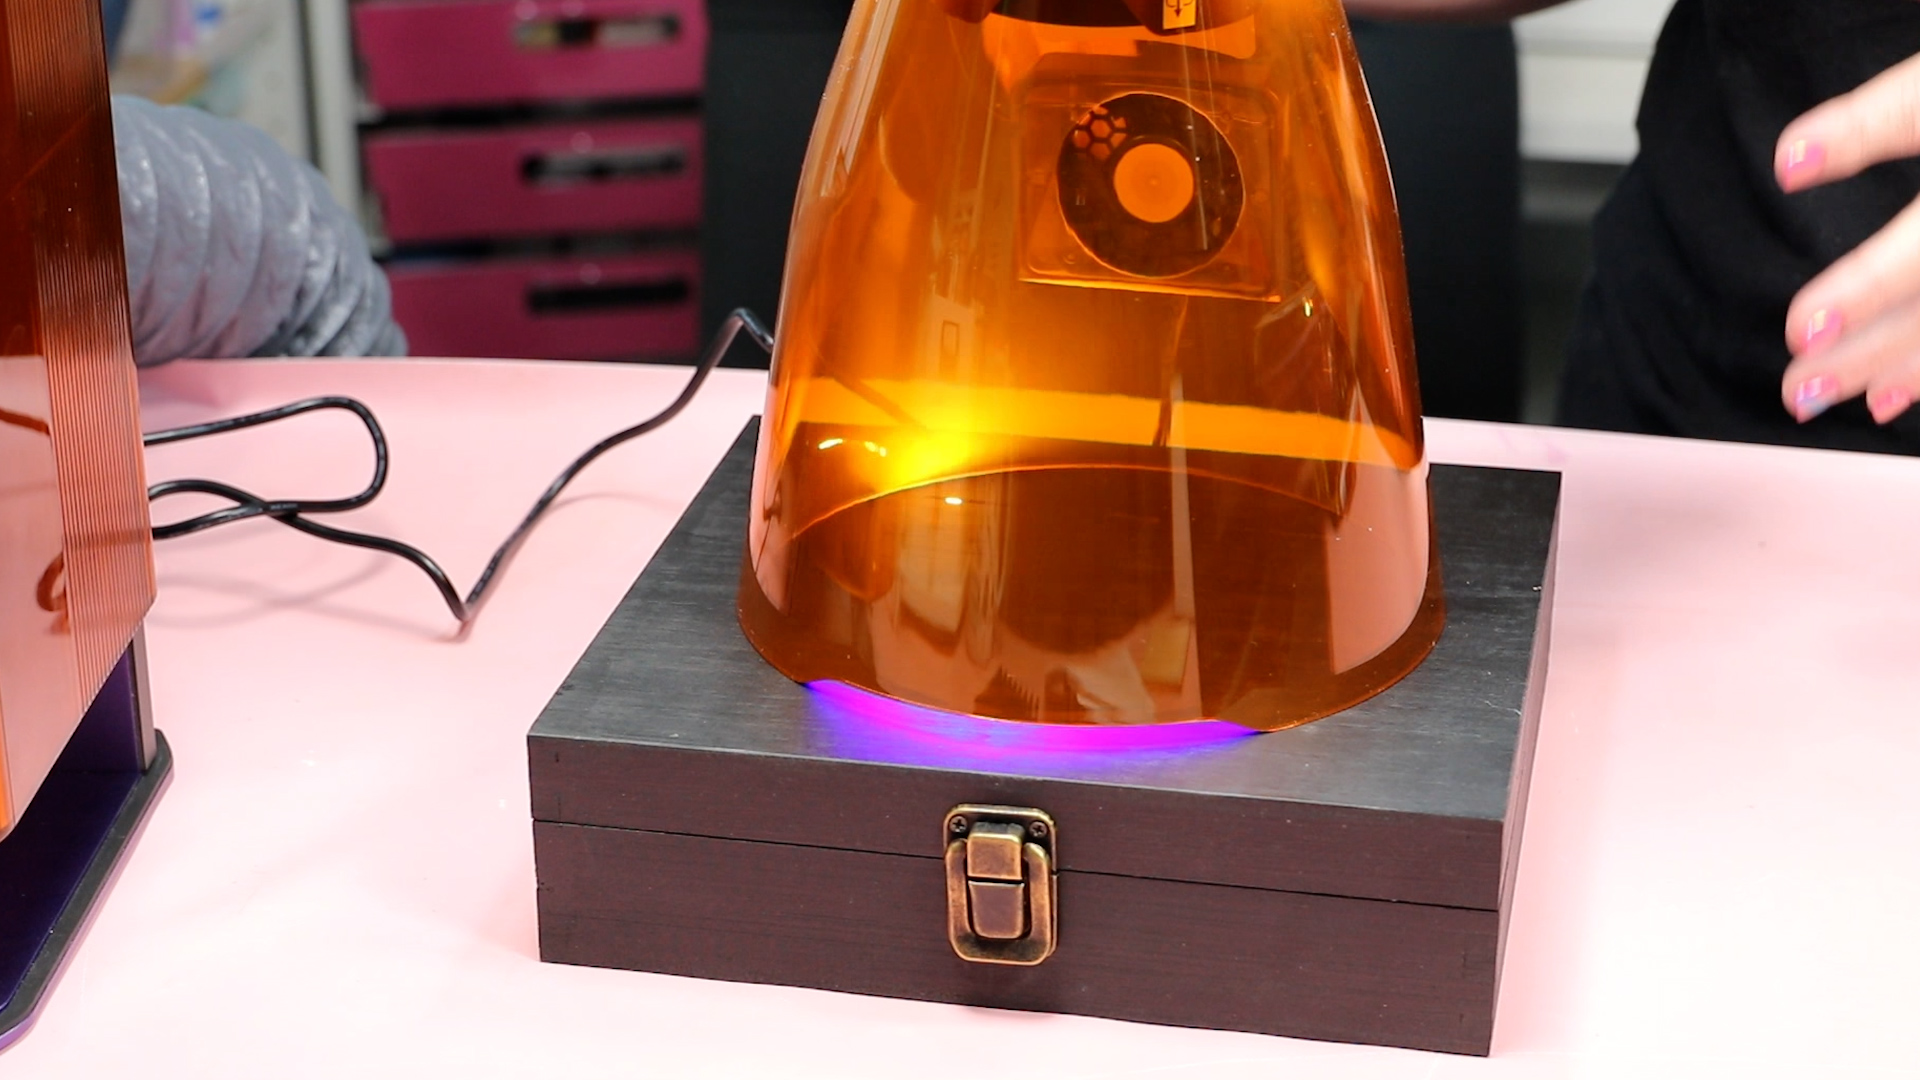
How to Engrave on Large Blanks with the Cone Accessory
For my next project, I'm going to engrave on a large blank.
I have this wooden box and I want to engrave in the middle of the lid. I can't fit the box inside the laser with the standard setup, so I'm going to use the Magnetic Protective Cone accessory.
Step 1: Add WeCreat Lumos Laser to Protective Cone
To use this accessory, loosen the screw on the inside and lift the laser portion out of the WeCreat Lumos base.

The cone accessory is magnetic and protects your eyes from the laser. Drop the laser into the protector until it clicks into place.
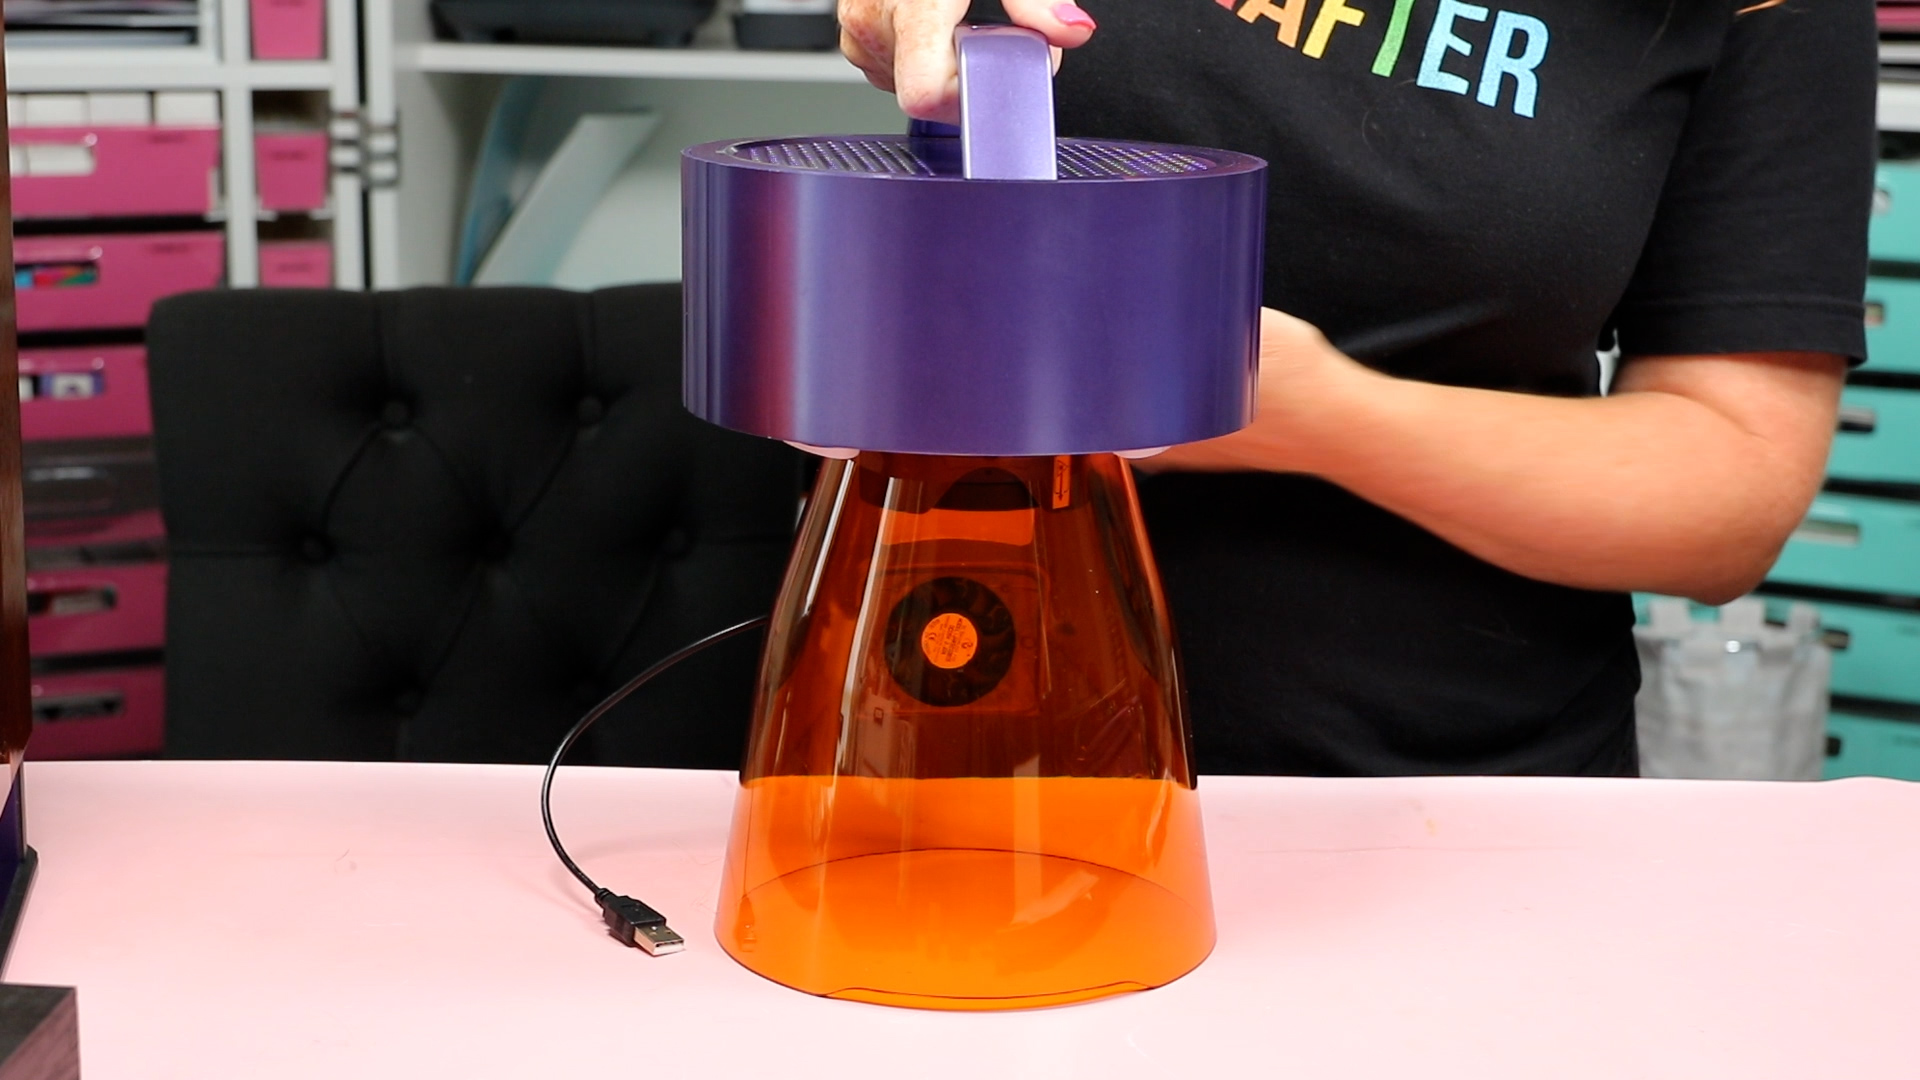
Connect the USB cord on the cover to the laser and then plug in the power cord. Turn the machine on and in the software instead of selecting Laser Flat, click Handheld.
Step 2: Set Up Project in Software
Since I'm engraving on a wooden box, I'm using the diode laser. On the screen, select the wood that most closely matches the wood you're engraving on.
Since I'm using a darker wood, I sketched the image and changed it to a fill engrave.
Step 3: Engrave the Wood Box with WeCreat Lumos
Add the handheld laser to the middle of the box. When looking at the preview, I chose a Power of 100 and a Speed of 100.
Click Start, and you can use the framing tool with the protective cone, but with the cover on, I found it hard to see.
I lined everything up the best I could and clicked Send, and then pressed Start on the top of the laser.
There is a fan on the back, but there is no way to hook this setup to an air filter or to vent it outside. Make sure you always use this in a well-ventilated area.
When it's done, lift the laser up and you'll see the finished product.

Tips for Using the WeCreat Lumos Magnetic Protective Cone
The Lumos engraved the wood beautifully. I did realize that I had the laser set up opposite of what I wanted.
I wanted the book facing the other way. Be aware that whatever it looks like on your screen is the way it's going to engrave.
Since I couldn't see the framing with the shield in place, I found it difficult to locate, and my design ended up a little crooked.
Take your time when locating the laser to get the best results using the protective cone.
How to Use the Rotary Accessory
The next accessory I'm testing is the rotary accessory. This is an additional accessory that you can purchase as a bundle with the laser or on its own.
When you purchase the rotary accessory, it comes with pieces to help you level your tumblers.
There are chuck pieces and screws that you can use with different types of tumblers, mugs, and other objects that are cylinders. There is also a tool to tighten and loosen the screws, a tape measure, and a level.
Step 1: Add the Tumbler to the Rotary Accessory
To get the tumbler to stay in place, I added extra chuck pieces with the included screws. With those pieces in place, the tumbler is secure, and I can use the level to ensure it's set up correctly.
This tumbler is tapered, so it won't be level from top to bottom. My goal is to have the top flatter area level.
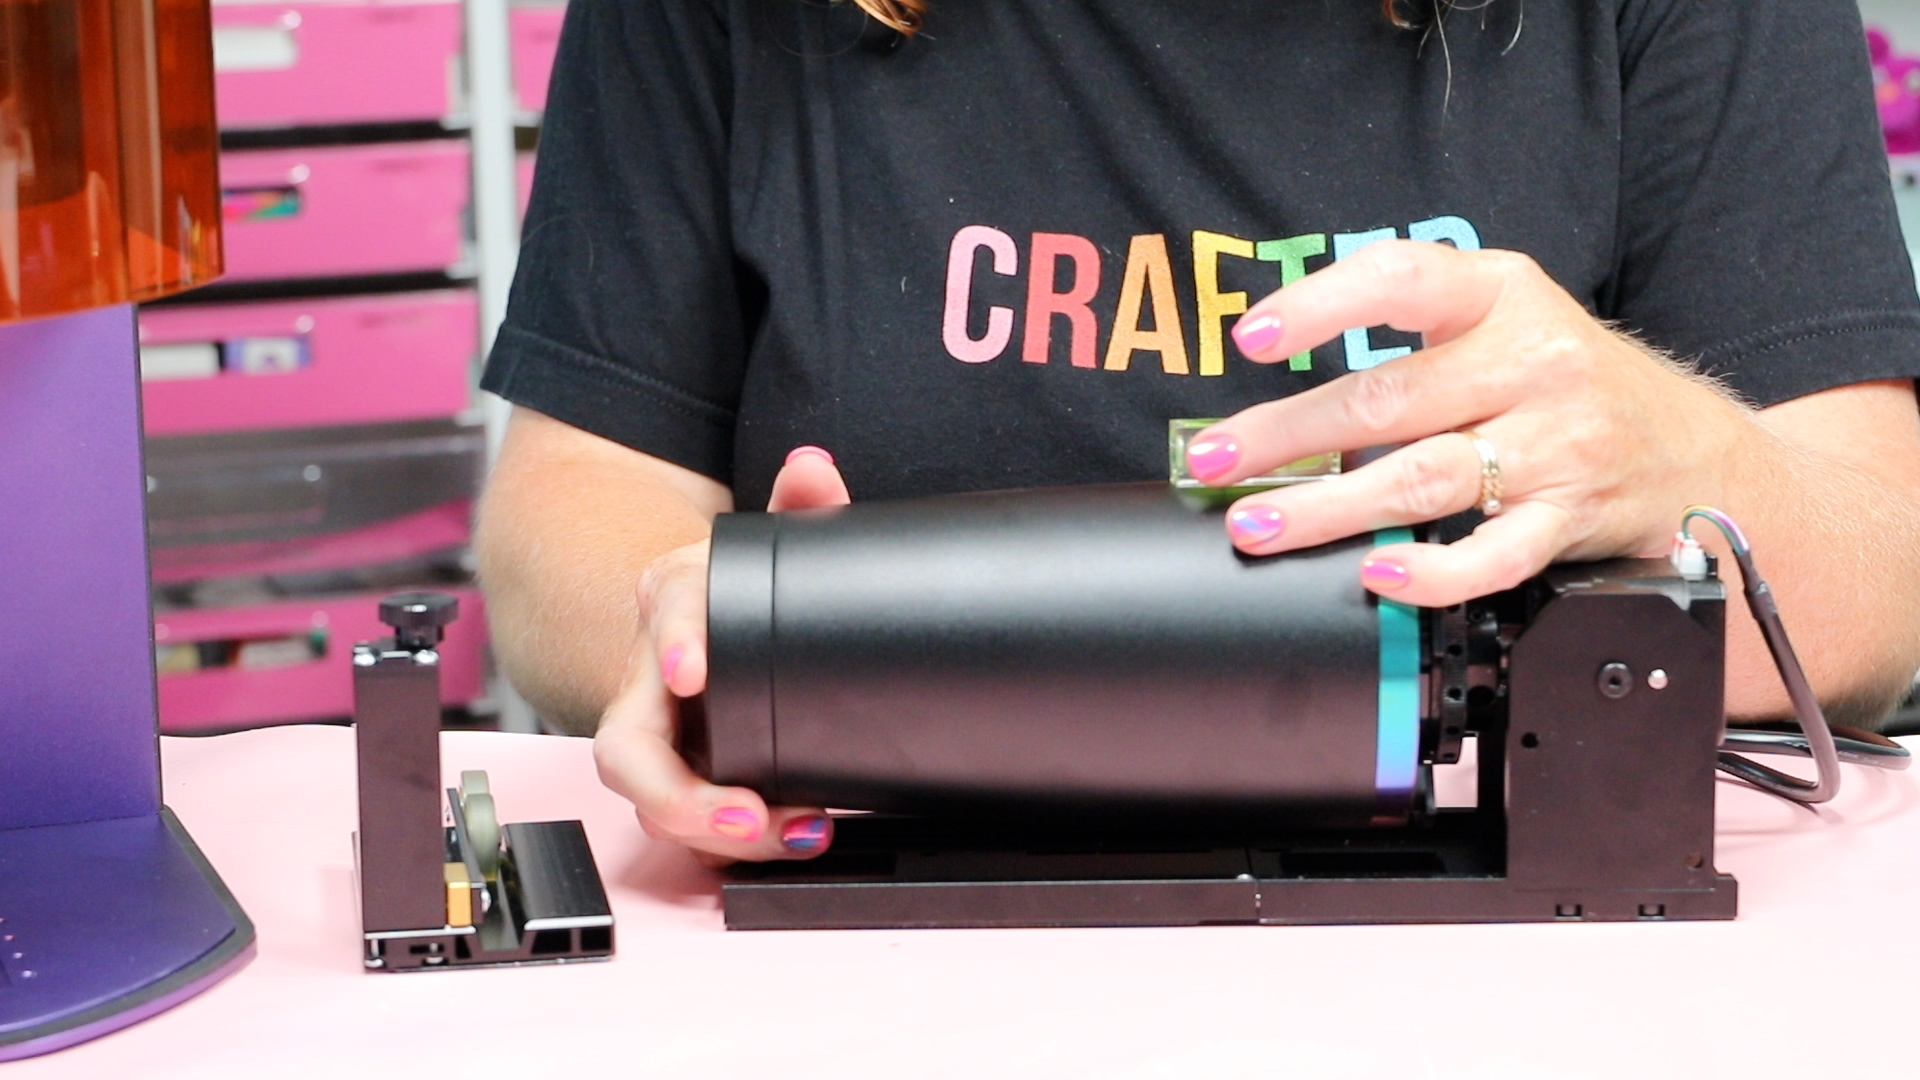
Step 2: Hook the Rotary Accessory Up to the WeCreat Lumos
The rotary assembly has a plug that attaches to the back of the laser. Where you plug it in is labeled Rotary.
Add the rotary assembly to the laser bed. If needed, there are holes in the base of the rotary assembly you can use to secure it in place with screws. I used it without using the screws and didn't have any issues.
Step 3: Prep Tumbler for Engraving
With the tumbler on the rotary accessory, measure the perimeter. Again, the tumbler is tapered so the measurement won't be the same at the top and the bottom.
I measured near the center and used that measurement in WeCreat MakeIt!
Step 4: Create Design in WeCreat MakeIt!
Within WeCreat MakeIt, change the laser setup to Laser Cylindrical. Put the perimeter measurement in the program, and it will calculate the diameter for you.
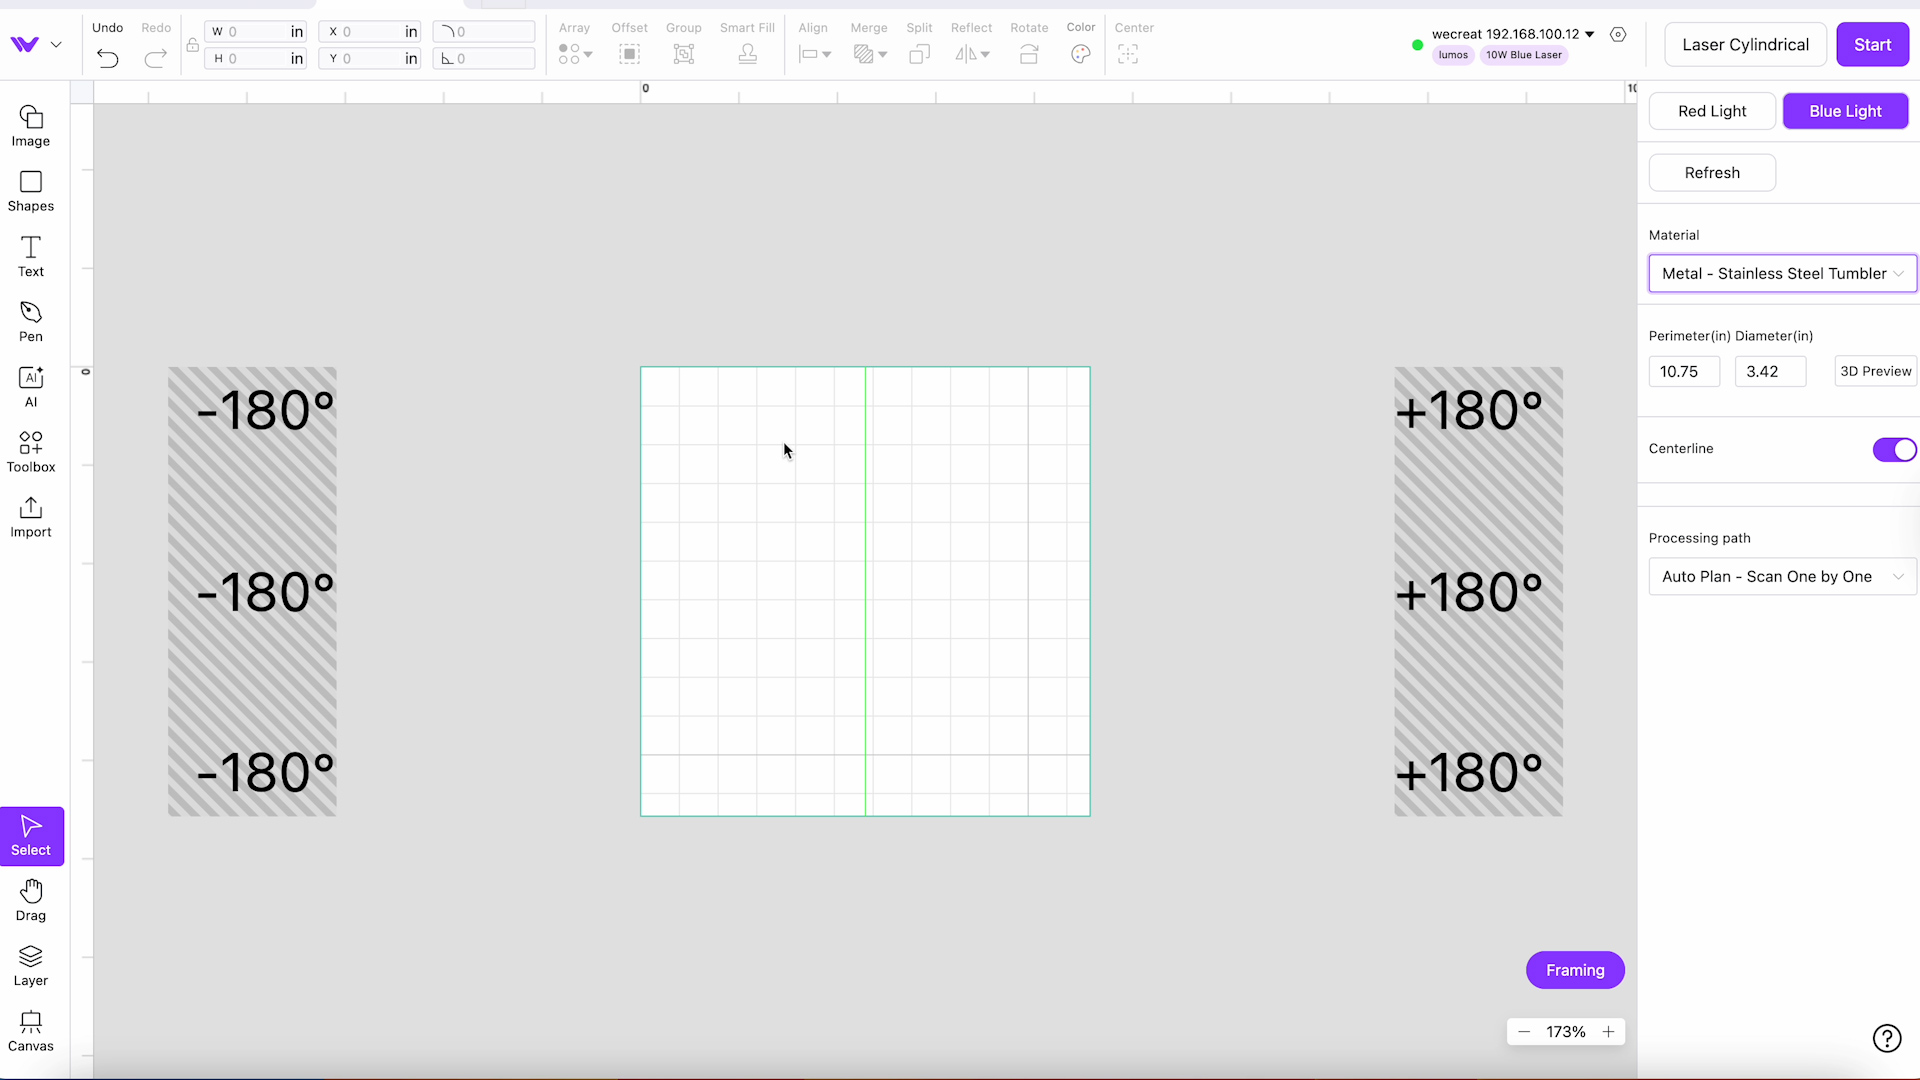
I changed the material to “Stainless Steel Tumbler” and chose the color black to match my blank.
Step 5: Upload and Resize the Design
I uploaded my image and then cropped and rotated it so it would fit on my tumbler. I want the design to wrap all the way around my tumbler without overlapping, so I edited the image and removed two leaves.
Now that the design fits, I'm going to change the way it engraves. Instead of engraving the entire design, I am going to have it sketch the outline. When it's done, remove the original image.

My design is slightly larger than the surface area, which works with this design because the leaves don't overlap. Making it a little larger will give it the full wrap look on the tumbler.
Step 6: Frame the Design on the Tumbler
I changed my engraving to a Line Engrave. With the rotary accessory and tumbler in place, click Framing. You'll see that the tumbler rotates, and it'll show you where it is going to engrave.
It can be hard to tell where the framing area is, so you can repeat the framing process as many times as you need.
Step 7: Focus the Laser on the Tumbler
For this tumbler, I am doing a manual focus. Line up the dots and then click 3D Preview. You can select the type of tumbler, and that will give you a better idea of what the design will look like on the tumbler.
Step 8: Engrave the Tumbler with WeCreat Lumos
With everything in place and set up, close the laser.
Note – the lid does not shut all the way with this setup. Make sure you use it in a well-ventilated area. Some of the fumes will vent out the window or through the air filter accessory, but some fumes will escape into the area.
When the laser is done, lift the cover and remove the tumbler from the rotary accessory. Wipe down the surface to remove any dust, and your tumbler is ready to use.
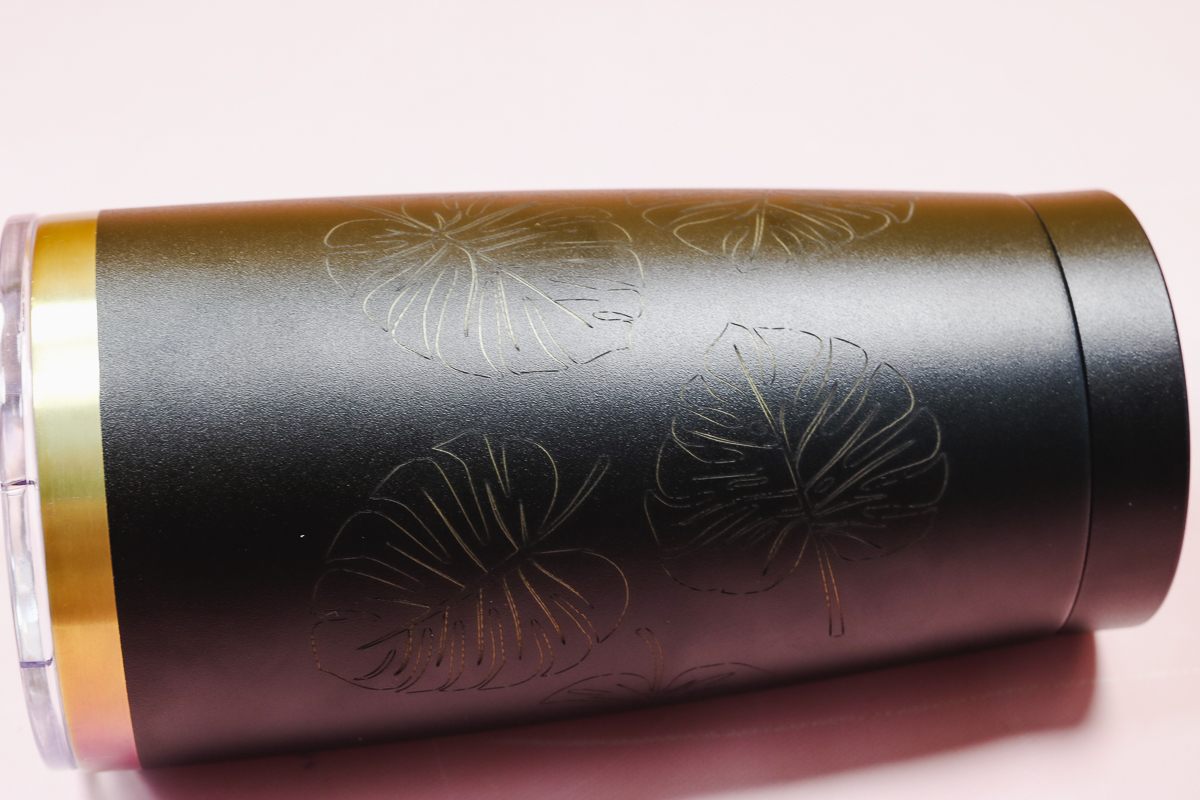
The engravings look great. This tumbler has a rainbow holographic finish that is exposed when the top layer is removed with engraving. I really like the way this project turned out. The holographic rainbow is subtle but looks awesome with the fine line engravings.
How to Use the WeCreat Lumos Slide Extension
The WeCreat Lumos slide extension is another accessory you can purchase that will make the laser even more versatile. It allows you to do multiple projects at one time or larger projects because the extension slides in and out, enlarging the working area.
Step 1: Install the Slide Extension
The slide extension comes mostly assembled. Add the L-shaped pieces to your base to attach the slide extension.
I did find it a little tricky to install. There is an arrow that indicates where the first L-shaped bracket should be located. Line up the arrow with the first screw and ensure the back one is in place.
You should be able to put your hand behind the slide, make sure you're not installing it too far back. The front L-shaped bracket should be in the front row of holes.
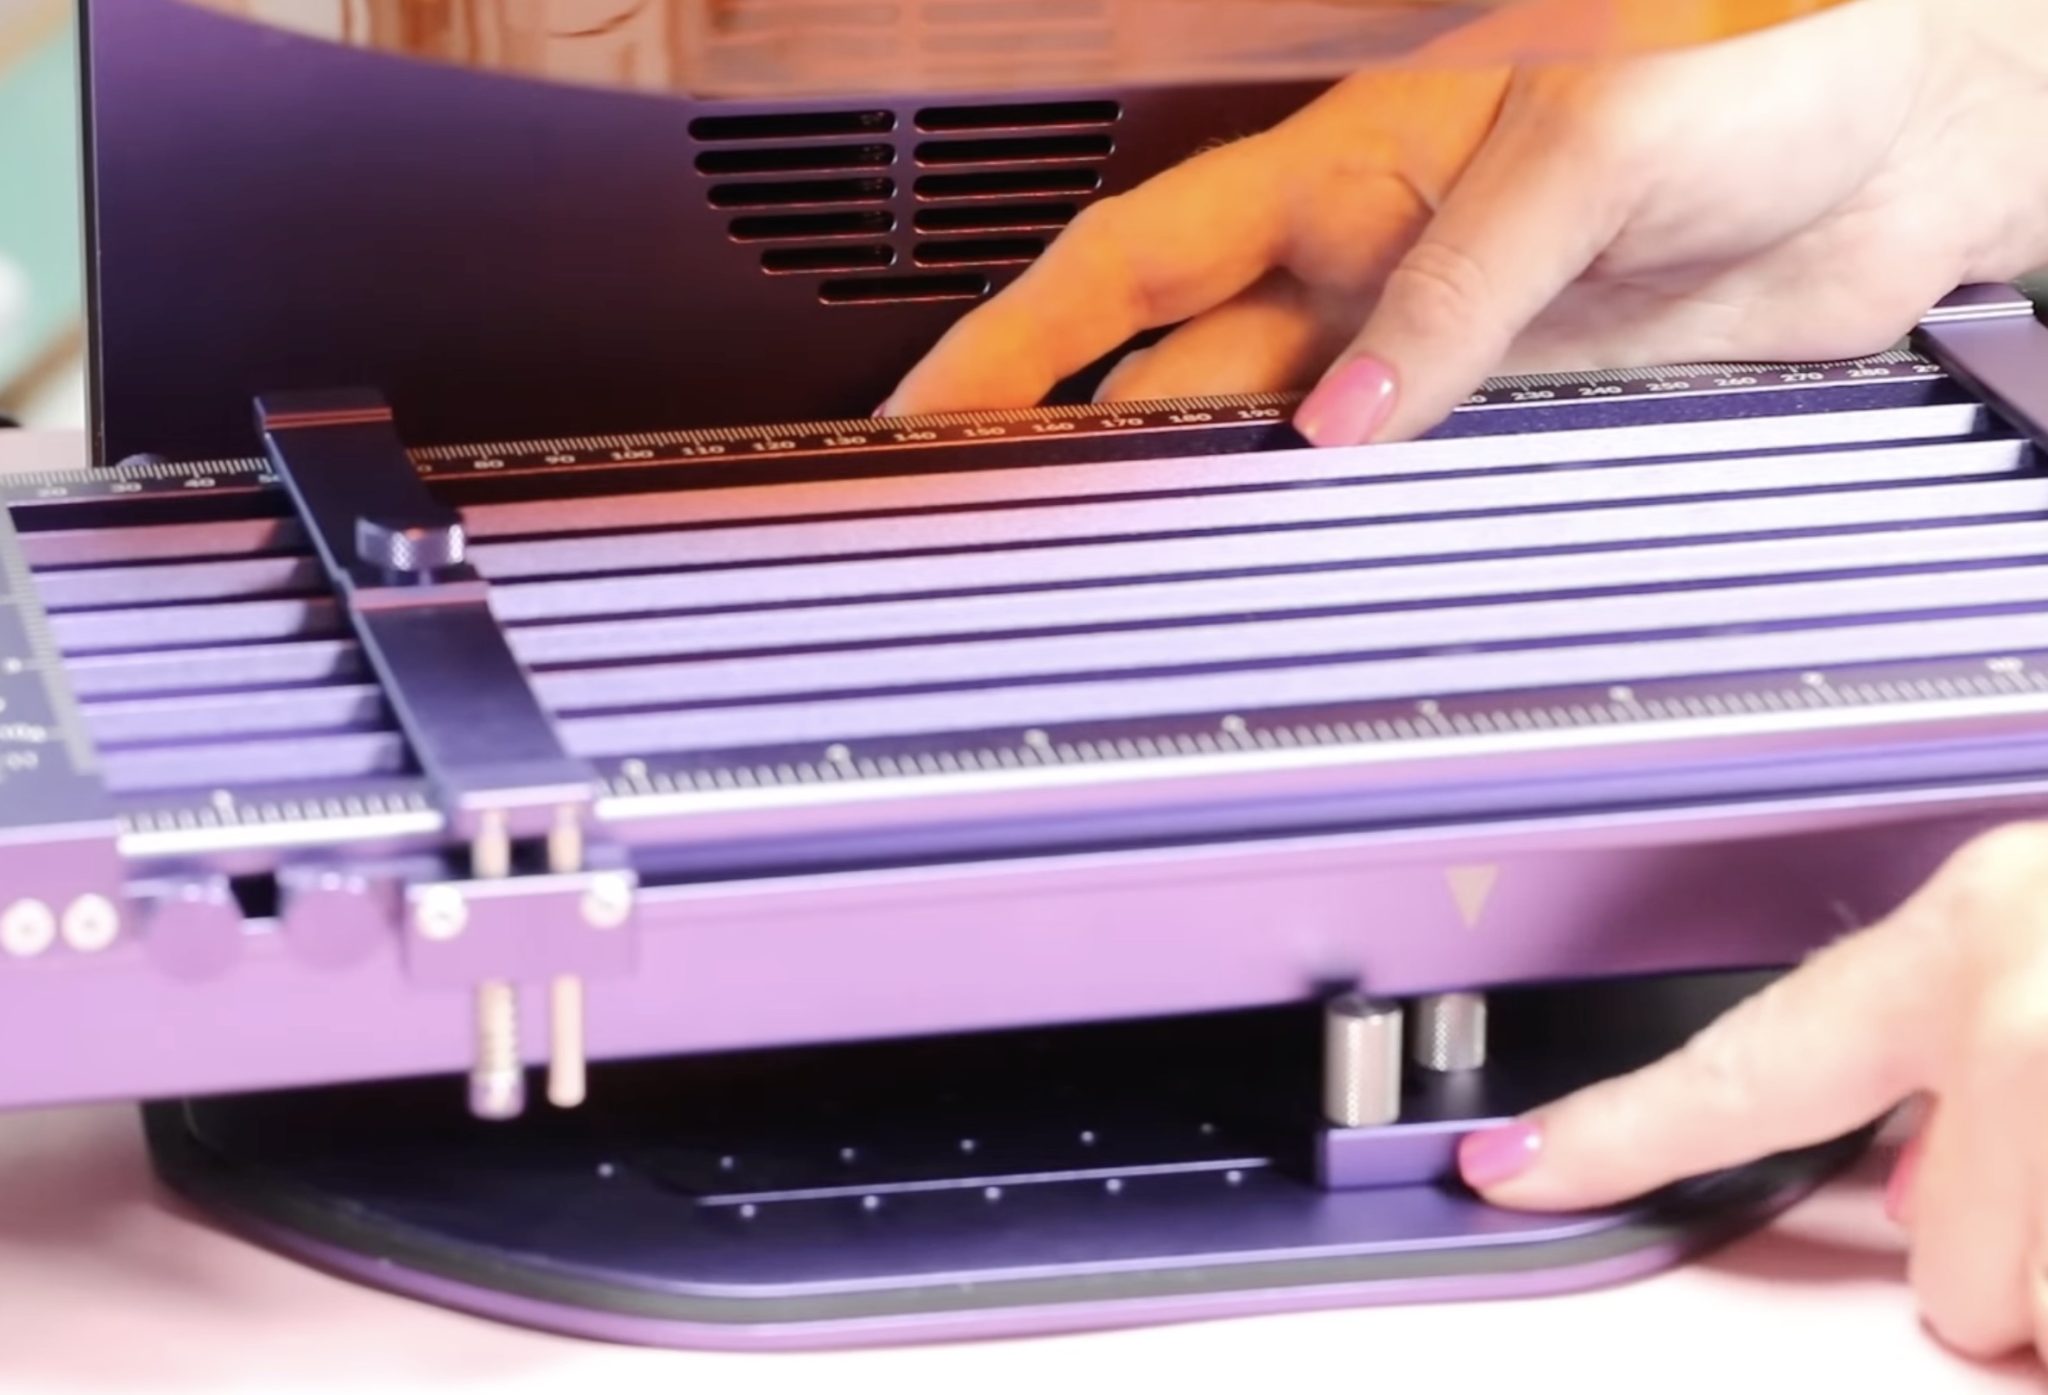
When the bracket in the back is in the right location, it will line up with the slide. Locate the slide in place, and you're ready to go.
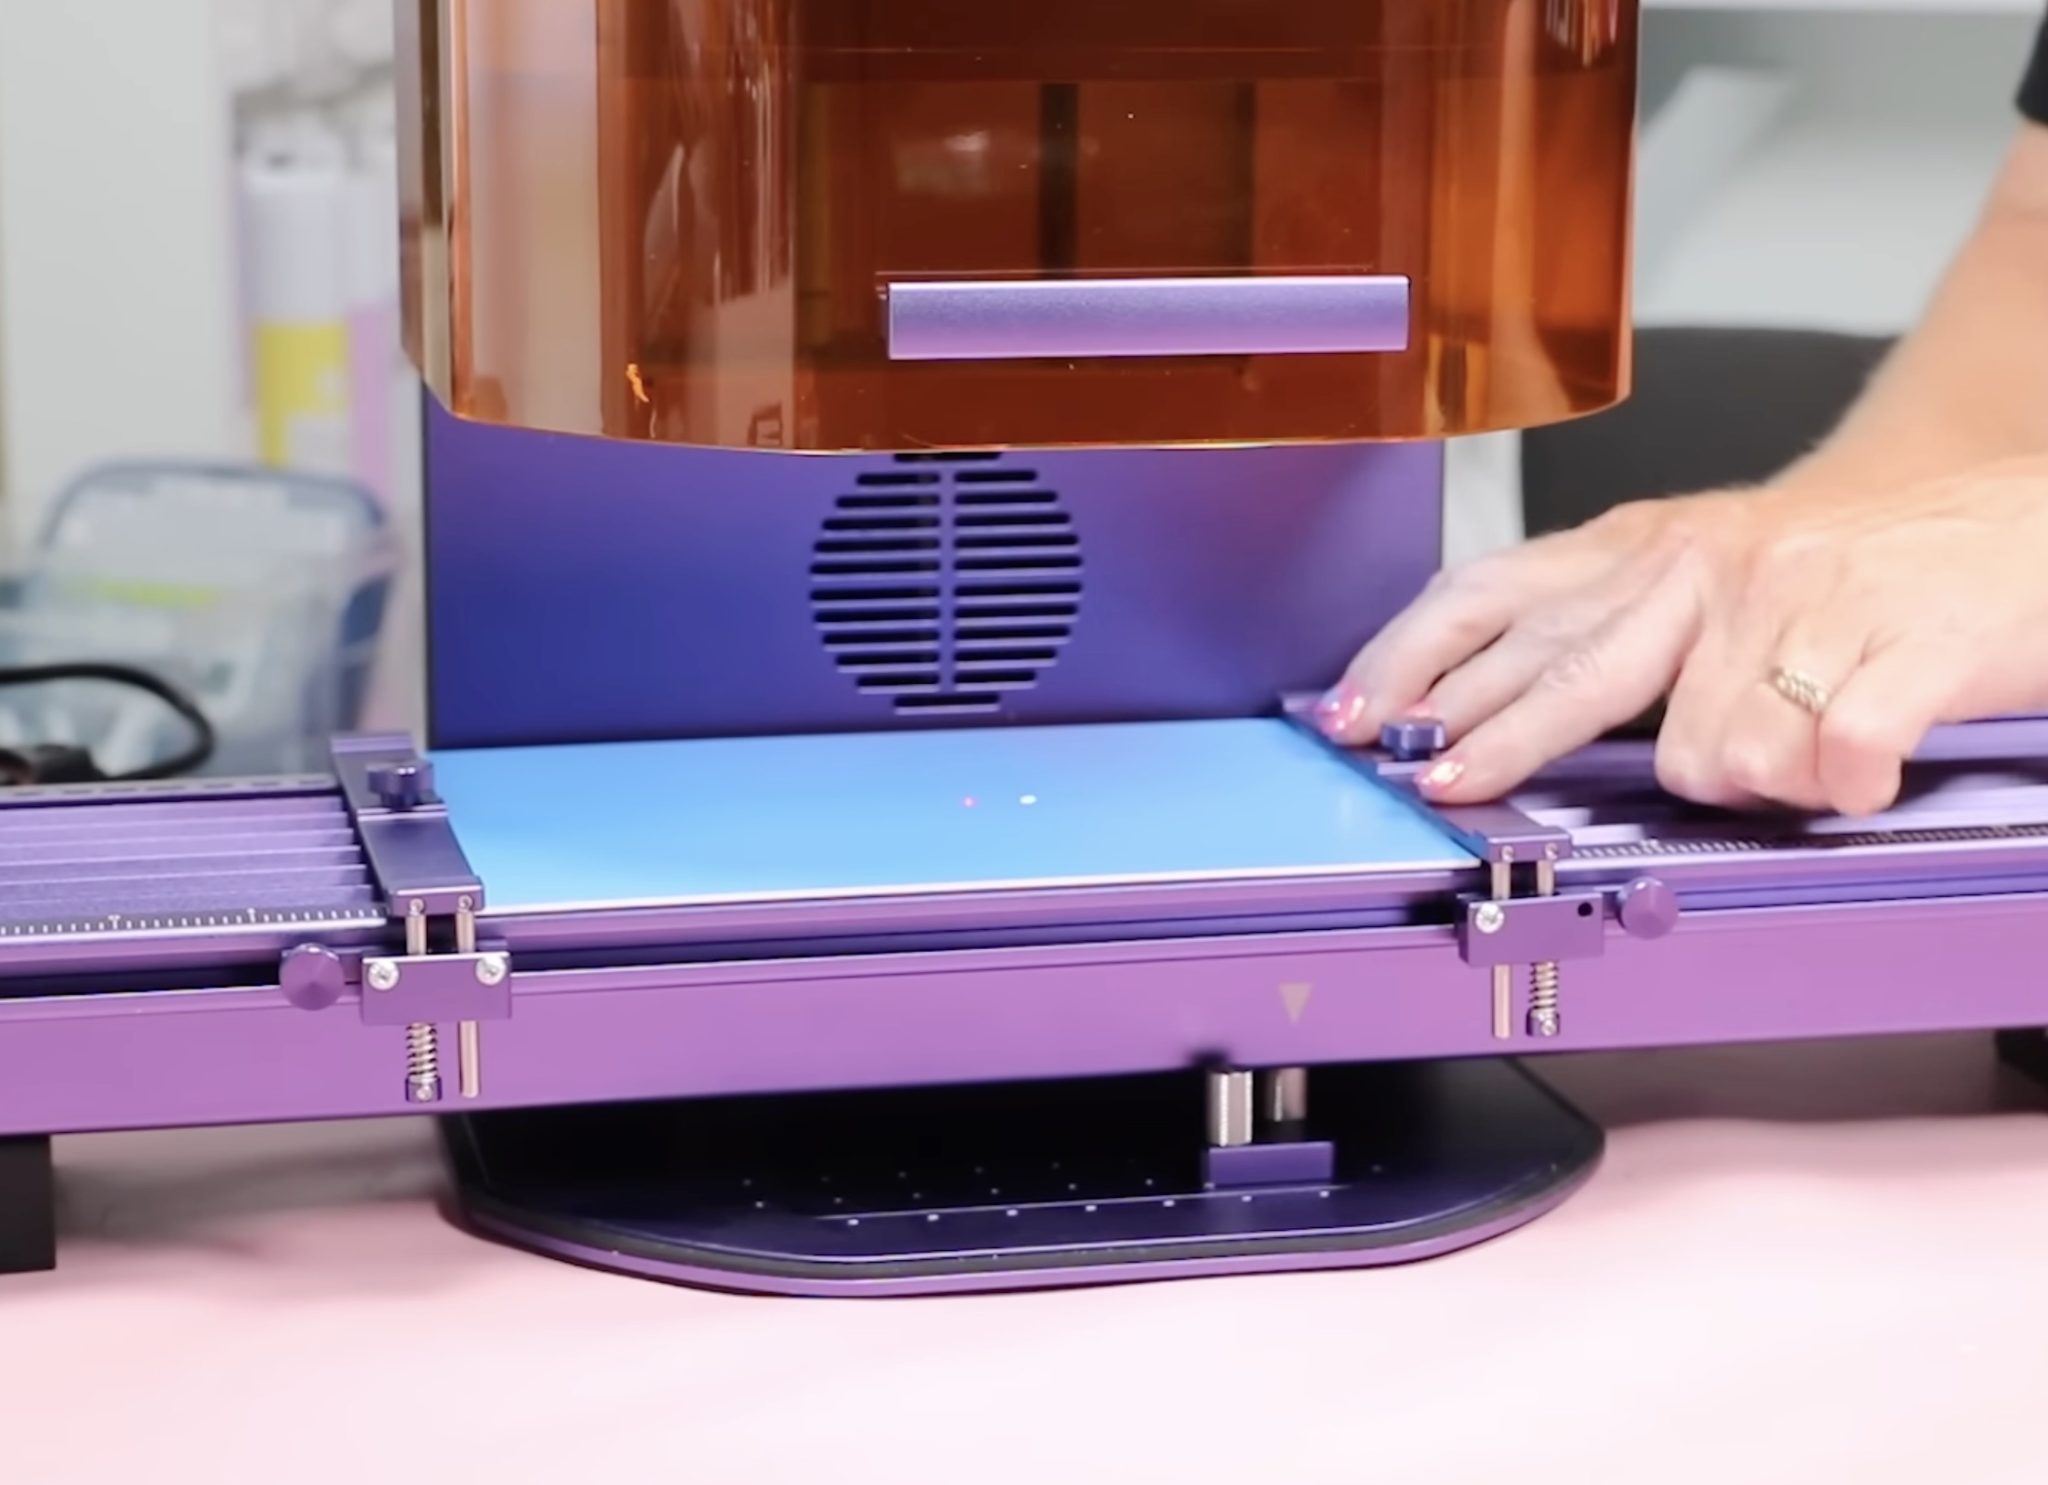
Step 2: Add Material to Slide Extension
For my project, using the slide extension, I am going to make a bookmark using acrylic.
You can use these clamps to hold the material in place. Lift the clamp and set it on the edge of the acrylic, and tighten it down to hold the acrylic in place.
Step 3: Set Up Design in WeCreat MakeIt
Open WeCreat MakeIt and change the setting to Auto Slider. This will change the canvas view.
Note – You can use the rotary accessory with the slide. I am not using it today, but if that is something you'd like to see in the future, let me know in the comments.
Upload the design and resize it to whatever size you want your design to be. I am making my bookmark larger than what can be made with the regular base.
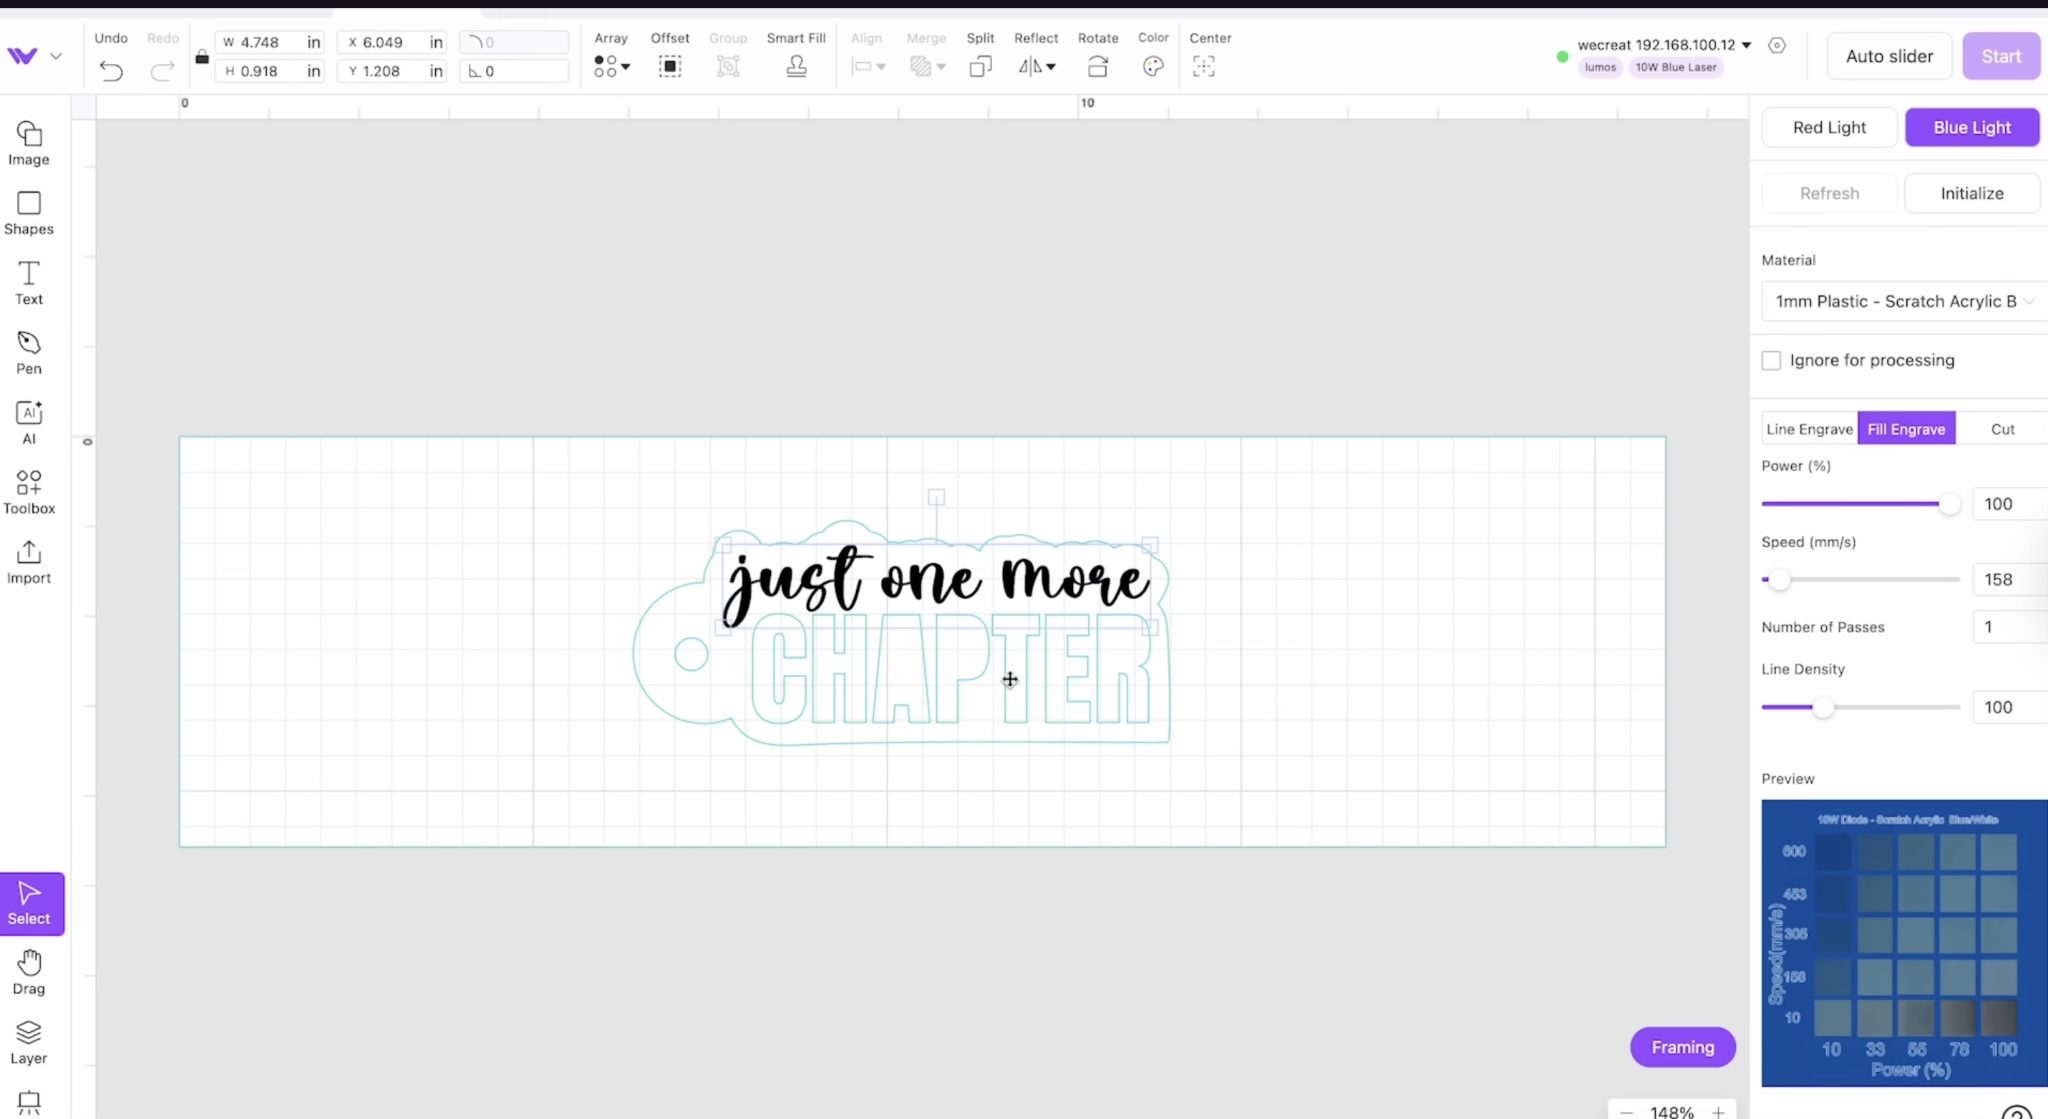
I am using the blue light laser for this project, and I have changed my material to 1mm Plastic – Scratch Acrylic.
My design has both engraved and cut lines that I am going to test to see how it does.
Step 4: Focus Laser and Locate Design
Focus the laser on the material and then hook up the slide exender.
There are cords that attach from the slide to the back of the laser. When everything is hooked up, click Initializing Software and then click Framing.
Framing will show you where the design will be on the material. From here, you can move the design around as needed to make the most out of your material.
Step 5: Start the Laser
Close the laser shield before starting the laser. The screws on the slide stick up, so make sure they don't get caught on the shield. I have mine raised up a little bit.
Press the Start button, and you can see that the slider moves as the laser operates.
Review the Finished Product
Here is how my acrylic bookmark turned out.
The engraving on acrylic worked great, but as you can see, the cutting did not. I can tell you that the fire protection in the WeCreat Lumos works well. My acrylic caught on fire as I was trying to cut it, but the fire safety worked.
I do want to note that, unfortunately, I was unable to cut acrylic with this laser.
Even though I was unable to cut the acrylic, you can see how much bigger the design is. The wood bookmark is as large as you can cut on the regular bed.
You can see how much larger I was able to engrave with the slide extender. There is a significant size difference, so if you want to make larger projects, you'll want to look at the slide extender.
Pros and Cons of the WeCreat Lumos
Now that you've seen what the WeCreat Lumos can do, let's talk about the pros and cons.
WeCreat Lumos Pros
- I love the size of this laser. It's small and portable, making it perfect for people who want to be able to personalize items on site.
- Lumos engraves really quickly, making it great for production. With both the infrared laser and the diode laser, the engraving results are fast and look really good.
- I'm also a fan of all the accessories. The air filter allows you to use the laser even if you don't have a window to vent out of. You can also add the rotary tool for tumblers, mugs, and other cylindrical blanks.
- The slide extender really opens up more project possibilities, and I feel like it's a game-changer. It's also great because you can lay out multiple blanks at one time, the laser will do its job, and you don't have to load and unload it multiple times.
- I love that we can combine the rotary tool and the slide extender to give even more options that I haven't seen with other lasers.
- Another pro is the color engraving on metal. I think it's such a cool feature. It did take a while to figure it out, but I think if you're looking to really stand out, adding color engraving to your metal blanks is one unique way to do it.
- I found the laser itself and the accessories to use, and everything worked really well.
WeCreat Lumos Cons
- The biggest con I have is what happened with the acrylic. If you are looking for a laser specifically to cut acrylic projects, this may not be the laser for you.
- The cutting process is done with the diode laser, and that limits the things you can cut, including clear acrylic and some lighter colored materials. I would definitely do some testing before trying to make a big project. When it comes to engraving, this laser is a workhorse, but with cutting, you may have issues.
- The WeCreat MakeIt software falls in both the pros and cons categories. I found it very easy to use, but it is not very robust when it comes to designing. I played with it quite a bit and found it clunky when trying to design images. Uploading images worked really well, including both PNG and SVG files. Using text in the program was easy, but the other elements I had some issues with so be aware of that.
- Another thing that is both a pro and a con is the size. Even with the ability to move the laser and use the shield, the size of projects you're going to be able to make is going to be small, or they are going to take a long time, with you manually moving the laser over and over again. The slide gives you the ability to make some larger projects, but it's not going to be like owning one of the larger lasers with a big bed and the pass-through feature.
- Another thing to mention is that although there is a handle on the top, I am nervous to lift it up by the handle. You'll want to ensure everything is attached and the screw is tightened because I'd hate for you to lift it and have the whole surround and base fall off and break.
My WeCreat Lumos Laser Review
My overall review is that this is a great laser. It can do a lot of different things, and it can do them quickly.
If you're looking at the galvo-style lasers, this is a great option and has features I haven't seen on other lasers, including colored engraving and the ability to combine the slide and the rotary tool.
I hope I've answered any questions you have about this laser. If you have additional questions or you have a project you'd like to see me make with it, leave a comment, and I will look into that for you.