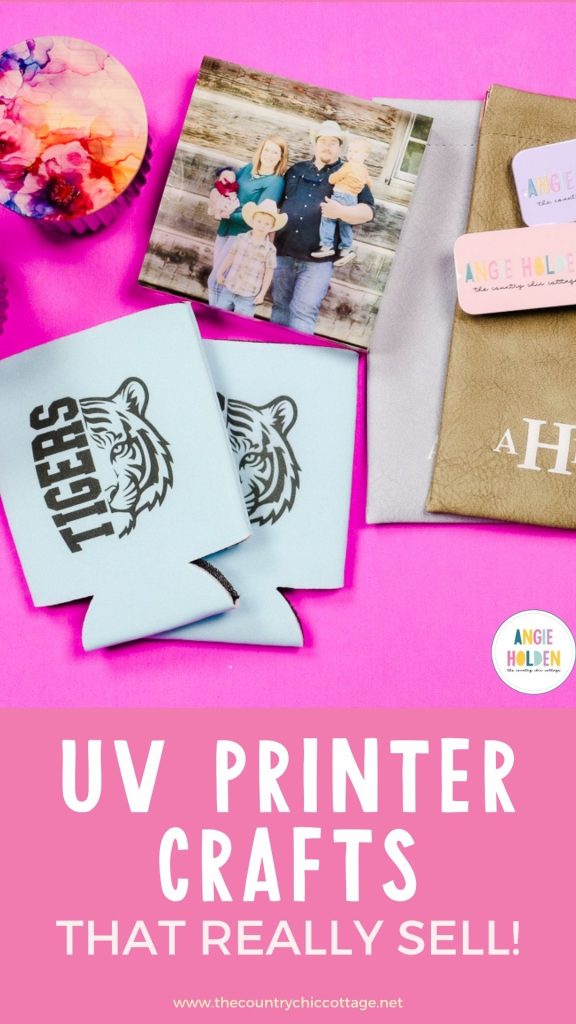
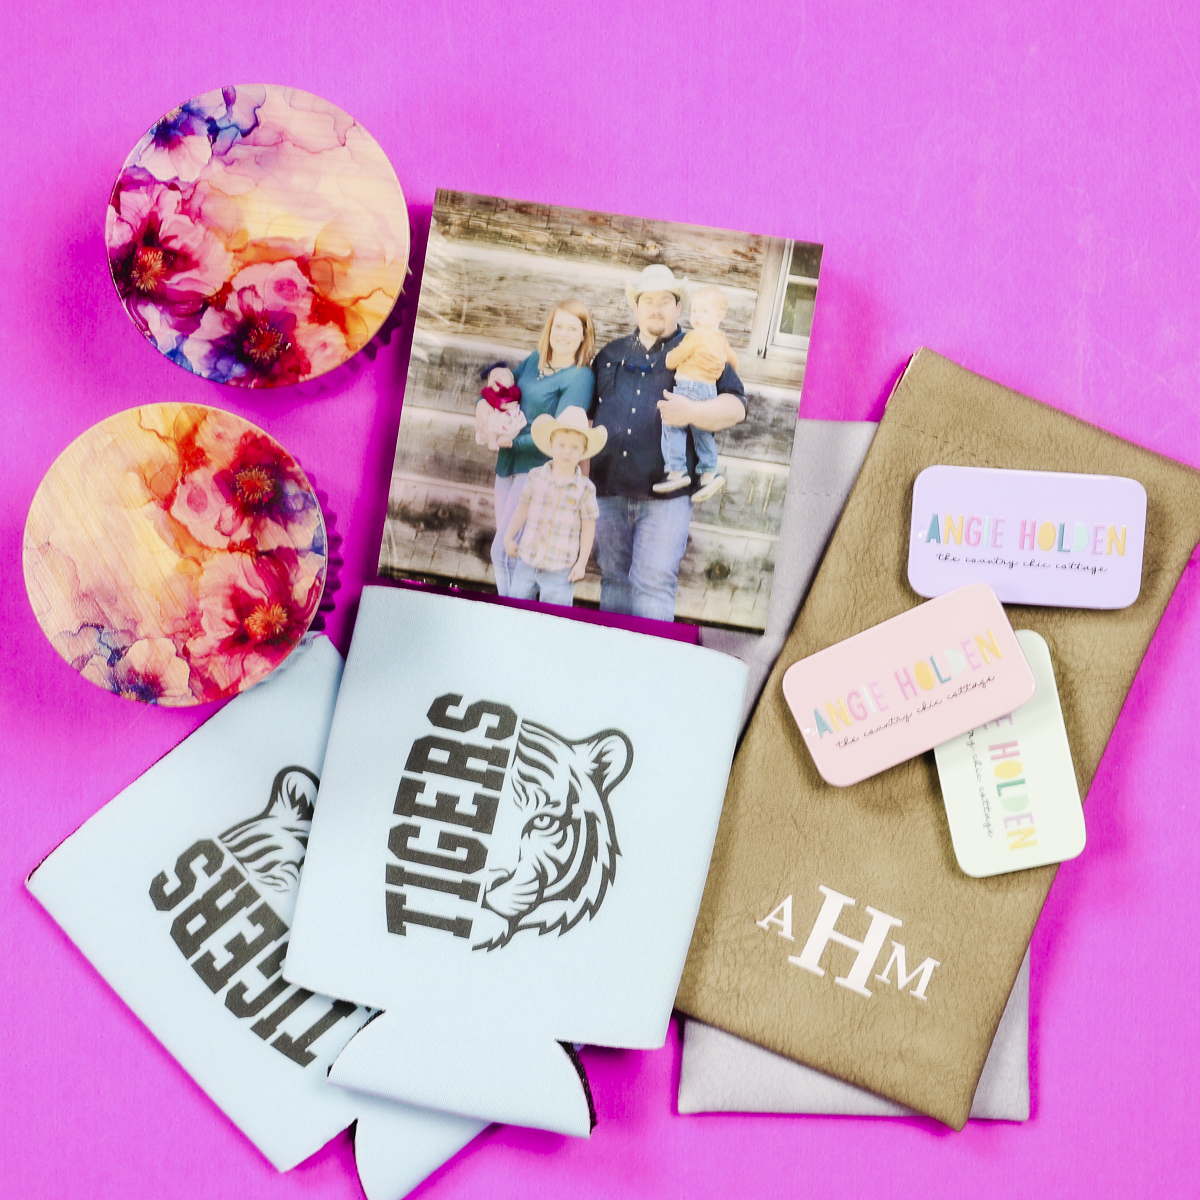
If you ordered a UV printer and now you're wondering what to make with it and what items you could sell, I'm here to help. Today, I'm going to show you 5 different UV Printer crafts that sell really well to help you get started.
If getting a UV printer is step one for you starting a small business, my 5 Things You Should Know Before You Start post is a great jumping-off point.
Investing in a UV printer is a big step. To help your business take off, you'll want to find a way to set yourself apart from the crowd.
Whether your printer just arrived, you're waiting for it to ship, or you're trying to decide if it's the right choice for you, click play on the video below to watch me make each of these projects.
What UV Printer Crafts Really Sell?
I'm going to share five different crafts you can make easily with a UV printer that sell well. These are crafts you can easily add to your current line of products or begin with if you're just getting started.
I'm going to show you how to make each of the crafts on my list today. For a full tutorial on the eufyMake and how to use it, head to my eufyMake E1 UV Printer Ultimate Guide.
1 – Adding Customization to Items You Already Sell
The first thing I want to talk about is taking something you already make and adding to it. I'm going to use an example of homemade candles.
That's not all, though; you can use this same idea and consider the items you sell and how you can add to them.
Using a UV printer to customize the lid of a candle jar is a great way to stand out in what may be a crowded market.
If you sell at local events, you could consider ways to appeal to the locals. For example, if you're in the Pacific Northwest, you may consider trees and wildflowers. If you're in the Southwest, something like cacti and desert scenes may be more fitting.
If you already have an established brand, adding your own colors and brand name could help people recognize a brand they already know and love.
You can also simply add more to your product that matches the product. If your candle is a fresh lemon scent, add a cute lemon design to the lid. If it's a holiday candle, dress it up with a holiday design.
The options are literally endless.
How to Add a Design to a Candle Jar Lid
I am using a candle jar lid as my example, but you can do this with spice jars, organization jars, lotion or bath salt containers, etc.
I have the large bed installed in my printer, which allows me to place multiple lids in the printer at one time.
Open eufyMake Studio and upload the design you want to use. From here, you can take a snapshot of the bed of the eufyMake E1, and that will show you exactly where the lids are on the bed of the printer.
When you take the snapshot, along with taking a picture, it also measures the height of the blank you have in the printer.
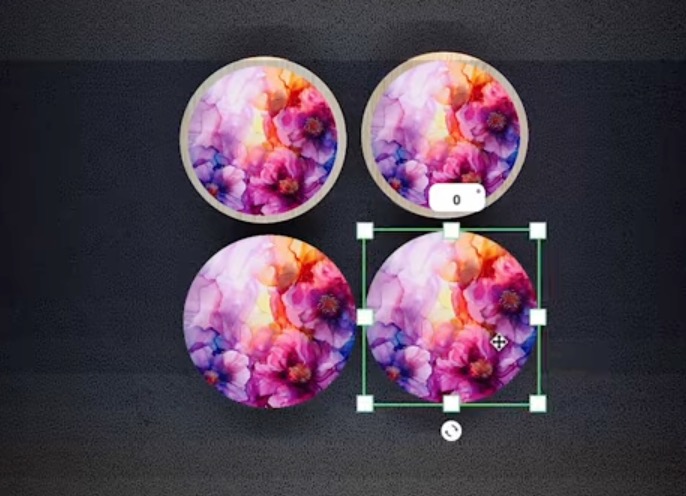
Now, I can resize and duplicate my design so I can add it to each of the lids. I can locate the design perfectly and, if I wanted, I could even add additional elements to the design right in the eufyMake Studio software.
If you want your design to cover the lid completely, I recommend making it slightly oversized. This will ensure you get a print from top to bottom and side to side.
What Printer Setting Should You Use on a Wood Lid?
With the designs located, I am going to choose Wood as my material, and I've found that the standard quality works fine.
I am going to try a few different settings so we can look at the differences.
For one lid, I chose White CMYK. For the other lid, I did CMYK with no white. This will show us easily if we need that white layer or not.
I did add a gloss varnish over both for added protection. Since it's a lid, it's likely to be handled often.
Click Print and then press the start button on the top of the printer.
Here you can see both of the finished candle lids.

The lid on the left is the CMYK with no white. I think it looks really good, and the colors are vibrant. You can see the wood grain through the design more than you can on the other one.
The lid on the right is White CMYK, and I think it is the obvious choice. All the colors really pop off the wood lid, even the lighter colors, and personally I think it looks just a little bit more professional.
I highly recommend testing your design both ways. Just because my design looks better to me, with the white, doesn't mean your design needs it.
I definitely think adding customization, like designs, branding, scent names, etc is a great way to stand out in the craft business market.
2 – Adding Business Logos to Products
My next example is all about adding business logos to the items you sell.
Whether you call this swag, promotional merch, or even employee gifts, offering customization for brands is a great way to grow your small business while helping other businesses market theirs.
There are companies out there that specialize in these promotional materials on a large scale, but being able to do them locally for smaller companies is a great way to use your UV printer.
How to Add a Logo to a Small Mint Tin
For this example, I am using these cute small mint tins. The process is the same as we did for the wood candle lids.
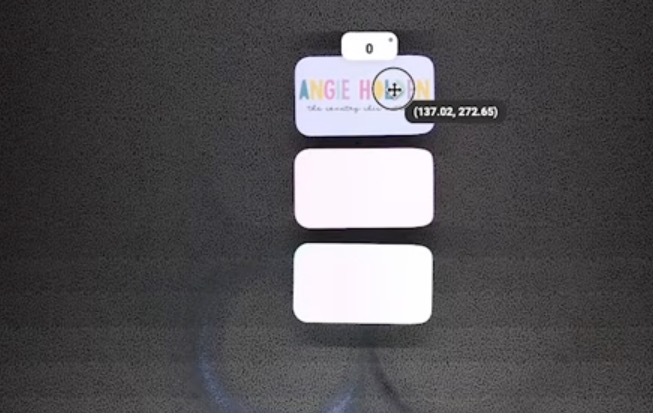
Add the tins to the UV printer bed, open eufyMake Studio, upload your logo or create a design in the software, and take a snapshot of the printer bed.
Resize the logo so it fits on the lid of the tin and duplicate it for each tin you have on the bed.
Change the Settings
Change the material setting to Metal, and I am choosing the print setting White, CMYK, Gloss Varnish.
Click Print and then Start on the printer.
When they're done printing, unload the tins from the UV printer.
Close Up of Logo Mint Tin
These small mint tins are just one option for things you can add logos to.

The colors all pop off the metal surface really well, even the lighter colors. I also love how well the eufyMake E1 UV printer does small text.
Whether you're looking to create merch for your own business or offering it to other small businesses, promotional merchandise like this definitely sells.
3 – Personalization with Photos
When it comes to personalization, nothing beats photos.
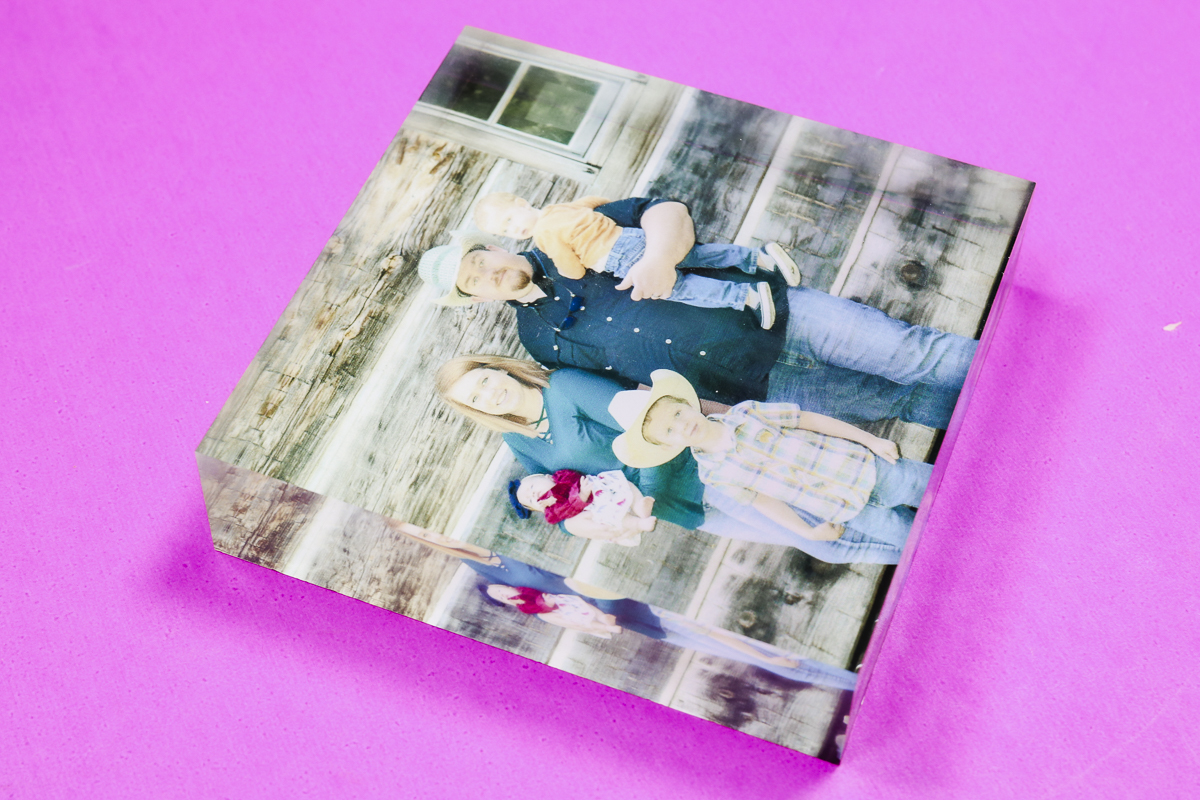
For my UV Printer crafts that sell really well example, I am going to add a photo to an acrylic block. Other ideas that work well are ornaments, keychains, even phone cases.
Printing photos directly on the surface of a blank is a great way to make money with a UV printer.
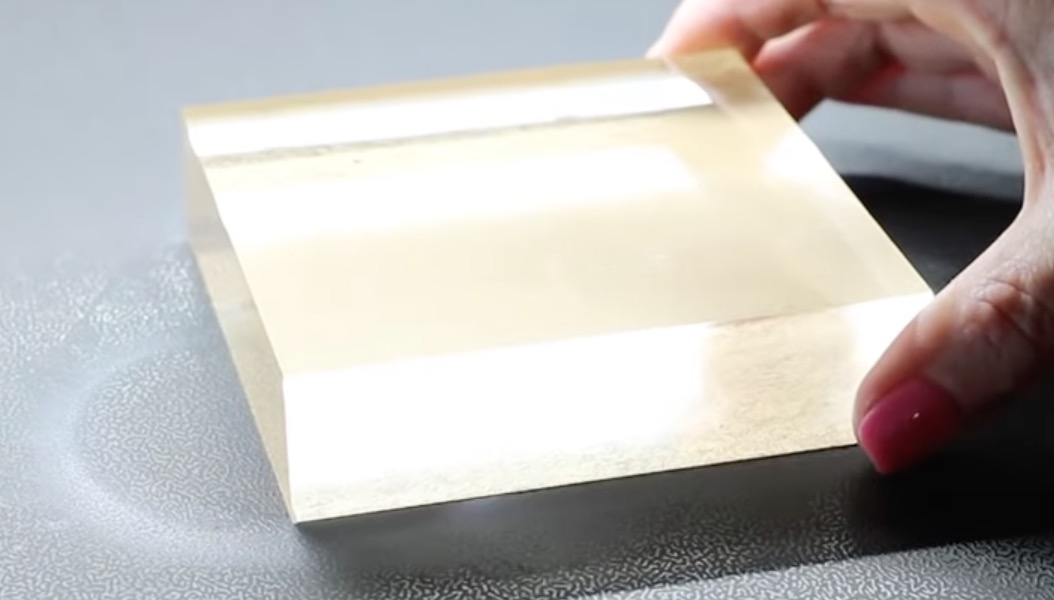
How to Add Photos to Acrylic Blocks
The acrylic block I'm using today is a really thick acrylic block. You can use other acrylic materials and other blanks like ceramic ornaments or coasters.
Once again, the setup is similar to other projects we've made.
For this project, I am printing on the backside of the block.
First, check the acrylic block for protective film. Remove the film from the backside, the side we're going to print on. Leave the protective film on the front.
Place the block, front side down, on the bed of the UV printer. Take a snapshot of the bed and upload the photo you're going to use.
Depending on your blank and the photo you're using, you may need to resize or crop the photo. This can be done in the eufyMake software.
Because I'm printing on the back of the blank, I right-clicked the image and flipped it. We want the image reversed so when we view it through the front of the block it is right.
What Print Settings Do I Use When Printing On the Back?
Since I'm printing on the back this time, I need to change the way I print the image. This time, I want it to print CMYK and then White.
This will make it so that when I view the image from the front of the block, I will see the colors, not the white layer.
I did oversize the image a little bit so it covers the entire back of the acrylic block. For the material, this time I chose the Plastic setting.
Click Print and then Start on the UV printer.
Close Up of Finished Photo Acrylic Block
I am obsessed with how well this photo acrylic block turned out. The photo looks SO good, and I'm really happy with the colors, even the skin tones.
Remove the acrylic block from the bed of the UV printer and remove the protective film from the front of the block.
If you're selling these acrylic blocks, I would use masking tape around the sides. There is a little overspray on this block, and if you want your image to cover the entire surface, you'll probably have overspray too.
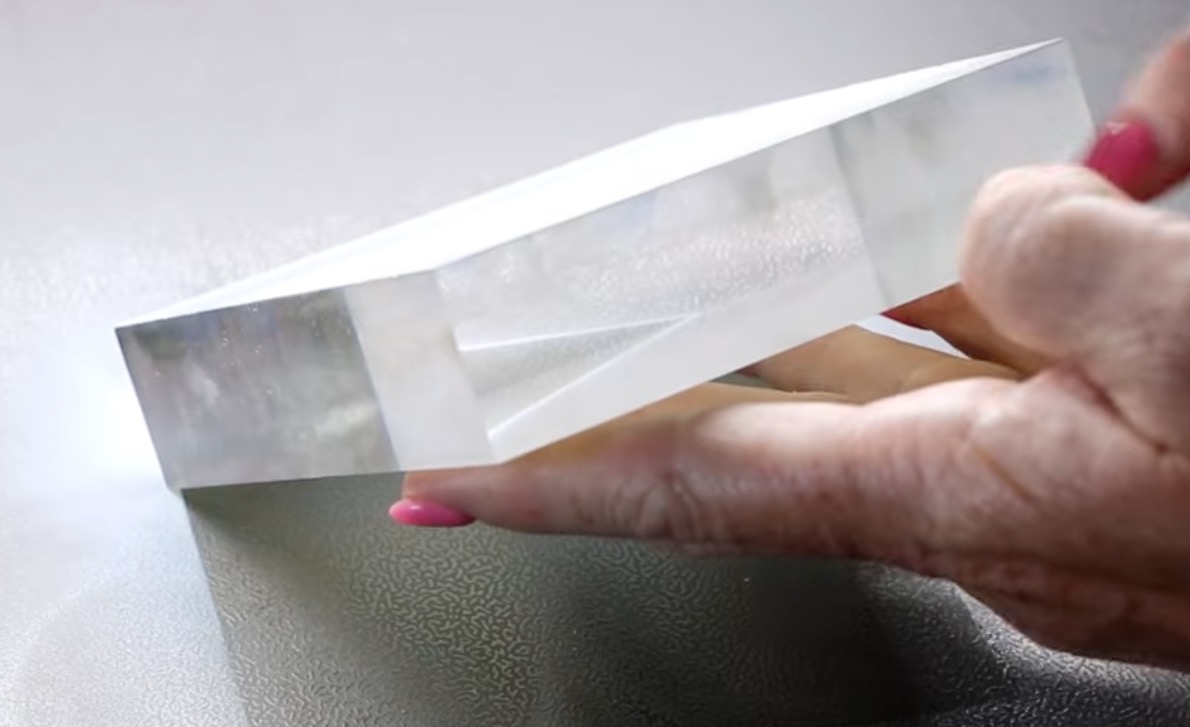
I was able to scrape the overspray off the sides so it didn't impact the finished product, but taping it off would save time in the future.
Having the print applied to the back gives the photo a 3D-ish look, and I love how it looks.
Now that you know how well a UV printer can print photos, what photo items are you considering adding to your small business?
4 – Creating Items with School/Team Names and Mascots
Everyone who has ever had a child in school or been involved in organized sports knows that items that include school names, team names, or mascots are big sellers.
For my example, I am adding the school mascot in school colors to a can koozie.
Consider other items like magnets, bag tags, keychains, and more.
How to Add Mascot Names to Can Koozies with a UV Printer
Because a can koozie is a softer item than the items we've used before, I am going to switch my white ink from the standard UV ink to the flexible UV ink.
I have a full tutorial on how to swap the ink. Make sure to check that out before adding blanks that require flexible white ink to your product list.
The design I'm using includes a football design and the school mascot.
Locate Koozie on Printer Bed
UV printers work best when the blank has a flat surface. To help make the surface of the koozie as flat as possible, I am adding double-sided tape to the inside of the koozie.
This process helps position the middle of the koozie, where it naturally domes up, at the same height as the sides of the koozie.
From here, take a snapshot of the bed, upload the design, resize it, and locate it on the koozie.
When to Use Flexible White Ink
As you can see, this design is all black. That means I don't need to use white ink when printing this design.
The CMYK inks in the eufyMake E1 UV printer are all flexible. You do not need to swap them out when using more flexible blanks.
The white ink is the only one that has a standard and a flexible option. For this design, I didn't need to change over the white ink to ensure the print would move with the blank.
With the koozie loaded on the bed and the print setting selected, click Print in the software and press the Start button on the printer.
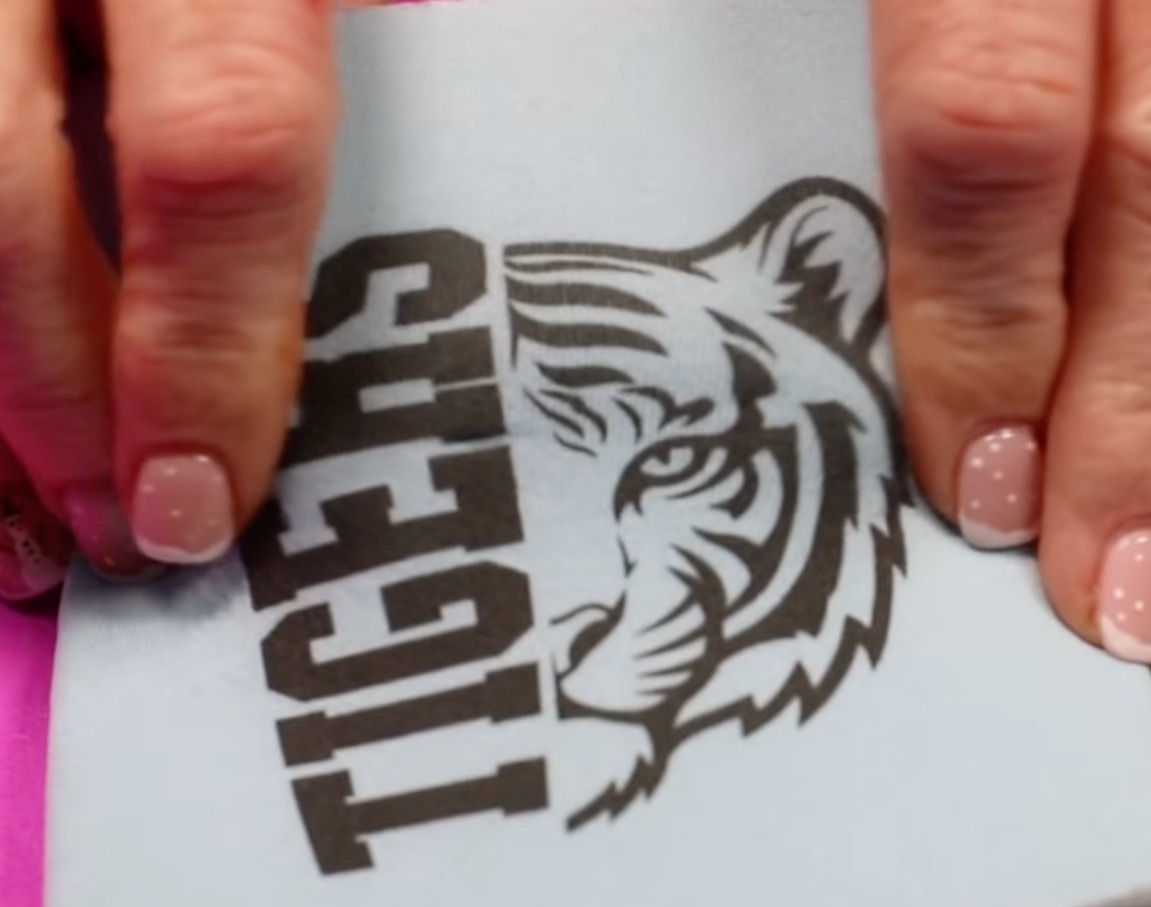
Close Up of Finished UV Printed Can Koozie
When the printer is done, remove the koozie from the printer bed and remove the double-sided tape from inside the koozie.
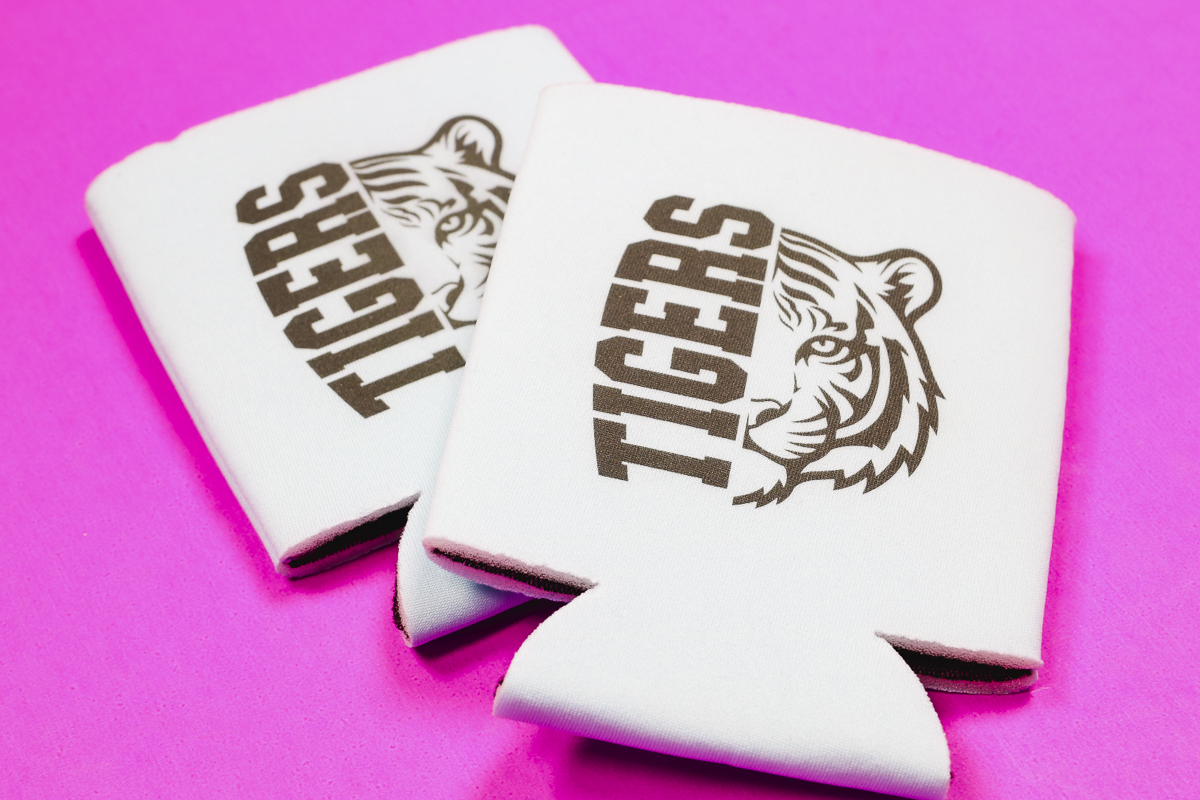
With the black ink, these koozies are completely flexible and ready to use.
Whether you do can koozies or other blanks, using a local team mascot and name combined with the school colors is sure to be a big seller.
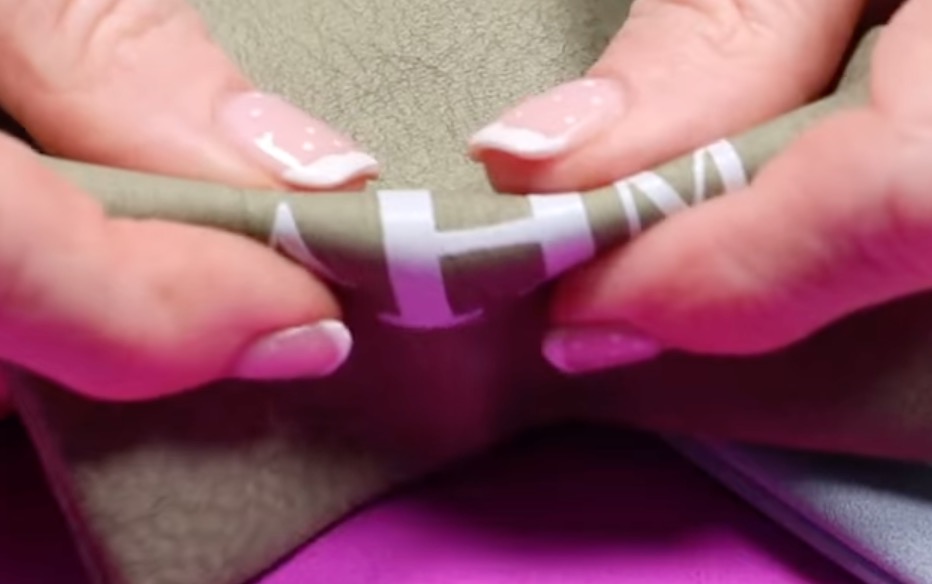
5 – Adding Monograms to Everyday Items
The last idea I'm sharing today is monogramming everyday items. From wedding party gifts to items for back to school, monograms are popular for everyone.
There are a lot of different ways to use monograms for your small business. Today, I'm adding a monogram to a leather eyeglass case.
For this project and design, I need the flexible white ink.
How to Add a Monogram to a Leather Eyeglasses Case
To help raise the center of the eyeglasses case, I added a piece of cardboard, approximately the same size as the case, to the inside.
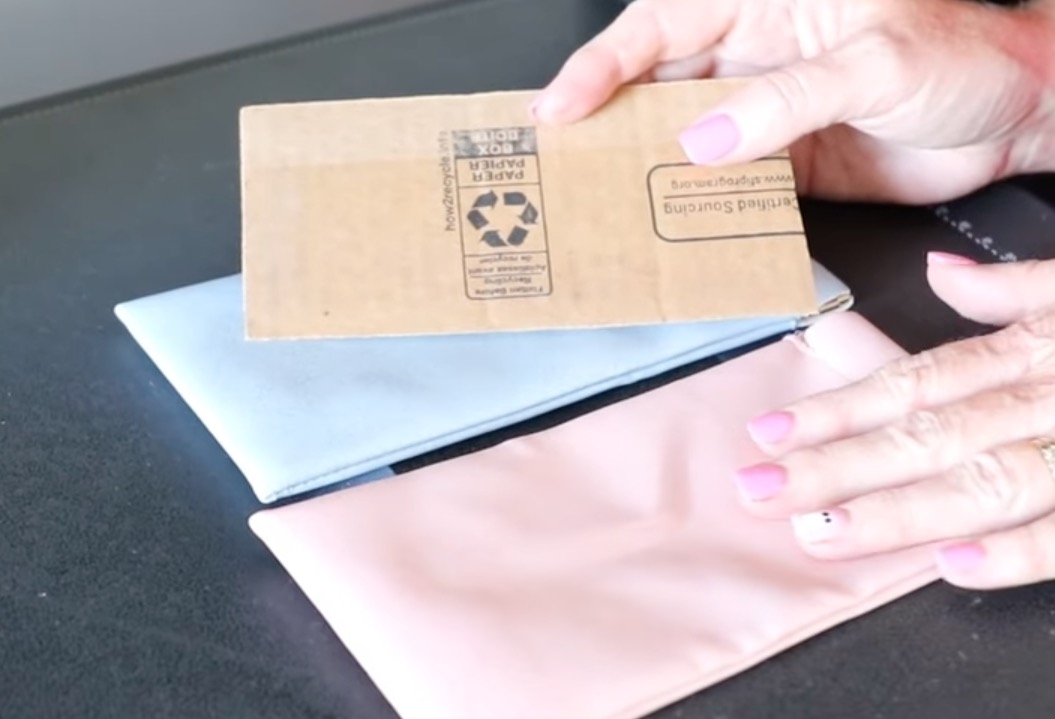
Locate the eyeglasses case on the bed of the printer.
I am adding a monogram in white; it's very important to use the flexible white ink for this project.
Take a snapshot of the bed to know where the eyeglasses case is. Instead of uploading a design, I am using the text tool to create the monogram. I added the letters in pure white and changed the ink mode to just white.
Click Print and then press Start on the printer.
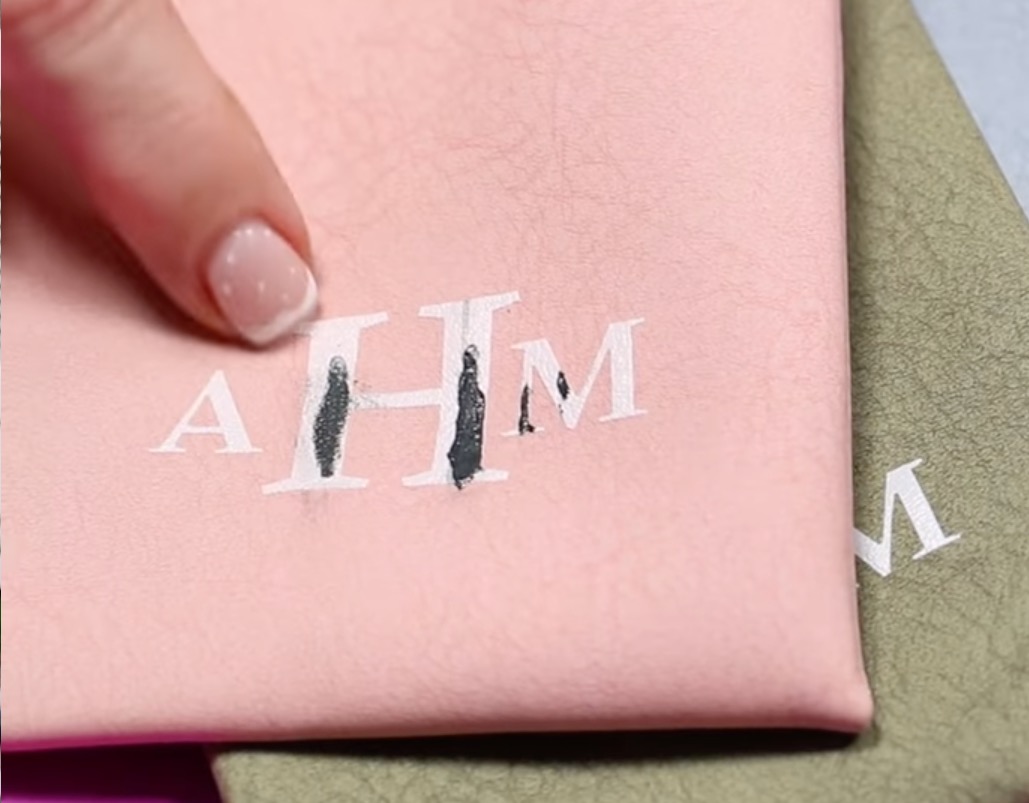
Close Up of Finished UV Printed Eyeglasses Cases
With the printing done, remove the cases from the print bed and take the cardboard out of the inside.
I did find that to get the best results, you need to add the cardboard and some double-sided tape to the cardboard to hold the leather of the case in place.
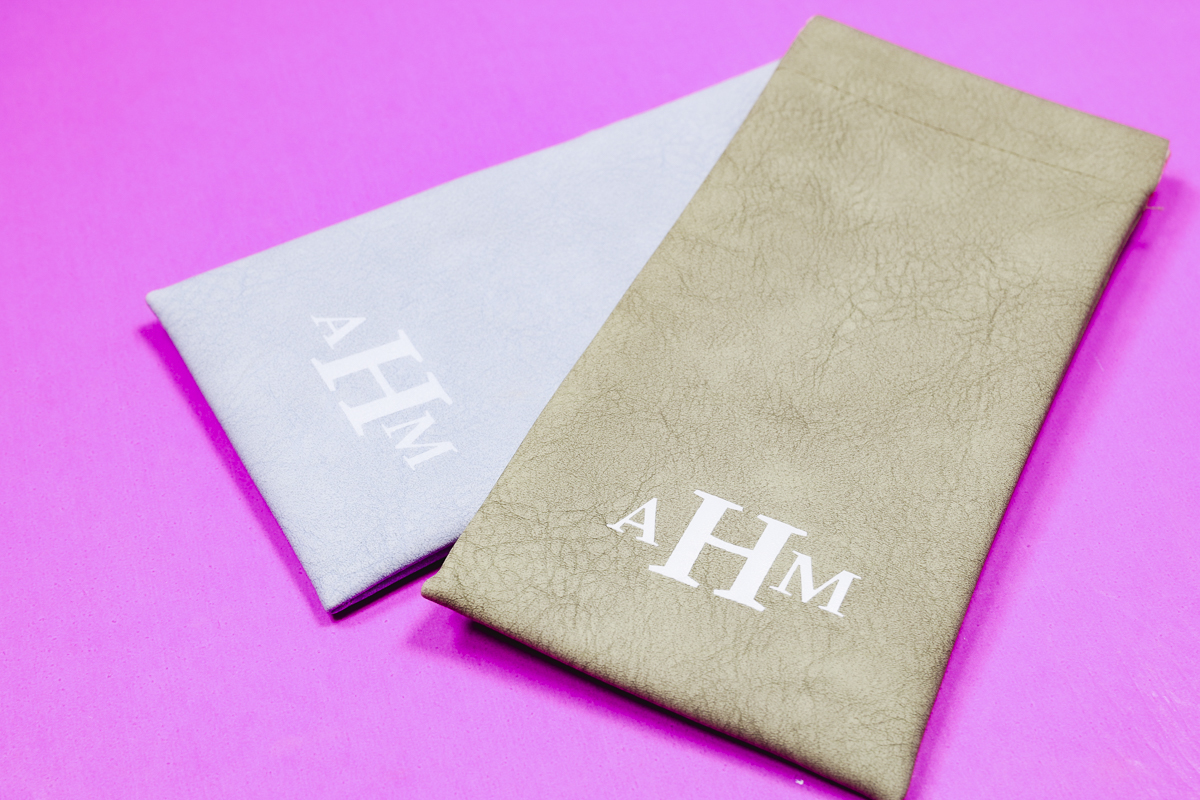
I tried a couple of different print settings for the eyeglasses case. For both cases, I used only flexible white ink and tested having more and fewer layers of ink. Even with multiple layers, it is flexible. It doesn't crack or lift at all.
I love the way these turned out. They look and feel very professionally finished.
Note: When I added cardboard without tape inside the case, the leather lifted up and hit the print head, resulting in black ink on the white, messing it up completely.
Are You Ready to Use a UV Printer to Create Crafts that Really Sell?
Now that you've seen the five different ideas I came up with today, I hope you're excited to make some for yourself.
I am looking forward to other projects I can make with this printer and all the possibilities it offers.
The great thing about the eufyMake E1 UV printer is that, along with blanks you purchase to sell, people can bring items they already have for you to personalize.
Whether you use the blanks I shared today or take these ideas and add them to different blanks, there are so many things you can make and sell with a UV printer.
If you have any other questions about UV printer crafts that really sell, leave them in the comments, and I'll be happy to answer them for you.