
No matter which Cricut model you own, there is a Foil Transfer Kit available for you, and you'll love the creations you can make with it. In this post, I have compiled everything you need to know about this tool. You will learn how to use it, how it compares to the Foil Quill, and how it performs on five different materials, among other important information. Be sure to check out our guide on finding single-line designs that work best with your tool, as these designs yield the best results. Now, let's explore the Cricut Foil Transfer Kit!
This is a sponsored post written by me on behalf of Cricut. All opinions are 100% mine.
Cricut Foil Transfer Kit
I have divided this post into sections to make it easier for you to find what you need. Click on the sections in the table of contents if you want to skip around to different areas of the post.
Cricut Foil Tool Video
Would you like to view all the information on the Cricut foil transfer kit in video format? You can click play below. All of the information contained in this post is in the video.
Can't watch the video or missed some of the steps? You can also follow along below.
What is the Cricut Foil Transfer Kit?
This kit lets you add metallic foiling directly to your projects with your Cricut machine. Applying pressure to the special foil transfers it to your chosen surface. While it is perfect for paper crafts, it can also be used on other materials. Keep reading for a list of materials and examples!

What machines will it work on?
The Cricut foil tool is compatible with the Cricut Maker, Cricut Venture, and the entire Cricut Explore series. So, for those of you with an older Cricut Explore machine, you have a new tool to play with! Please note that if you have a Cricut Joy or Joy Xtra, you will need a separate Cricut Foil Transfer Kit.
I would also like to note that, at this time, the Cricut Foil Transfer Kit is only compatible with the desktop version of Design Space.
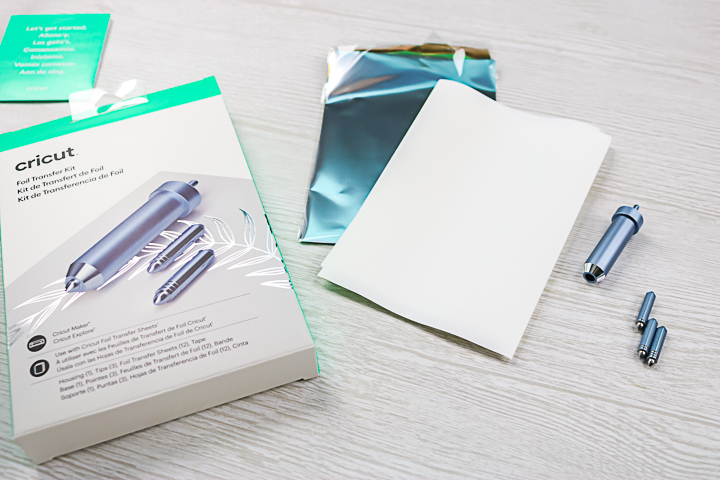
Contents of the Kit
The Cricut Foil Transfer Kit comes with the following:
- Foil transfer tool housing
- Foil tips (sizes fine, medium, and bold come with the Explore/Maker/Venture kit; the Cricut Joy version only has the fine tip)
- Tape (sized correctly for the foil sheets)
- Foil sheets (size 4×6)
So, literally everything you need to get started on a project is included right in the kit. And, there is no need to worry about replacement tips, as they are designed to last for a long time. The only way you would need to replace them is if you lose one.
Where do you buy it?
You can pick up the Cricut Foil Transfer Kit at a local craft retailer, including Michaels stores. You can also order from the Cricut website using the following links:
- Cricut Foil Transfer Kit (for the Cricut Maker, Venture, and Explore line of machines)
- Cricut Joy Foil Transfer Kit
- Cricut Foil Sheets
What type of foil do you use?
The foil used with this tool must be pressure-sensitive. You may have a heat-reactive foil in your craft room for other uses; however, it will not work in this case. The products differ in their functionality and work in distinct ways. Be sure to pick up the Cricut Foil for use with this tool.
The foil sheets are available in a wide variety of colors and sizes. You can get variety packs in 4×6-inch and 12×12-inch sheets. I love the large sheet options for when I want to make a big project.
Cricut foil sheets include special tape for temporarily securing them to your surface. This tape is pre-cut to fit your foil. It is designed to be gentle on your surface; however, I always recommend conducting a test first.
How does the Cricut foil transfer kit work?
The foil tool travels along lines and presses the foil sheet down. This transfers the metallic foil to your surface. And unlike other foiling systems, no heat or additional electricity is required to achieve the desired foil look. It fits into the same machine slot as you would use for any other blade.
What types of files are best?
You will want draw files or writing fonts that are a single line for the best results. Otherwise, the foil tool will trace around your design, similar to the way a pen would write in the machine. You can filter the files in Design Space by writing or drawing, or see our guide here on finding single-line designs.
How do you add the foil to the sheet?
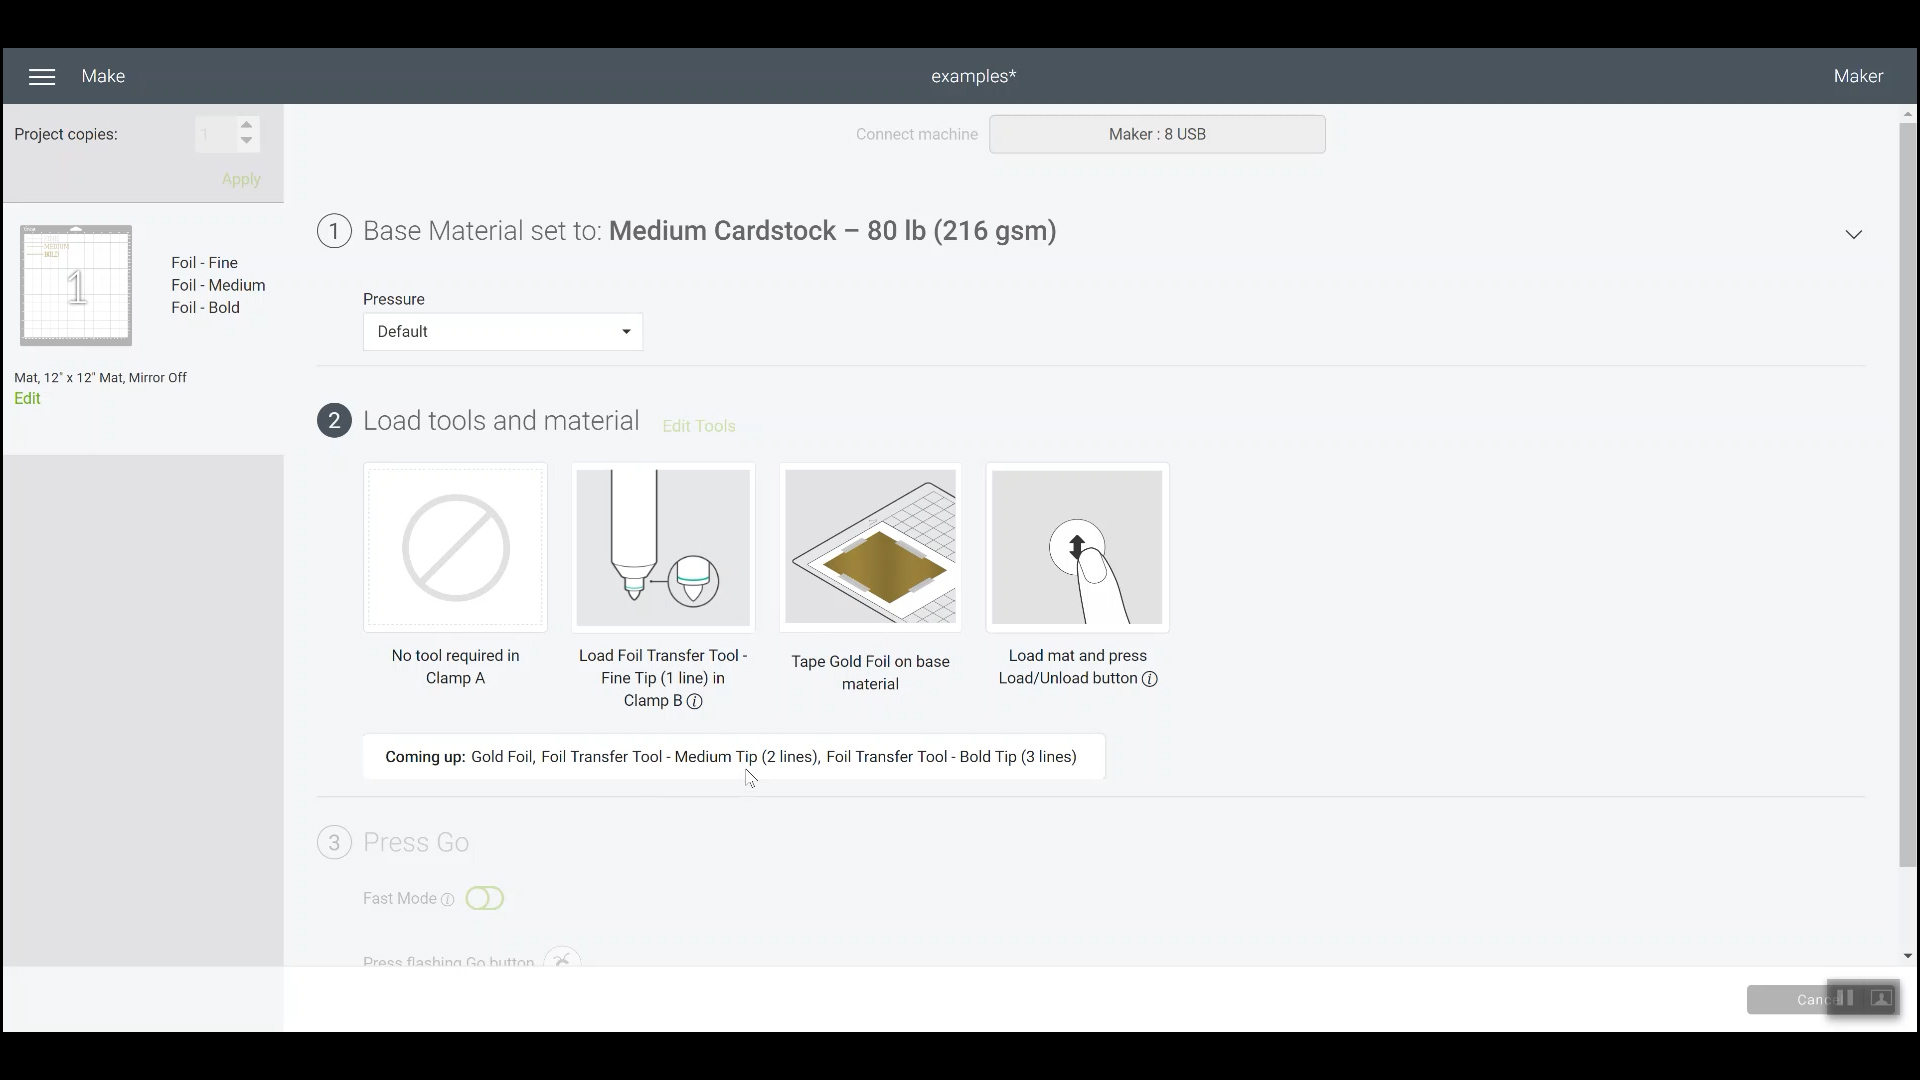
Cricut Design Space will prompt you when it is time to add the foil to your project. Sometimes you will add it before adding the mat to the machine, and other times the machine will stop and partially eject the mat so you can add it mid-project.
To add the foil, start on one side and use the provided tape. Tape the foil down just along the edge. Pull the foil tight and add tape to the opposite side. Repeat this procedure with the other two sides, taping all four sides. You also want the foil sheet to be fairly tight on your surface with minimal wrinkles.
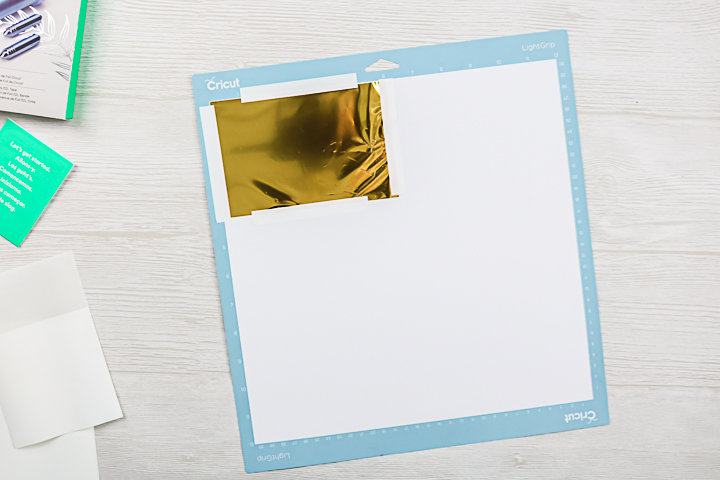
You can test the tape on your surface before using it to make sure it will not cause any damage. I didn't have any issues with the materials I have used so far.
Here are a few notes for foil location that you should try to follow:
- Add foil where it is about 1/4 to 1/8 inch away from the edge of your paper.
- Locate the foil where there will be 1/2 inch from the edge of your design to the edge of the foil. You can move your design in Cricut Design Space to get this measurement.
- When in doubt, use a full-size sheet to cover the area.
- Please do not touch the foil to the mat, as it will stick to the mat.
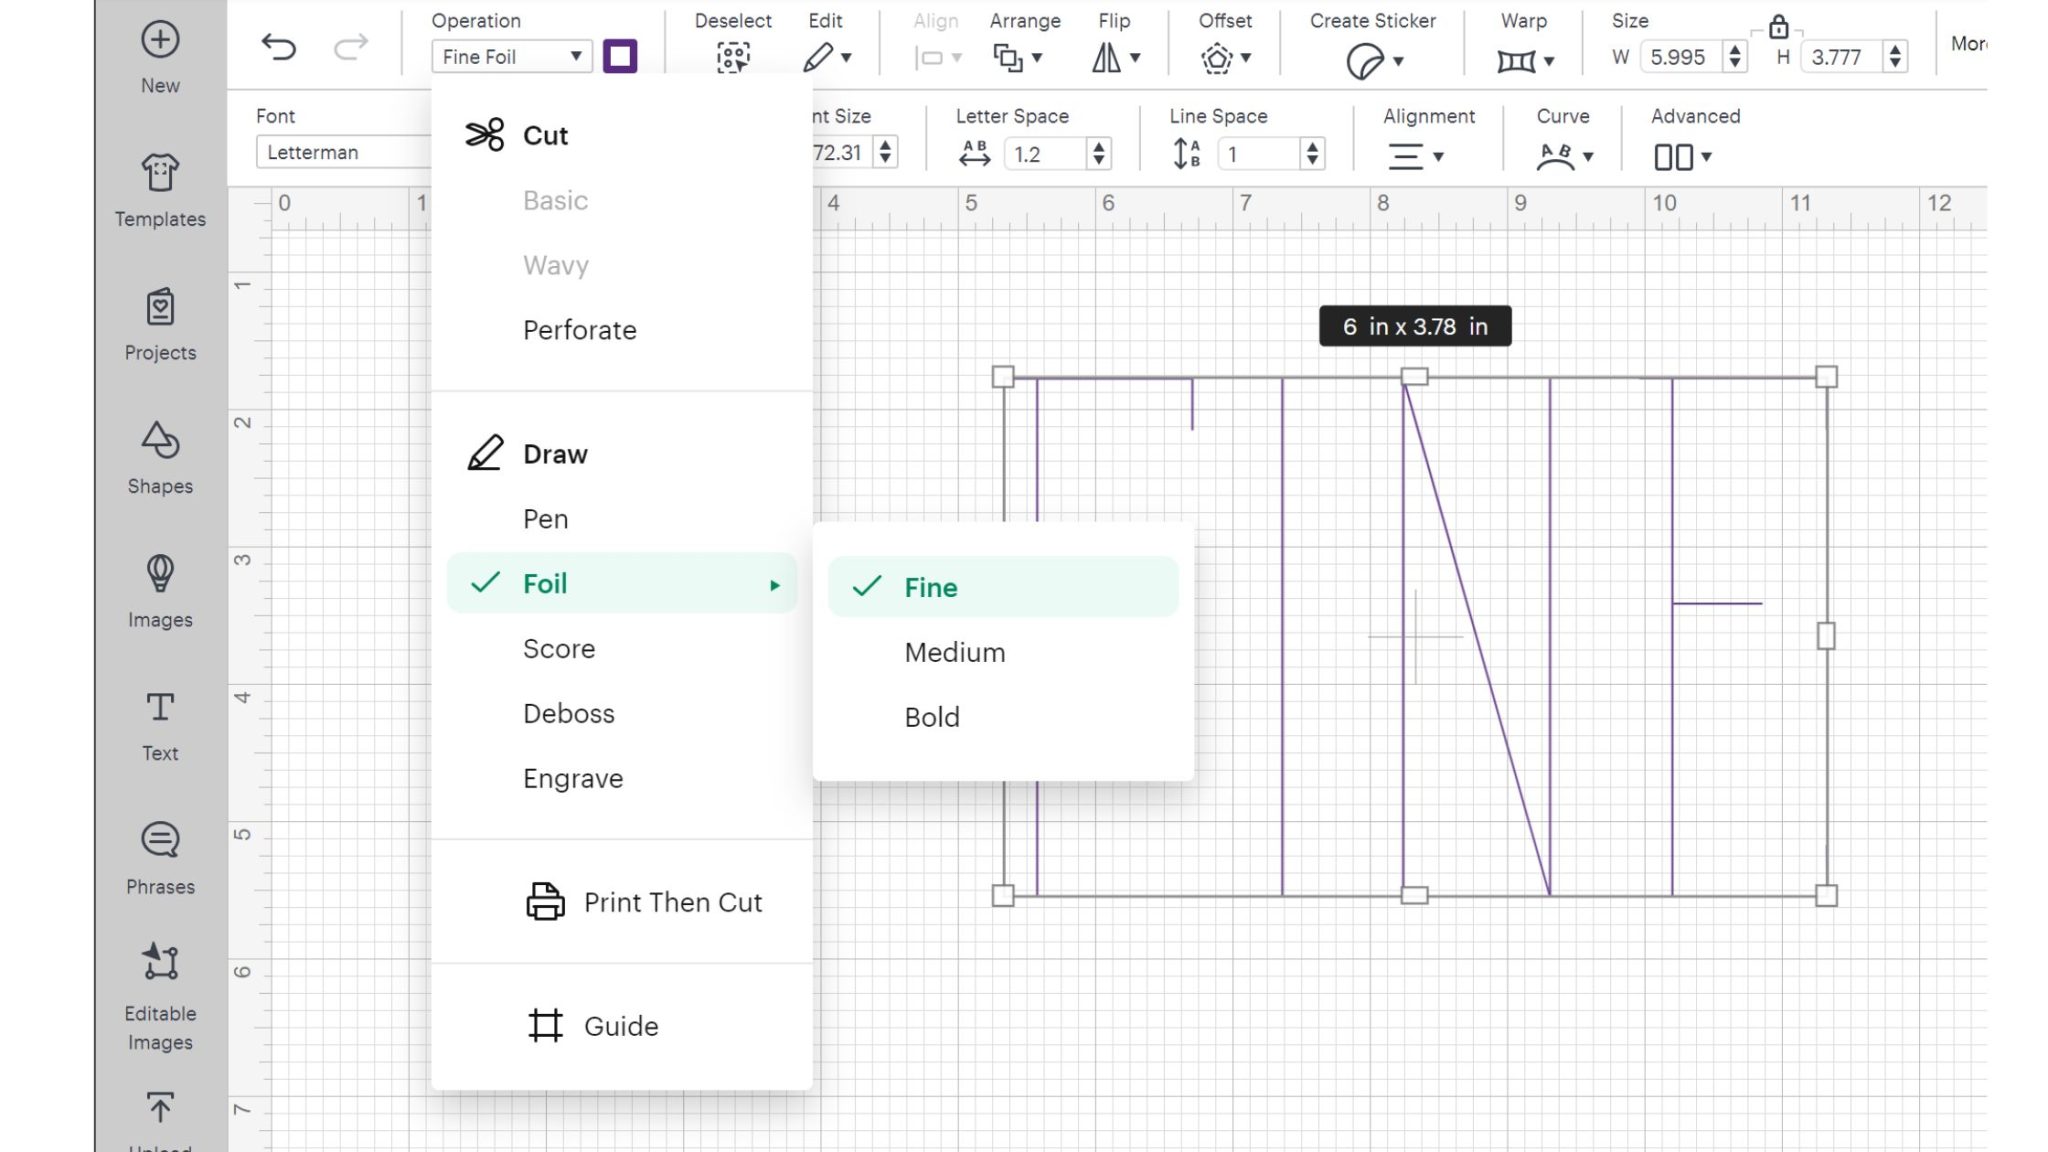
Where do you find the foil setting in Cricut Design Space?
Highlight your object or text and pull down the operation menu. There you will find the foil option with “fine”, “medium”, and “bold” included. You can pick one of these to change your line type. The item will change to reflect your selection, and you can even pick the color of foil so that you can use two different colors of foil on one project.
Please note that the image below is for the Maker. The Explore, Venture, and Joy machines will be similar, but some options will differ. Remember that the mobile device for Cricut Maker, Explore, and Venture does not support the foil tool.
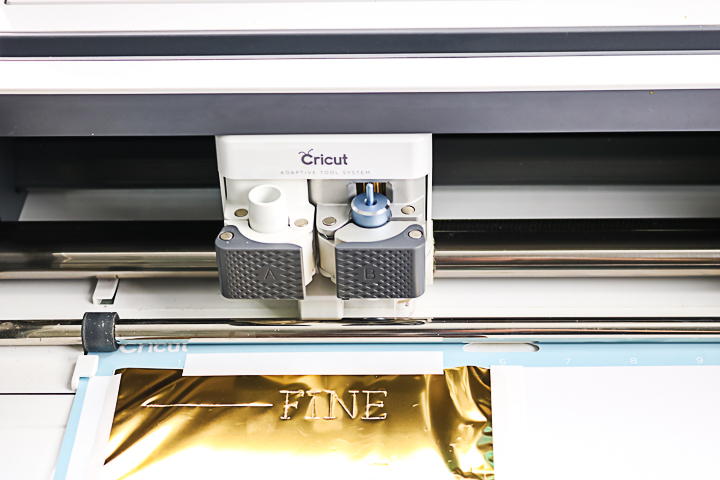
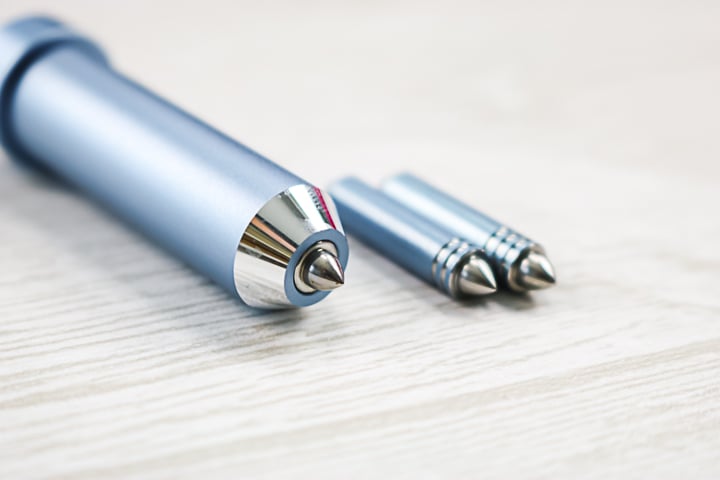
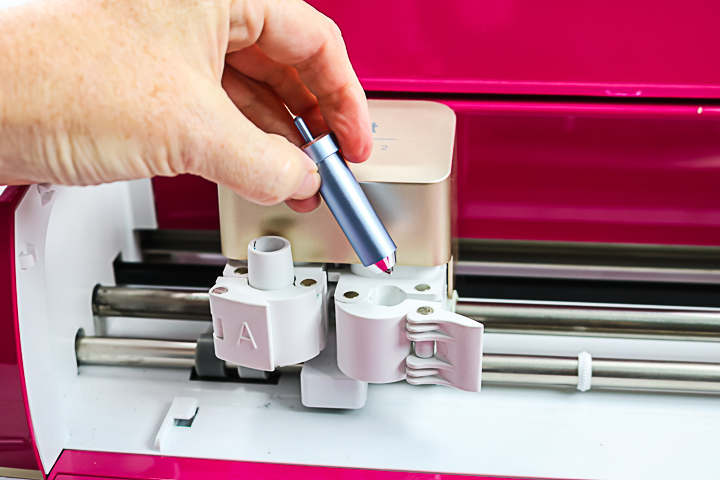
How do you change the tips?
The housing for the foil tool has a plunger at the top. When depressed, the tip pushes out of the housing for easy removal.
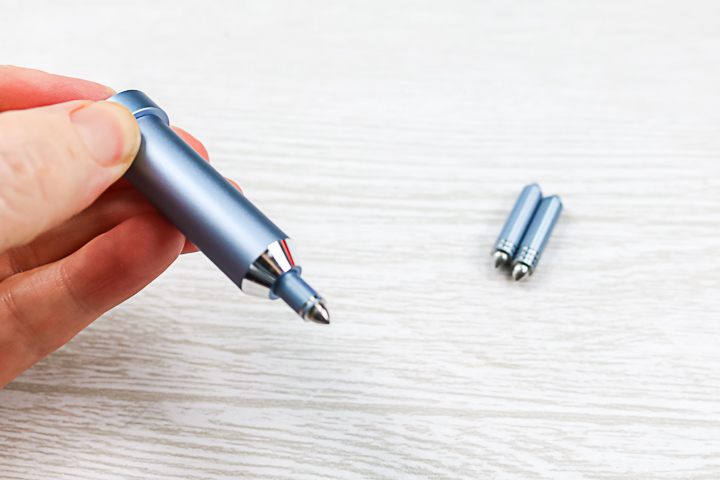
Note that the fine tip has one line, the medium two lines, and the bold has three lines. The foil tip for the Cricut Joy machines only have the fine tip. Cricut Design Space will prompt you for the tool along with the number of lines on the tip when the machine is ready to foil.
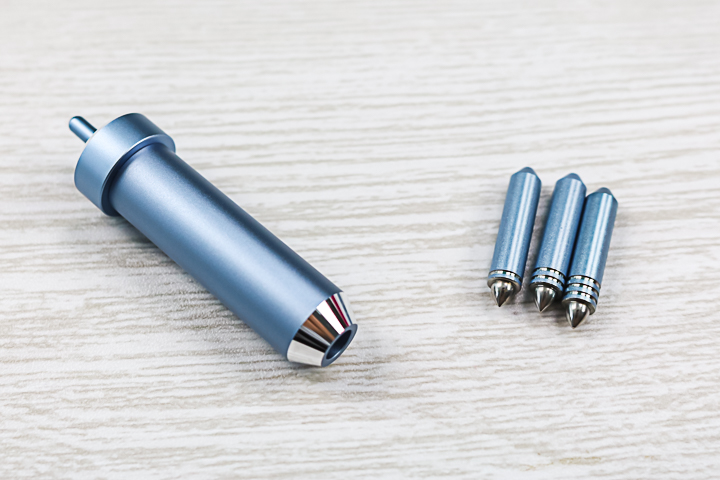
To change the tip, just pull out the one you don't want, insert the correct version, and release the plunger. The tips are magnetic, so they will pull right into place.

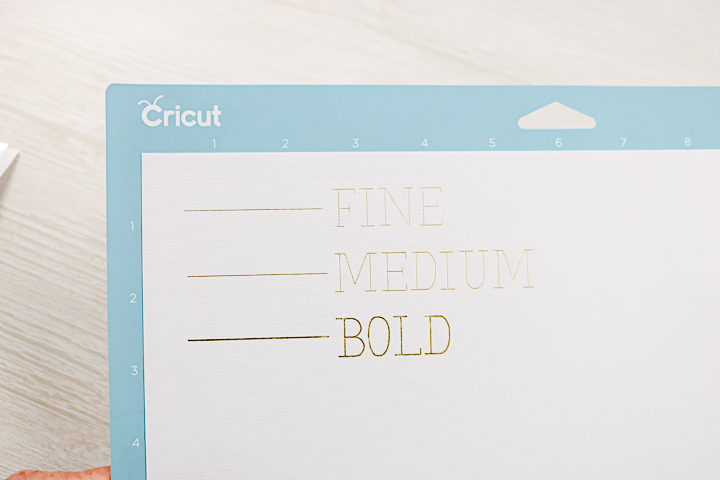
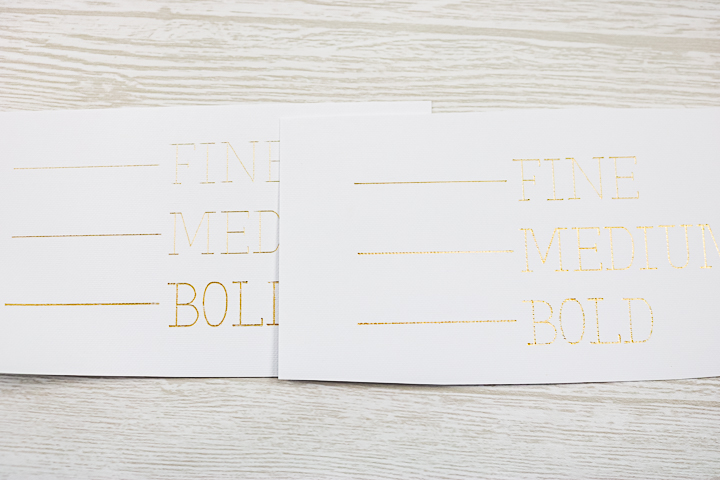
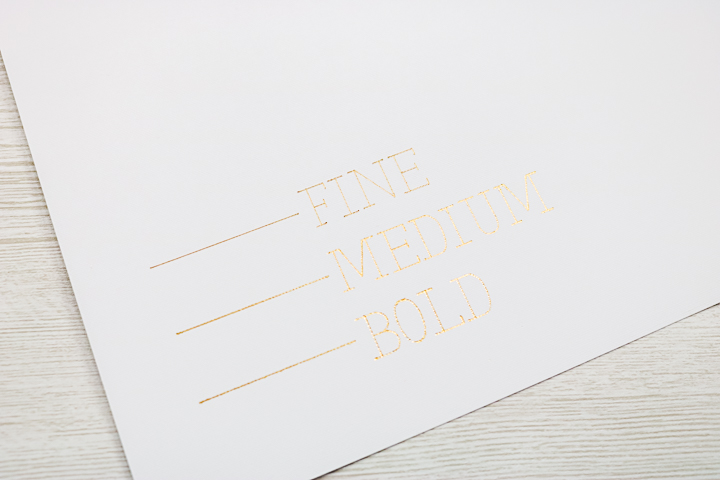
What is the difference between the fine, medium, and bold tips?
The tips increase in thickness from the finest to the boldest, depending on the look you want for your project. As you can see, the tips are pointed to give you really fine detail if you need it.
Here is a look at all of them, used on plain white cardstock, to give you an idea of the thickness difference between them.
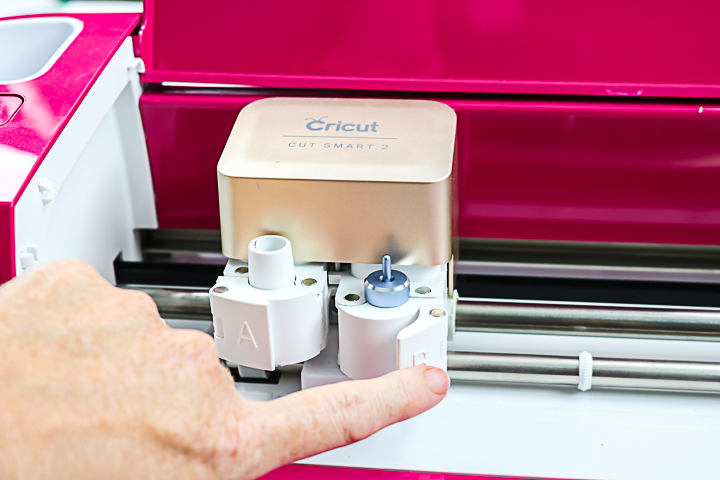
Adding the Tool to Your Machine
The Cricut foil transfer kit will need to be placed on the blade side of either your Maker, Venture, or Explore series machine. With the Joy line of machines, you only have one spot for blades. You will add this whenever Design Space prompts you to add it. Remove any blades from the machine and add the foiling tool.
Close the clamp once the tool is in place, and you are ready to create. NOTE: The Explore, Venture, and Maker machines cannot verify that the correct tip is in place, so be sure to change to the proper tip. You will want to move the white star wheels on your machine to the right. Remember that this foil works with pressure, so the wheels may transfer some foil if left in place.
How do you cut and foil on one project?
Cricut Design Space will prompt you for what tool to load when and tell you when to add/remove your foil. It will eject the mat enough to make this possible, but the mat will still be under the rollers, so the location is correct for your entire project.
With my Maker, I have used a scoring wheel, a foil transfer tool, and a fine-point blade on one project with zero issues. Just follow the prompts! You can see more of the screens in design space in the video at the beginning of this post.
How does this compare with the foil quill?
This is the big question many of you may have. I have talked about using the foil quill with your Cricut before, and I have used it myself many times. How do these two foiling tools compare? Let's take a look!
The card on the left in the image below was made with the Cricut Foil Transfer Kit. The card on the right was created with the We R Memory Keepers Foil Quill. The first thing I noted is that the Cricut tool can get finer lines. The foil quill fine tip is more like the transfer kit's medium tip. Also, there really is no difference between the medium and bold tip of the foil quill.
Here is a closer look at writing with the foil quill pen. The cardstock used has a very slight texture, which becomes quite noticeable when writing with the foil quill. The foil sits on top of the surface, creating a dotted effect as it follows every bump in the paper. In contrast, the Cricut Foil Transfer Kit produces clean and even lines. This is because it slightly debosses the paper while foiling, resulting in a smooth finish in the areas where the lines are applied.
So, I definitely prefer the lines from the Cricut Foil Transfer Kit. But how do the two foiling tools compare otherwise? Here are a few things worth noting:
- The foil quill is heat-activated and requires plugging it in. This causes a few problems. The first issue is that the cord gets in the way, causing various problems when using the machine. The second is that you must allow it to heat up for 5 minutes before using it, which slows crafting. Additionally, the heat can damage your machine. The Cricut Foil Transfer Kit does not require heat, so you don't have to worry about these issues.
- The use of the foil quill voids the warranty of your machine, as it is a non-Cricut product. The foil kit is from Cricut, so there's no need to worry about that.
- The foil quill uses the pen side of your machine to draw lines. This means that it will not work with the “foil lines” option. It also means the machine will not know to partially eject the mat for tool changes. This makes it really difficult to foil and cut the same project, whereas the Cricut Foil Transfer Tool is designed to do just that.
- Finally, I have arthritis in my hands, and at times, I struggle to change the adapter on the foil quill. However, the plunger on the Cricut foil tool is something I can use even on a bad day.
Not all of these points may apply to you; however, I hope this gives you a good idea of why I personally prefer the Cricut Foil Transfer Kit. I have had much better luck with it and the projects that I have made so far.
What materials can you add Cricut foil to?
Cricut is constantly testing and adding new materials, but as of this writing, the foil tool is said to work with:
- Kraftboard
- Cardstock and paper of all types
- Faux leather
- Clear printable sticker paper
- Vellum
- Photo paper
- Printable vinyl
I thought I would create a few simple projects using some of these materials to demonstrate what the Cricut Foil Transfer Kit can do.
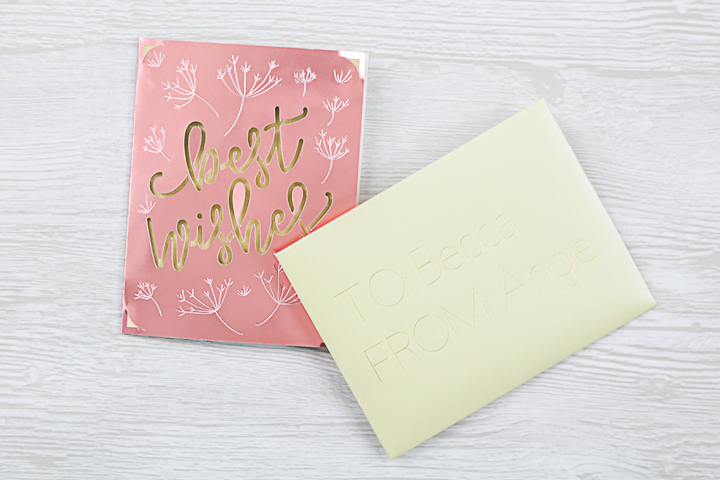
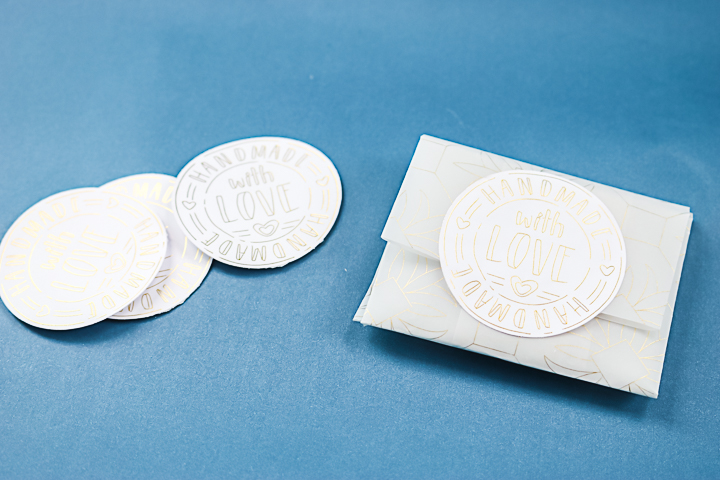
Cardstock
I made both a card and an envelope using Cricut foil posterboard and pearl paper. The foil worked great on both surfaces. I learned from this to ensure that your design and foil are positioned correctly. In the first version of the card, the machine was trying to foil over the taped area, but it definitely didn't transfer well. Learn from my mistake and measure twice before placing your foil.
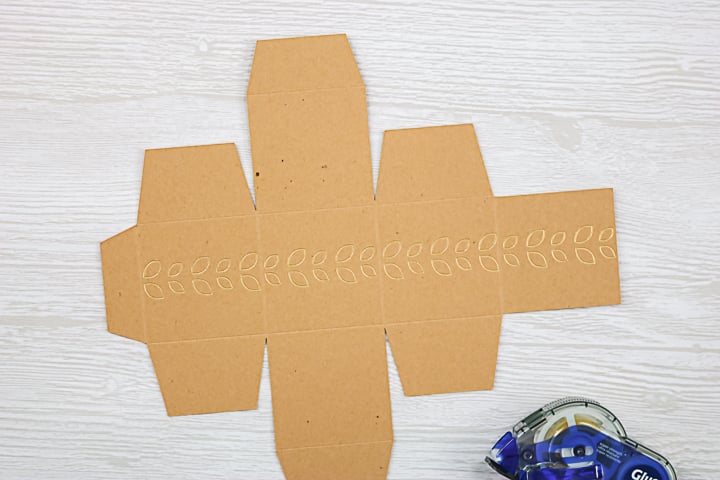
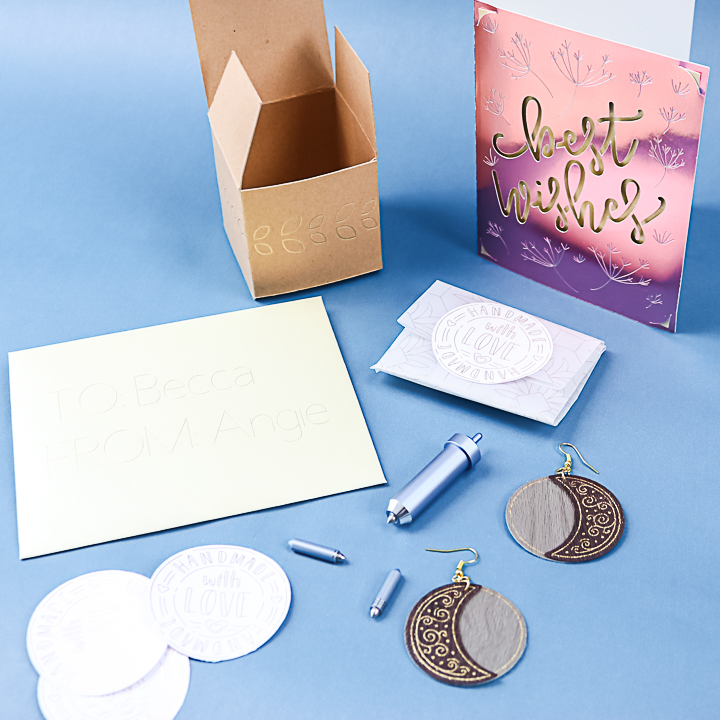
Kraftboard
Kraftboard is a really thick paper that is great for many projects and one of my favorite materials. In this case, I made a box with a gold foil accent. Again, the foil tool worked great. This is actually the bold tip used in the Maker. Note that this project was initially scored, then foiled, and subsequently cut. So, yes, you can do multiple things on one sheet.
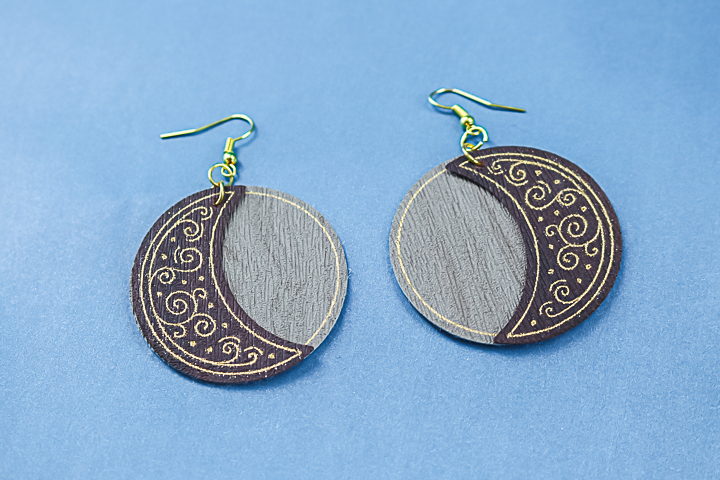
Faux Leather
Now let's talk about something a bit more exciting! You can add foil to faux leather! That makes things like making earrings with your Cricut even more exciting by adding gorgeous details to your designs. I mean, look at that detail!
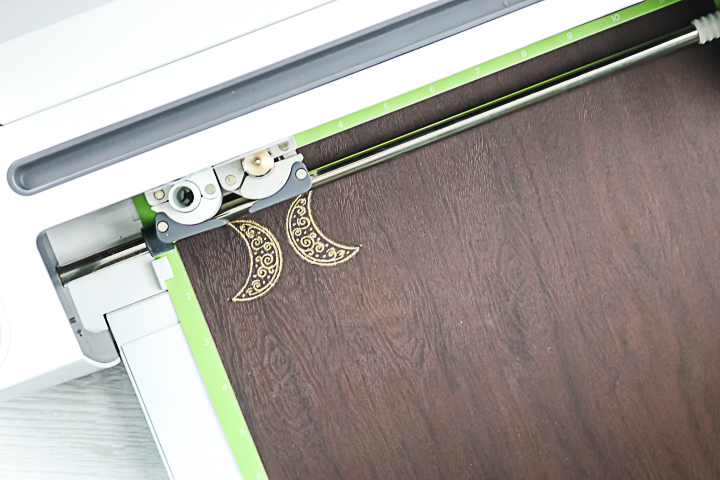
I created a pair of earrings featuring two faux-leather pieces in different colors, each adorned with gold foil accents. Once the Cricut has finished cutting, all you need to do is attach some jump rings and earring hooks to complete the project.
Vellum
Yes, you can definitely add foil to vellum! This allows for a wide range of project possibilities. I wanted to test this out using a complex pattern design. In the image below, you can see how the Cricut machine ejects the mat just far enough for you to remove or add the foil easily.
I am currently organizing all of my projects to create a lovely gift, and I've incorporated the vellum sheet into the wrapping. However, I needed something to keep it closed, so I made one final project below. Unfortunately, I did get some foil on my mat while working on this one. Again, please learn from my mistakes and be cautious with foil placement.
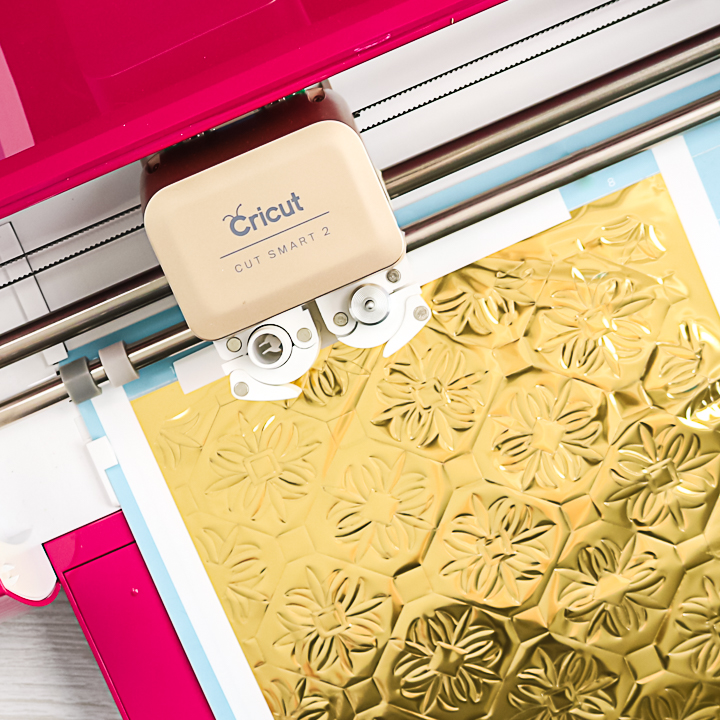
Printable Vinyl
You can make foil stickers with your Cricut machine. You read that right. I am over the moon excited about the possibilities for this one! Simply add your printable vinyl to your machine and foil, then cut your stickers (either with a kiss cut or a cut-through method).
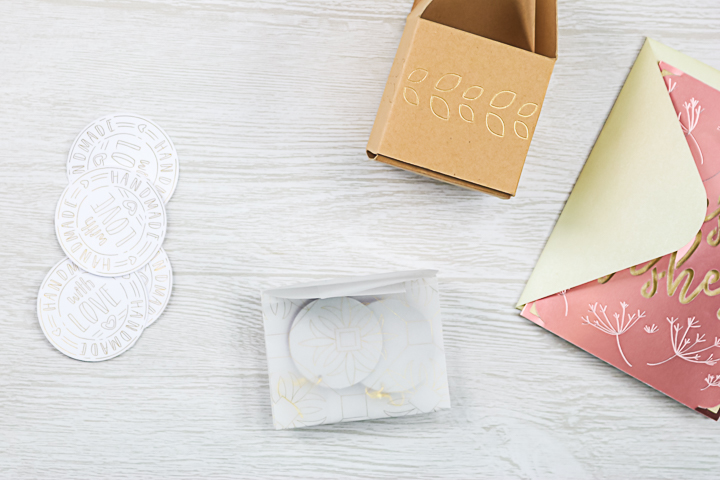
Cut Files for Projects
Want to make any of the projects shown above? Visit my Cricut Design Space profile and scroll to this project (note that there are also other foil projects available there). Remove or hide any images you do not want to use, and start foiling.
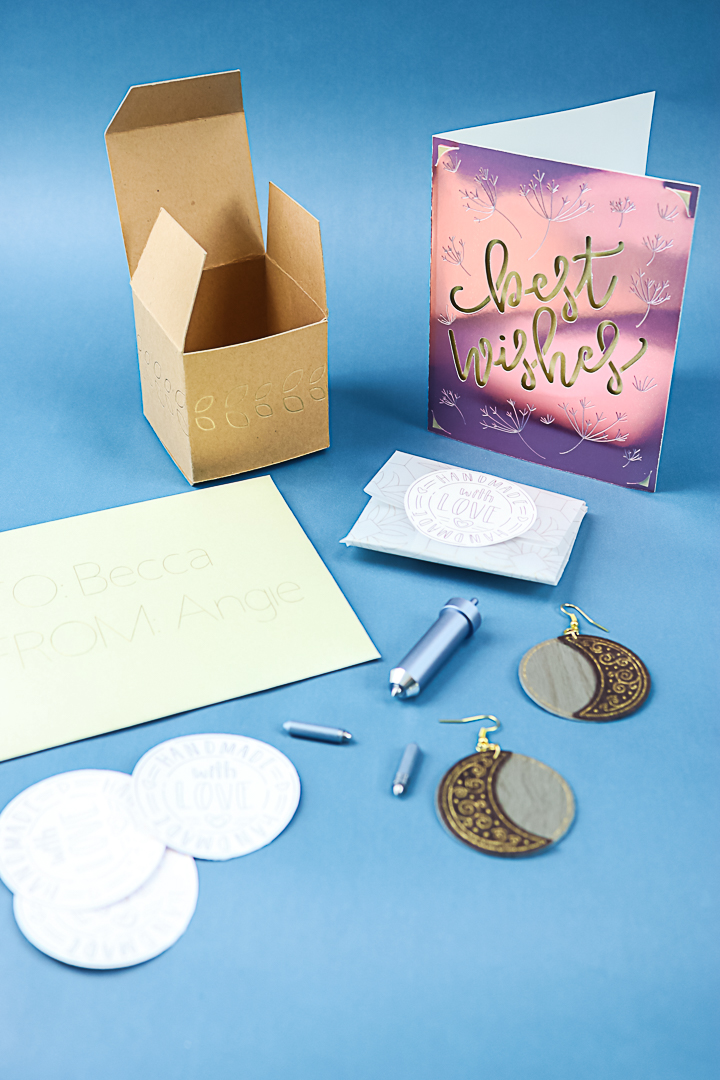
I combined all of my projects into one charming gift idea, with the earrings beautifully wrapped in vellum and placed inside a gift box. This Cricut foil transfer kit can be used in various ways, and creating gifts is just one of the many possibilities.
Storage Tips
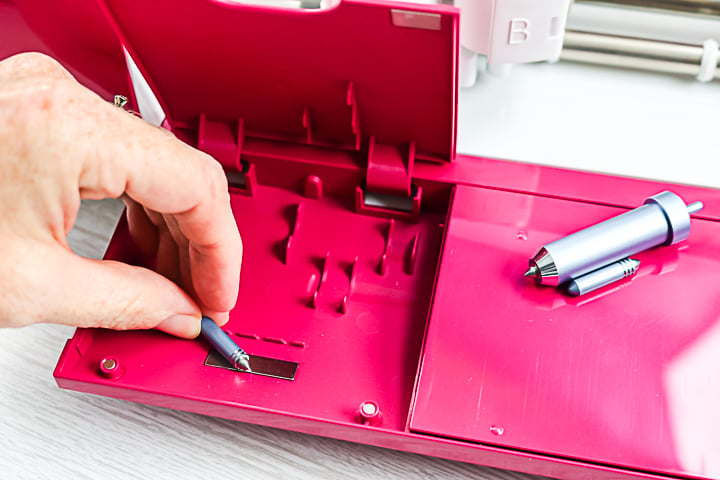
One thing to note is that the tips are super small and easy to lose. My tip for you is to add them to the magnetic strip inside the tray of either your Maker or Explore. This will keep them from getting lost and you from needing to buy replacements.
Cricut foil tool transfer kit wrap-up
The final question is whether or not you need the Cricut Foil Transfer Kit for your machine. Here are a few of my top reasons for buying this tool:
- If you have ever wanted to experiment with metallic foil in your craft projects, this is a great way to do so.
- If you have been frustrated by other foiling methods, I think you will be pleasantly surprised by this one. I have tried several methods over the years, both with and without my Cricut. I must say that this one is easy and has excellent results.
- If you have never heard of foiling until just now and you are intrigued, there is no better time to start!
- If you love all things shiny, what are you waiting for? Be sure to order your kit today.
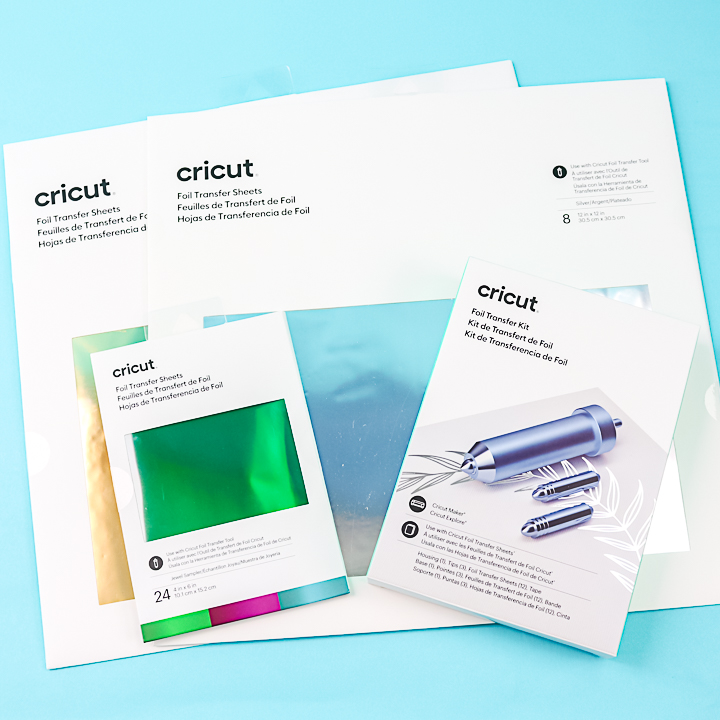
The Cricut Foil Transfer Kit has everything you need to get started, unless you want to start with larger projects. If that is the case, you will want to get the larger 12×12 sheets. Also, the kit includes gold and silver foil. If you want to add some color, be sure to pick up a colorful variety pack as well.
If you have any questions or if I overlooked anything, please feel free to leave a comment below. I’ll do my best to update this post with new information and projects as they come up. I have plenty of ideas for this kit, and I’m excited to share them all with you!


Thank you for your comprehensive post! I do love my new foil transfer tool! The first project I tried in Design Space was beautiful, but I’m having problems with the text. It’s a multi-line project, which requires changing the text to personalize. I have to detach to do so and then I’m unable to attach it back, so the lettering comes out beside the box top. So frustrating! I have a request in to Cricut Support hoping they can help, as I’ve spent hours trying everything to get it to work.
You could always move it on the mat instead of attaching it. Not precise but will work until they get back to you!
Thanks for the suggestion, that’s actually what I did!
I can’t seem to get the foil onto the vellum paper. Is there a specific setting you used on your Maker for that? I can do cardstock ok??
Hmm…I used the vellum setting and didn’t have issues. Does the vellum feel different on one side versus the other? Maybe one side has a coating?