

If you love the look of decorative letter decor but not the price, then today's project is for you! Learn how to Mod Podge cardstock onto papier-mache letters to create custom, gorgeous monogram letter decor!
How To Make Mod Podge Cardstock Letter Decor
Creating knock-offs is my specialty! I love making these kinds of things because they save me money and let me add my own twist to something I already love.
For instance, today's project was inspired by all those monogram letter decor pieces I have been seeing online. These decorative pieces are essentially letters of the alphabet with a specific pattern on their front. This pattern could be a general one (like stripes) or something more specific, like a still-life scene.
Regardless of the pattern, the letters look amazing, but the prices are crazy! So, I decided to make my own using papier-mache letters, Mod Podge, and cardstock.
The results were impressive, and the price was even more appealing! The original items I found online were priced at $48 each, but I was able to create mine for about $10 each. With those kinds of savings, you could make four of these monograms for the cost of one! It’s definitely worth it!
NOTE: If you are looking for similar projects, I have a similar craft using metallic paper and scrapbook paper, too.
Supplies Needed To Make Mod Podge Cardstock Letter Decor
- 12-inch Paper Mache Letters
- Scrapbooking Paper (I used the Royal Garden Stack from DCWV)
- Mod Podge
- Craft Knife
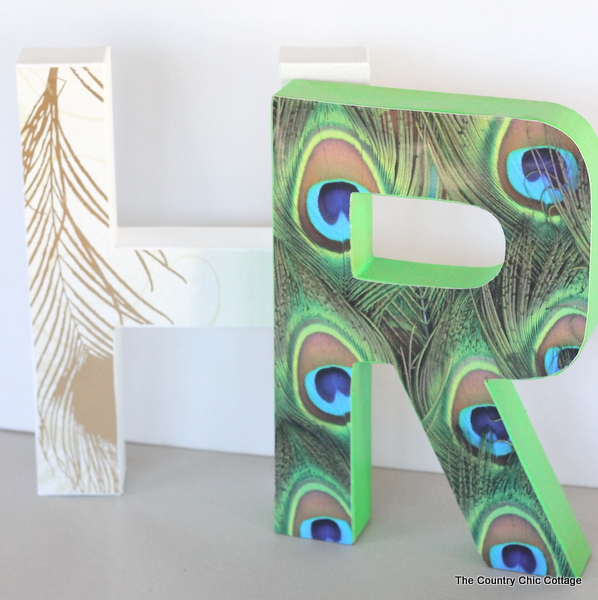
- Craft Paint in your choice of color (I used white on the H and Glamour Dust by DecoArt on the R)
Step 1: Paint Paper Mache Letter
First, paint your sides in the craft paint color of your choice. Use enough coats to cover your paper mache completely. The Glamour Dust really should have had a base coat painted under it. Instead, I painted way too many coats to get good coverage. Learn from my mistake.

Step 2: Cut Out Letter From Cardstock
Turn your letter upside down on the BACK of your paper. Use your craft knife to cut around your letter carefully.
NOTE: Place a non-cut mat or old magazines under your paper to protect your work surface.

Step 3: Mod Podge Cardstock To Paper Mache Letter
Then simply decoupage the paper directly onto the letter. Believe it or not, that is all there is to it. Allow it to dry, and they are ready to display in your home!

These are wonderful to display anywhere in your home. I do love the peacock version that my daughter chose. The “H” is all mine, however!

Get that fancy letter decor look for just a fraction of the price. Plus, the options to personalize these great letters are endless. Take your kids to the craft store and let them pick their favorite paper in the scrapbook section to get your own project started. They will love the results, and you will love the price tag!

FAQs About Mod Podge Cardstock Letter Decor
Here are answers to some of the most frequently asked questions I receive about this Mod Podge cardstock letter decor. If your question isn’t listed, feel free to drop it in the comments, and I’ll be happy to help!
How Tall Are Your Paper Mache Letters?
My version is 12 inches high, but you can make your letters as big or as small as you would like.
Could I Use Wood Letters For This Project?
You can, but it will most likely cost more and weigh more.
What Type Of Mod Podge Did You Use For This Project?
I used matte Mod Podge for this project, but you could use gloss as well.
Besides Home Decor, Where Else Could I Display These Monogram Letters?
You can display these monogram letters at a variety of parties and events! For example, you could display this monogram letter decor at the following events:
- Birthday Party
- Graduation
- Wedding
- Baby Shower
5 More Mod Podge Crafts
If you loved learning how to Mod Podge cardstock and are looking for more Mod Podge crafts, check out the posts below!
- Fabric Plant Pots with Mod Podge Ultra
- How To Make Easy DIY Oyster Shell Trinket Dish
- Broken Glass Mosaic Frame with Mod Podge Ultra
- Mod Podge Glitter Earrings
- DIY Vintage Crate with The Home Depot


Thanks for your tutorial! I purchased an initial for my daughter’s first apartment. I can’t wait to create a keepsake for her! 🙂