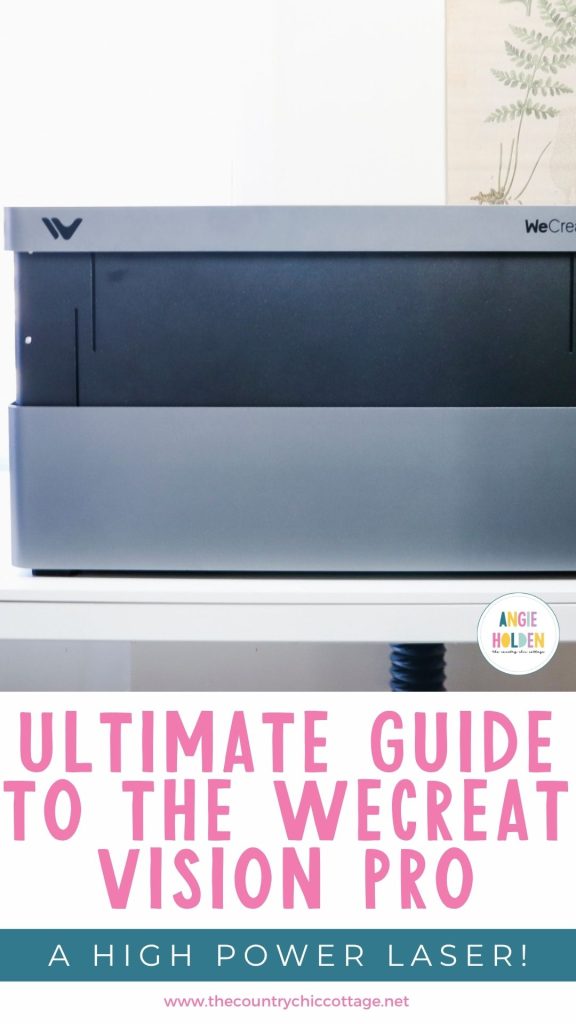
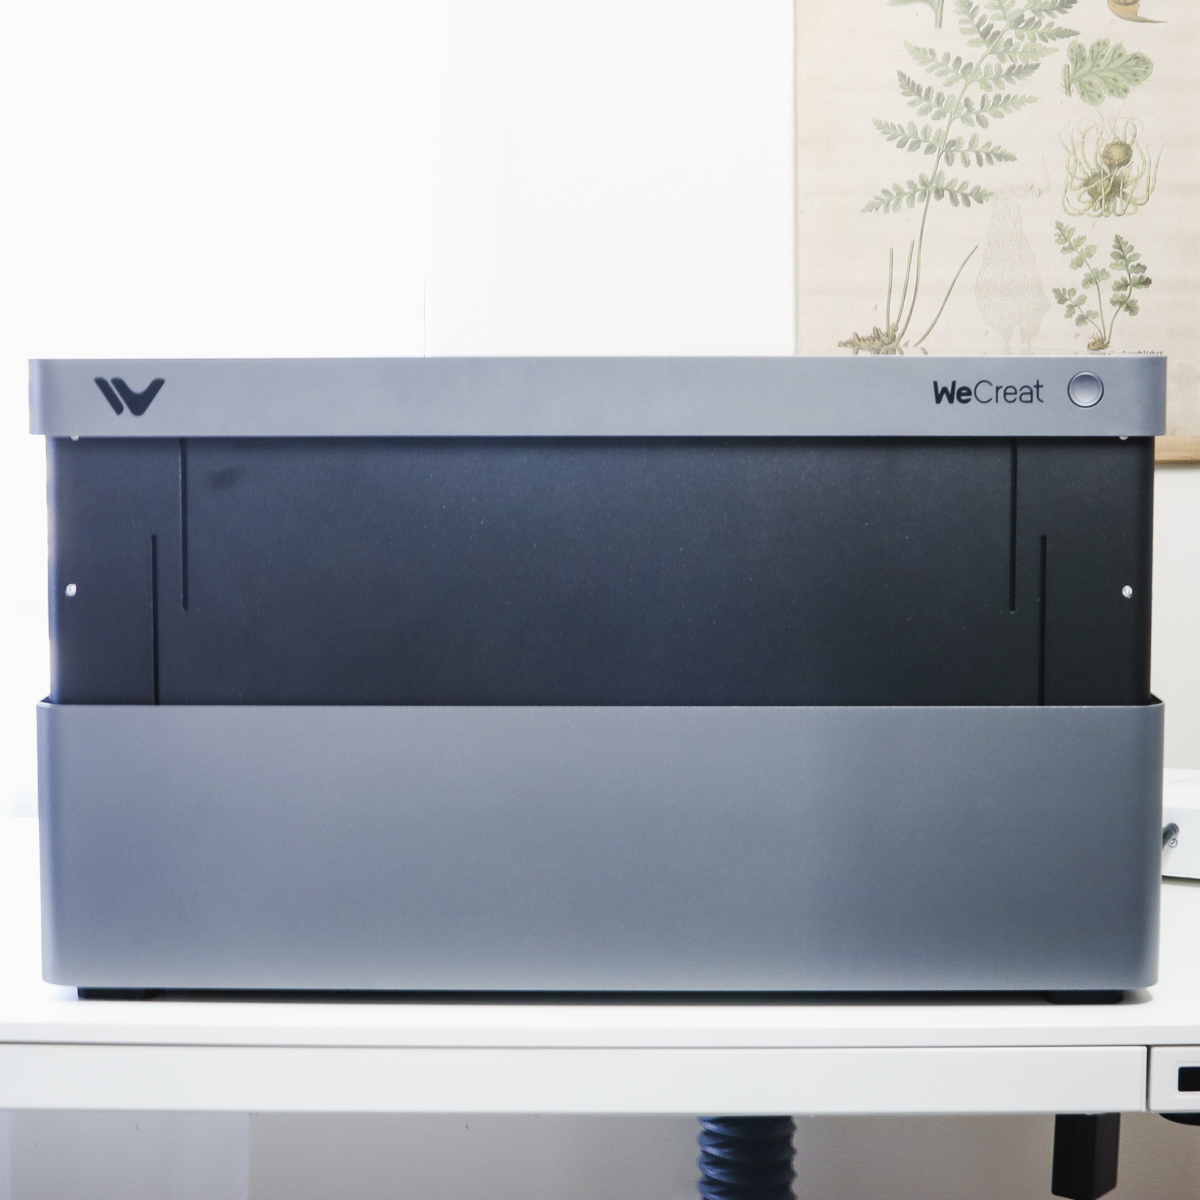
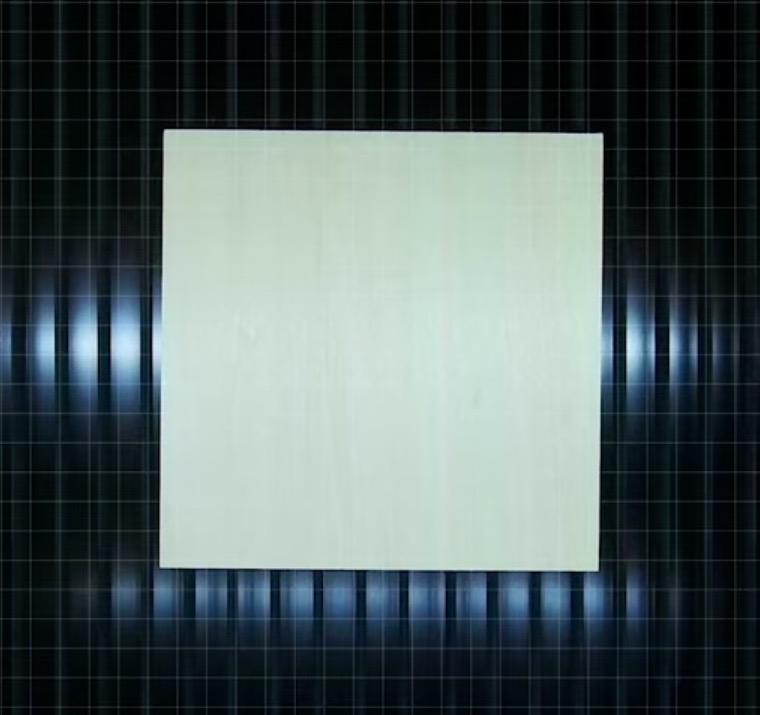
If you're searching for a high-powered laser that will allow you to cut thick wood, the WeCreat Vision Pro may be exactly what you're looking for.
This 45W diode laser was designed with small business owners, advanced crafters, and even woodworkers in mind. An upgraded version of the WeCreat Vision, the Vision Pro allows you to level up your laser crafting while still being beginner-friendly for laser crafters just starting out.
With impressive cutting power, you're going to love being able to cut thick materials like wood with the WeCreat Vision Pro.
You can watch me walk through all you can do with this machine by pressing play on the video below.
WeCreat Vision Pro 45W Laser
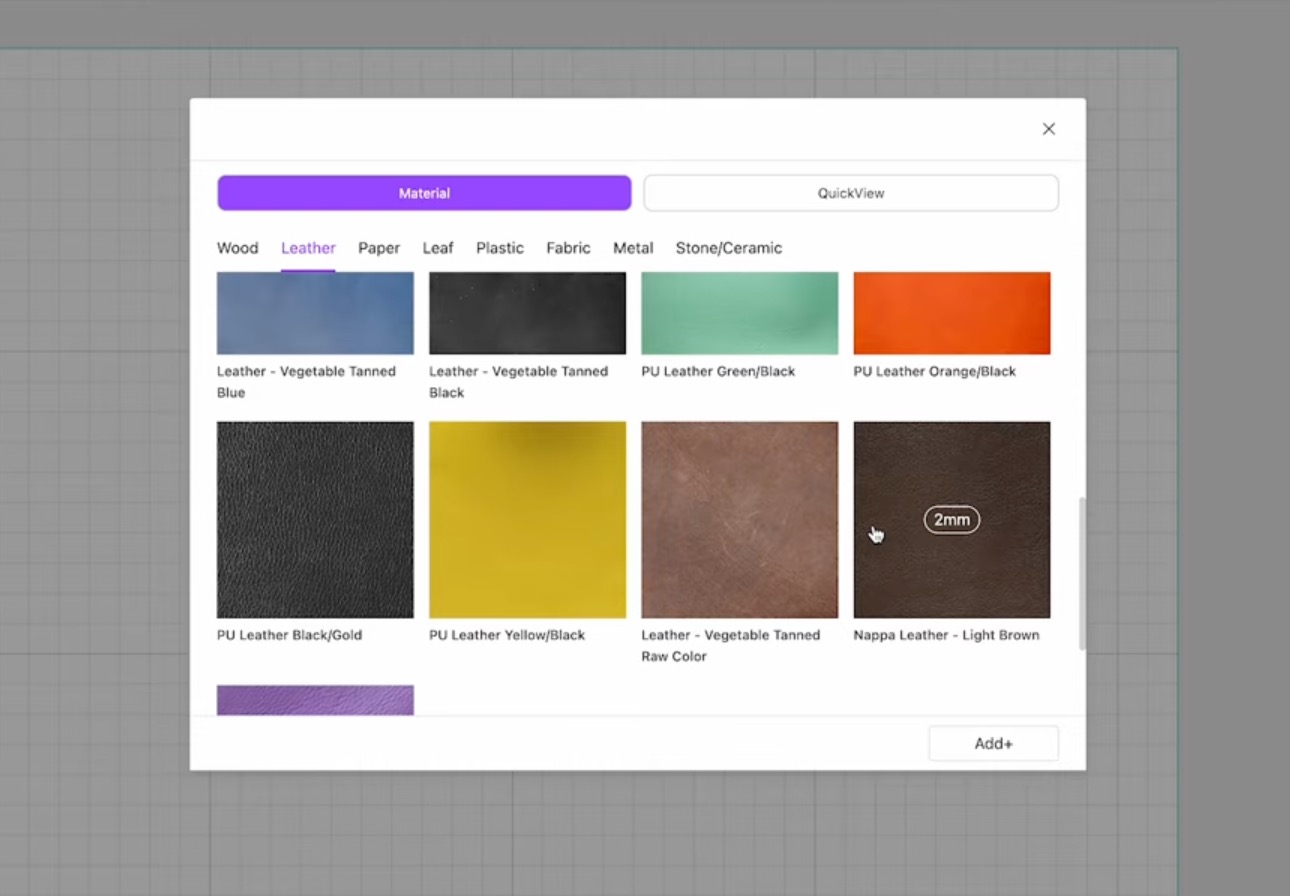
Just like the original WeCreat Vision, the Pro is a blue light, diode laser that allows you to cut laser-safe materials like wood, opaque acrylics, leather, cardboard, cork, etc.
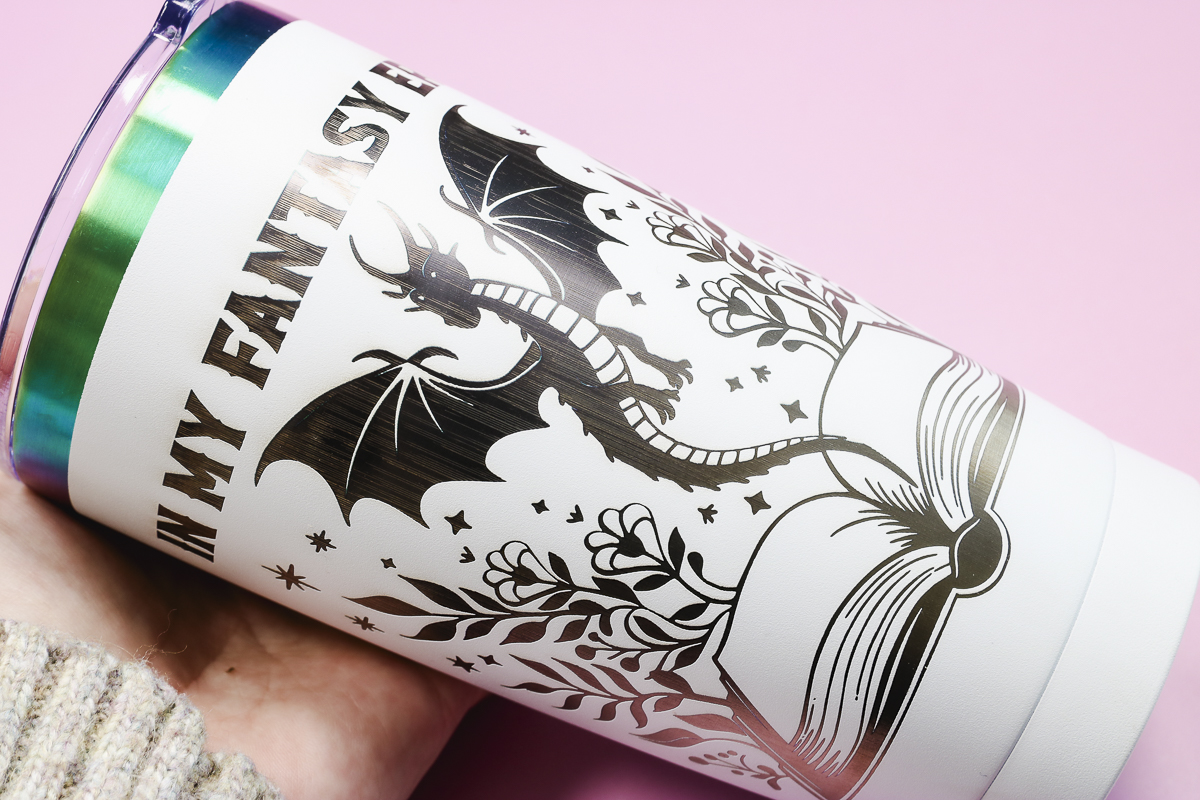
With the WeCreat Vision Pro, you can engrave on wood, leather, opaque acrylics, tumblers, and even metal.
How is the WeCreat Vision Pro Different?
With the original WeCreat Vision, you had laser head options of 20W or 40W. The 45W blue diode in the pro laser can cut thicker materials and provides professional-level cutting and engraving.
Perfect for small business owners, woodworkers, crafters who want more cutting power, and laser crafters wanting a larger work area or faster production speeds.
While this laser has professional capabilities, the setup and software continue to be beginner-friendly.
The Pro also has a larger bed, not just in height but in width as well. That means the laser itself is larger so make sure to check the dimensions to ensure it can fit in your crafting space.
Beam Focus Technology
The WeCreat Vision Pro has a revolutionary beam focus technology that allows the 45W laser to perform like a 60W laser while using less energy. This is a very powerful laser.
The benefits of this 45W revolutionary beam focus technology vs a 60W laser include:
- Smaller Laser Spot Size
- Higher Power Density
- More Efficient Cutting
- Cleaner Cuts
- Longer Lifespan
You'll see some of these come into play in some of the projects I am going to make today.
WeCreat Vision Pro Laser Setup
One of the best things about this laser is how easy it is to set up, which allows you to get crafting faster.
The laser is almost completely assembled when you receive it.
You'll need to remove it from the packaging and then take the time to remove all the packaging from inside and outside the laser.
Some of the accessories and supplies will be packaged inside the laser. Don't toss anything until you're sure there is nothing inside.
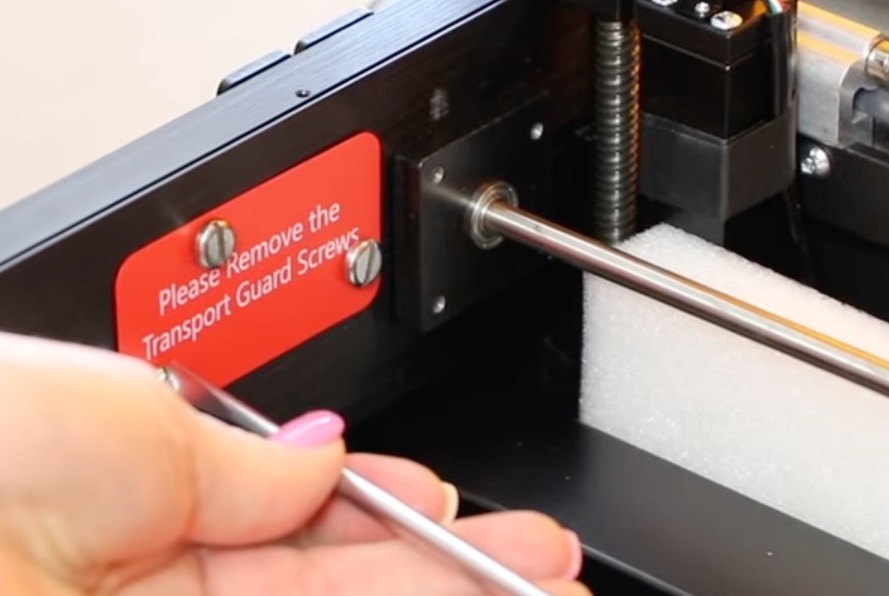
With the foam and packaging removed from inside the laser, with the lid lifted, you'll see three transport guard screws. These have a red label, and all three need to be removed.
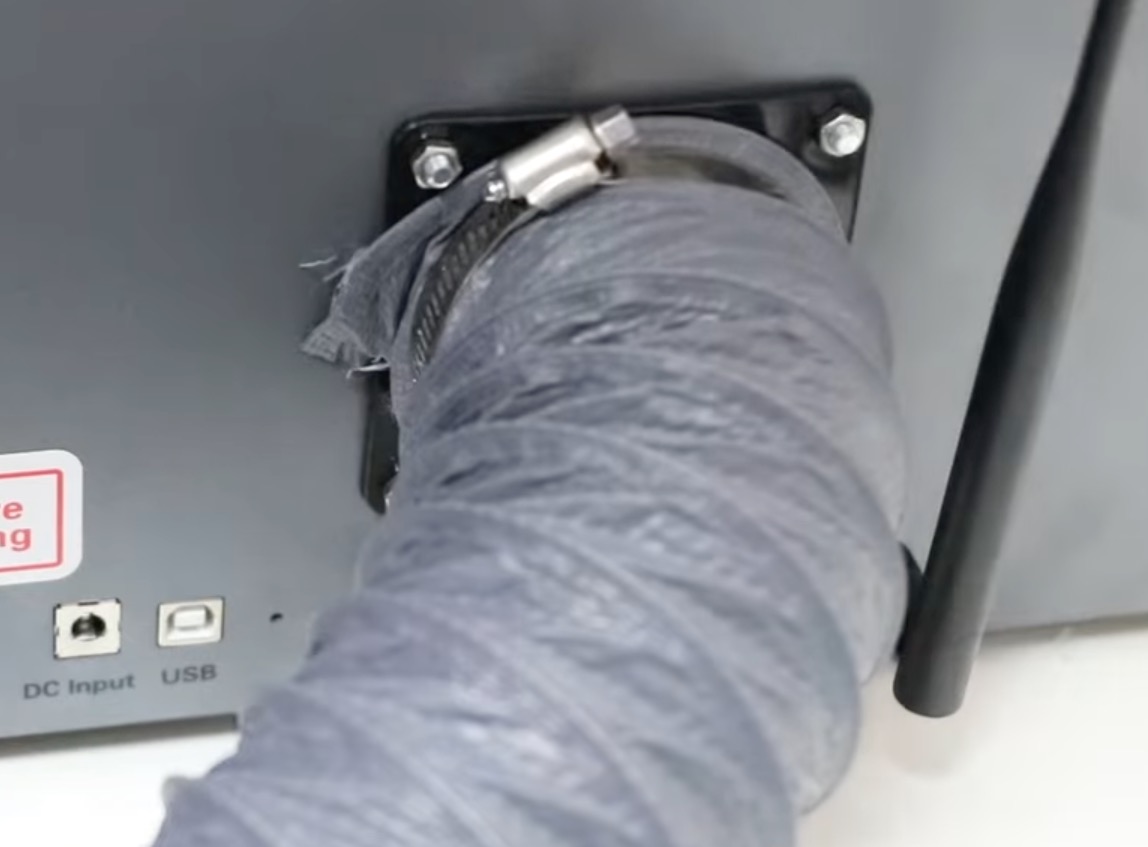
On the back of the laser, attach the exhaust hose bracket and hose, and connect the Wi-Fi antenna. Plug in the USB cord, power cord, and air assist cables.
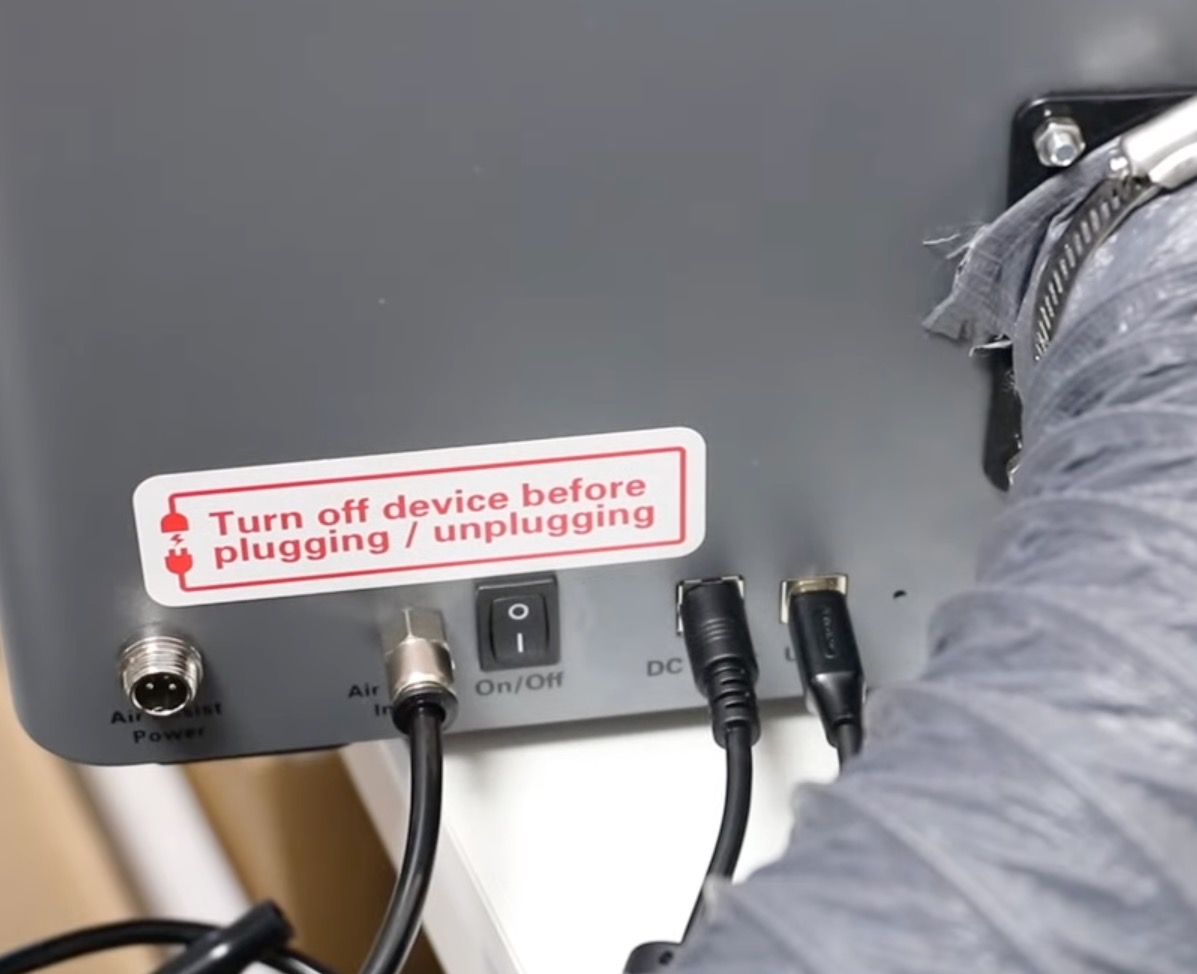
For the Air Assist, you will attach the cable for the power and the tube for the air itself. The other end of the air tube is attached to the air assist box.
Other Items Included
There will be other items included with your laser. What is included will depend on how you purchased your laser. Did you purchase it by itself or as part of a bundle?
I have the infrared laser head and the rotary accessory, so some of those items were packaged with the laser.
Your laser will also come with a pack of materials for you to make your first project and some wood pieces to use when calibrating the camera.
Insert the Bottom Tray
The Vision Pro has a bottom tray that needs to be added to the laser. To do this, lift the front of the laser a little bit and slide it into place.
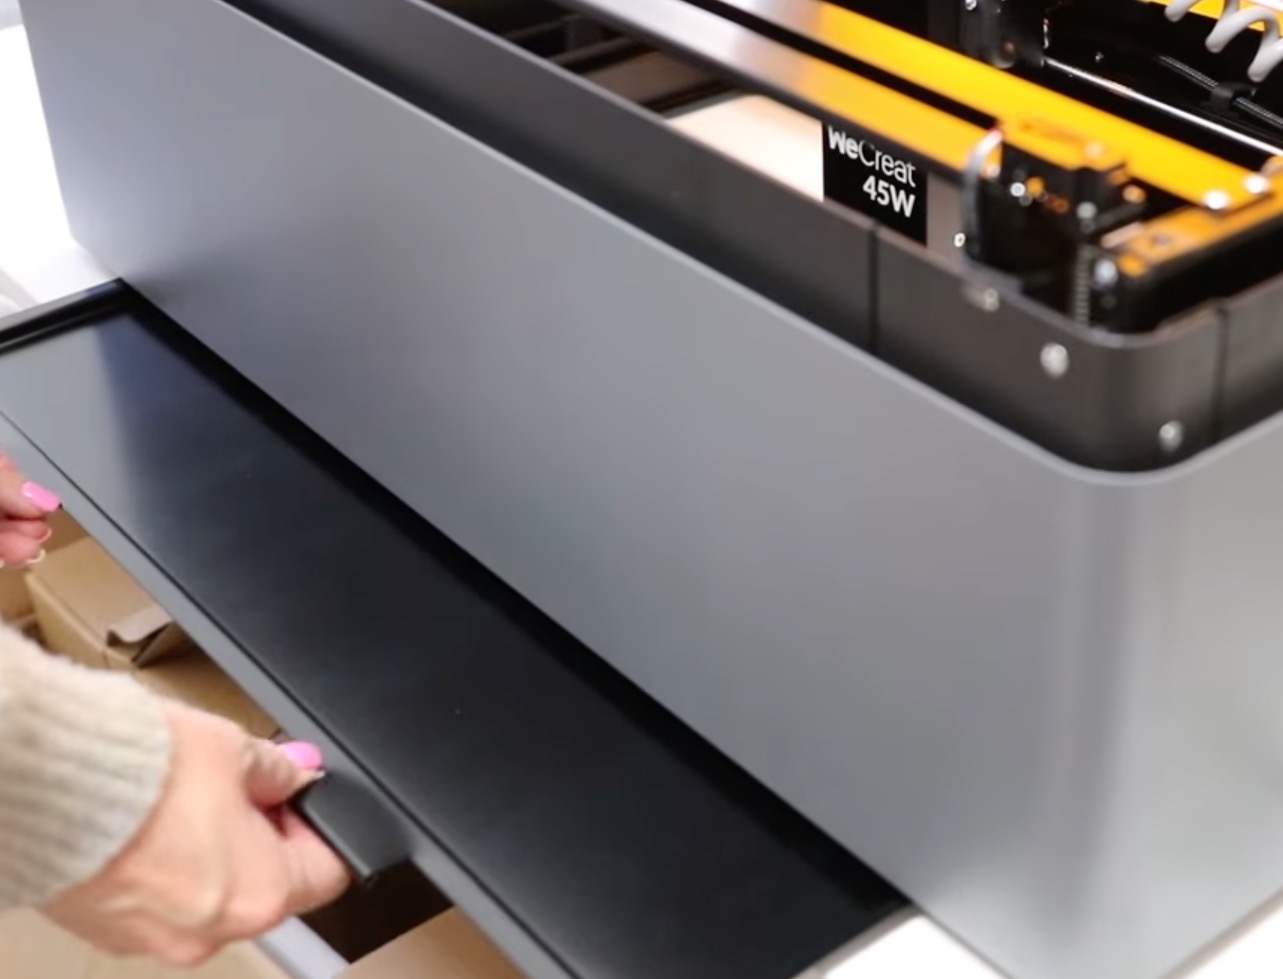
Lift the laser lid so you can make sure the tray slides in on the rails on both sides, and now we're ready to power on the laser.
Power On the WeCreat Vision Pro
Plug the laser into a power source and click the button on the back to turn it on.
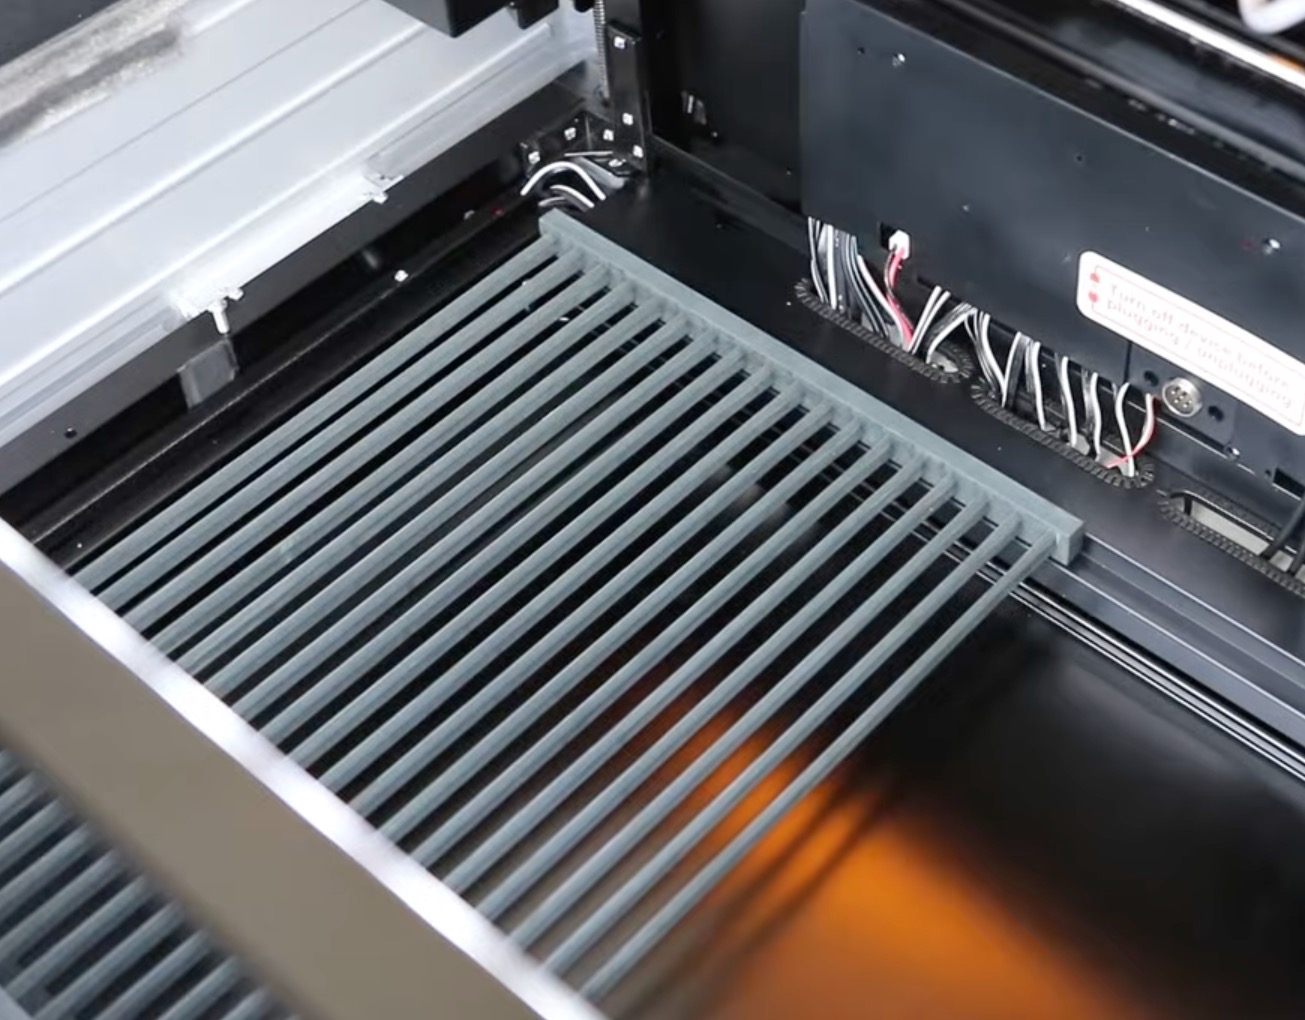
Once it's on, it will make a noise and then raise itself up to its resting position.
Make sure you are out of the way while the laser is raising, so you don't interfere with the process.
Note – raised up is the resting position for this laser; this is how it will sit as a default.
With it raised, we can add the laser beds inside. These pieces were in the foam packaging, so make sure to check for them.
With those installed, the laser setup and assembly are complete. I love how simple the process is.
WeCreat MakeIt Software
The WeCreat Vision Pro uses the WeCreate MakeIt software. If you haven't already, go and download that software.
From there, you will connect the USB cable to your computer and then connect the laser to the software. Follow the prompts, and it will walk you through the steps to connect to the WiFi.
You can use the laser by connecting via the USB, but I find it much easier to use it regularly by connecting via WiFi. Once you're connected to the WiFi, you no longer need to use the USB cable.
If you have any questions on this process, the manual included with your laser will walk you through the process step by step.
The MakeIt software is designed to be beginner-friendly while still allowing you to create the impressive projects you're imagining.
Within the MakeIt software, you'll find material presets, built-in shapes and text tools, framing tools, a camera preview, the ability to autofocus, and the option to import designs.
Camera Calibration
Within the WeCreate MakeIt software, you can calibrate the camera that is on the lid, inside the laser.
The calibration process is really simple, and the software will walk you through the process. I calibrated my camera, and it was a very easy process.
LightBurn Compatibility
I am using the MakeIt software for all of the projects I am making today, but I did want to mention that the WeCreat Vision Pro is fully LightBurn compatible.
If you're familiar with LightBurn and prefer to use that with your laser crafts, you can do that. An added bonus is that the built-in camera works with LightBurn and WeCreat MakeIt.
Optional WeCreat Vision Pro Accessories
There are optional accessories you can get to work with the Vision Pro. These can be purchased in a bundle with the laser itself or on their own.
- 2W Infrared Laser Head – The blue light diode laser head can mark coated metals, but it can't really engrave them. The 2W infrared laser head allows you to truly engrave metal, even uncoated metal, and other specialty materials.
- Rotary Pro Accessory – If you want to engrave cylindrical objects like tumblers, cups, mugs, and bottles, you'll want to add the rotary pro. The Rotary Pro makes the engraving process easy, and the results are amazing.
- Auto Pass-Through Feeder – If you want to make really large projects, make sure to check out the Auto Pass-Through Feeder. When I think about the pass-through feeder, I picture vertical porch signs with intricately engraved designs.
During this review, I will be testing the 45W blue light diode laser head, the 2W infrared laser head, and the rotary pro accessory. I won't be testing the pass-through feeder.
Laser Safety
Alright, now that we have both the laser and the software set up, we're ready to get crafting. Before we begin, let's chat about laser safety.
I always like to talk about laser safety before making the first cut with any laser, because it is so important to operate these machines safely.
The Vision Pro has some built-in safety features:
- It is fully enclosed, which will protect your eyes while it's working.
- It has smoke and fire detectors that will shut it off automatically.
- The air assist accessory can also help prevent fires.
Other safety things you need to know include:
- Never leave the laser unattended while in use. Smoke and fire detectors are helpful, but you need to stay close by in case something happens and the detectors fail.
- Always ventilate your laser. The hose we attached to the back of the laser can be vented out a window or attached to an air filter. Compatible air filters can be purchased as a bundle with your laser or on their own at a later date.
- Keep a fire extinguisher and/or fire blanket nearby.
- Only use laser-safe materials. Some materials can emit toxic fumes when cut with a laser. Always make sure the materials you're using are safe to use in a laser.
Cutting Capacity and Specs
Now that we know how to be safe when using the WeCreat Vision Pro, let's look at the specifications for the projects we can make.
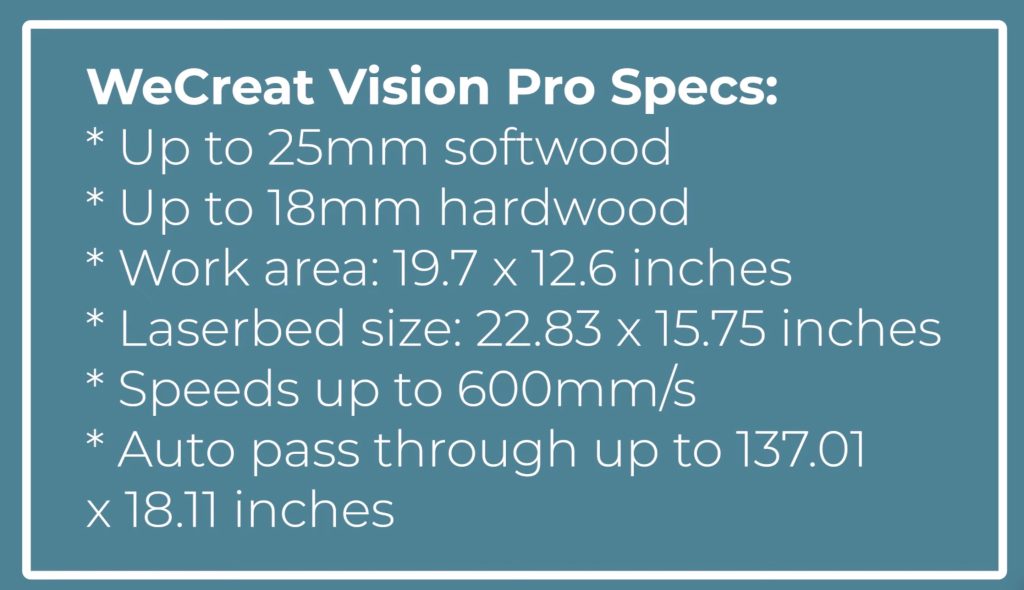
- The Vision Pro is capable of cutting soft woods up to 25mm thick and hard woods up to 18mm thick. It can cut 25mm basswood in a single pass.
- The work area is 19.7″ by 12.6″, and the laser bed is 22.83″ by 15.75″. It has a maximum speed of 600mm/s.
- The auto pass-through feeder can accept materials 137.01″ by 18.11″.
The large cutting area makes this machine perfect for people making oversized projects or batching a lot of products at once.
Cut and Engrave Thin Wood
When using any laser for the first time, I like to do a simple project that cuts and engraves so I can test how everything works and that it's working correctly.
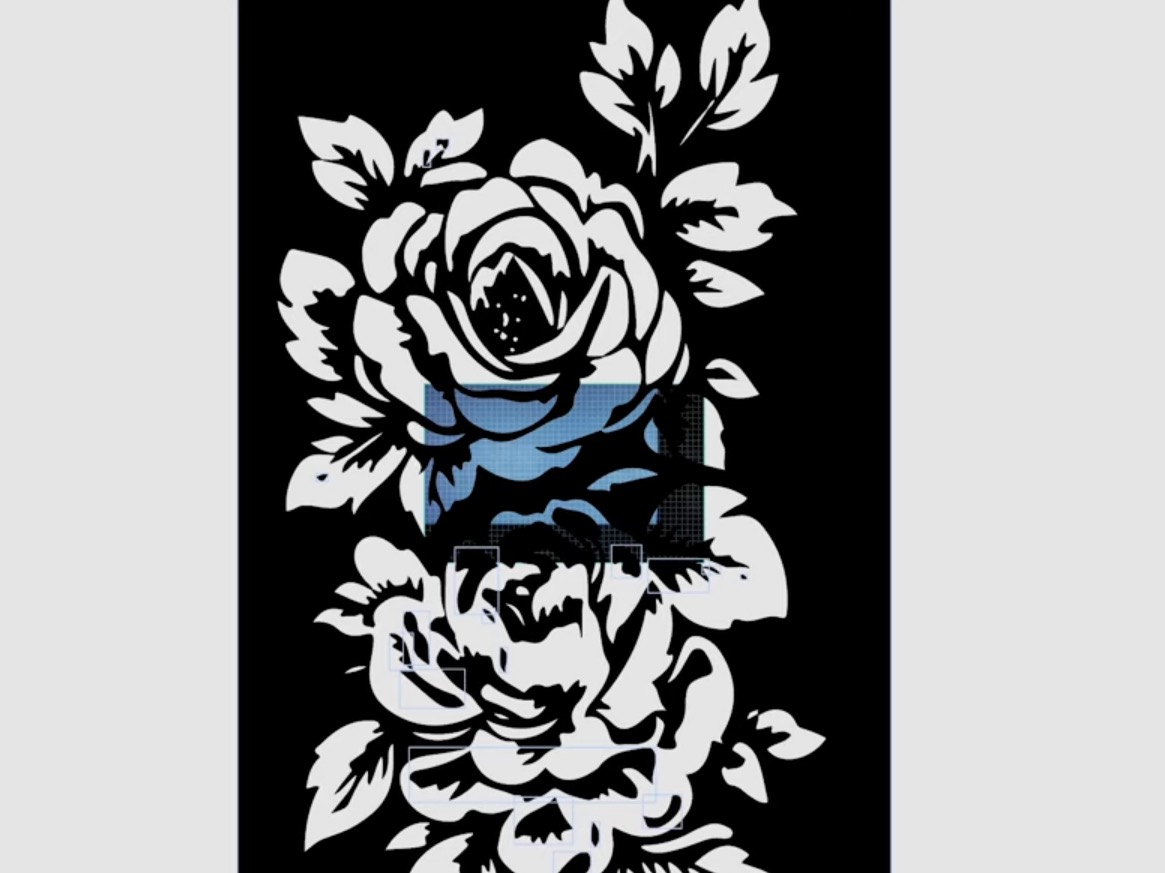
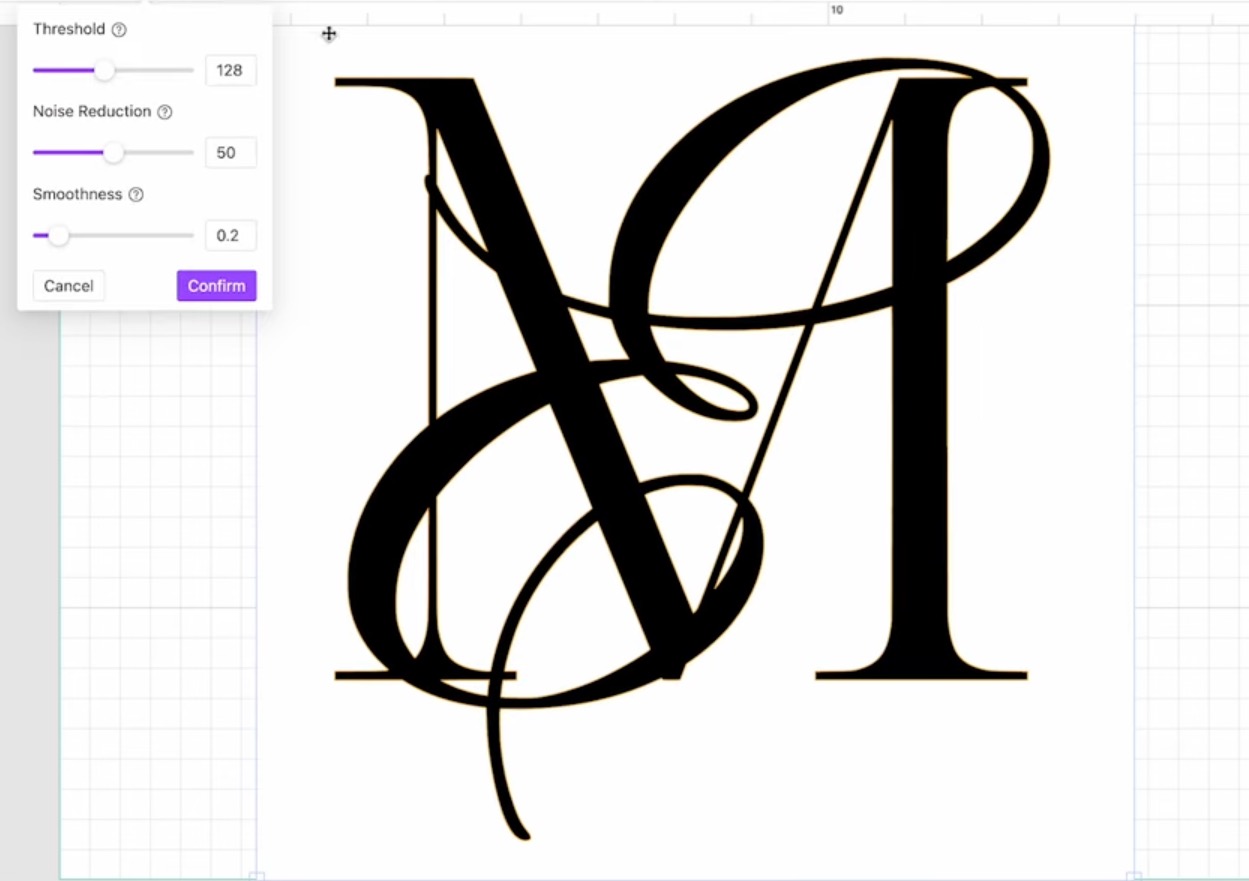
Step 1. Create the Design
Open the MakeIt software and click on New Project. Connect your laser, and you will see the laser bed on the screen.
Open the laser lid and place the material on the laser bed. Hit Refresh, and when the screen refreshes, you'll see the material on the laser bed.
To test the cut and engrave abilities, I am going to add some text to my design.
Add Text
Click on the Text tool and type Hello and scroll through the fonts to find one you like.
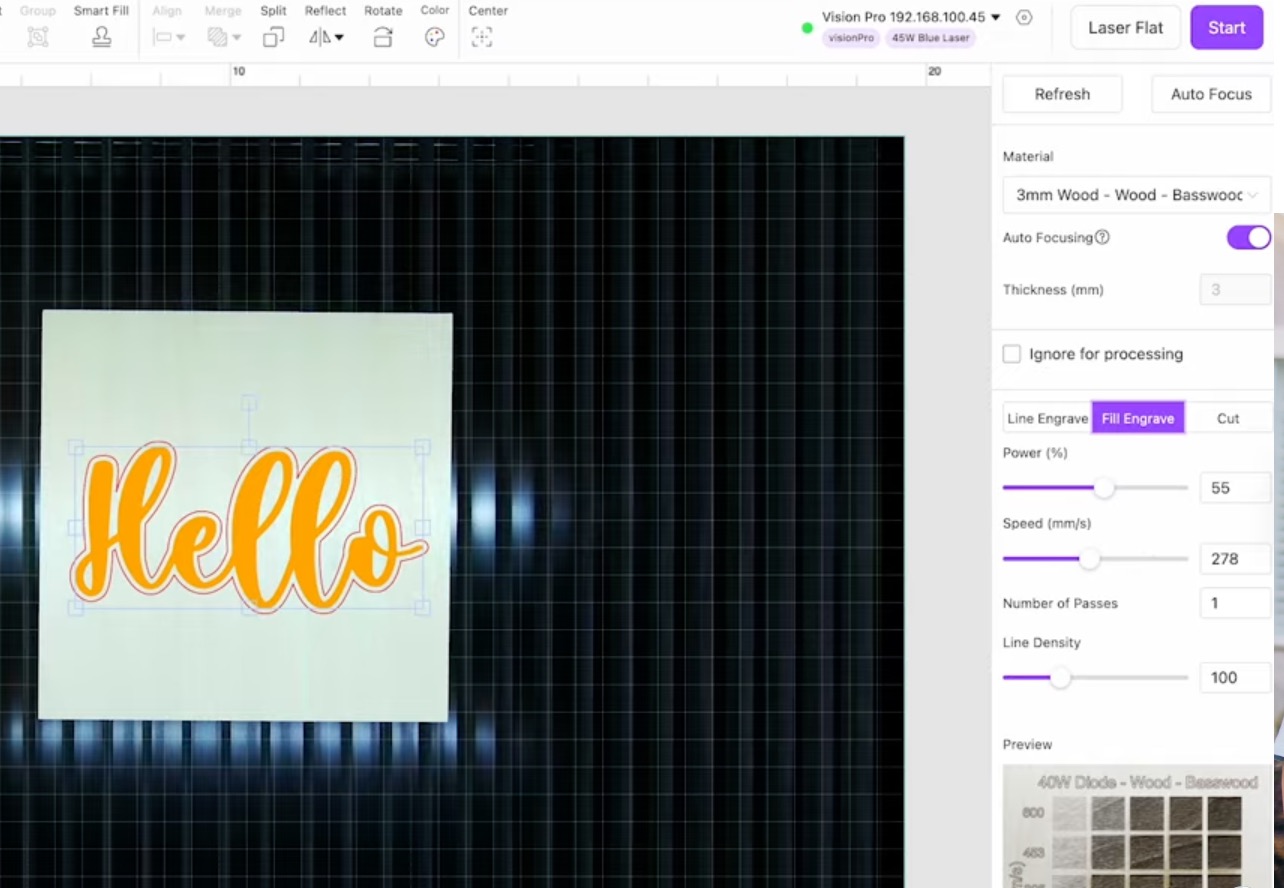
I chose a script font so all the letters would touch. If you do this, make sure to weld the letters so they cut out together, not individually.
I have my text layer set as an engrave line.
Add an Offset
Next, I added an offset layer. You can make the offset as big or small as you'd like. I wanted mine to be big enough to include all the letters without any inside cuts.
I set the offset layer to cut so I can test both cut and engraving on this one project.
Resize the Design
To finish the design, I selected both layers and resized the design so it cut how I wanted on the material.
Step 2. Choose Your Material Settings
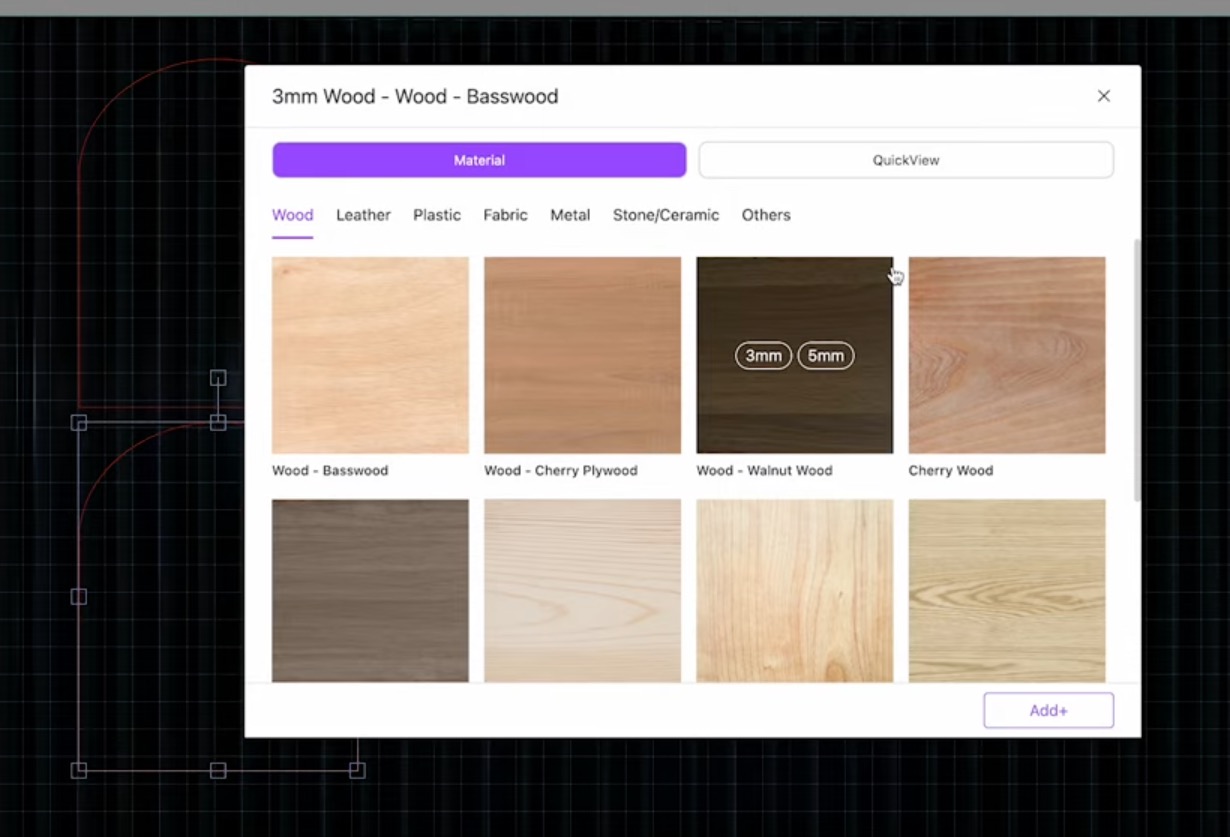
In MakeIt, I selected the 3mm Basswood material because that is what I'm using.
On the right side of the screen, you can see a preview of what the different settings will look like on that material.
This preview allows you to change the recommended settings if you'd like a different engraving result.
If you want your engraving to look lighter or darker, you can change your settings to match those.
Step 3. Auto Focus the Material
With the settings selected and the design sized correctly, click Auto Focus, and the machine will auto focus on the material.
You may see the machine move up and down during this process. This is normal and what it's supposed to do.
When it's done auto-focusing, the screen will refresh.
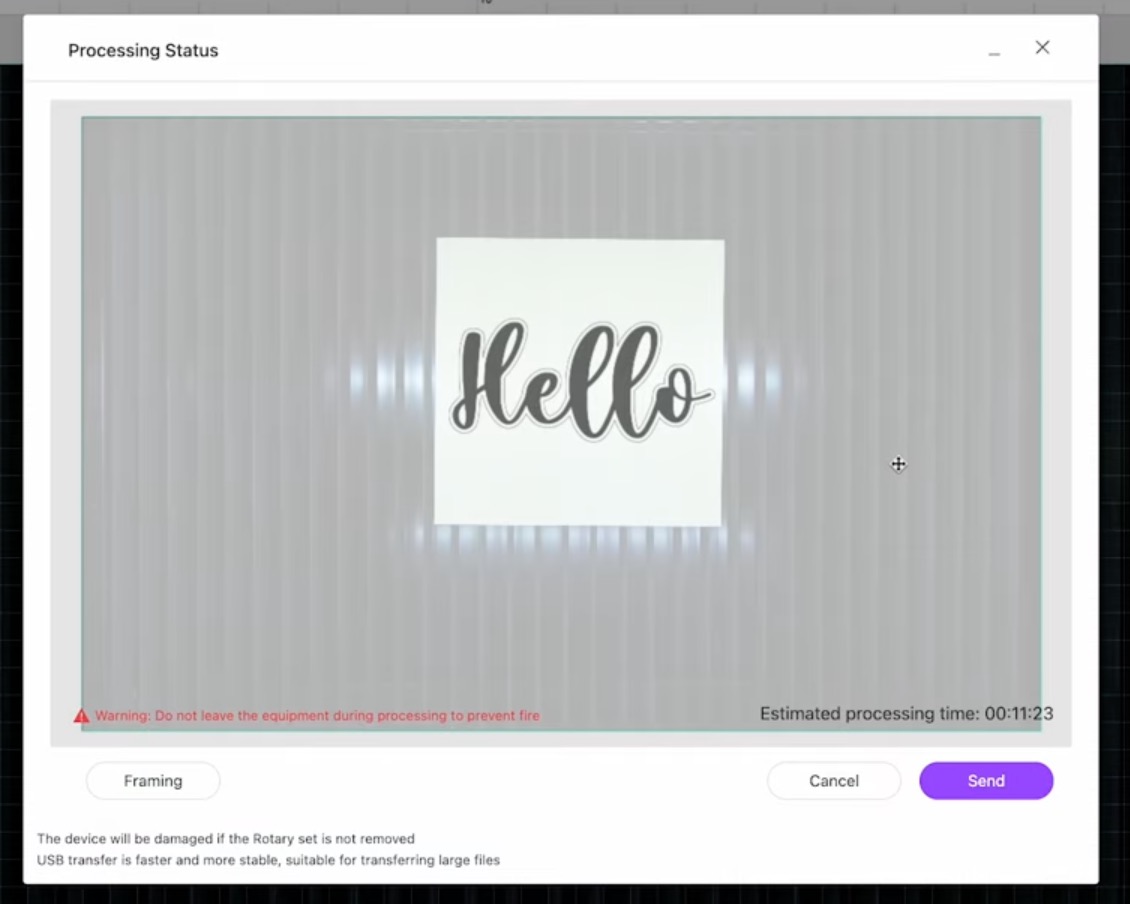
Step 4. Frame the Design
After the auto-focusing is done, click Start, and here you can choose to frame the design.
Click Framing, and instead of looking at the computer screen, look inside the laser. You'll see the laser head move, and the light will show you where it's going to cut/engrave without actually doing it.
I find this helpful, especially when my design is close to the sides of the material.
I always do this step to make sure everything is located correctly. If it doesn't look right, you can either move the material or the design and click Framing again.
Step 5. Cut and Engrave the Design
When I'm happy with the way the framing looks, I'll click Send to send the design to the laser.
Press the button on the front of the laser to start the process.
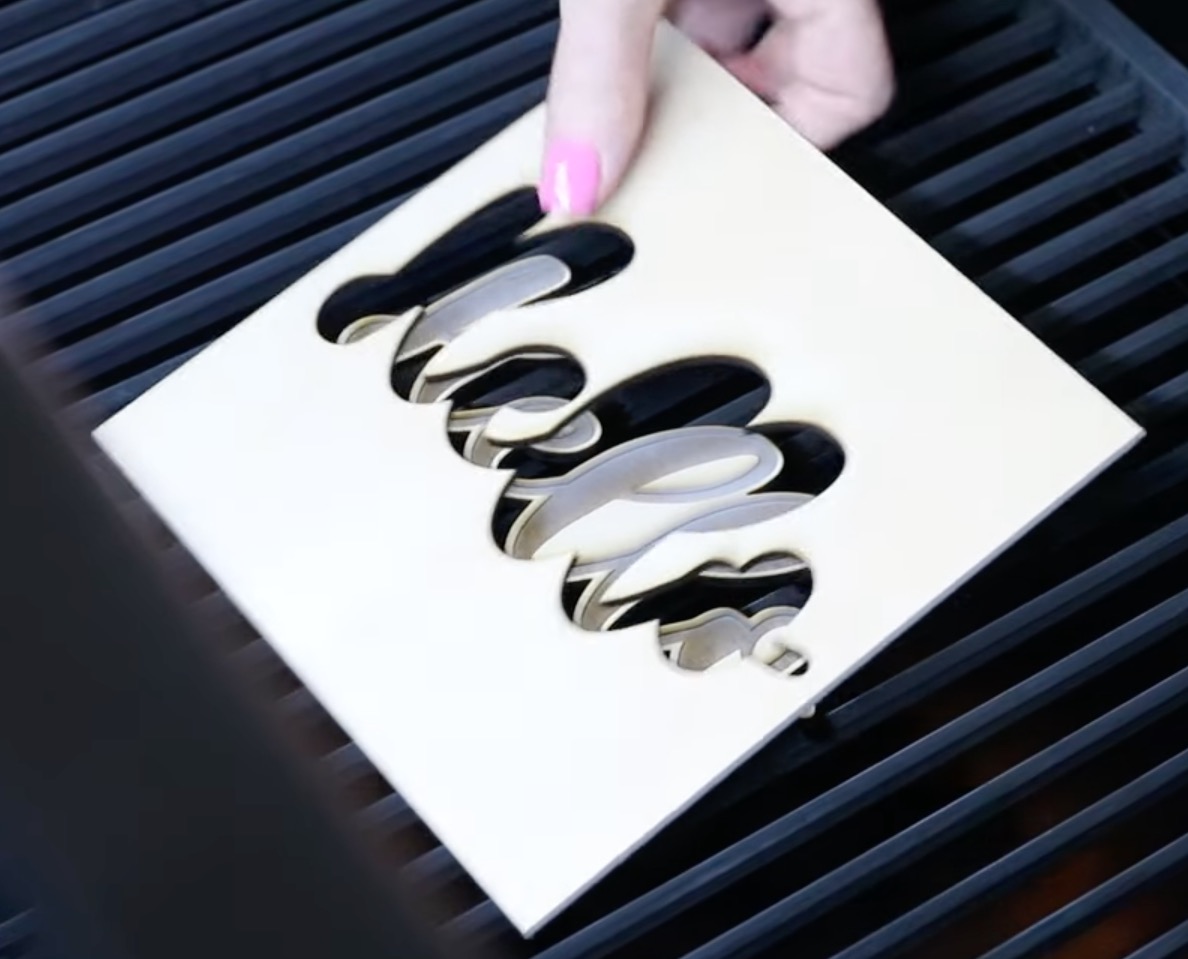
The laser will engrave the design first and then cut it out.
When it's done, the top of the laser will rise up to the original position, and the project is done.
Open the lid to remove the project.
Step 6. Project Clean Up
For projects like this, you may need to clean them up a little bit. There may be some charring from the laser.
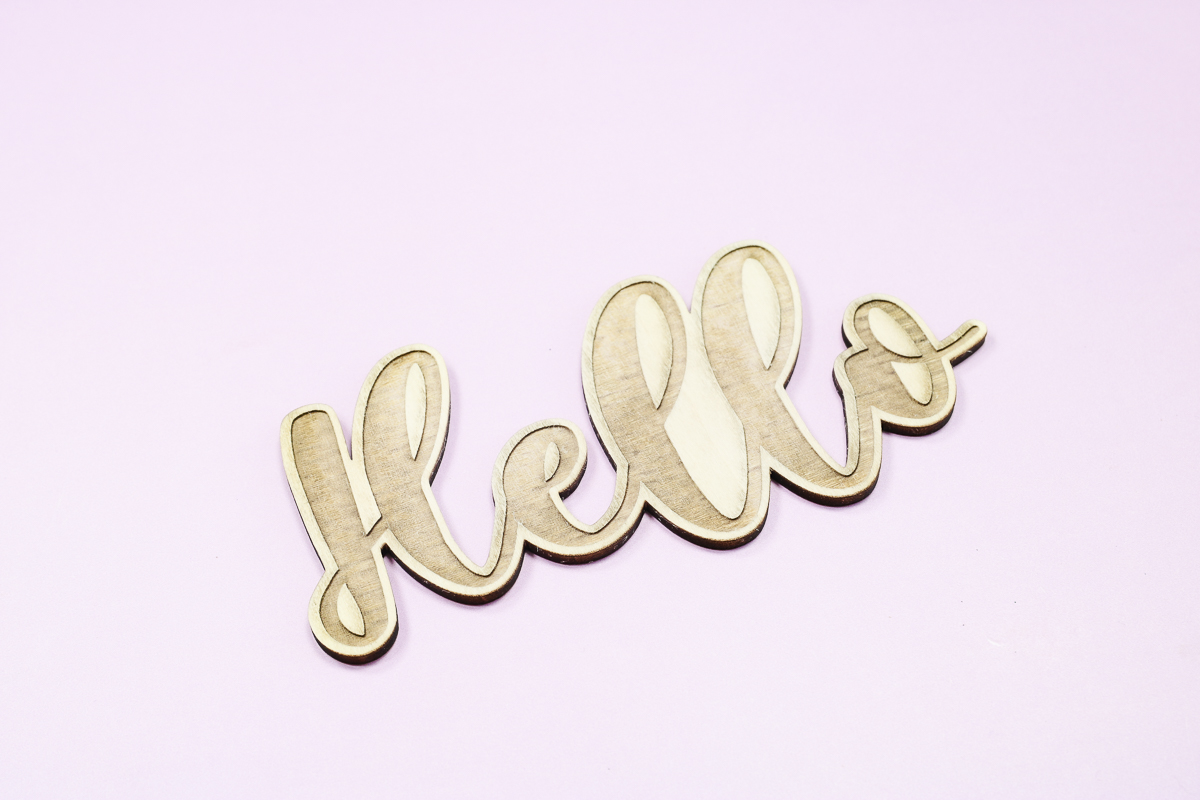
I cleaned mine up at the sink so I could see how well it did, and it looks great. The Vision Pro did a nice, deep engraving, and I'm really happy with how this turned out.
Cutting Thick Wood with the WeCreat Vision Pro
Now that I have the first project done, I'm ready to jump into another project, and I'm going all in.
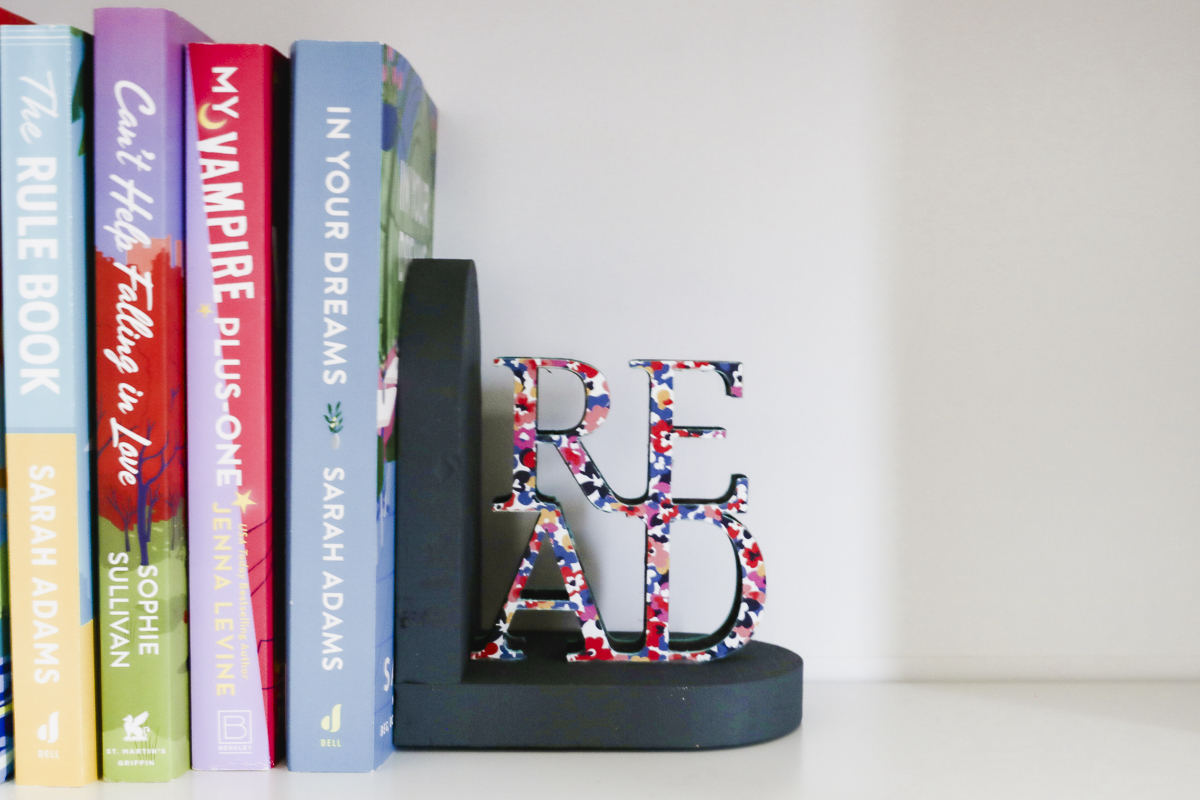
I'm going to make a bookend using 3/4 inch thick wood and acrylic.
First, I'm going to cut the wood, and then I'll cut the acrylic.
Step 1. Create Design in MakeIt
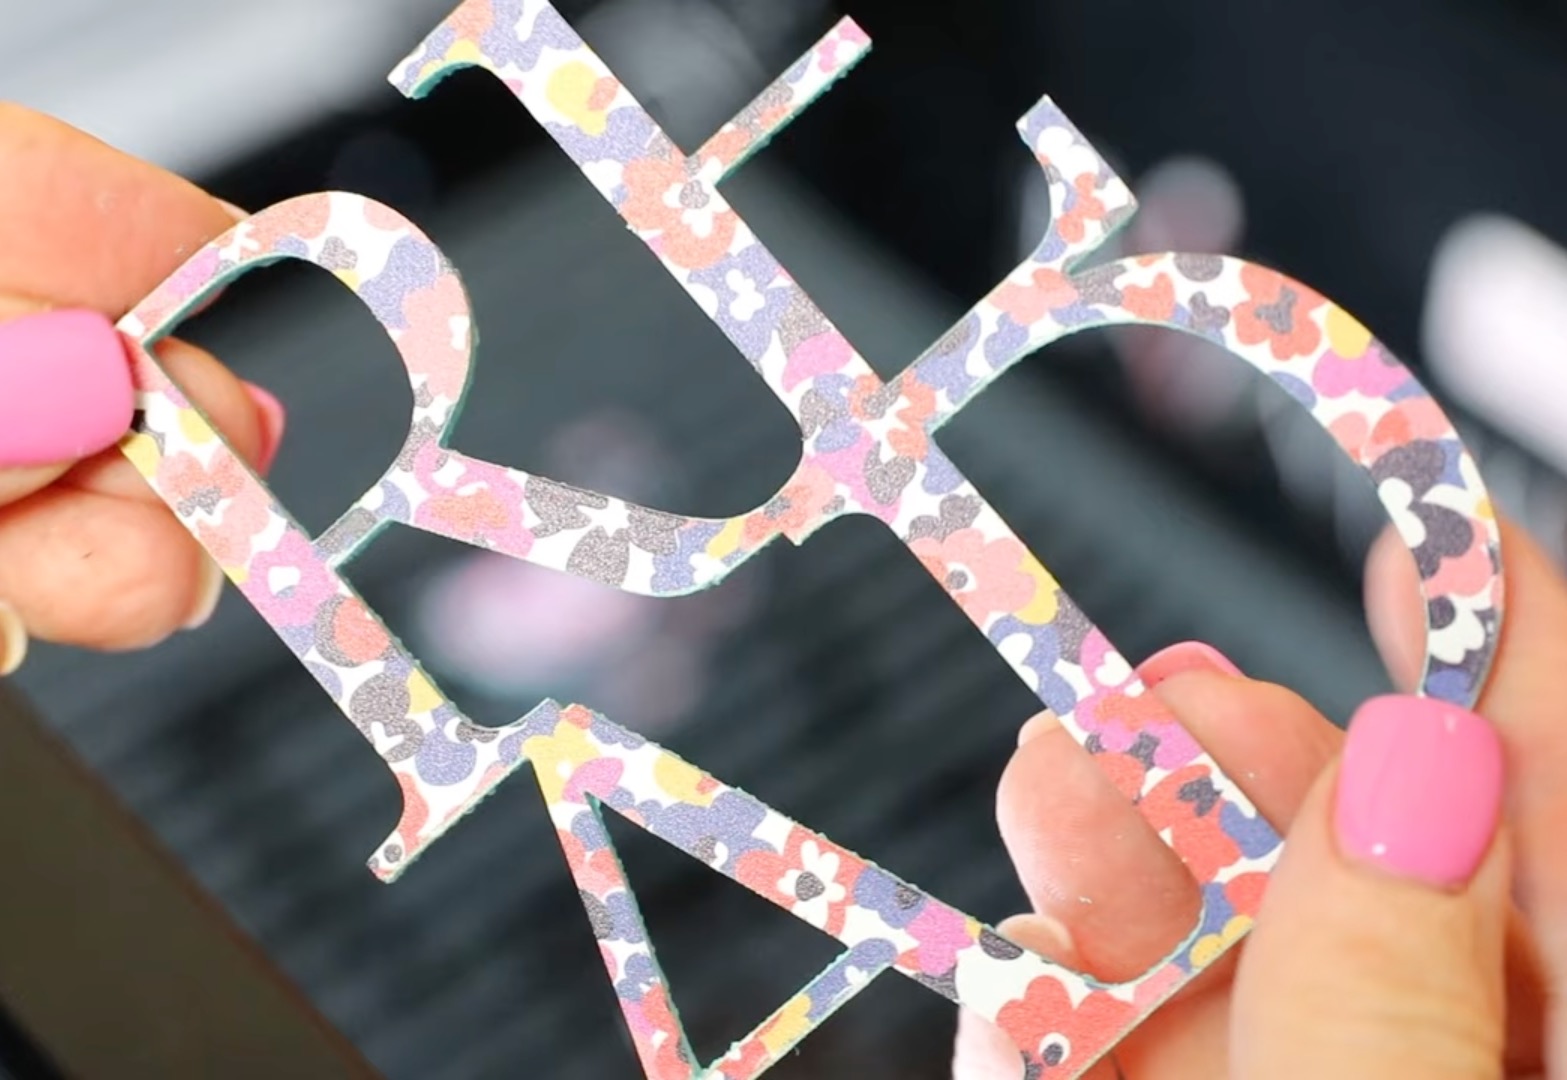
Again, I am creating the design in WeCreate MakeIt, and first, I am adding the letters RE and AD into the software.
Next, I chose the font I wanted and moved the letters very close to each other, so they're overlapping a little bit. On top, we have RE, and under that, we have AD spelling out READ.
Because I want them to cut out together, I clicked Merge, which is the same as welding, so it will all be cut out in one piece.
I want the bookends to be an arch, so I found a graphic shape within the MakeIt software, and I separated the shape so I could remove everything except the arch shape I want.
NOTE: You can watch the video above for individual steps on creating this design.
Step 2. Choose the Materials
With the Vision Pro hooked up, I can choose the material I'm using and make any setting adjustments.
My wood is a little thicker than 15mm, so I chose the 15mm basswood setting and changed it to two passes.
This ended up being a lot more than was needed. I think it would have been fine with one pass.
Step 3. Mask the Wood
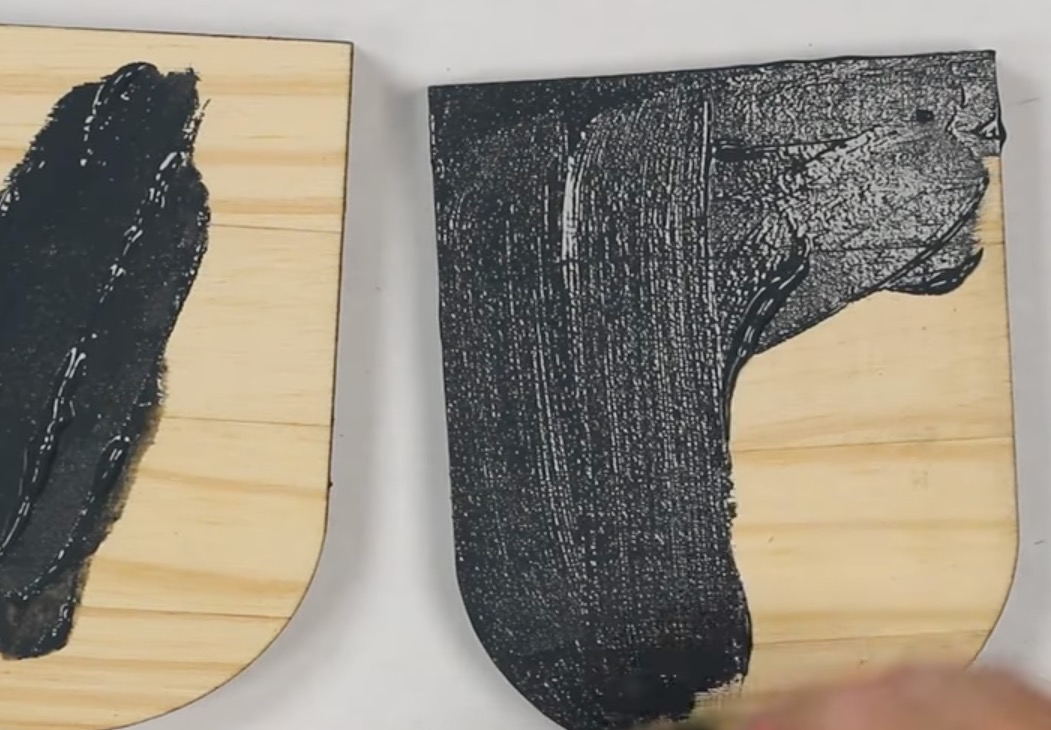
To help prevent charring, I decided to add masking to the front and the back of the wood piece.
Masking won't prevent charring on the entire edge, but it does help with charring on the top and bottom.
Press the masking down so it sticks everywhere, and place the wood in the laser.
Step 4. Adjust Design Locations
With the wood in the laser, refresh the screen so you can see where it's located.
I have my designs sized correctly, so I only needed to rearrange everything so it would fit on the wood.
If you don't want to waste masking material, you can place the wood inside the laser without the masking to see where the designs will sit and only add masking to that portion.
Step 5. Frame Design and Cut
When you have everything set up how you want, click Framing to double-check inside the laser.
If the framing looks good, send it to the laser.
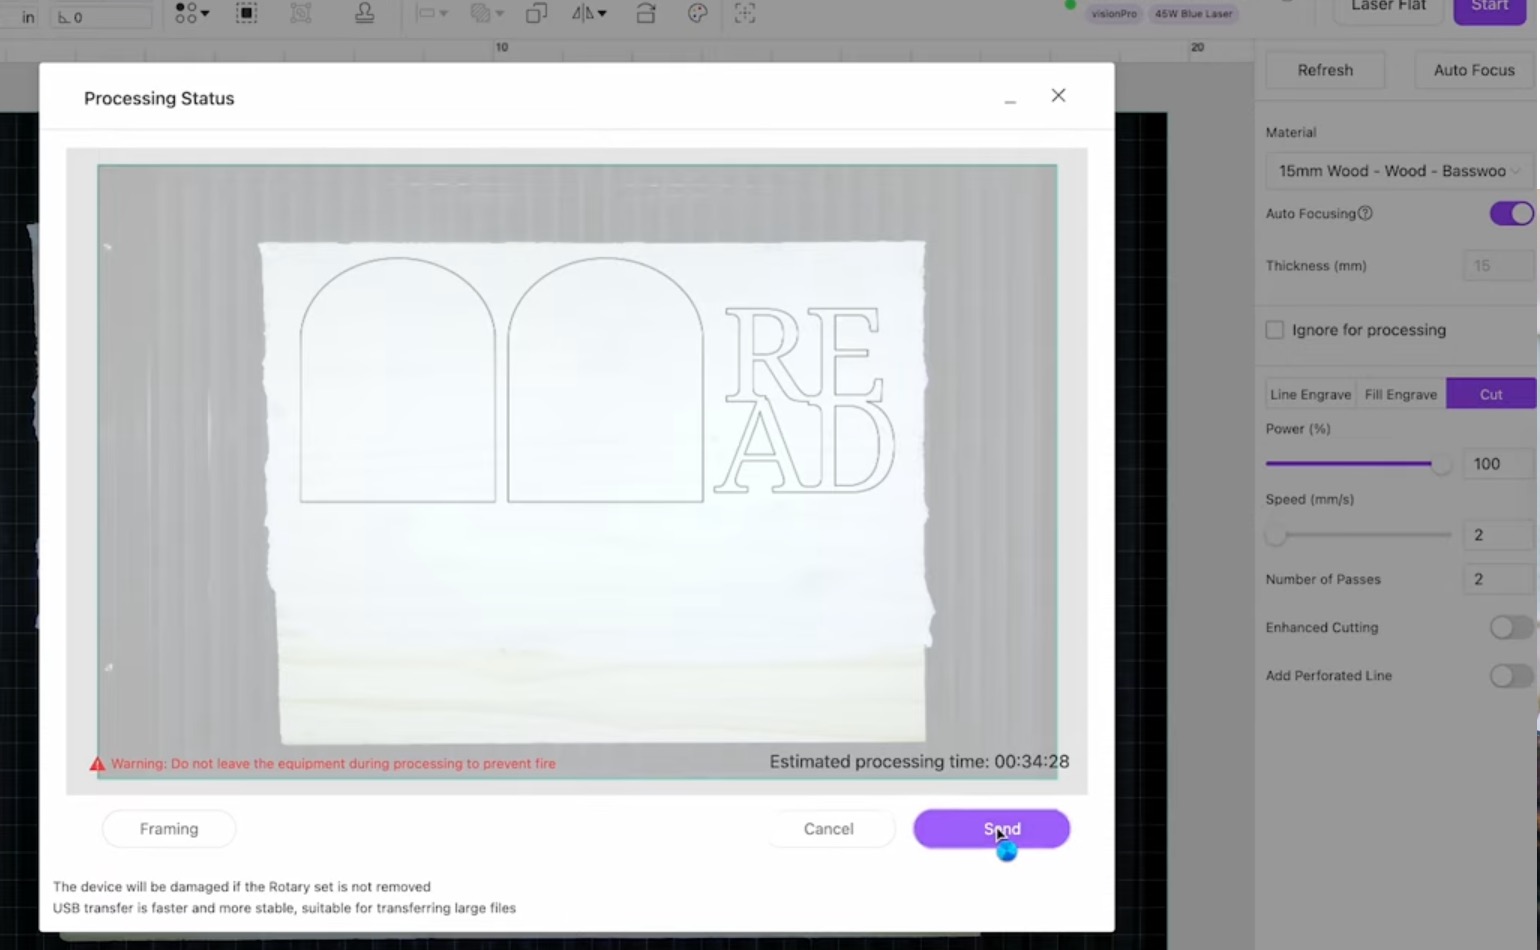
This says it will take an estimated 34 minutes and 28 seconds to cut. I do feel that my settings were more than they needed to be, so it would probably be significantly less if I had the settings correct.
Press the button on the front of the laser and allow it to cut.
When the laser is complete, the laser will rise up, and you can remove the wood.

I am really impressed with how well the Vision Pro cut this very thick wood. I am going to stain the wood and assemble the bookends after cutting the acrylic.
Cutting Acrylic with WeCreat Vision Pro
I decided to add acrylic to the READ portion of the book ends. I want it on the front and back, so I'll need to cut 2 with one of them being mirrored for each book end.
Diode lasers, even powerful ones, cannot cut clear acrylic and can have issues with light colored acrylic.
The acrylic I'm using today is a patterned opaque acrylic, so it should cut really well.
Note – Make sure you are using laser-safe acrylic.
I love how easy it is with a laser to combine different elements on one project.
Step 1. Locate Design on the Acrylic
Because this is part of the same project, I don't need to do any designing.
I need the acrylic READ letters to be exactly the same size as the wood letters.
Add the acrylic to the laser and click Refresh so you can see the acrylic on the screen.
Move the READ design so it's on the acrylic, make sure you don't resize it at all while moving it.
If you want acrylic on the front and back of your bookmark, make sure to duplicate the design.
Note – If your acrylic looks the same on the front and back, you don't need to mirror it.
Some acrylic pieces are more matte on one side than the other. If you add an adhesive sheet, like 3M, to the back of your acrylic to make it easy to attach, you will need to mirror the design because you have a defined backside.
Step 2. Adjust the Material Settings in MakeIt
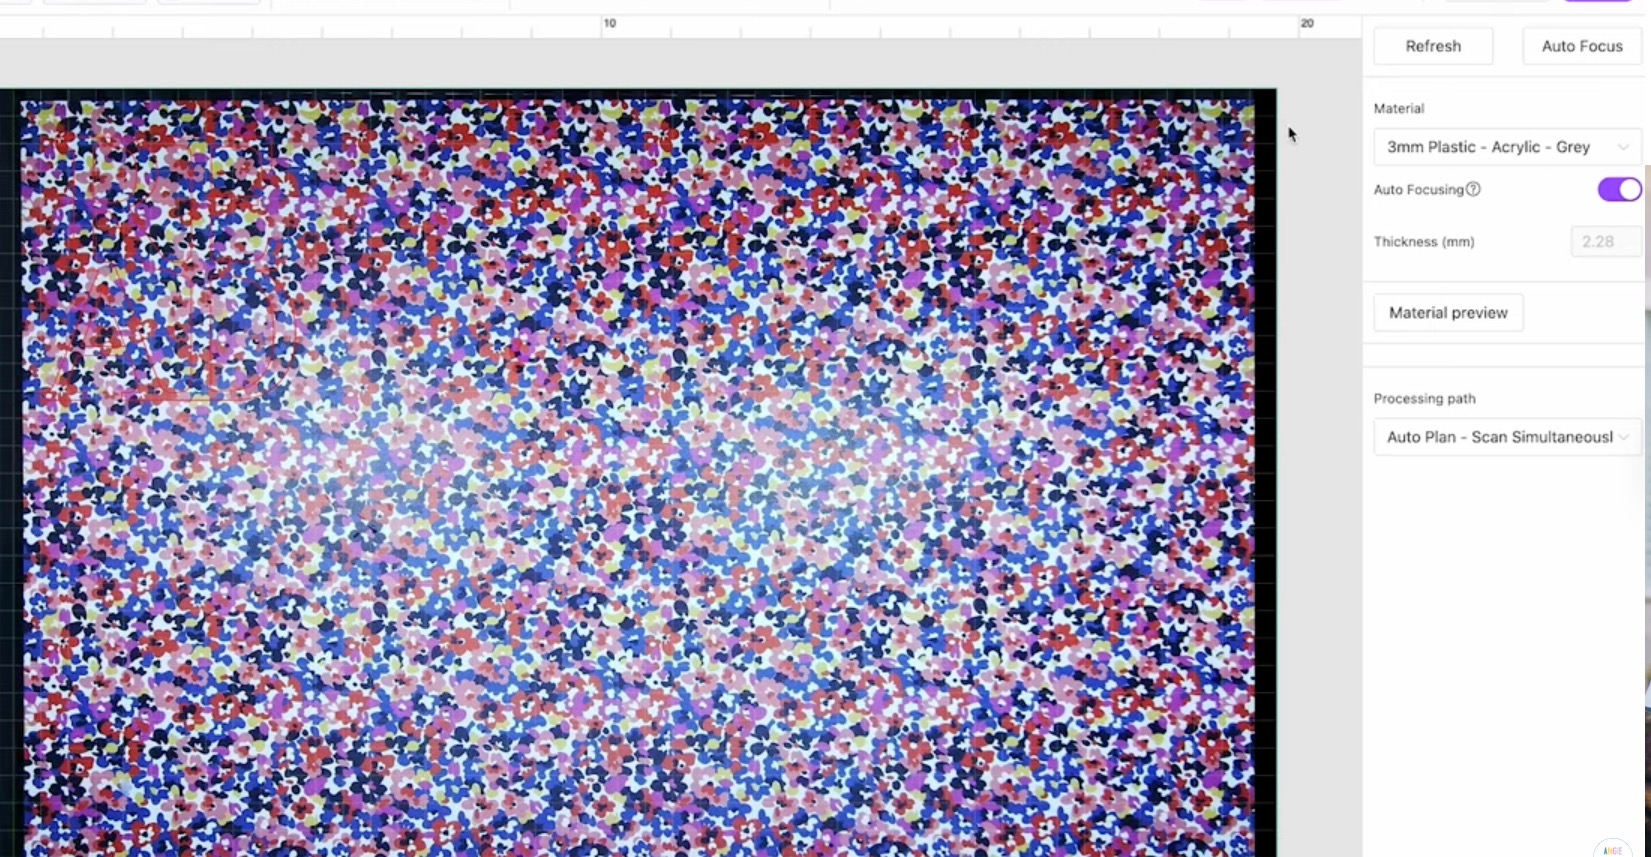
For my acrylic pieces, I changed the material settings to 3mm Plastic Gray Acrylic.
This setting worked really well for my material.
Step 3. Auto Focus and Frame the Design
As we did before, with the location and settings complete, we're ready to auto focus and frame the material.
Click Auto Focus, allow the laser to auto focus, and then go ahead and click Framing.
Watch the material inside the laser to ensure the design is located so it will cut completely on the acrylic piece. If needed, make adjustments until it's located correctly.
Step 4. Cut Out the Acrylic
Now we're ready to send the design to the laser. Press the button on the front of the machine, and it will cut out the acrylic.
When the cut is complete, open the lid and remove the acrylic from the laser.
The 3mm setting was perfect for my material, and I am really happy with the finished result. It looks really good.
Assembling the Bookend
First, remove the masking. Now, you can assess the charring.
There are a few options when it comes to the charring on the edge:
- Sand the edges to remove the charring.
- Wash the wood to lighten the charring.
- Paint or stain the wood to cover the charring.
I am going to paint the wood dark, so I don't need to do anything about the charring.
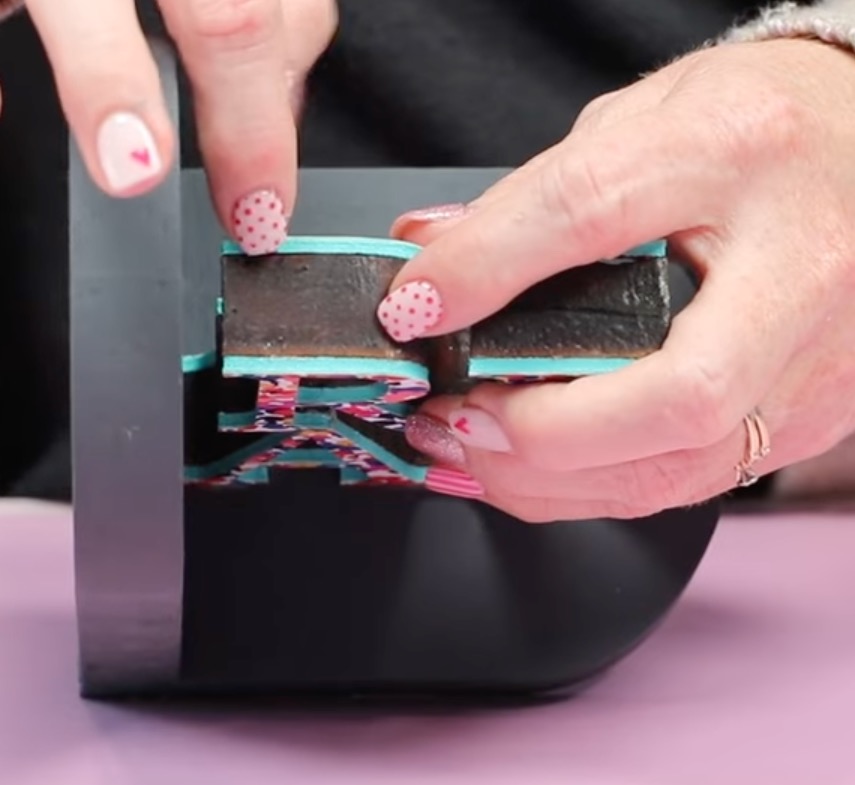
After painting the wood, I allowed it to dry completely and then glued the pieces together and secured them with screws.
With all the wood pieces glued together, I added the acrylic to the front and back of the bookend.
Note – After assembling the bookend, I wish I had also painted the edges of the wood READ letters. Because you won't see the wood from the front or back, I didn't do that step, and from the top and side, you can see the brown charring. In the future, I'll paint all the wood pieces before assembling.
While blue diode lasers cannot cut clear acrylic, the Vision Pro cut the patterned acrylic beautifully.
Between the acrylic and thick wood pieces, the finished bookend is professional-looking and heavy enough to hold the books up.
Engraving Thick Items
Now that we've cut thin and thick wood, and acrylic, I want to test engraving.
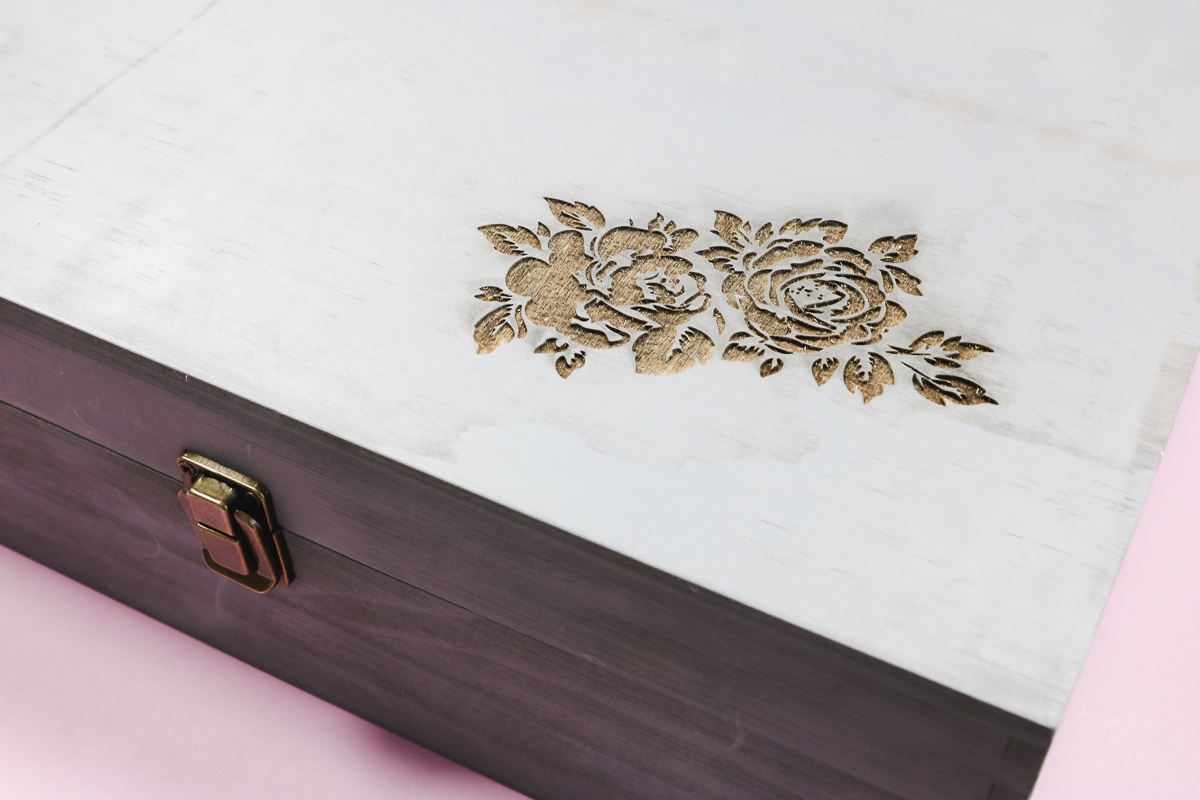
First, I am going to test a wooden box that is about 4.5 inches tall. I want to engrave the top of the box.
1. Remove the Laser Beds
First, we need to remove the laser beds from inside the laser. This will allow the box to sit further down in the laser.
2. Add the Box to the Laser
Place the box inside the laser with the portion you want engraved facing the top.
Note – If the camera is having a hard time seeing the box, it may be because it is too dark. I tried using a black box first, and my camera couldn't recognize it; it was too close in color to the base.
To solve that issue, you can add masking to the wood. This will make it easier for the camera to see the box.
I swapped the black box for a grey box when I realized what the issue was.
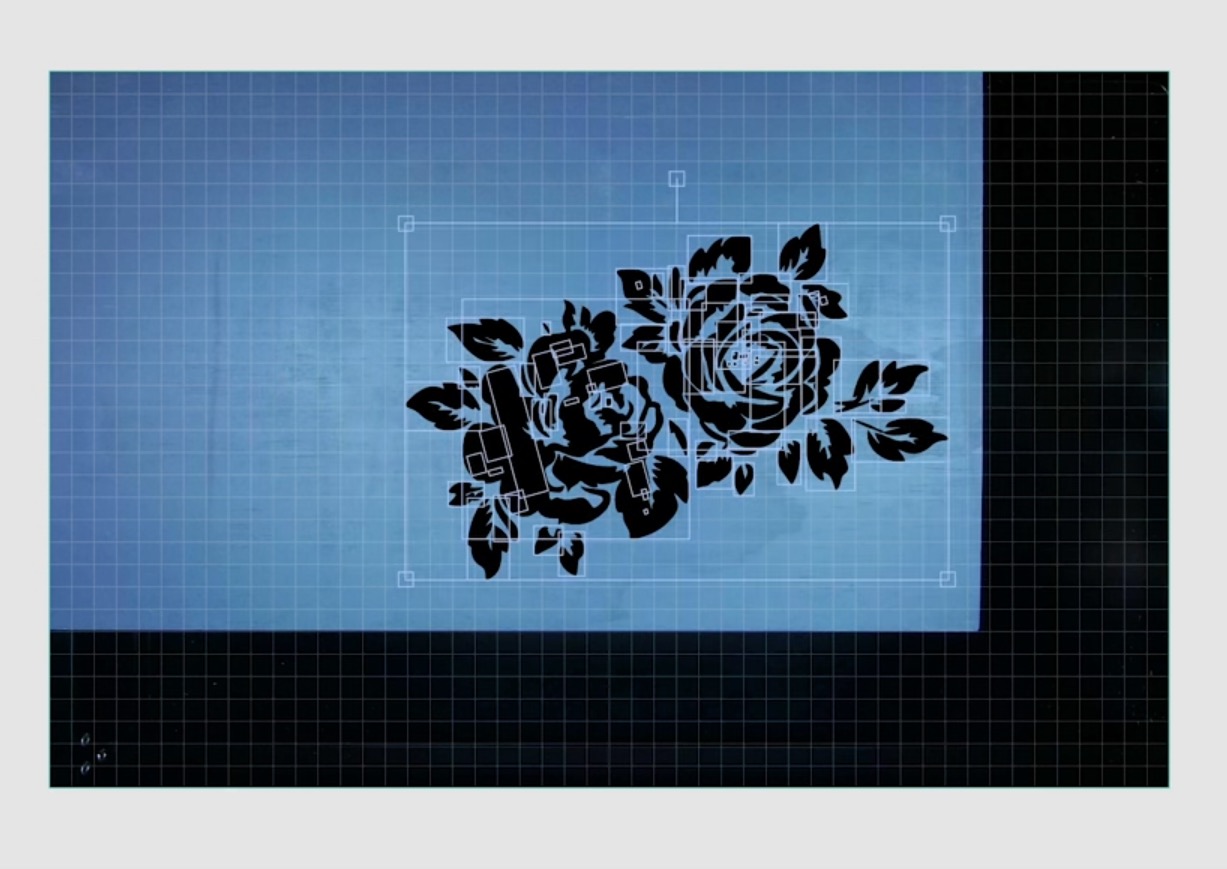
3. Upload the Design into MakeIt
For this project, I am uploading a design to MakeIt. This is a .png file.
Depending on the file size, you may need to resize or rotate the design for it to fit on the box.
There was part of the design I did not want on the box. Within MakeIt, I was able to split the design and delete the portion I didn't want.
Select all the remaining pieces and merge them together.
4. Adjust the Settings
For this project, I chose the basswood setting.
I adjusted it so the engraving would be really dark, so it would stand out on the grey box.
5. Frame the Design
The next steps are similar to the previous projects. Because of how the box sits in the laser, the camera cannot see the entire laser bed.
The thicker or taller the blank, the less you can see with the camera.
For my first project like this, I wasn't comfortable trying to engrave the entire surface.
Using the framing tool, I was able to locate the design where I wanted it on the box. You can do this to add a design to the entire surface; you may need to do it multiple times and resize and relocate as needed.
Because I couldn't see the entire surface, I relied on the framing tool to ensure the design would be where I wanted it on the box.
6. Send the Design to the Laser
Within MakeIt, send the design to the Vision Pro laser and then press the button on the front of the laser to start the engraving process.
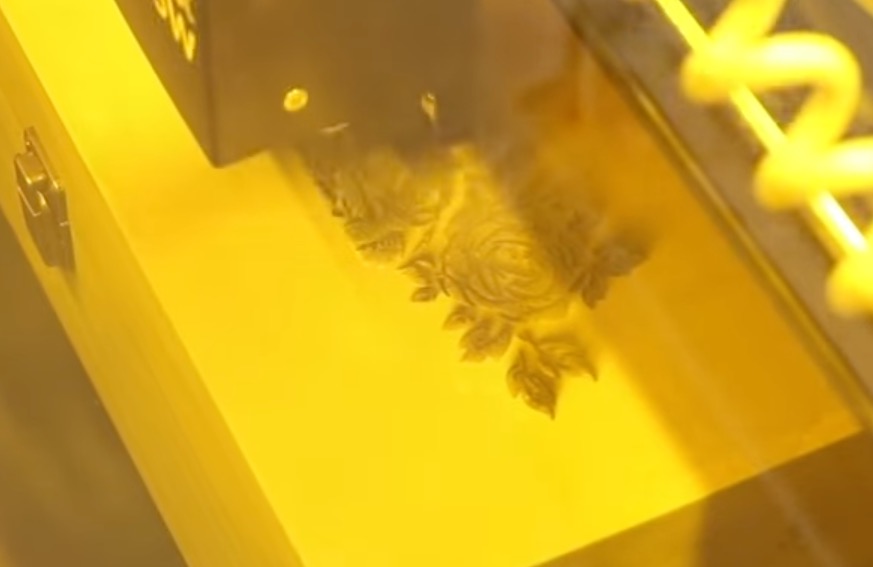
7. Clean the Engraving
When the laser is done engraving, lift the lid, and from here you can either clean the charring while the box is in the laser or remove it first and then clean it.
I used a damp cloth to clean the surface while it was still inside the laser, and you can see the engraving is deep and looks great on this box.
Engraving on Leather
Now that we've tested engraving on thick and thin wood, I want to test another material.
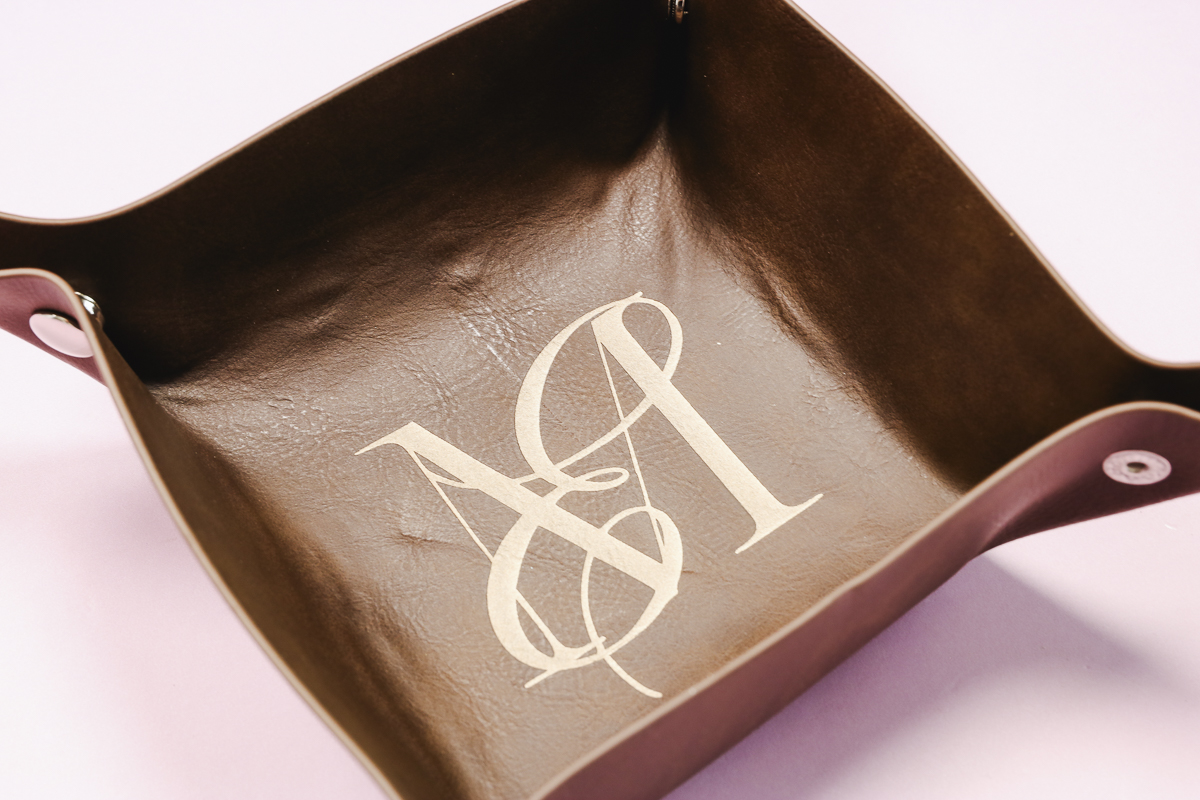
This leather blank is a leatherette material that has a contrasting color under the surface. When engraved, you'll see a different color exposed.
You'll engrave the leather tray flat and then snap the corners together.
The process for creating the design is the same as the other projects.
I've uploaded the design, traced it, and resized it to fit the tray.
There is a leatherette setting within WeCreat MakeIt, so I used that setting and then used the framing tool to make sure the location is correct.
Send the design to the laser and press the button on the front of the machine.
When the engraving is complete, remove the leather from the laser, and you can see it is gorgeous. I love the two-tone effect on the leatherette.
Setting Up the Rotary Pro Accessory
Now that we've used the diode laser on its own, I'm ready to try out the Rotary Pro.
The Rotary Pro is an additional accessory that can be purchased as part of a bundle or on its own.
If you want to make things like tumblers and other round objects, you'll need the rotary tool.
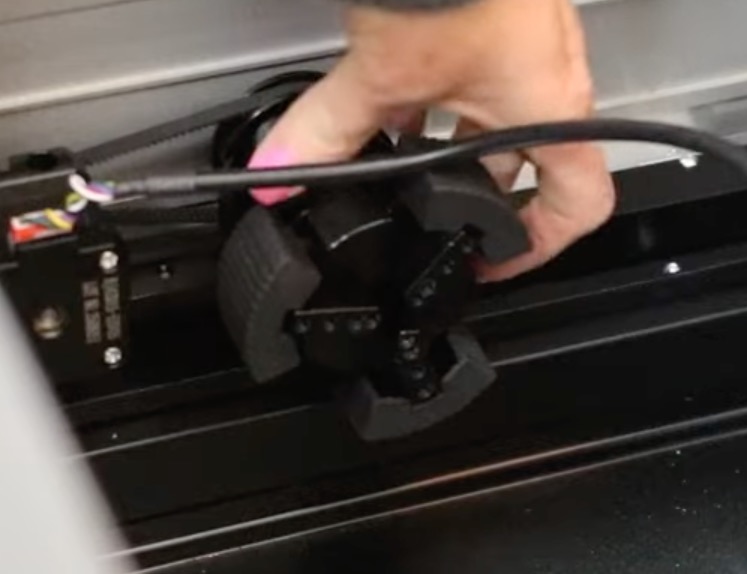
Step 1. Install the Rotary Pro Tool in the Vision Pro
The WeCreat Vision Pro does not require any risers because the top lifts up and down on its own.
To use the Rotary Pro, first, you need to remove the laser beds.
On the side of the laser frame on the left side, there are two screws that need to be removed.
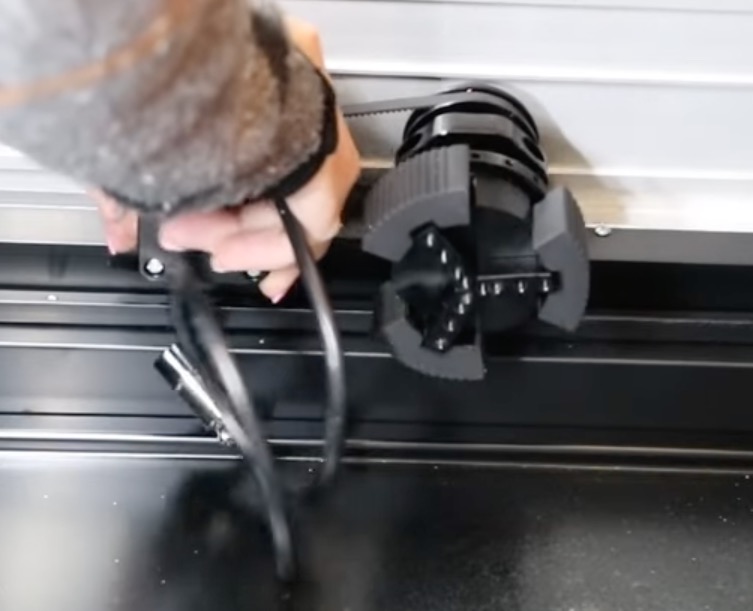
The Rotary Pro has a locating pin, and the laser has a locating hole. Drop the Rotary Pro into the locating hole and then add the screws back through the Rotary Pro and into the laser bed.
Ensure the laser is off, and then use the connection cable and plug it into the back of the laser. The cable will run under the rotary accessory and into the back of the machine.
With the cable connected, the Rotary Pro is installed, and I'm going to engrave a tumbler first.
What is the Difference Between the Rotary Pro and the Rotary Accessory?
The Rotary Pro supports the tumbler with pieces that fit inside the tumbler itself. The regular rotary accessory has arms that support the tumbler on the outside.
Step 2. Add the Tumbler to the Rotary Pro
I wanted to see if the Rotary Pro, as is, would work for the tumbler I have.
Depending on the tumbler you have, you may need to add other attachments.
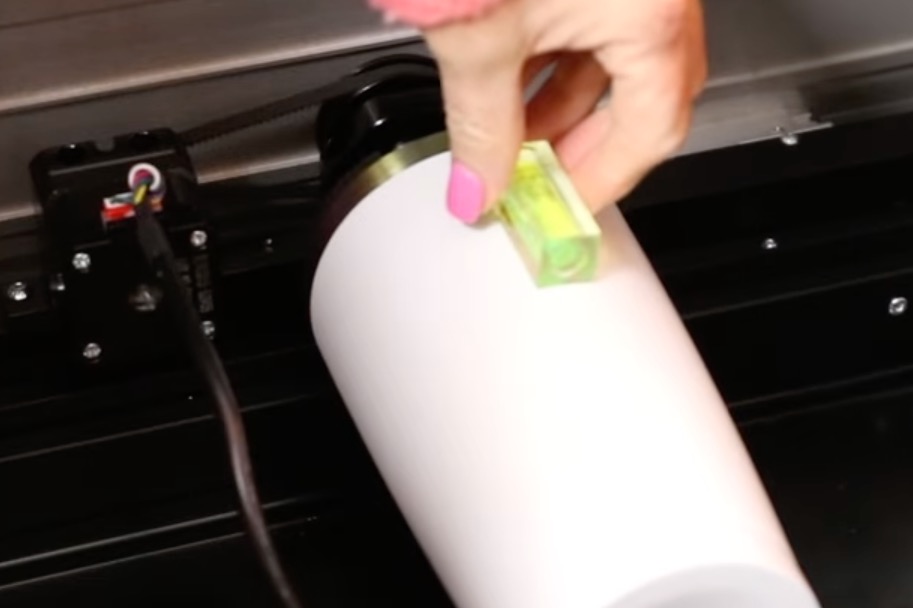
Rotating the chuck will adjust it in and out. Add the tumbler to the chuck and rotate it until it's straight and firmly secured.
If your tumbler is longer, there is a holder that you can place under the cylinder at the bottom to raise or lower the bottom portion to make sure it's level and has support from end to end.
For my tumbler, I did use the additional holder.
To ensure the tumblers are level, rotate the tumbler and use the level to check that it remains level as it moves. If it's not level, make the needed adjustments until it's level.
Step 3. Adjust the Tumbler on the Rotary Pro
In order to get as much engraving as possible on the tumbler, I like to move the tumbler down a bit on the chuck.
While making sure the tumbler is still secure on the chuck, you can adjust it a little bit, allowing for more of the tumbler to show within the software.
Step 4. Adjust the Settings in WeCreate MakeIt
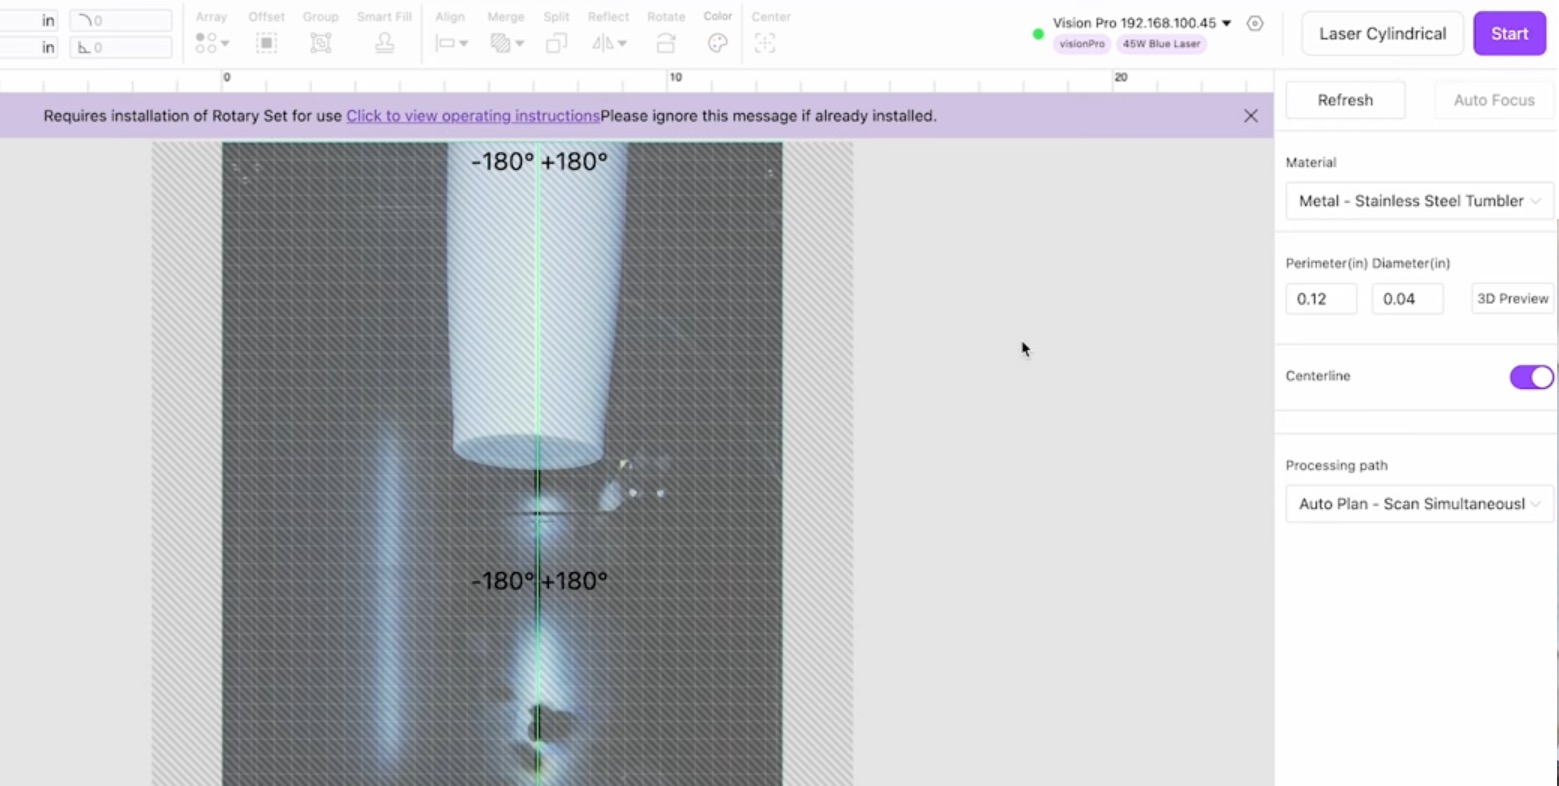
Within the software, change it from Laser Flat to Laser Cylindrical, and you'll see the program screen change completely.
If you have the Rotary Pro, go into the settings and turn off the nonworking area.
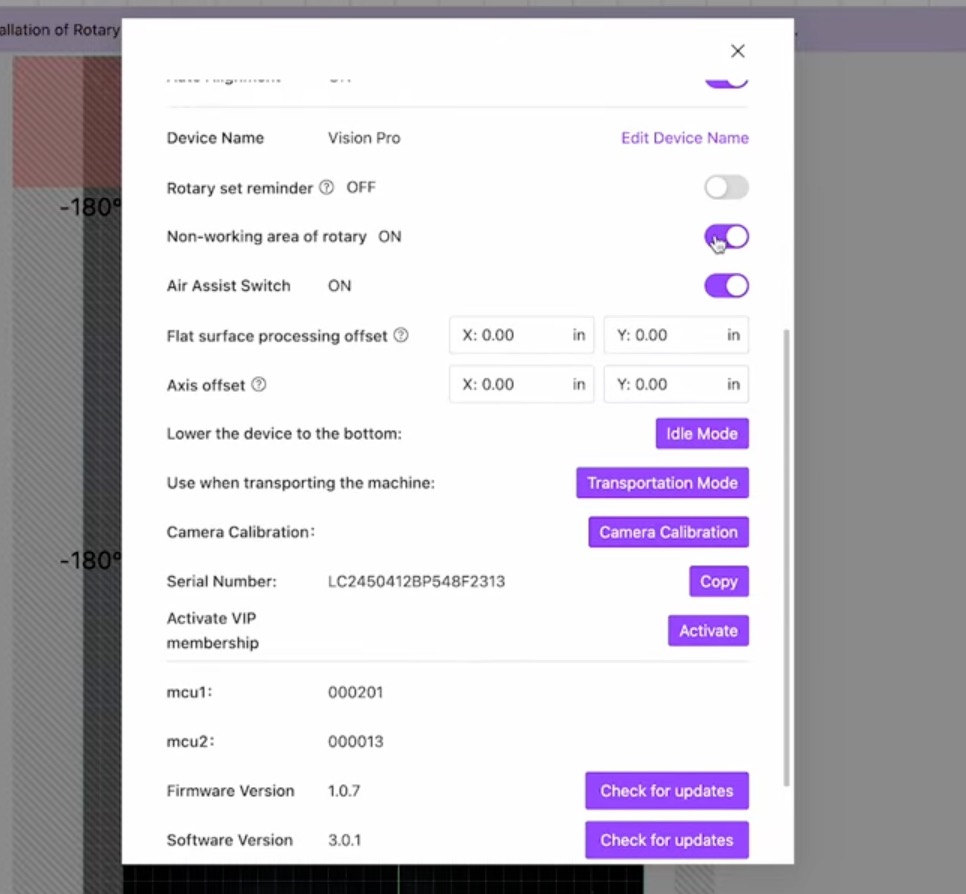
Note – If you do not have the Rotary Pro, do not turn this setting off. MakeIt will give you a warning reminding you to ensure you have the Rotary Pro installed.
With the nonworking area turned off, you'll see that the area on the screen becomes much smaller.
Add the perimeter measurement. Measure the largest area of the tumbler and add that to the software.
When you change the settings from Laser Flat to Laser Cylindrical, the material will change automatically to Metal Stainless Steel Tumbler. You can change that if you're using something else.
Step 5. Upload and Adjust the Design
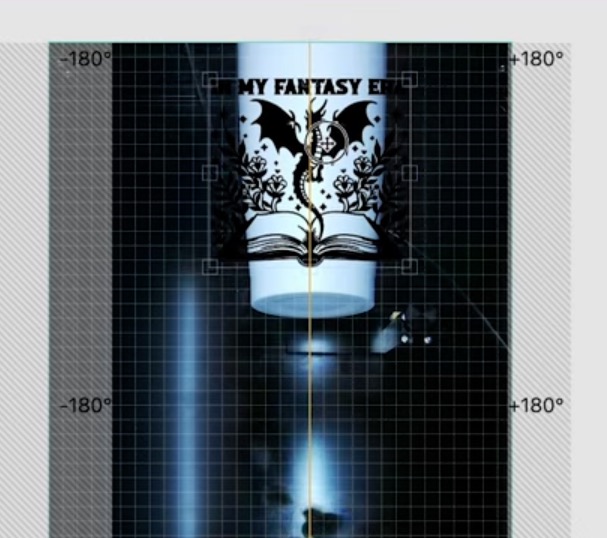
For this project, I uploaded my own file and resized it so it would fit on the tumbler.
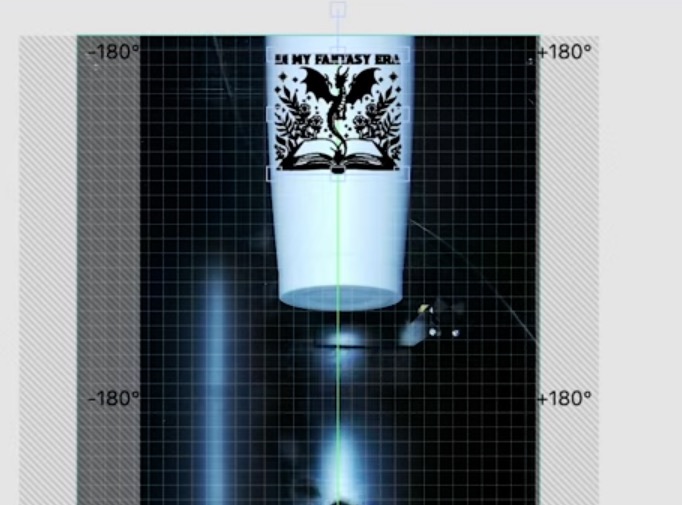
Within the software, you can see a 3D preview to get an idea of how the design will look on the blank.
I did the framing step several times so I could get the design the right size and located exactly where I wanted it.
Step 6. Engrave the Tumbler
With the design located where I wanted, I sent the design to the laser.
Press the button on the laser, and it will begin to engrave. You'll see that the Rotary Pro will rotate as it's engraving.
When the engraving is done, you can open the laser and remove the tumbler from the Rotary Pro.
Step 7. Clean Up and Close Up of Finished Engraved Tumbler
You will need to clean the tumbler when it's done to really see the engraving.
I think this looks really good. It may be a little deeper than it needed to be, but it looks really good.
I used a white tumbler, but you can use different colors, different sizes, and even other cylindrical objects with the Rotary Pro.
WeCreat Vision Pro 2W Infrared Laser Head
The last thing I want to do today is test the 2W Infrared laser head to engrave on metal.
To engrave on metal, you need the 2W Infrared laser head. That means we're going to have to remove the 45W laser head that comes with the Vision Pro when you purchase it.
The infrared laser head is a separate purchase. You can get it with your laser in a bundle or purchase it at a later date.
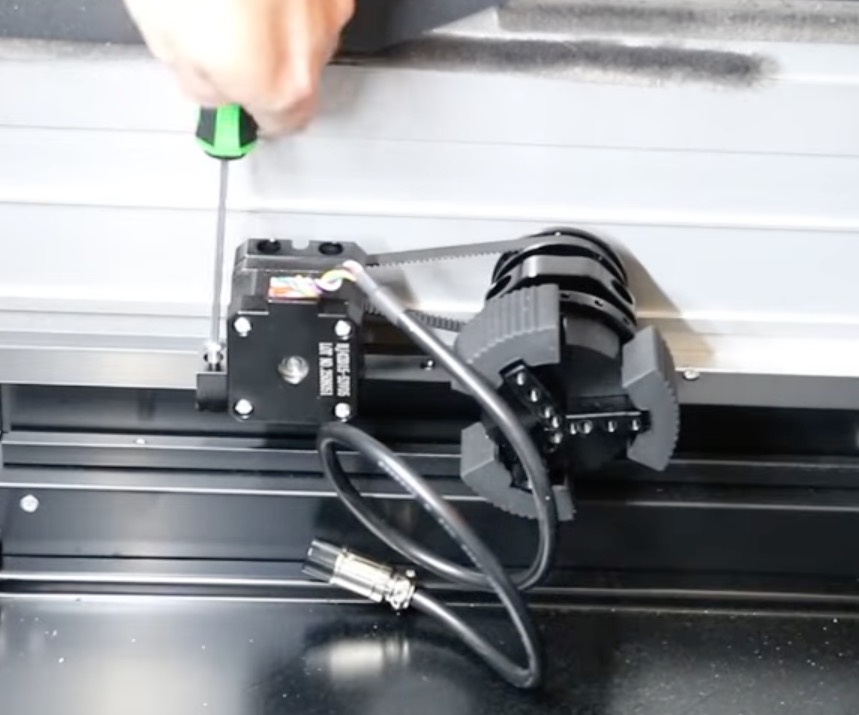
Step 1. Swap the Laser Head
First, turn off the laser and move the laser head to the center.
Remove the air hose inside the laser, and then take the laser head and move it all the way to the right and to the front of the laser itself.
Remove the screw inside the white clamp and the four screws in the back that hold the laser in place.
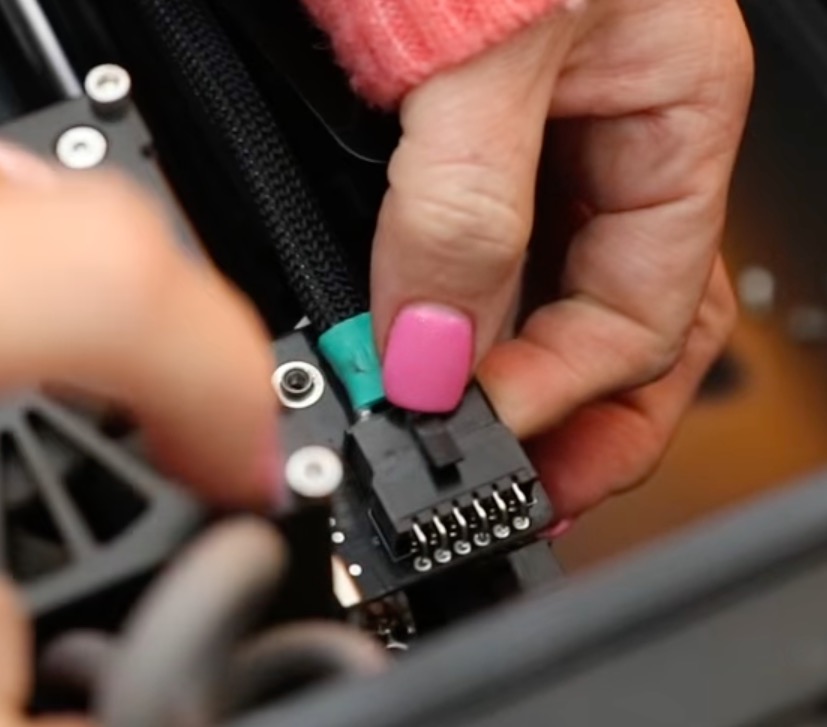
With all the screws removed, you can remove the white clamp and then hold down on the tab and pull out the cord.
Note – I have a lot of trouble with connections like these, getting them unhooked. Even though I wasn't concerned about messing up the cable, because an extra cable is included, it still takes a while.
With the cable removed, add the 2W infrared laser, doing everything we did to remove the other laser head in reverse.
Hook up the cable, add the clamp, and replace the four screws. You don't need the air assist with the 2W laser head, so you don't need to hook that back up.
I would not recommend doing this swap often. If you're engraving metal, keep the infrared laser head installed. If you're engraving or cutting wood, leather, and/or acrylic, you'll keep the 45W diode laser head installed.
Turn the laser back on, and you'll see the laser head move to the left and back to the home base.
Step 2. Engrave on Metal
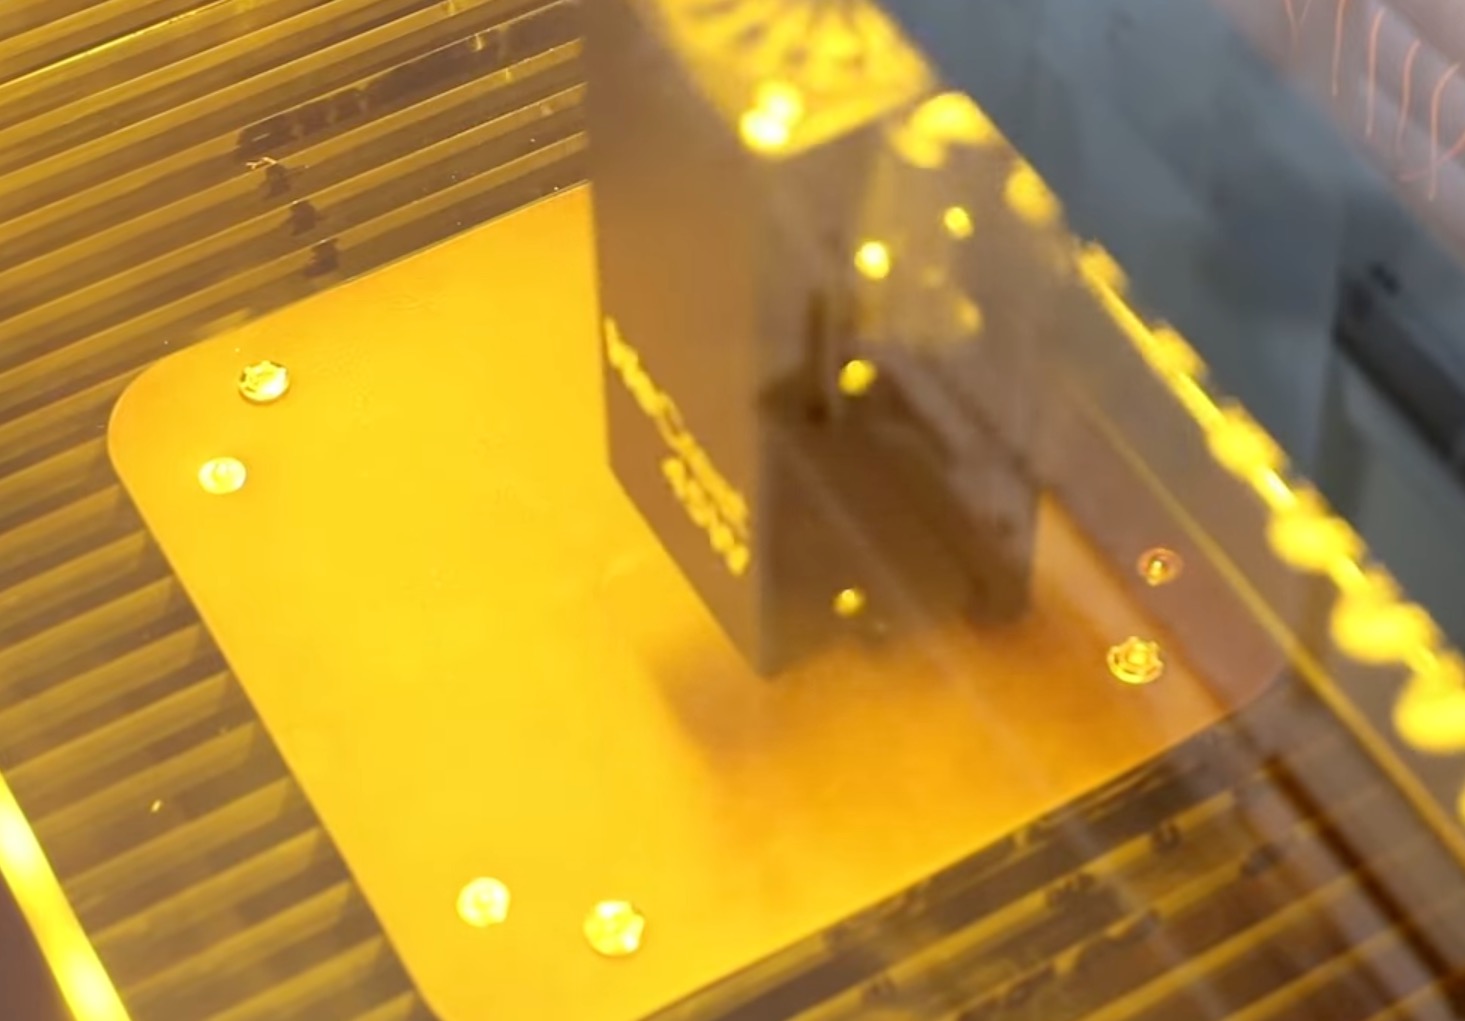
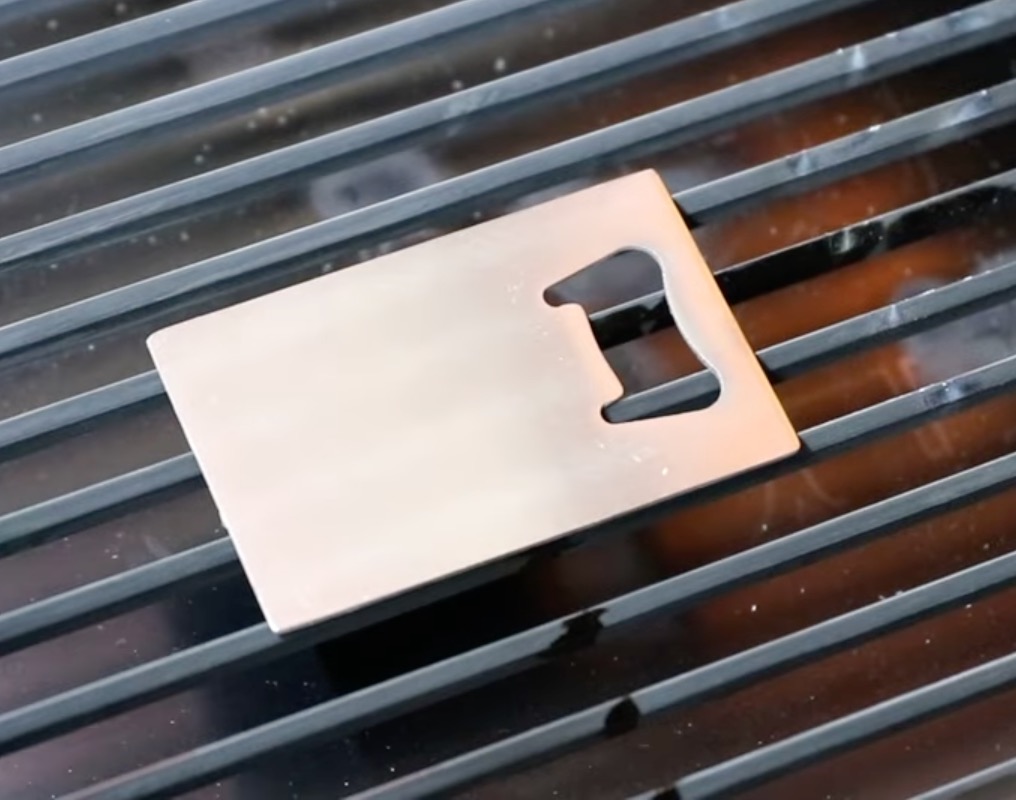
With the infrared head installed, I added a stainless steel bottle opener to the laser bed.
When you open WeCreat MakeIt, you'll see it recognized that the laser head has been switched.
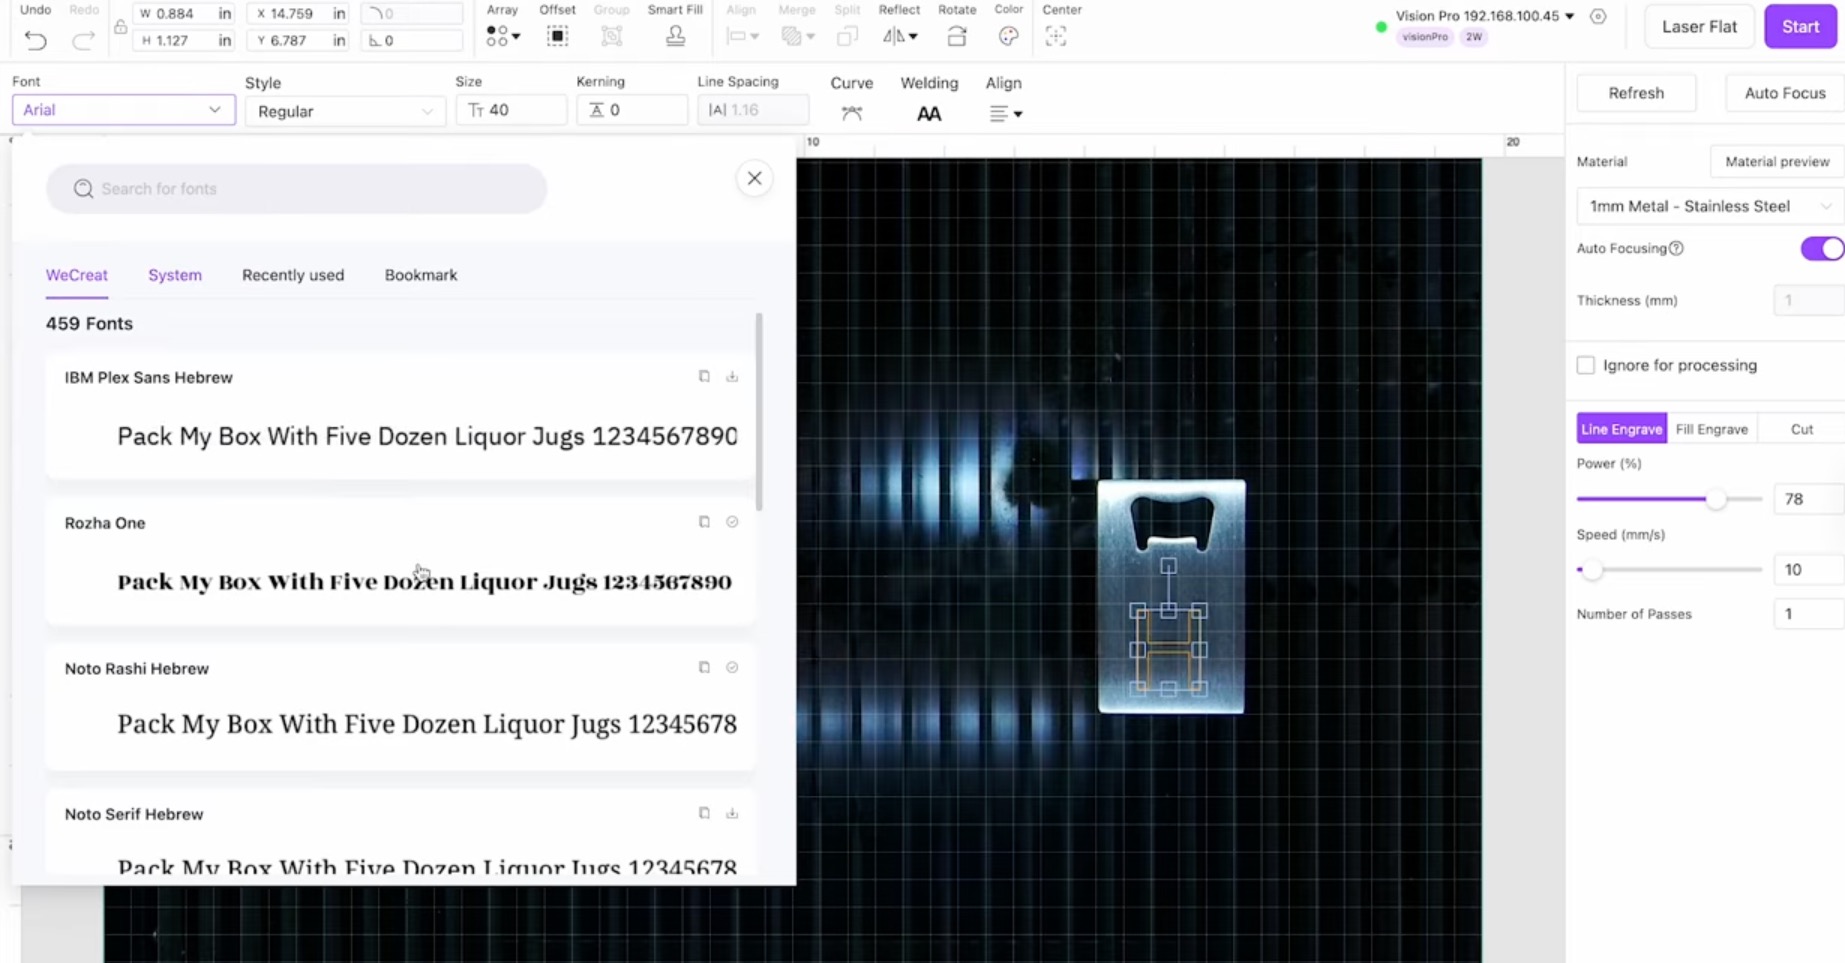
I chose a stainless steel material and used the text tool to add an H to the canvas, so I can add a monogram to the bottle opener.
Choose the font you want and then select Fill Engrave so the whole letter is engraved, not just the outline.
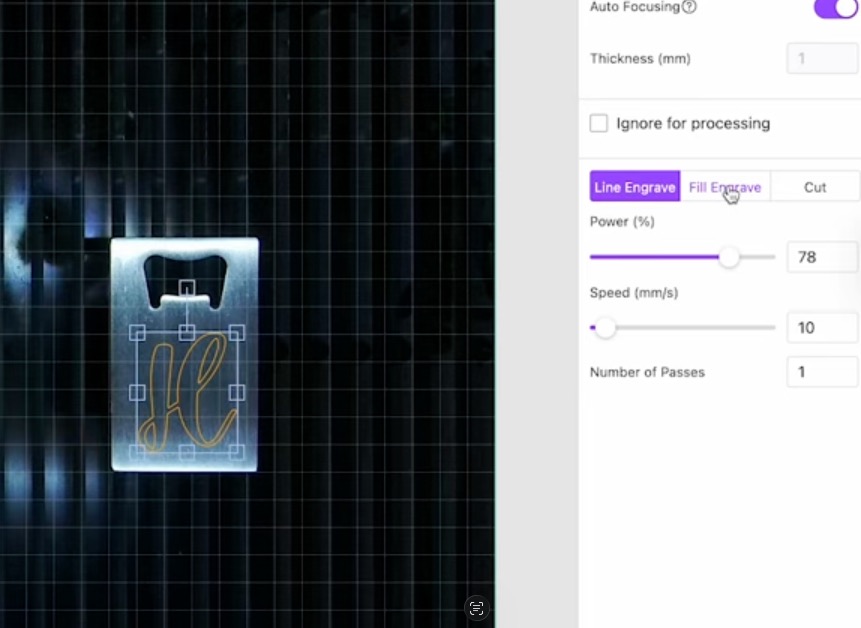
I selected my settings based on the preview.
Auto Focus the material and use the framing to check the location. If everything looks correct, send the design to the laser.
Press the button on the front of the laser, and it will start engraving.
Step 3. Close Up of the Metal Engraving
When the laser is finished, lift the lid and remove the bottle opener from the laser.
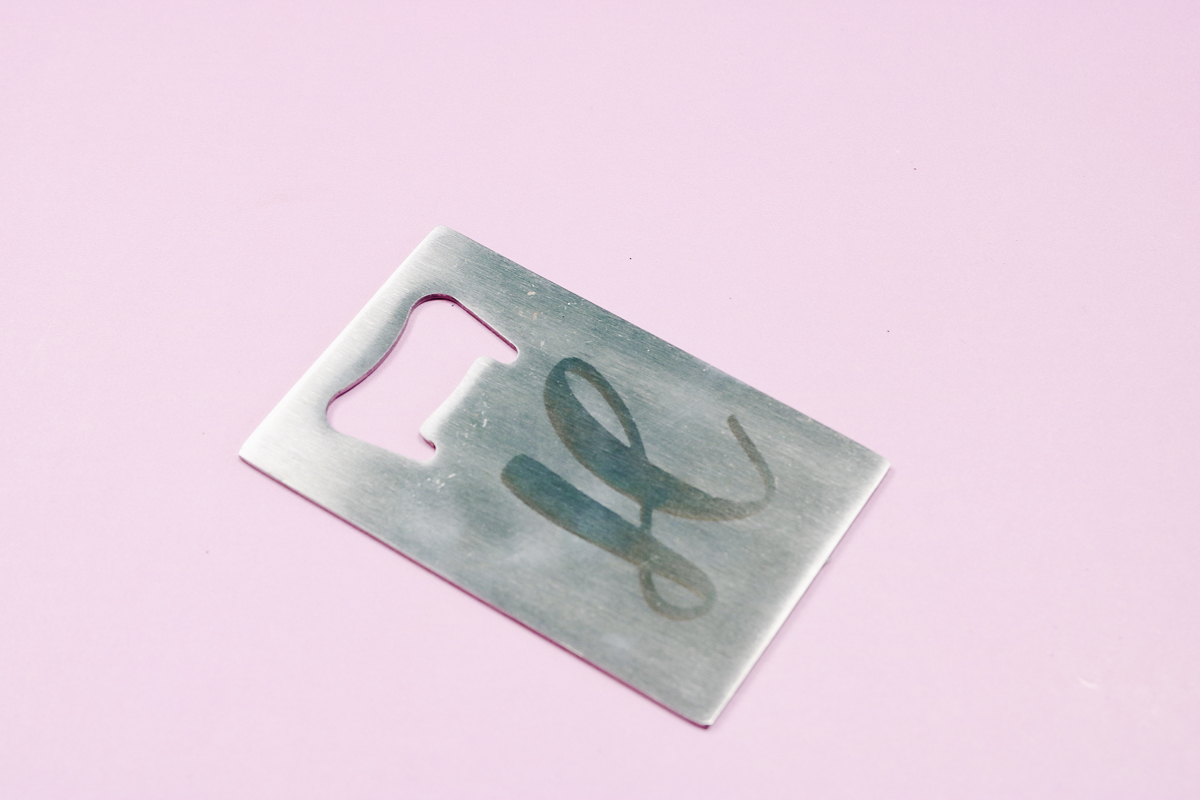
The engraving looks really good. It is very noticeable and feels great on the surface.
WeCreat Vision Pro: Pros and Cons
Now that we've made a few projects and tested the laser, let's talk about the pros and cons.
WeCreat Vision Pro Pros
- The biggest pros are the cutting power and efficiency. The ability to cut really thick wood so easily was my favorite feature.
- Another pro is the auto lift, and the auto focus works well.
- Because the Vision Pro lifts on its own, you don't have to use risers.
- Because of the power, it's great for small businesses. While the price point isn't the lowest, for a laser this powerful, it is a good price.
- The larger working area, especially with the pass-through accessory, opens up a lot of different possibilities.
- If you're a woodworker, this could be the laser that changes your small business.
- Now, the price might be a con because it is a more expensive laser, but at its price point for as powerful as it is, it is really great for a small business.
WeCreat Vision Pro Cons
- Depending on where you're at with your needs, the price may be too high.
- The laser itself may be more than a lot of people need. I don't think it's necessary for hobby crafters or casual laser users.
- Between the price and the larger footprint, it may not be the right laser for you.
- Swapping the laser head isn't the easiest thing. With more practice, it may get easier, but for the first time, it was difficult.
- If you don't have an adjustable table, the way it raises can make it difficult to place blanks inside.
How to Purchase the WeCreate Vision Pro
There are a variety of ways to purchase the WeCreat Vision Pro.
You can purchase the laser on its own, get it in a bundle with the Rotary Pro, purchase it with the Rotary Pro and Conveyor accessory, or purchase the Super Pack that includes everything listed above and the 2W Infrared Head.
All of the bundles have different price points; the more you add, the more expensive it will be.
You can see the options and purchase price here.
Who is the WeCreat Vision Pro For?
Who should consider the WeCreat Vision Pro? I think it's best for woodworkers and small business owners who want a higher-powered machine.
Laser users who need more efficiency, need a larger laser bed, or makers who need more power from their laser.
If you need to cut thicker wood, this is a great option.
People with limited crafting space need to check the measurements before purchasing to make sure it'll fit in their space.
Is the WeCreat Vision Pro the Right Laser for You?
I really, really love that you can cut thick wood, and I am impressed with how well it cuts and engraves the different materials.
I kind of wish the resting position were the lower position instead of raised.
The WeCreat Vision Pro bridges the gap between hobby-level lasers and higher-end professional lasers.
The large working area, auto focus, and beginner-friendly software are also reasons to consider the Vision Pro.
While the price point and larger size may not be for everyone, if you're looking to up your laser crafting game, make sure to look at the WeCreat Vision Pro.