
Are you ready to learn how to create your own DIY cupcake stand? It’s simple to make and budget-friendly! Plus, I’ll show you an easy trick to add color, so it matches your party decor perfectly!

How To Make DIY Cupcake Stand
Cupcake stands are excellent for parties, but they can be expensive if you want a high-quality, sturdy stand, or cheaply made if you're looking for something more affordable.
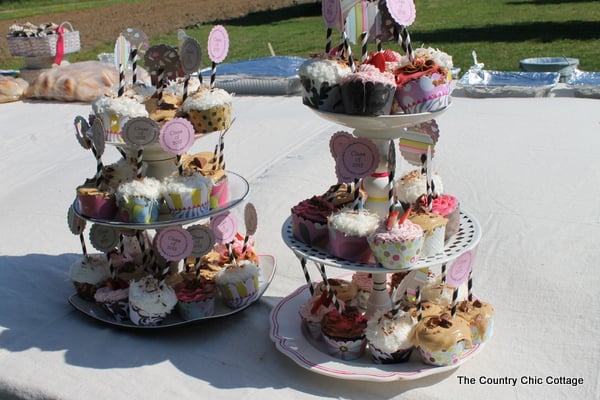
Yesterday, I showed off my own DIY cupcake stands in this post all about the graduation party I threw for my oldest daughter. The cupcake stands were a huge hit because not only were they adorable, but they also held a ton of gorgeous and delicious cupcakes!
Today, we're skipping the expensive cupcake stands and the cheap cardboard ones to create our own from items found at the thrift store!
Yes, I said the thrift store! These DIY cupcake stands are incredibly easy and affordable to create, so you'll want to make them for all your holiday parties and get-togethers!
Supplies Needed To Make DIY Cupcake Stand
- 3 Different Sized Plates – Mine are from the thrift store
- 2 Tall Candlesticks
- Spray Paint – I used white spray paint
- E6000 Glue
- Deco Art Glass Markers (optional)
Step 1: Spray Paint Candlesticks
Spray paint the candlesticks using white spray paint and set them aside to dry.
Step 2: Glue Plates & Candlesticks Together
Once your candlesticks are dry, take one and apply some glue to the bottom. Press it firmly into the center of your largest plate. Next, add glue to the top of the candlestick and carefully place your medium-sized plate on top.
Repeat this step using your second candlestick and smallest plate. Once everything is glued together, set it aside to dry.
Step 3: Decorate Each Plate & Candlestick (Optional)
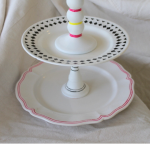
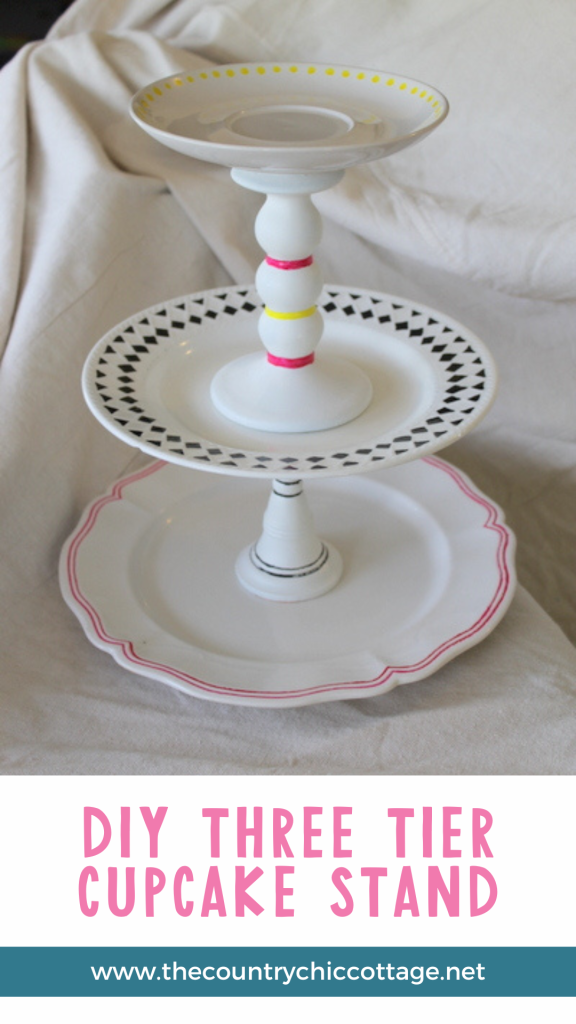
Now, are you ready to glam them up? One of the plates already had a colorful polka dot design, so I decided to stick with those colors. I used DecoArt Glass Markers and drew directly on the plates. That’s all there is to it!

I also drew colorful lines on the candlesticks in a few places. I think these stands took me maybe 20 minutes to make (NOT including dry time).

They made a great statement at the party—all in 20 minutes for about $6! I already had some of the plates, DecoArt markers, and glue. Gotta love thrift store shopping!

I am in love with the Deco Art Glass Markers. Y'all be prepared to hear tons more about those. I can't wait to use them on even more projects. They are so easy to use and make your glass projects gorgeous!

Serving cupcakes at your next party? Go BIG and make your cupcake stands with THREE tiers!
FAQs About DIY Cupcake Stand
Here are a few common questions that I often see readers asking about making this DIY cupcake stand. If you have a question, please check if I’ve already addressed it below. If you don’t see your question listed, please leave it in the comments
Can I Use Candlesticks And Plates From The Dollar Store?
Yes, you can! Visiting the Dollar Store is actually a great way to find different-sized plates in matching colors and patterns, if that's the look you're going for.
Can I Decorate The Plates Before I Glue Them Together?
Absolutely! I chose to decorate my plates after they were glued together. However, you could decorate yours before gluing them together to give you better control when drawing or doodling.
Are These Plates Food Safe If I Decorate Them?
No, if you use Deco Art Glass Markers on your plates, they will not be food-safe. Therefore, I recommend using only the markers on the edges of the plates and having all your cupcakes in liners.
5 More Cupcake Crafts
If you love this DIY cupcake stand, here are some other cupcake crafts that you won’t want to miss!
- Cupcake Stand from Clay Pots
- Free Printable Floral Cupcake Toppers
- Free Printable Cupcake Toppers and More Party Printables
- DIY Cupcake Wrappers With Your Cricut
- Cupcake Gift Idea and a Strawberry Lemonade Cupcake Recipe


I love the extra touch of drawing on the plates!
Too cute, and those cupcakes look yummy.
These are lovely!
This is so cute!! I just recently started blogging and I would love to do my own version of this idea…with credit to you of course. Would you mind?
darlingsimplicitys.blogspot.com
I would love to hear from you!!
Great post! We will be linking to this great article on our
site. Keep up the good writing.
These are to die for! Love, Love, Love them and can’t wait to make me some. Thanks so much for sharing!