
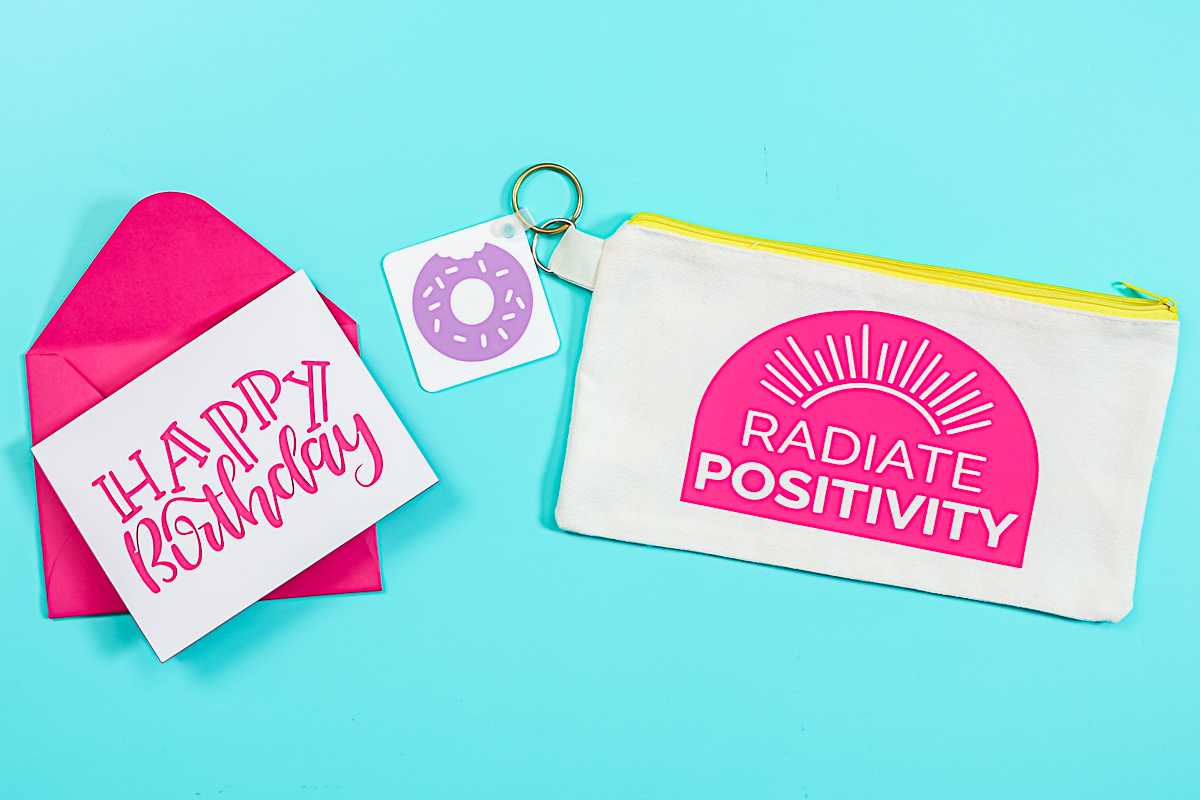
Are you looking for the perfect Cricut projects for beginners to use with your machine? You've come to the right place! I frequently receive questions about where to start when getting a new Cricut, and I have three fantastic projects to help you get started. In this post, you will learn how to create projects using paper, vinyl, and iron-on materials—all in one comprehensive guide!

Cricut Projects for Beginners
What are we going to create today for Cricut beginner projects? We'll start with a simple card, which is a fantastic paper project to begin with when cutting paper using your Cricut. Next, we'll move on to vinyl and apply it to a two-sided keychain. After that, we'll use iron-on material to make a zipper pouch. These same techniques can be applied to various materials for other projects as well. Just click play on the video below to watch!
Can't watch the video or missed some of the steps? Just follow along below!
Supplies Needed
- Cricut machine (I am using a Maker 3, but any Cricut will work.)
- Card supplies
- Keychain supplies
- Zipper pouch supplies
Pro Tip: Scoring Stylus Versus Wheel for the Cricut Maker
If your project includes score lines, you will need a tool to add them. For the Cricut Maker, you have the option to use either the scoring stylus or the scoring wheel for creating score lines. If you choose to use the scoring stylus, make sure to click on “Edit Tools” after selecting your material, choose the stylus from the options, and then click “Apply.” You can learn more about the differences and advantages of both tools here.
Cut Files
The cut files for the keychain and pouches are available in Cricut Design Space. You can find the designs I used by visiting my Design Space profile and scrolling through each project.
- Happy Birthday Card
- Donut Vinyl Keychain
- Basic Zipper Pouch
Beginner Card Project
Let’s begin with creating a card and cutting paper using your Cricut machine. I believe paper crafts are ideal projects for beginners with Cricut. This project is a fantastic way to familiarize yourself with your machine, as it is both easy and inexpensive.
Step 1 – Find a Card Design
To find a design in Cricut Design Space, you can use the images available in Design Space. First, type “birthday card” into the search bar. Then, select “Images” from the menu above the search results. Browse through the options and choose the design you like (the design I used below is image #M460EF9F, which is included with the paid Cricut Access subscription). Click “Add to Canvas” to insert it into Cricut Design Space.
As a beginner, I recommend starting with a simple card design. Choose one or two colors and keep the layering minimal. This approach will help you become familiar with your machine before moving on to more complex cards. The card I selected also includes an envelope.

Step 2 – Choose Colors in Cricut Design Space
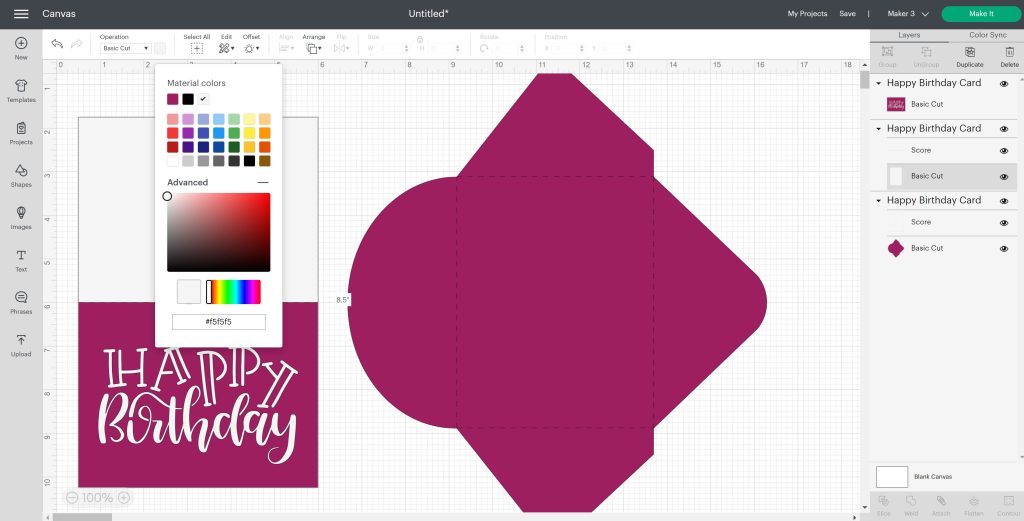
When you select an item in Cricut Design Space, it is initially grouped, as indicated by the “Group” label in the Layers Panel. To better visualize what my final design will look like, I will click on “Ungroup.” Changing the colors helps me envision the project and ensures that I cut it from the correct material. However, keep in mind that your Cricut does not detect the color of the paper on the cutting mat, so you don't need to use the exact colors—just representative ones will work.
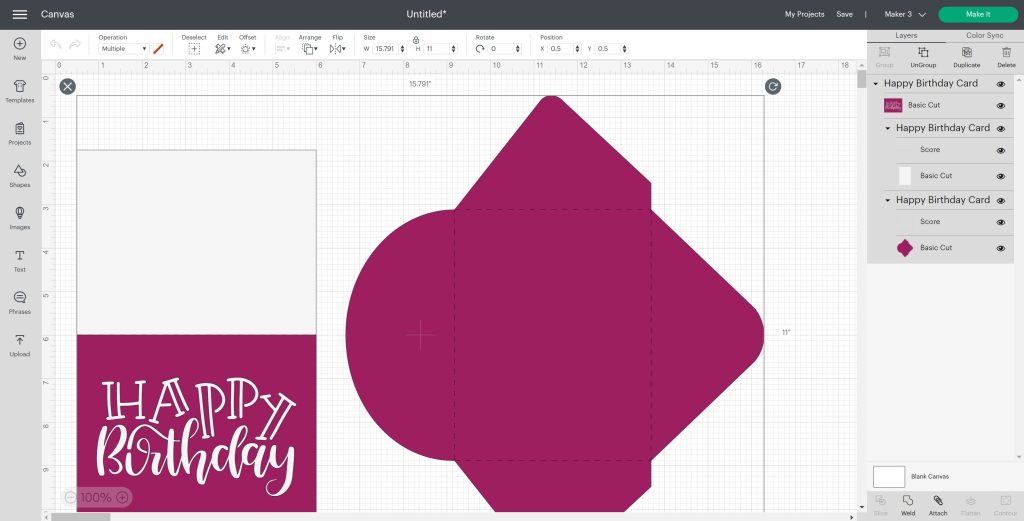
Select the card in the Layers Panel. Make sure to choose only the card itself and not the one with the scoreline. Next, click the drop-down box next to “Operation” and change the color. I want to use a dark pink, but there's no exact match available. Click the plus sign next to “Advanced.” After that, choose a color and adjust the slider to explore different shades. Repeat this process for the other elements.
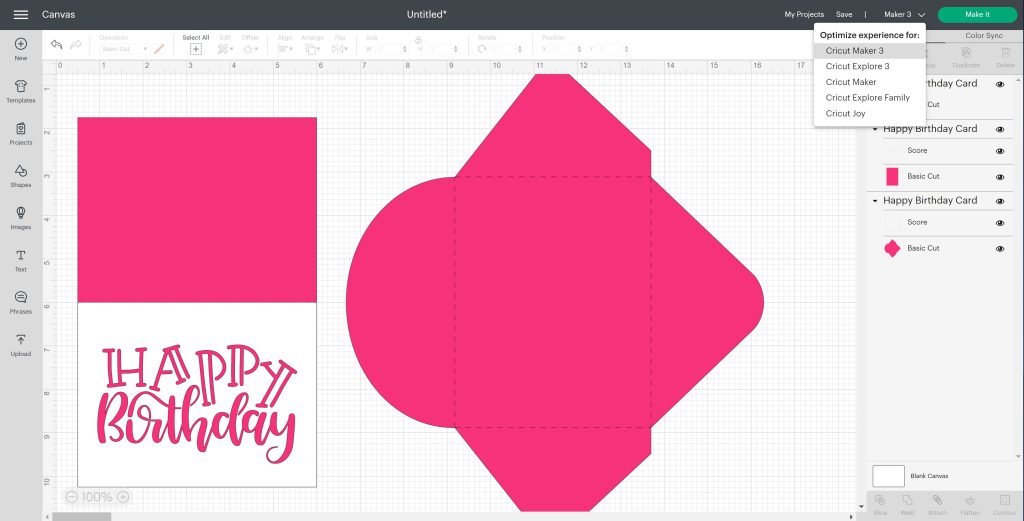
When creating elements to cut out, ensure that they are made from the same type of paper and are the exact same color. Additionally, in Cricut Design Space, it's important to select the correct machine. To do this, pull down the menu in the upper right corner and choose the machine you are using. Lastly, make sure that the score lines are attached to both the card and the envelope. Select both the score lines and the object, and then click “Attach.”
Step 3 – Resize the Card
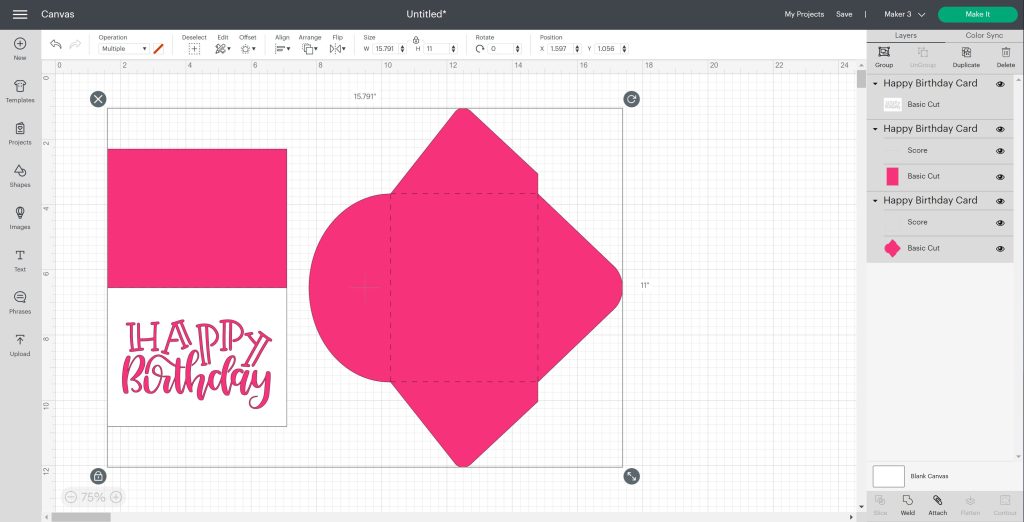
The card comes in a specific size of 5.5 inches by 8.5 inches. When folded in half, its dimensions will be approximately 5.5 inches by 4.25 inches. To visualize this size, I can use a ruler in my mind. If this size doesn't meet my needs and I want to resize the card, I need to ensure that I select all elements before resizing.
I would start by clicking and dragging my mouse to draw a box around all the elements to select them. There are two ways to resize the selected elements. One option is to use the arrow button for resizing, making sure to lock the dimensions by clicking the small lock icon above the size fields. This will ensure that all elements change proportionally. Alternatively, I could also input a specific size directly in the top toolbar.
Step 4 – Send the Design to Your Cricut
Once everything is the way you want it, click “Make” and start to cut. Design Space will ask you how you will be cutting. I picked “on mat” in this case.
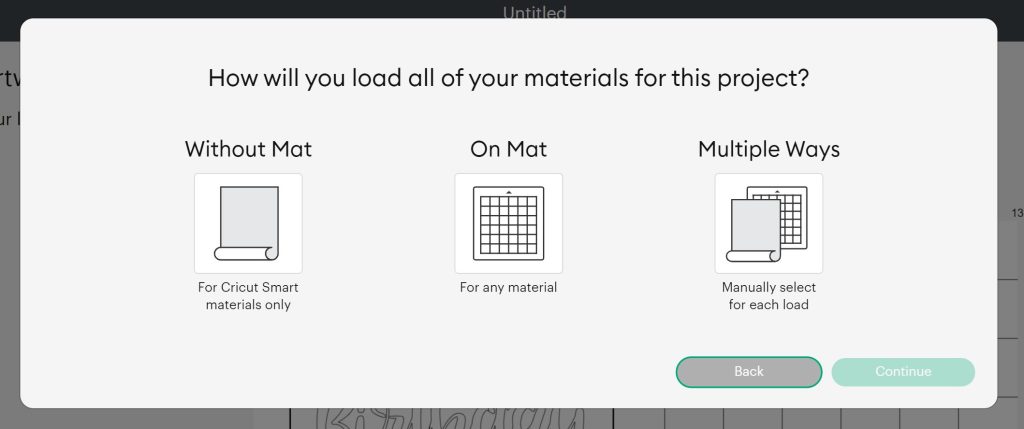
From the Material Size drop-down, you can change sizes, so if you had 12 x 24 paper, you could pick 12 x 24. If this cut preview looks okay, click “Continue” to cut. NOTE: For paper, you don't have to mirror your design.

Step 5 – Add Cardstock to the Mat
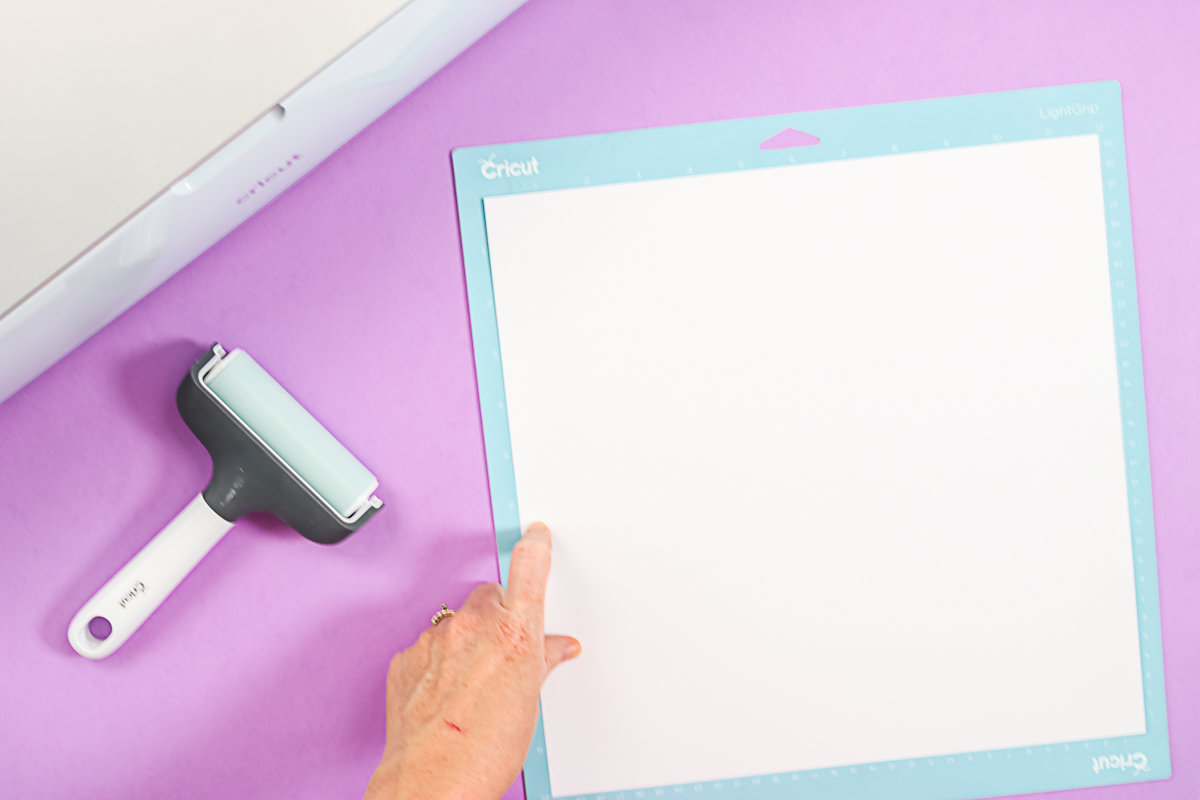
To prepare your mat, start by peeling back the protective sheet. Be sure to save this sheet, as it helps keep your mats clean and free from dirt and debris, extending their lifespan.
Next, we'll cut the white paper. Use the grid lines on the mat to align the paper properly. Once it's lined up, press it down into the adhesive with your hands. As your mat ages, using a brayer tool will be beneficial; simply roll it over the paper to ensure it adheres more securely.
Step 6 – Cut and Score
Select the “Medium Cardstock” setting. Please note that any material listed with a “C” beside it is a Cricut material. Design Space will also indicate which tools you need.
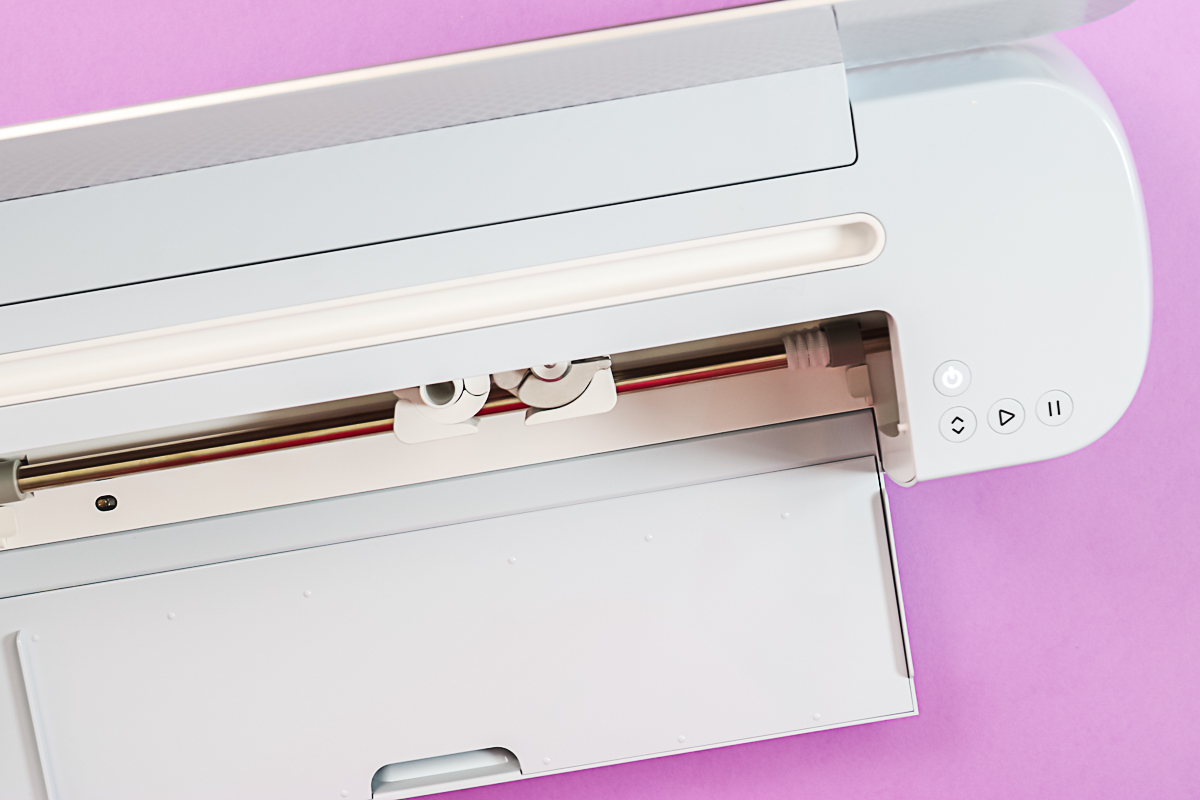
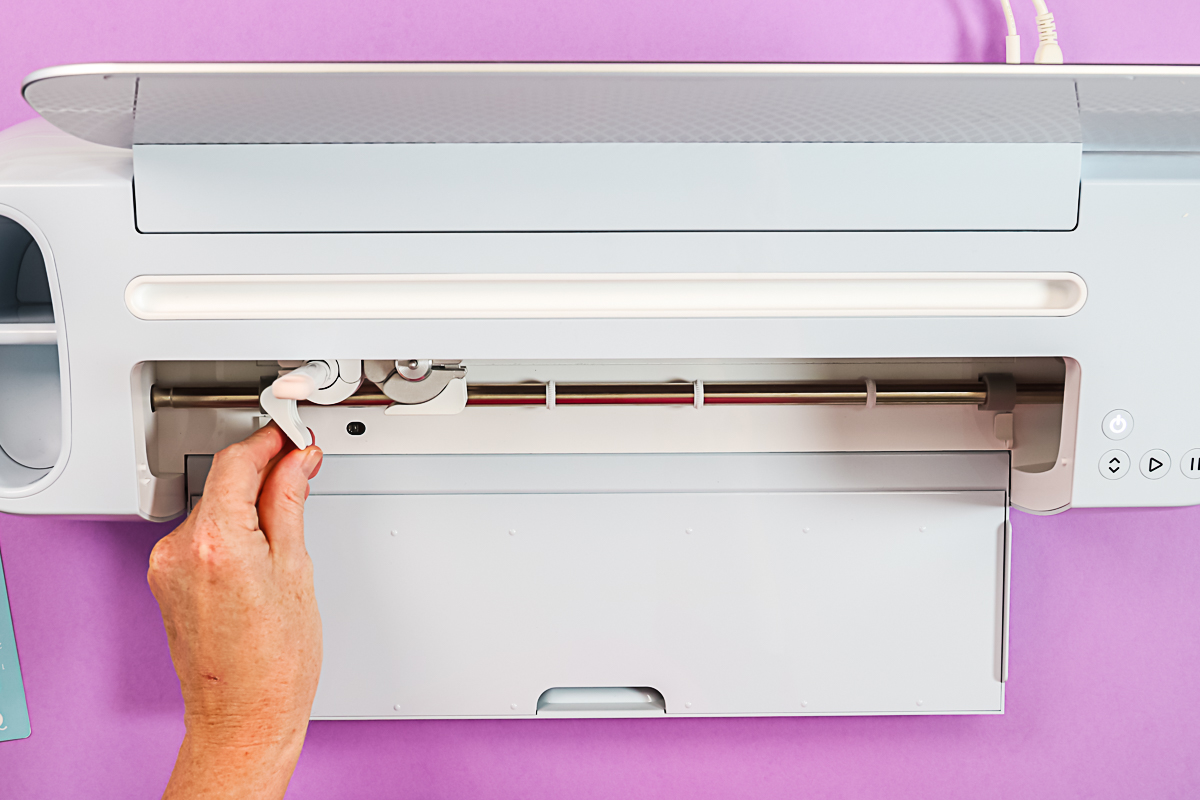
If you are using a Maker and want to utilize the scoring stylus, refer to the section above for guidance. At this point, you should see the arrow button flashing on your machine, indicating that it is ready for you to load your mat. Take your mat to the machine, ensuring it is positioned under the guides on both sides. Press it against the rollers and hold it in place while pressing the arrow button simultaneously. The mat will then load into the machine.
Once your Cricut machine is loaded, it will check if the correct blade is installed and ensure that there is enough material. Since we are just cutting the white cardstock and not scoring, make sure you have the fine-point blade installed. After confirming this, press the go button, and the machine will begin cutting your design. Once the cutting is complete, the arrow button will start flashing again. Simply press it to unload your mat.
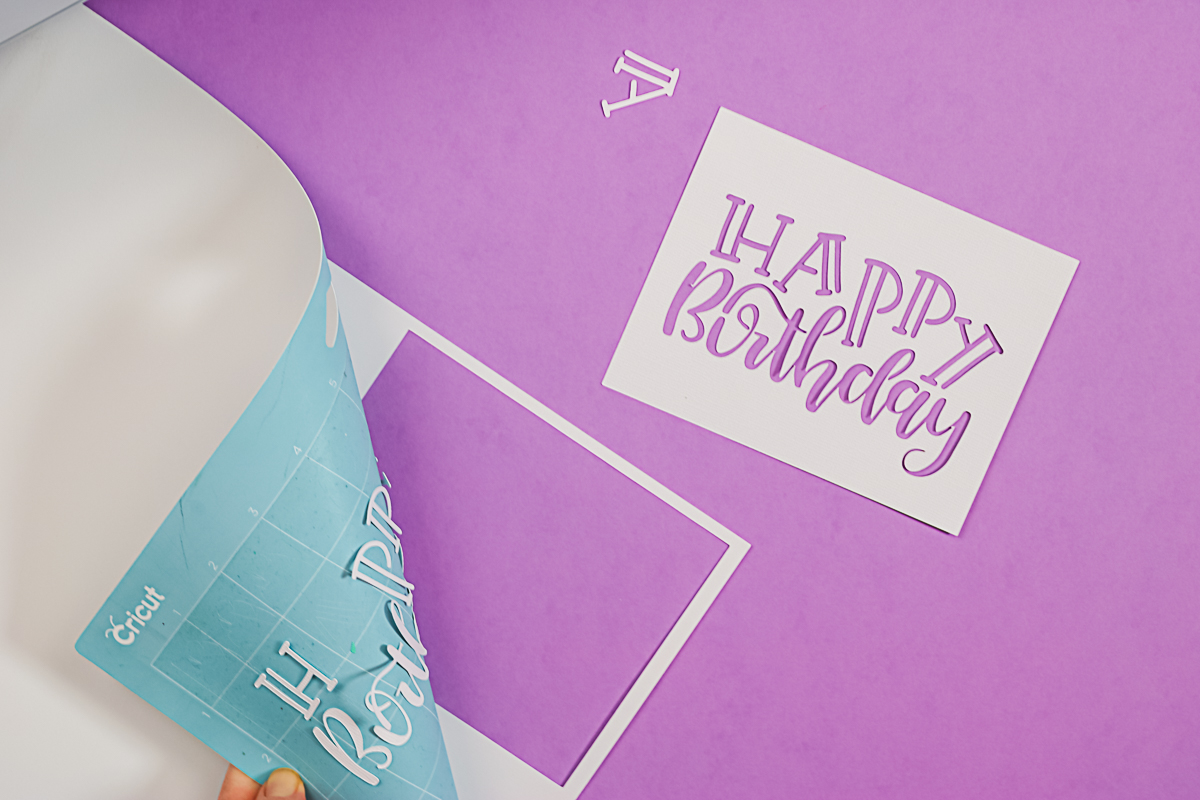
Step 7 – Remove the Paper from the Mat
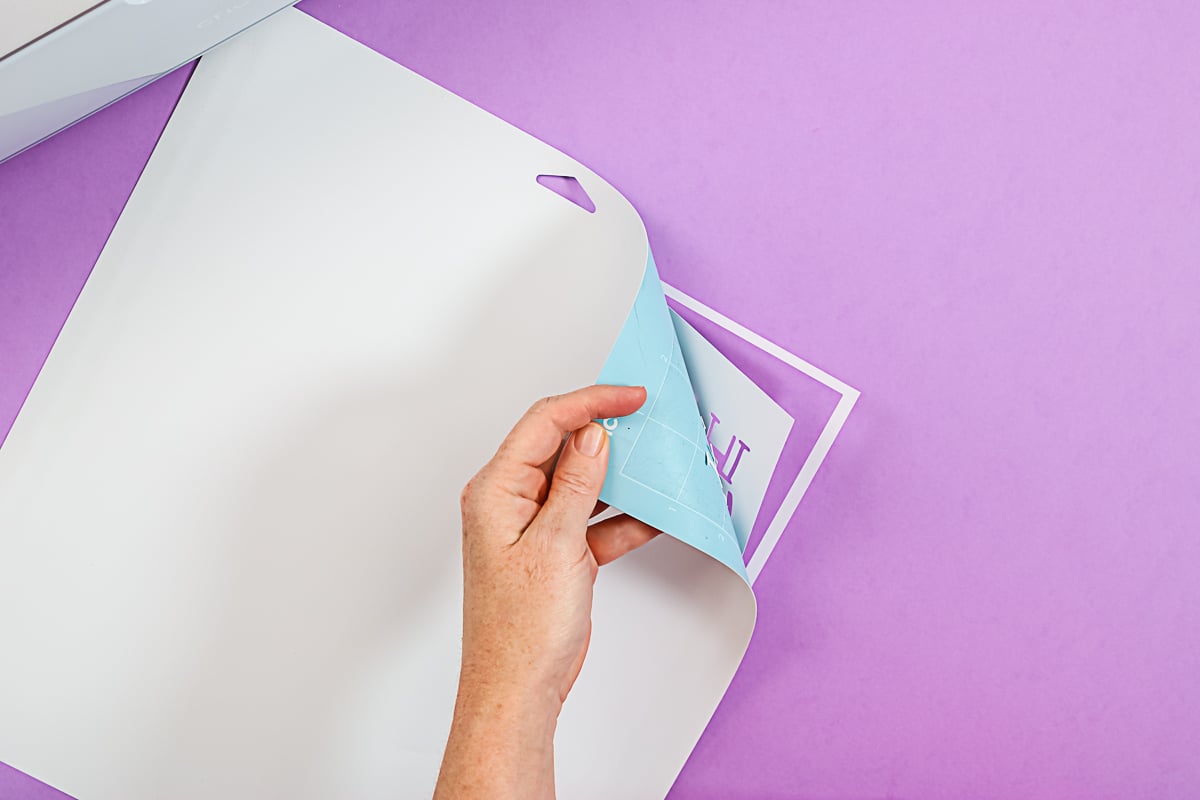
My top tip for removing paper from a Cricut mat is to do it the opposite of what you might expect. Turn the mat upside down and peel the mat back from your project instead of pulling the project off the mat. This method helps prevent the paper from curling. Continue peeling the mat back until your piece is loose, and then you can remove it. If your design is meant to be taken off in one piece, you won’t need to worry about the centers of letters. However, if you have a design that requires keeping the centers, be sure to save those pieces when removing them from the mat. If you like the design on the mat, you can save it to use for a future design, so it's kind of getting two projects in one!
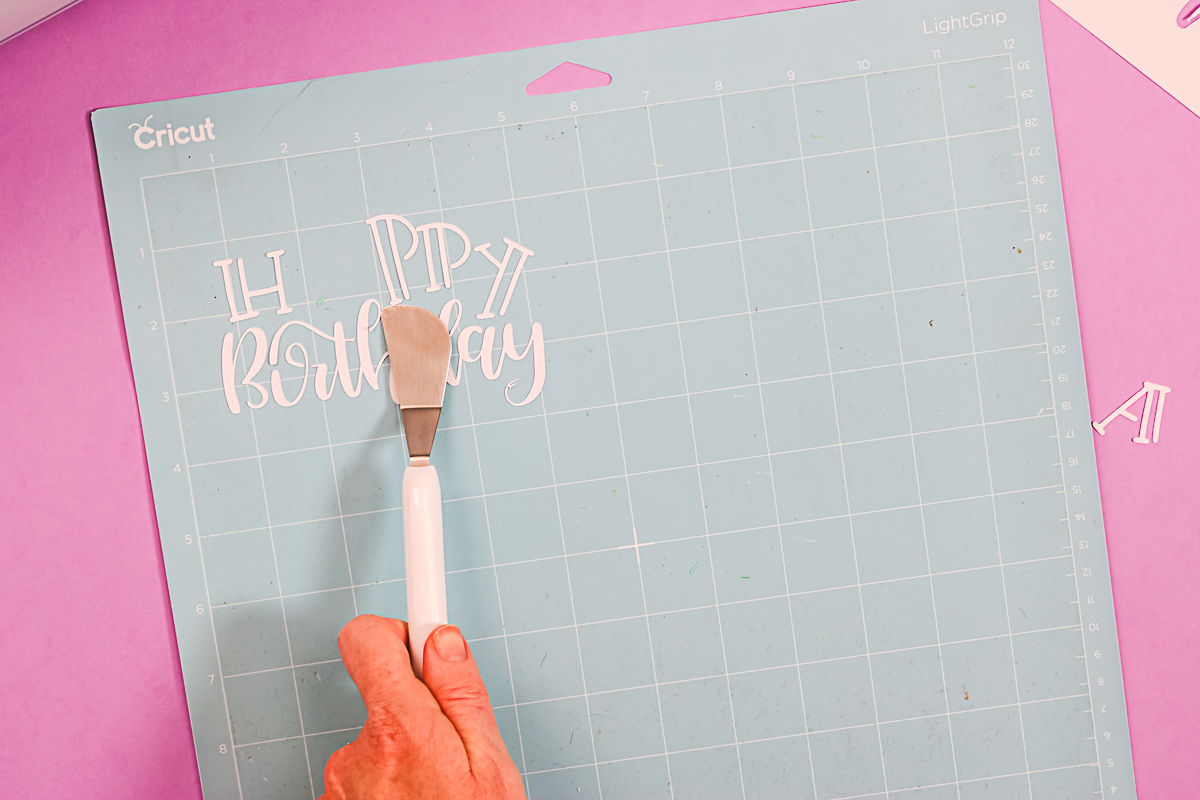
You can use a spatula to remove all of the scraps from the mat or to use them for another project, lay a piece of press & seal wrap over the design and rub well with your scraper until the pieces are adhered, then flip the mat over and gently peel the press & seal from the mat to preserve the placement of the design for another project.
Step 8 – Cut the Remaining Pieces
To prepare the next part of the card, you will need to create a scoreline. I'm using a scoring stylus, so I switched the tool in Design Space. Then, open clamp A on your machine, ensuring that the arrow and the word “Cricut” are facing you. Insert the scoring stylus into the machine until it clicks, then close the clamp. This setup allows the stylus to score while the fine point blade, which remains in clamp B, handles the cutting. You only need to press the go button once to start the process.
If you are using a scoring wheel instead of a stylus, place it in clamp B. The machine will stop after completing the scoring. At that point, you will need to replace the scoring wheel with the fine-point blade to continue cutting your project.
Place the paper for the card onto the mat, just as we did with the white paper. Load the mat into the machine and press the “go” button to start cutting. The machine will first add the scoring lines, and then it will cut the remainder of your project. Once the cutting is complete, carefully remove the mat from the machine and take the paper off the mat, just like I showed you earlier.
Step 9 – Assemble the Card
Keep in mind that there is a score line running down the center of the card. Our Cricut machine created this score line, making it easy to find and fold the card precisely in half. I will use dry adhesive, but you can choose any type of adhesive you prefer.
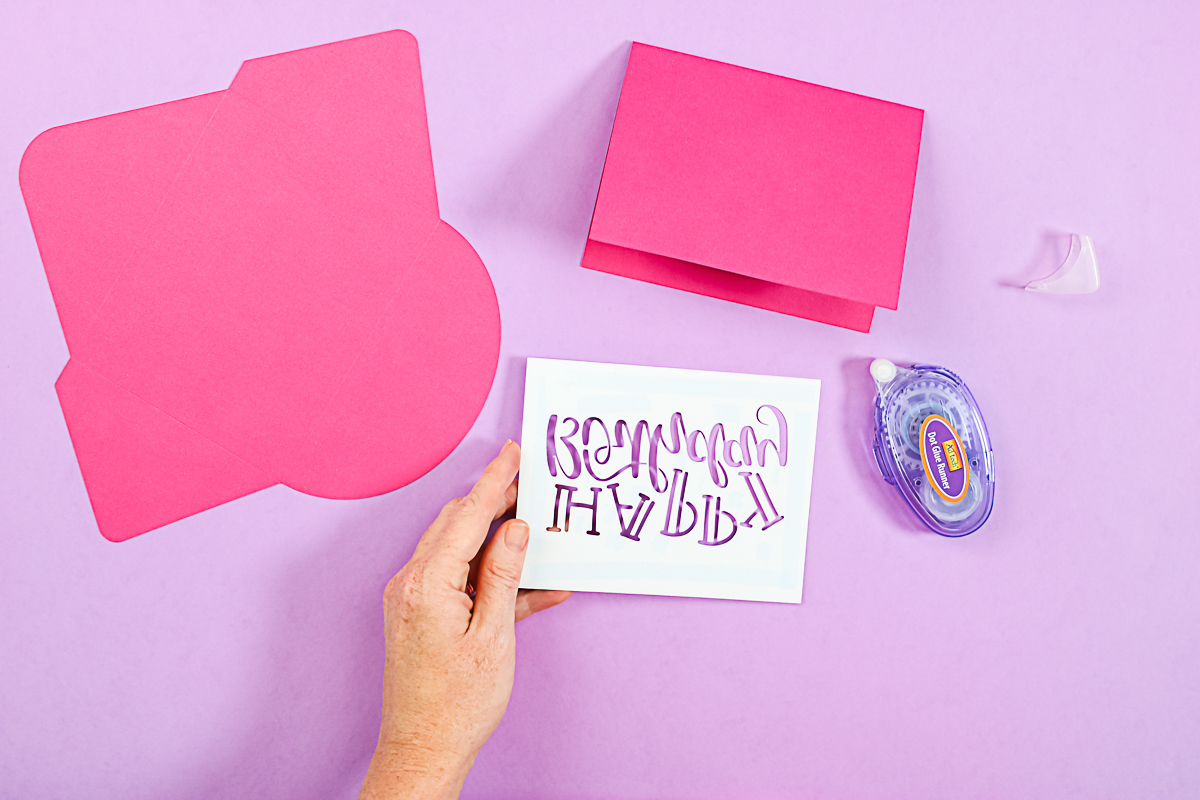
After applying the adhesive, place your paper on the front of the card so that it lines up perfectly. Press the adhesive firmly to secure it in place. The card is now complete! You can write any message you like on the inside. Keep in mind that your Cricut can use a pen to write. As you gain more experience, you could consider adding writing to the inside of the card as well.
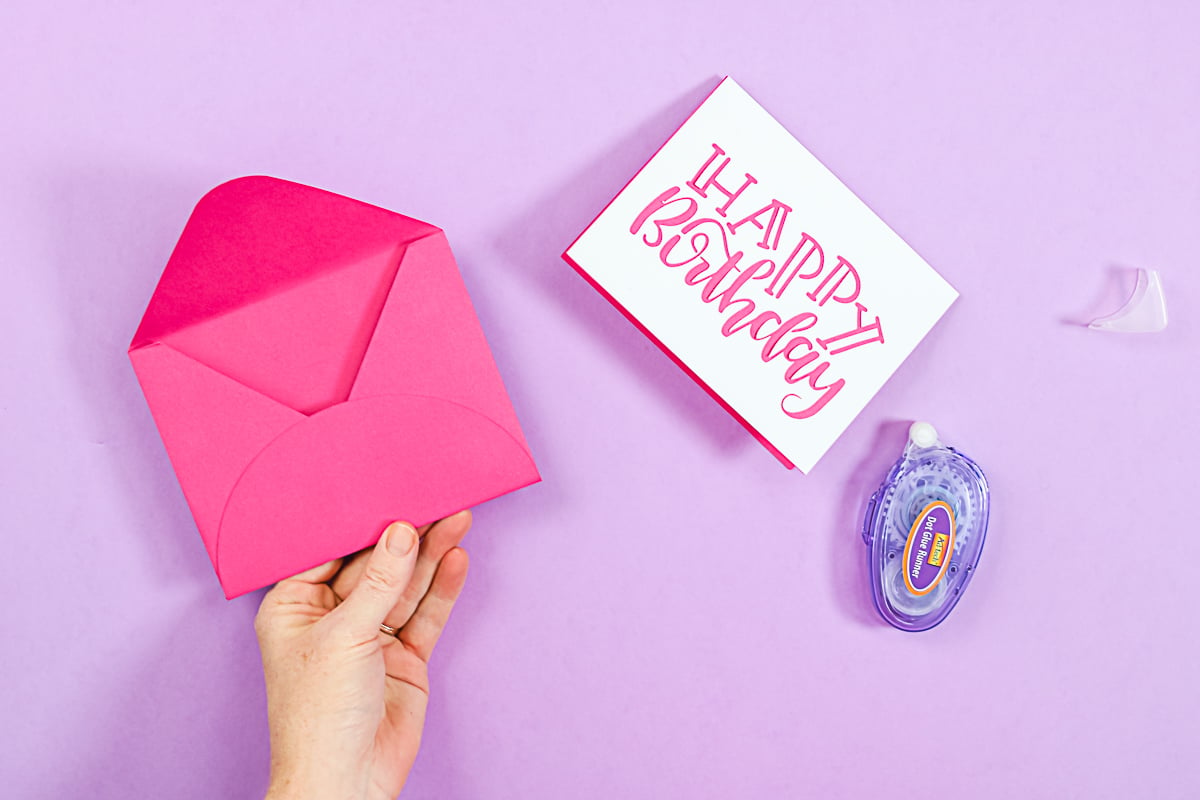
Step 10 – Assemble the Envelope
To create the envelope that complements your card, start by folding along the four score lines. After folding, apply adhesive along the two side flaps. Then, press down the bottom flap to secure everything in place. Now you have a completed envelope!
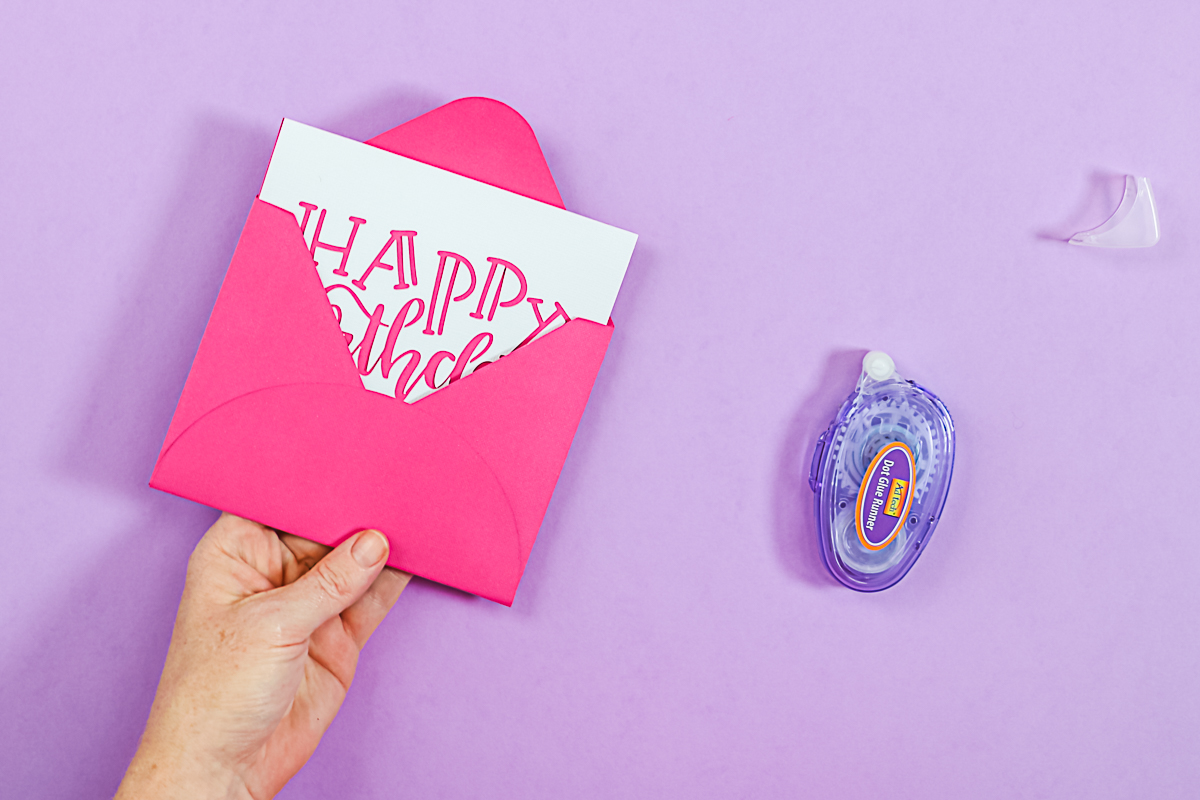
You can insert the card you just made into the envelope, close the flap, and it’s ready to be given. Don’t forget to write the recipient's name and address on the front if you plan to mail it. Alternatively, you can simply note who it’s to and who it’s from.
As you become more skilled, consider using your pens and your Cricut machine to do the writing for you. Now you have a lovely card for a birthday, or you can make one for any other occasion!
Beginner Vinyl Project
Now that you have your card, let's learn how to use vinyl with your Cricut machine for the next project in this series of beginner Cricut projects. Adhesive vinyl is a common material that works well for a wide variety of projects.
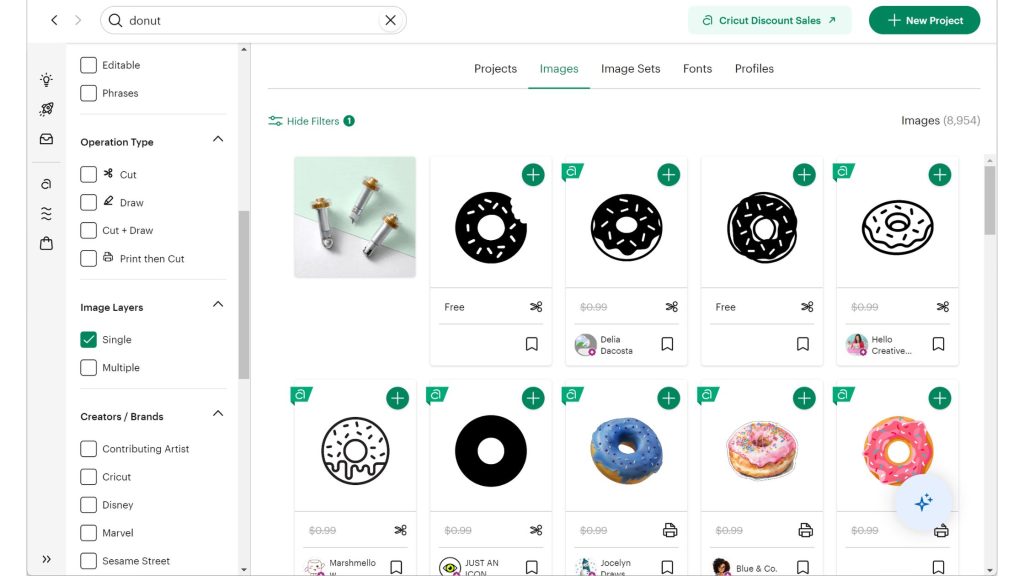
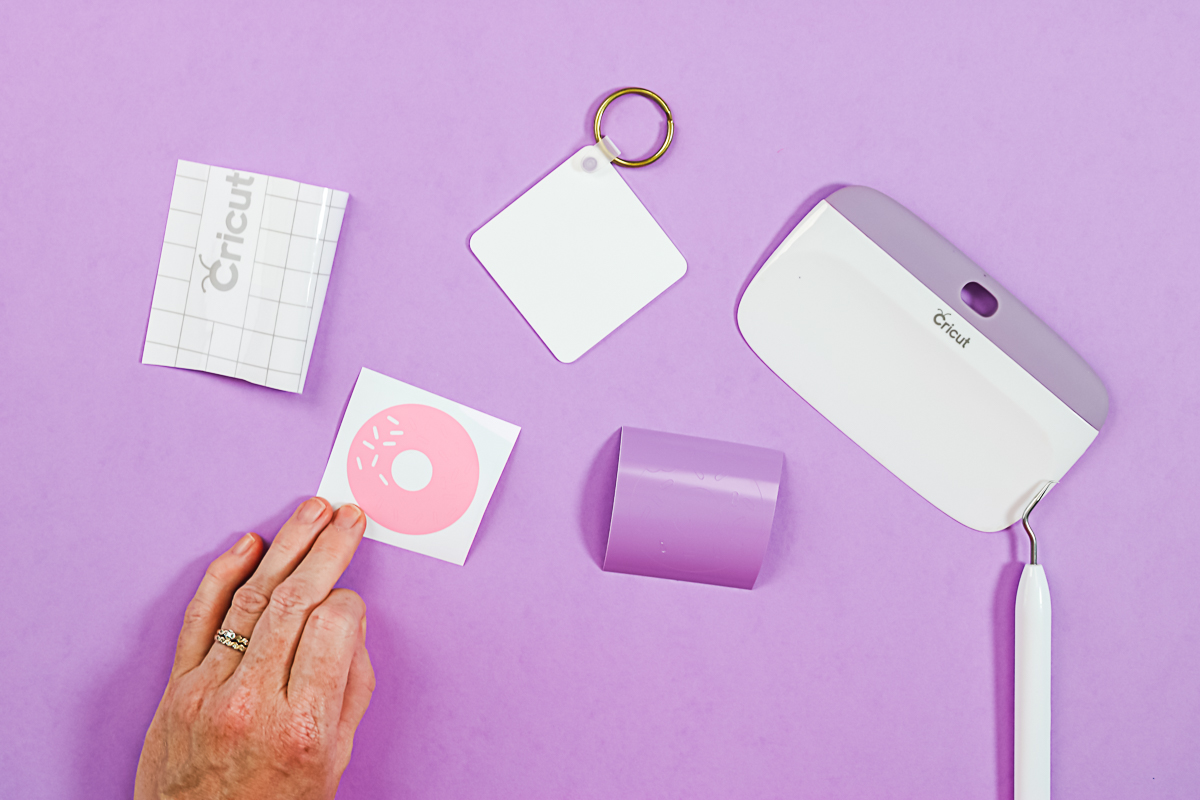
Step 1 – Select Donut Image in Design Space
For the adhesive vinyl project, I found several donut designs by searching for images. There are many options to choose from, but I wanted to keep things simple, so I selected two images that were single-layered.
Step 2 – Resize the Images
I measured the keychain with a ruler and found that a size of 2 inches around would be perfect for this particular blank. To determine the best size for your blank, measure it with a ruler and visualize what would look appealing. In Design Space, use the arrow button to resize the donut shape. You can also enter the exact size in the top toolbar. Ensure that the lock button is on so that the entire design resizes proportionally. The final dimensions should be 2 x 2 inches.

Step 3 – Change Image Colors
I thought it would be fun to place one donut on one side and another donut on the other side, each in a different color. I will choose purple for one of the donuts from the color menu. You can select any color you like for both donuts, but make sure they are different colors. By selecting two colors, each donut will be on a separate mat in the next step.
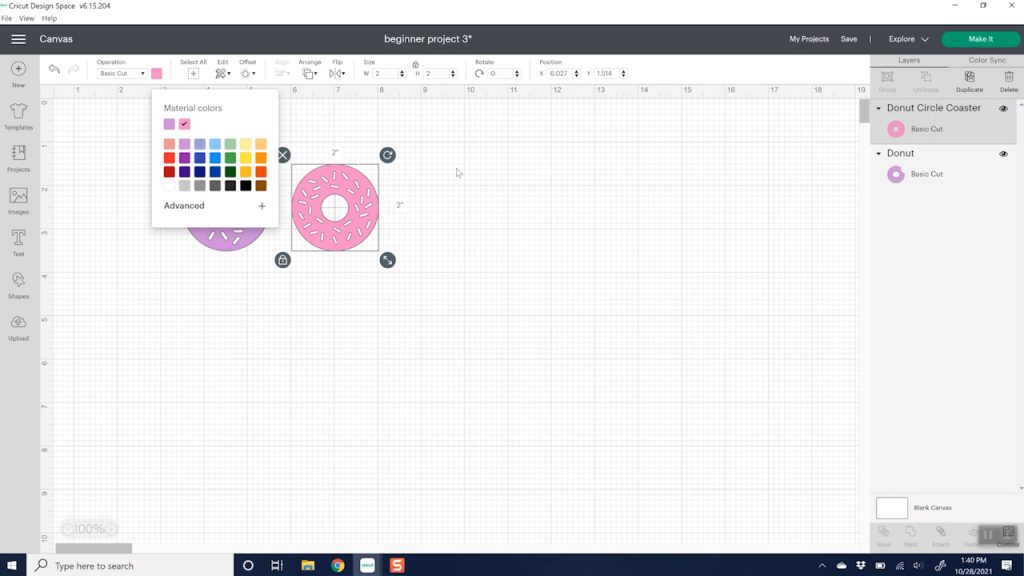
Step 4 – Send the Project to your Cricut
Then click “Make.” I will select “On Mat” because I am using regular vinyl. The option to choose “Without a Mat” is only for Cricut Smart Materials, and since I’m not using Smart Materials for this project, I will click “On Mat” and then click “Done.” Now, I see our donuts displayed on two different mats—one pink and one purple. You’ll notice that the mat color on this screen matches the color you selected for your item on the previous screen. This feature helps you keep everything organized, especially if you have several different objects. Next, click “Continue.”

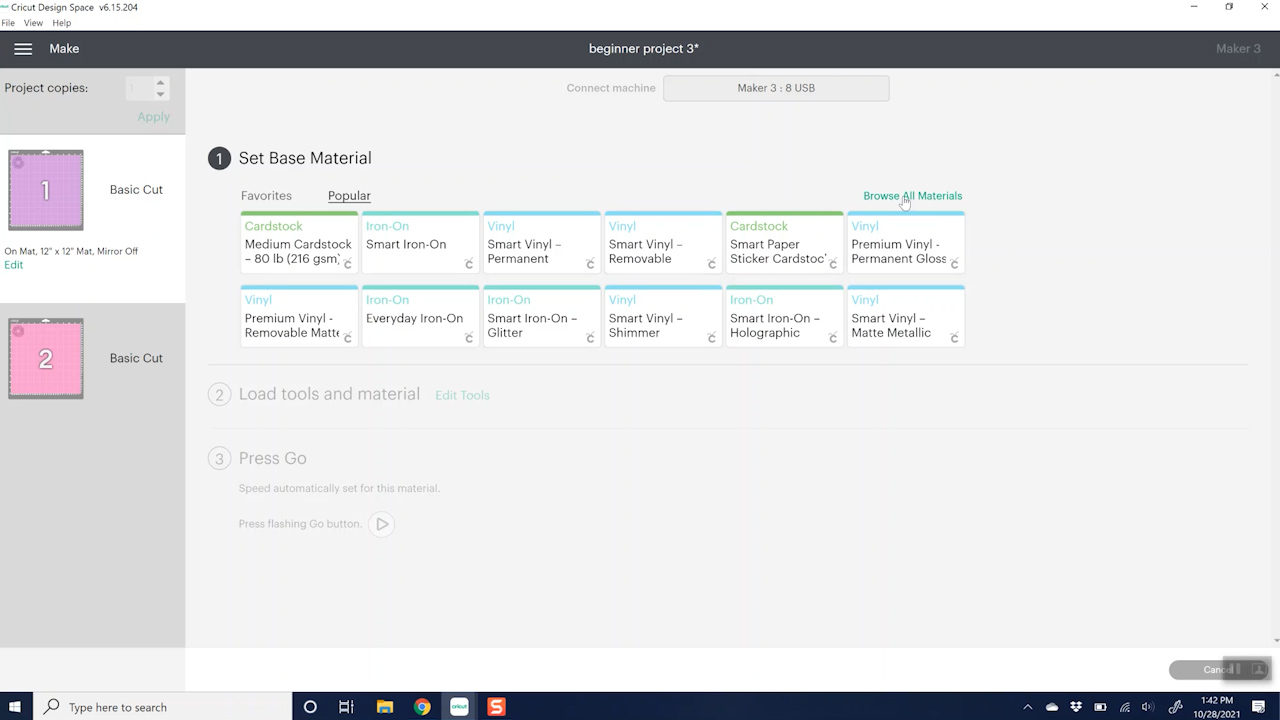
Step 5 – Choose Material in Cricut Design Space
Click on “Browse All Materials” to choose your material. I’ll select premium vinyl, permanent glossy, as that’s what I'm using. Since both mats use premium vinyl, I can check the “remember material settings” box. This way, when I switch to my second mat for cutting, it won’t prompt me again because both mats are made from the same material.
Step 6 – Add Vinyl to the Mat
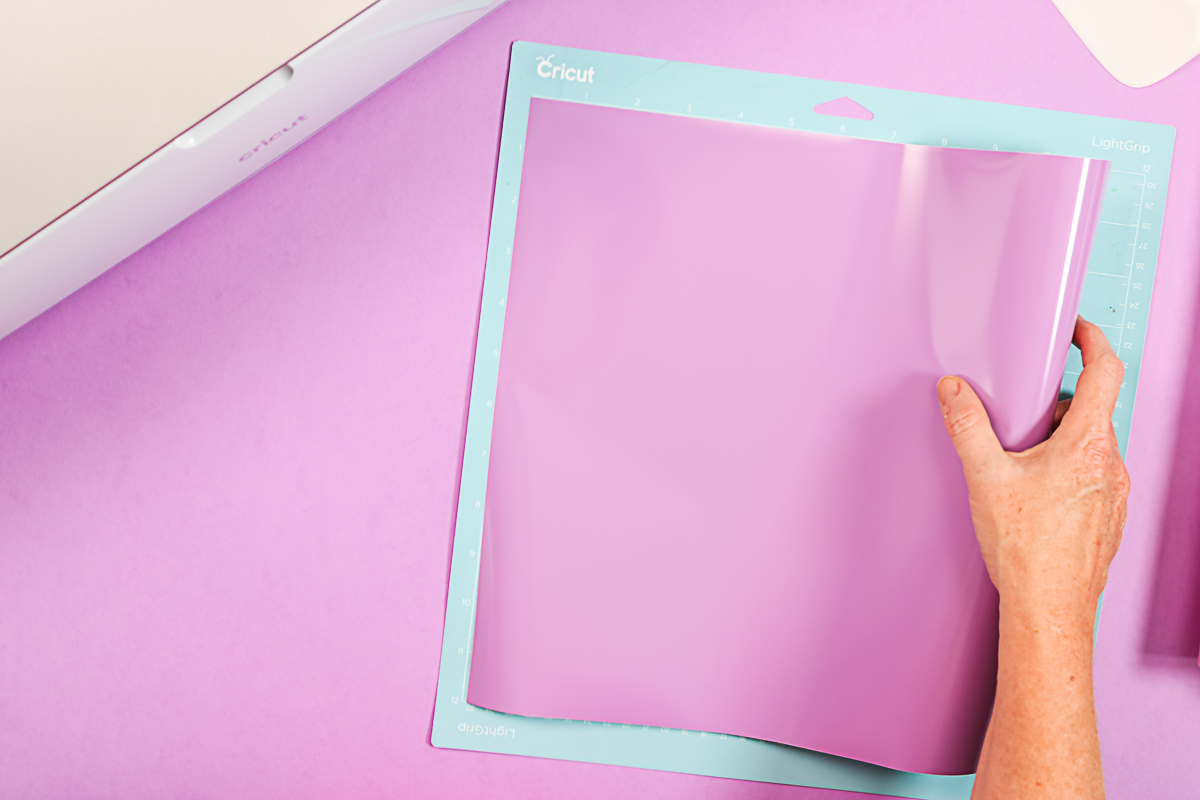
Place the vinyl on the mat in a manner similar to how you would position the paper. Be sure to remove the protective film from your mat and keep it safe, as you will want to put it back on after you finish. Align the vinyl with the grid on the mat and press it down firmly. If you feel that it hasn't stuck down well, you can use a brayer to smooth it out.
Step 7 – Cut Adhesive Vinyl
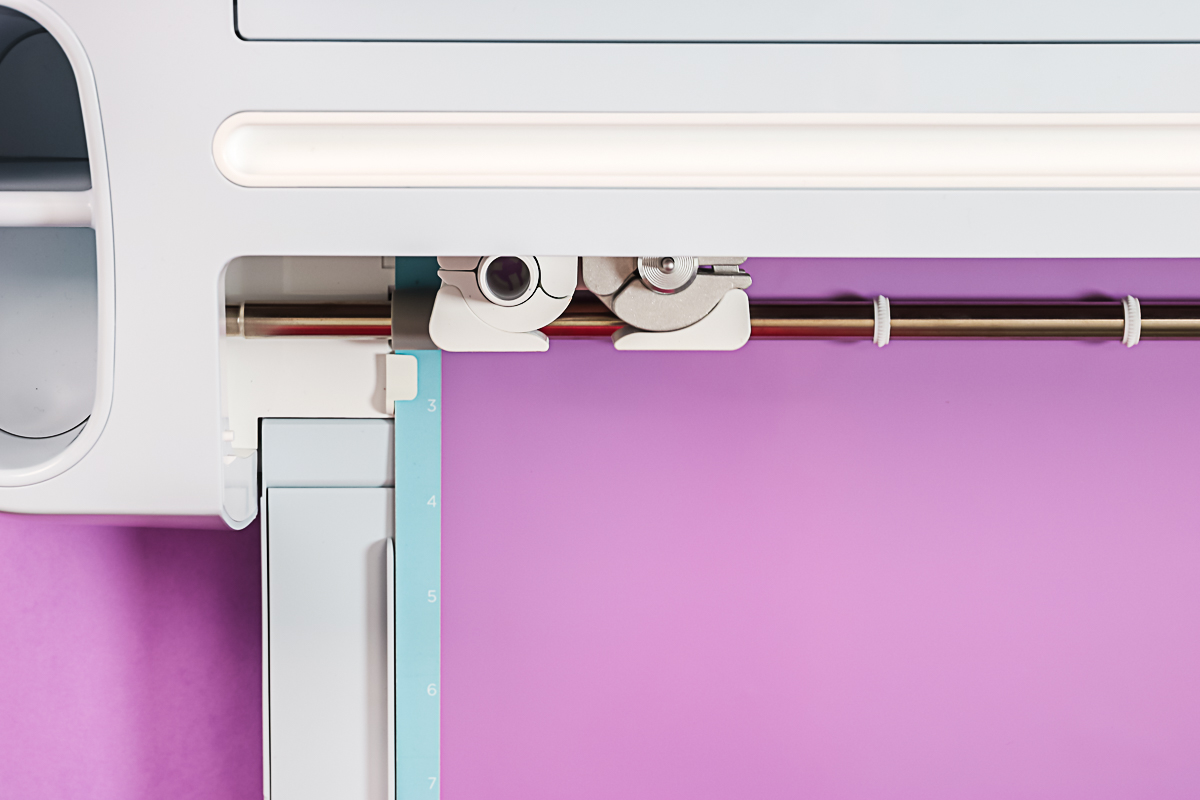
Once your vinyl is positioned on the mat, it's time to move to the Cricut machine to begin cutting. By now, you should be confident in loading your mat. To load the mat, press the arrow button and gently push it in. For this project, make sure the fine-point blade is loaded into clamp B. Once everything is set, you can press “Go” to start the cutting process.
Once your machine has finished cutting, press the arrow button to eject the mat from the machine. I will now cut my pink vinyl in the same manner. After that, we will discuss how to remove the vinyl from the mat and the next steps for assembling our project.
Step 8 – Remove the Vinyl from the Mat
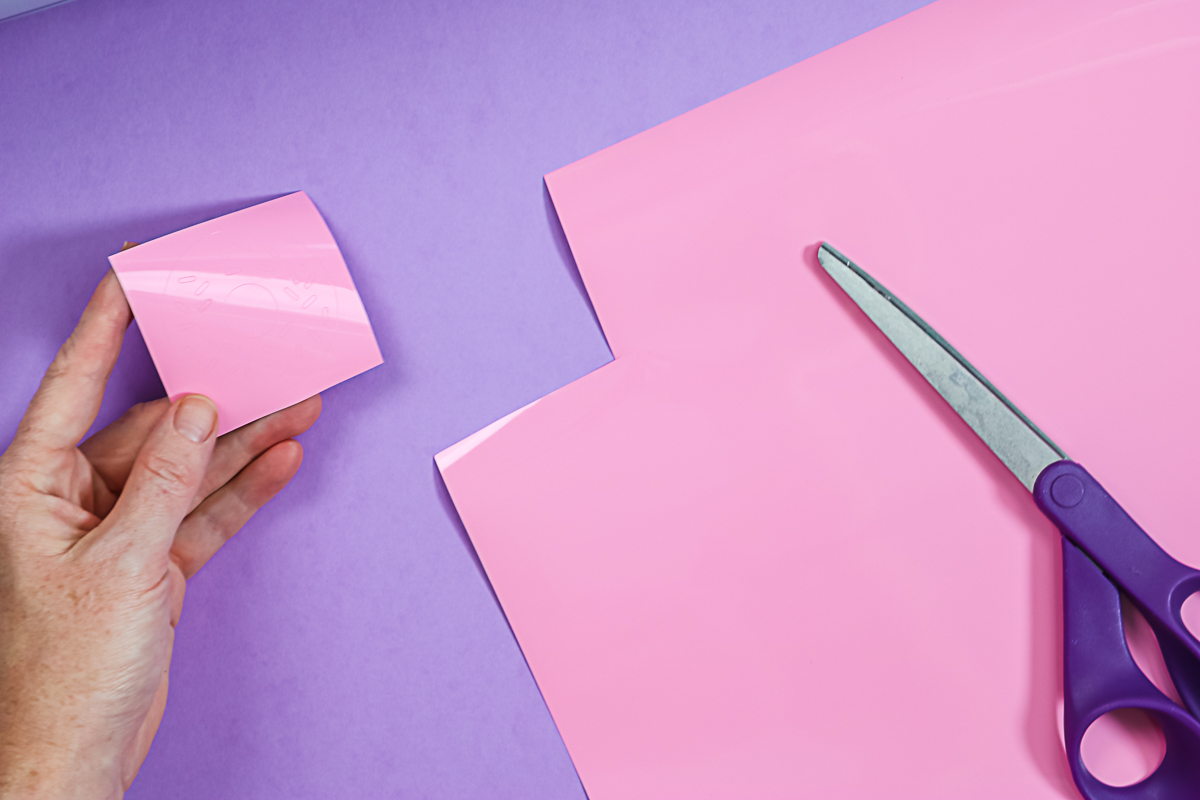
To prevent your vinyl sheet from curling, it's a good practice to peel the mat back from your material. In this instance, I placed an entire sheet of vinyl on the mat but only cut a small portion from one corner. You can use scissors to trim away any excess vinyl and save the remaining sheet for future projects.
Step 9 – Weed the Cut Design
In this project, we will begin by weeding around the outer edges, as well as the center of our donut and each of the sprinkles. You will notice the cut lines that outline these areas, and you can use your weeding tool to carefully pick up all of the small pieces. I’ll be doing this for both my pink donut and my purple donut. If you're new to weeding, take your time. This design is fairly simple, making it perfect for beginners who are trying weeding for the first time.
Tip: After completely weeding both designs, hold them up to the light to check for any remaining cut lines.
Step 10 – Apply the Vinyl
Before applying the vinyl to your blank surface, be sure to clean it using a small amount of rubbing alcohol or an alcohol wipe, and allow it to dry completely. I cleaned both the front and back to ensure they are free of dirt and residue.
Next, it’s time to add our design. Start by cutting a small piece of transfer tape. Peel off the backing paper to reveal a clear piece of transfer tape with grid lines. Stick the transfer tape onto the vinyl. This is where the scraper comes into play. Use the scraper to scrape and burnish the vinyl on both the front and back.

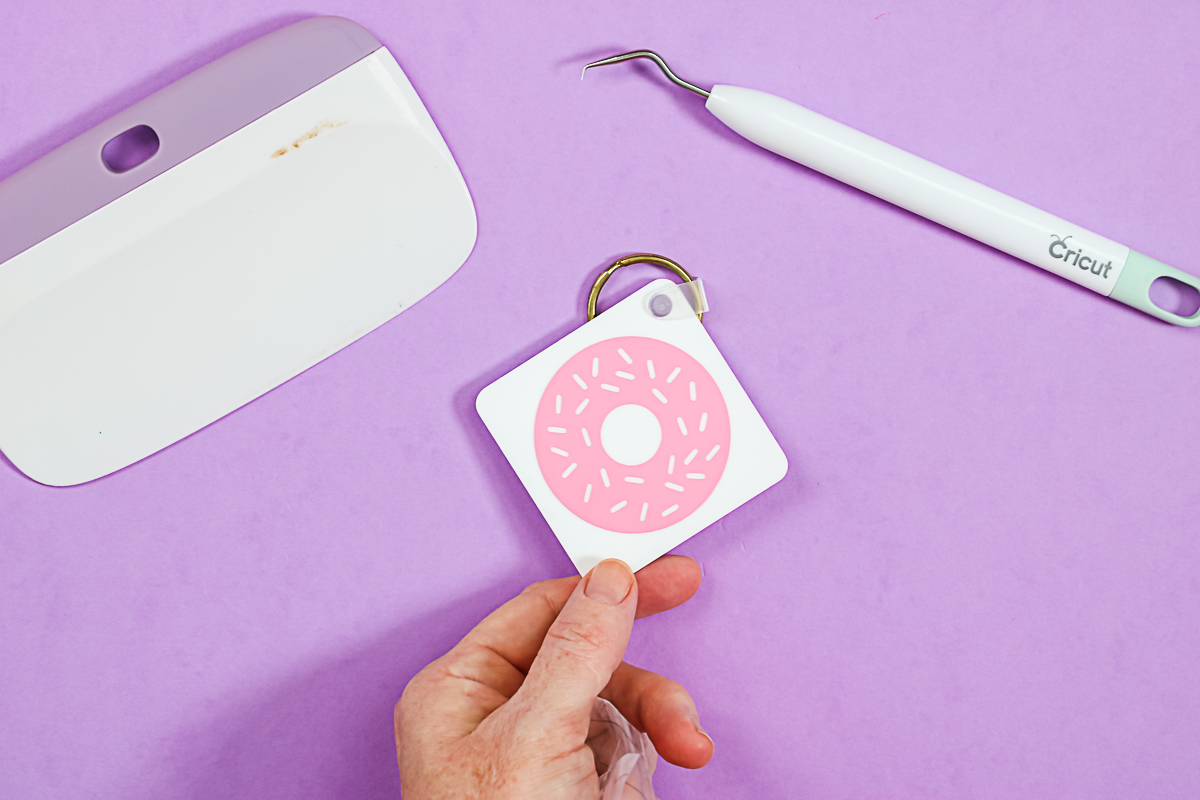
First, peel back the backing paper from the vinyl, making sure to pull it all the way back to where it folds onto itself for easier removal. It's important to keep the vinyl attached to the transfer tape. If you find that the vinyl isn't peeling off easily, use your scraper to burnish it and then try again. Once the vinyl is fully adhered to the transfer tape, you're ready to apply it to your keychain.
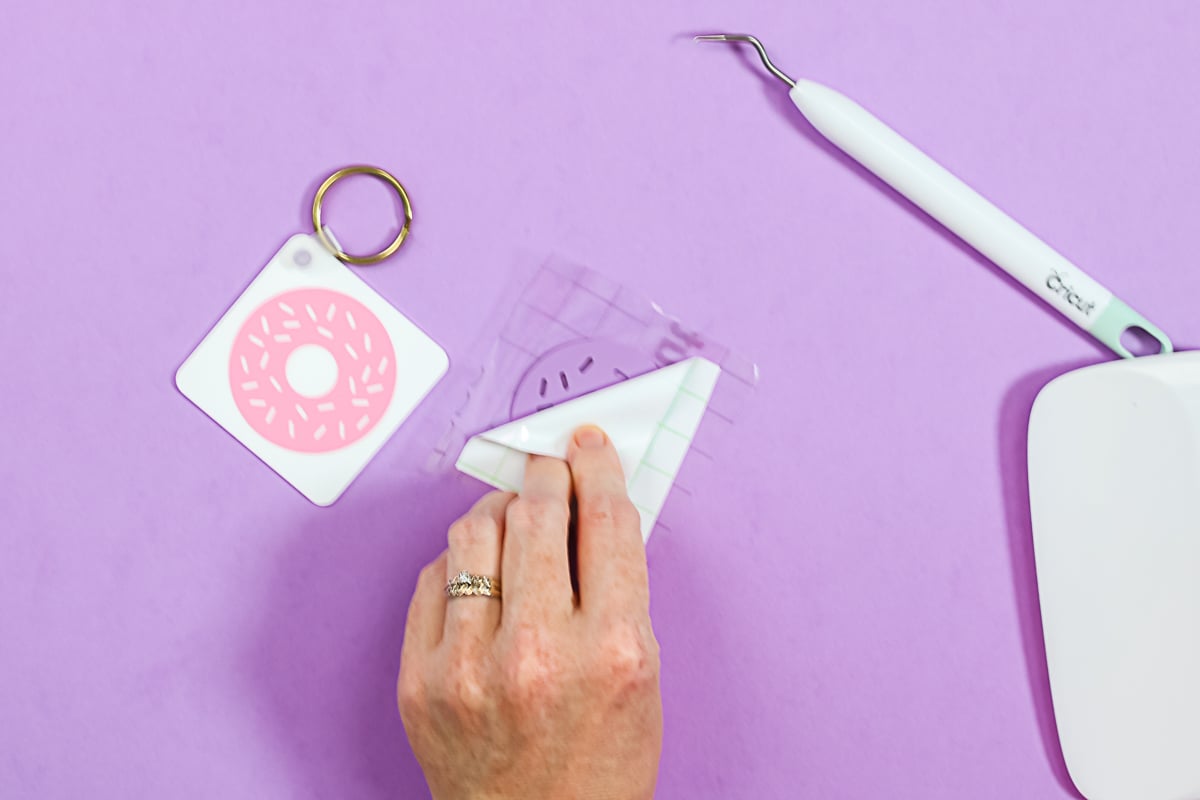
To position the item, aim to place it approximately in the center. You can use a ruler for a more precise alignment. Once you’re satisfied with the placement, press it down firmly with your scraper, ensuring that all air bubbles are removed. After it’s securely attached, carefully peel the transfer tape away. It's best to fold the tape back onto itself while peeling, as lifting straight up may pull some of the design off the blank surface. If the design does start to pull up, gently place the transfer tape back down and burnish well to try again.
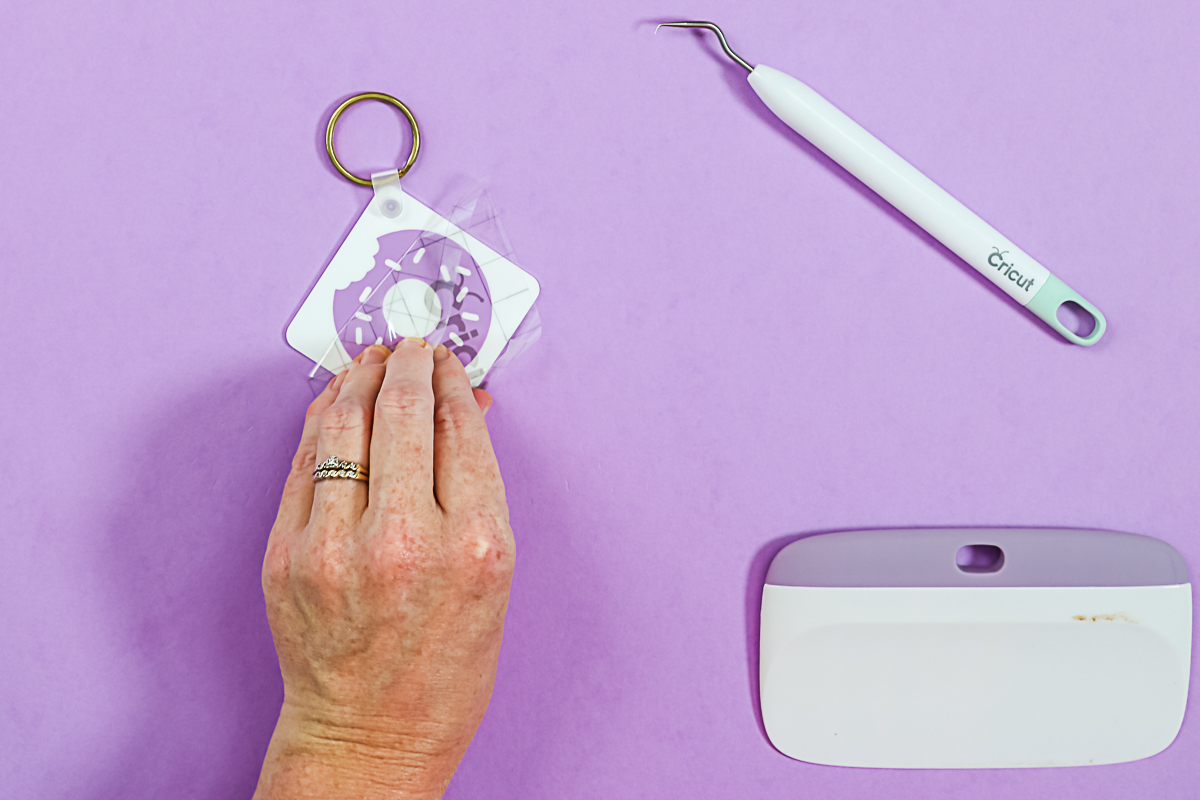
Pro Tip: Reuse this transfer tape for the other side. There's no reason to get another piece.
To complete the keychain, repeat the entire process on the other side. Now that both sides are done, you can see that you have a two-sided keychain. It's a charming accessory that you can keep for yourself or give as a gift!
Beginner HTV Project
Now, let's talk about iron-on materials, also known as Heat Transfer Vinyl (HTV). Gather your iron-on supplies to create this adorable zipper pouch, which will be our final project in this series of beginner Cricut projects, and be sure to grab my HTV Cheat Sheet below.
Free HTV Cheat Sheet
Get your FREE Printable HTV Cheat Sheet now! This guide has sizing and position recommendations for infant through adult shirts as well as a handy HTV use guide. Print this double sided guide and put it by any heat press you own!
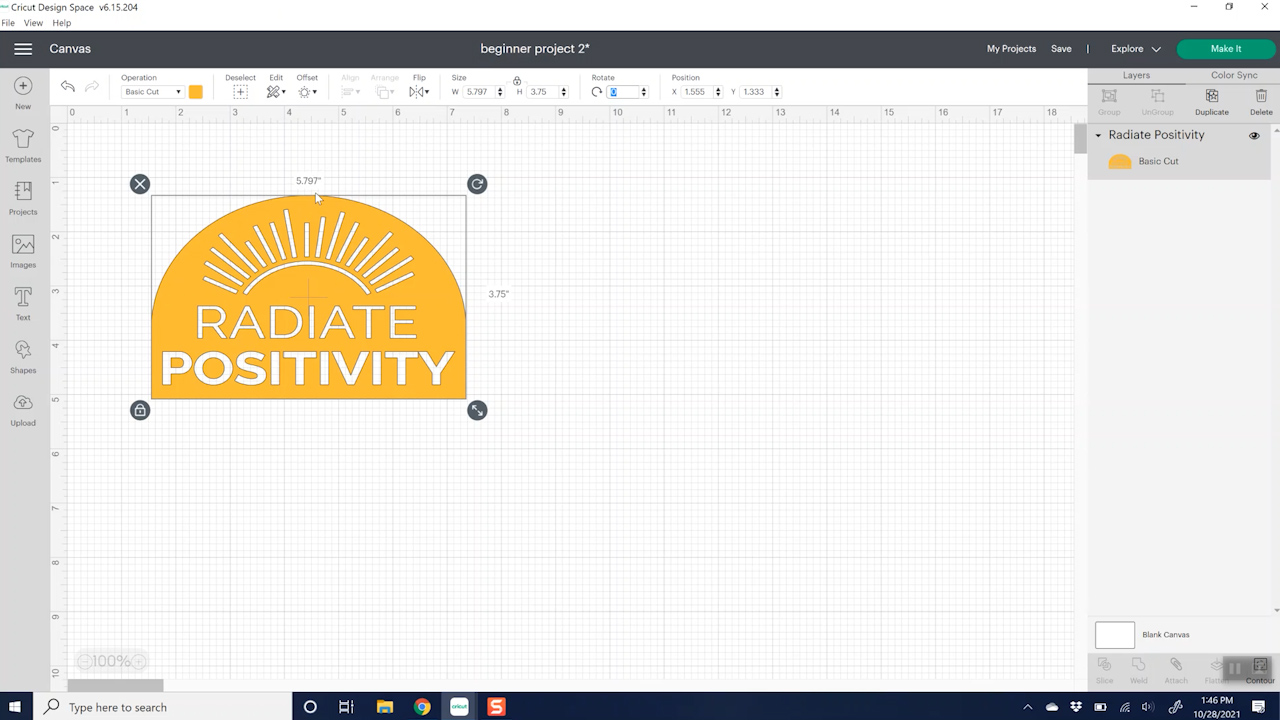
Step 1 – Choose your Design and Resize it
First, I located the image I wanted to use and added it to my canvas in Design Space. For this project, I measured my zipper pouch, focusing primarily on its height. I want to ensure that it doesn't exceed 3.75 inches tall. I will resize the image to approximately 3.75 inches. To achieve the exact size, I can type the measurement into the top toolbar. I've locked the dimensions by clicking the lock icon, so everything remains in proportion. The width of the image is 4.86 inches.
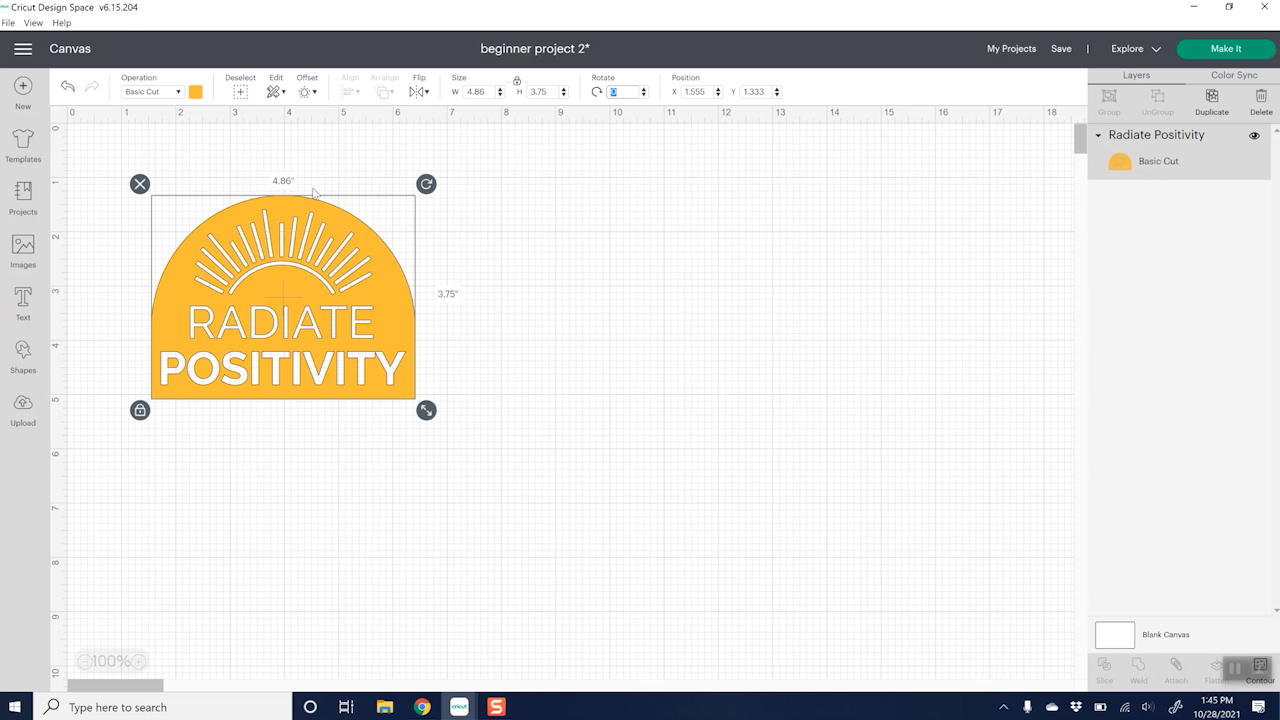
To check the placement, I went back with my ruler to see if a size of 4.86 inches would look good. However, I wasn't satisfied with how that would fit. So, I clicked the unlock button and adjusted the dimensions slightly. I ultimately settled on a size of 3.75 by 5.797 inches.
Pro Tip: Save your Project
To save this project for later, click on the drop-down menu and select “Save.” After that, you can choose “Save As” to give it a specific name of your choice. Additionally, you can add the project to a collection to help organize your projects.
Step 2 – Cut the Iron-on Vinyl
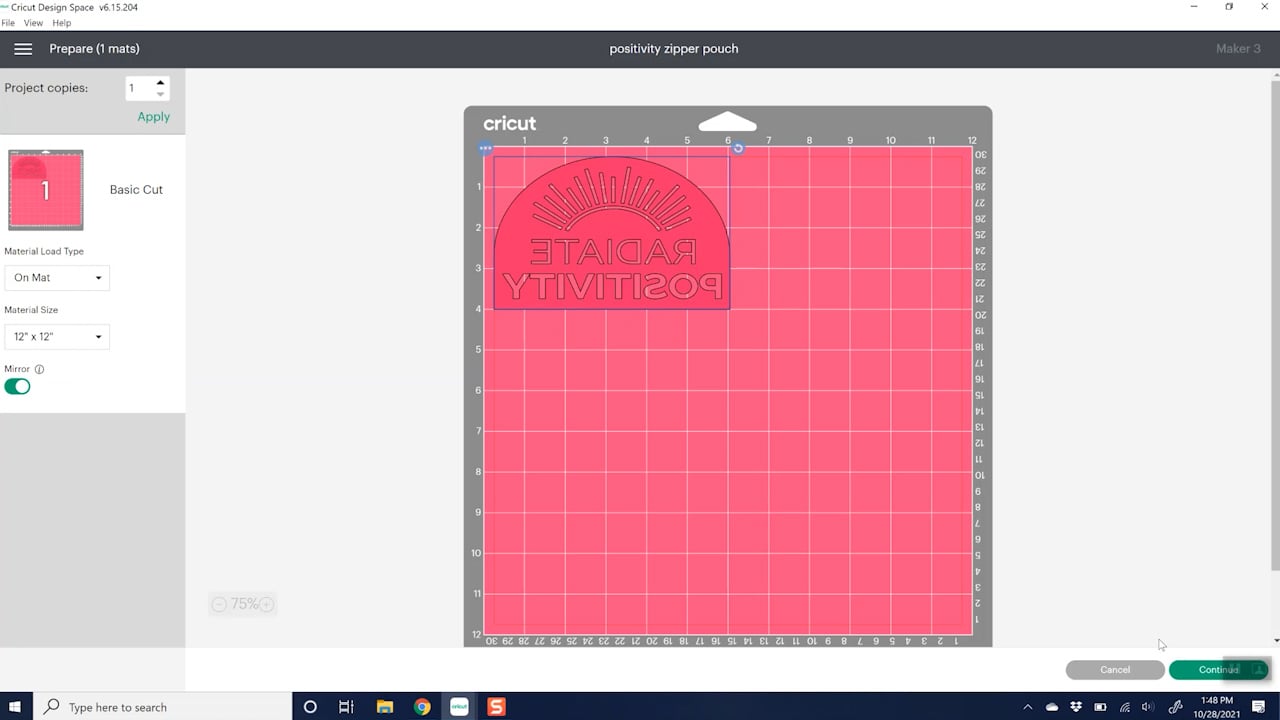
Now we're ready to click “Make.” As with our other projects, select “On Mat.” since you are applying your vinyl to a mat and not using Cricut Smart materials. But unlike regular vinyl, when using iron-on material, you'll need to mirror the design. You'll understand why as we create our zipper pouch, but it's essential to always mirror your iron-on design. When you click “Mirror,” you should see the design reversed on the mat on your screen. Ensure that it appears backward. Then, click “Continue.”
The number one mistake I see when doing iron-on is not hitting that mirror button.
Once the machine is connected, we can choose a material. I recommend using the everyday iron-on setting for the type of heat transfer vinyl (HTV) I am cutting. If you're cutting glitter iron-on, you can select a different setting. The machine will use the fine-point blade and will not require any additional tools.
Step 3 – Load Mat and Cut
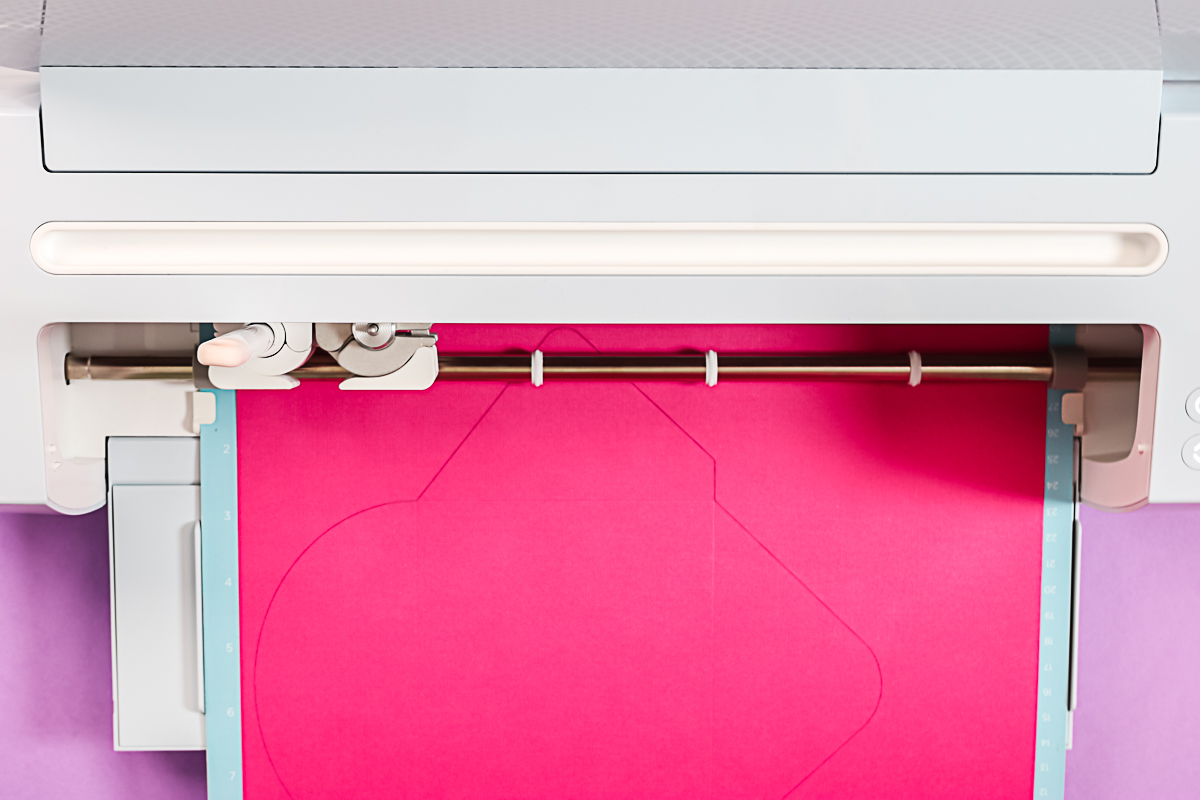
When using iron-on or heat transfer vinyl (HTV), you'll notice that both sides look similar, but one side is shiny. Be sure to place the shiny side down onto your cutting mat. Since this roll of iron-on is quite long, I want to minimize waste and avoid cutting off any unnecessary material. To do this, I’ll let the roll hang off the edge of the mat while I cut. This way, I can make my cuts and save the leftover material to roll up for future projects.
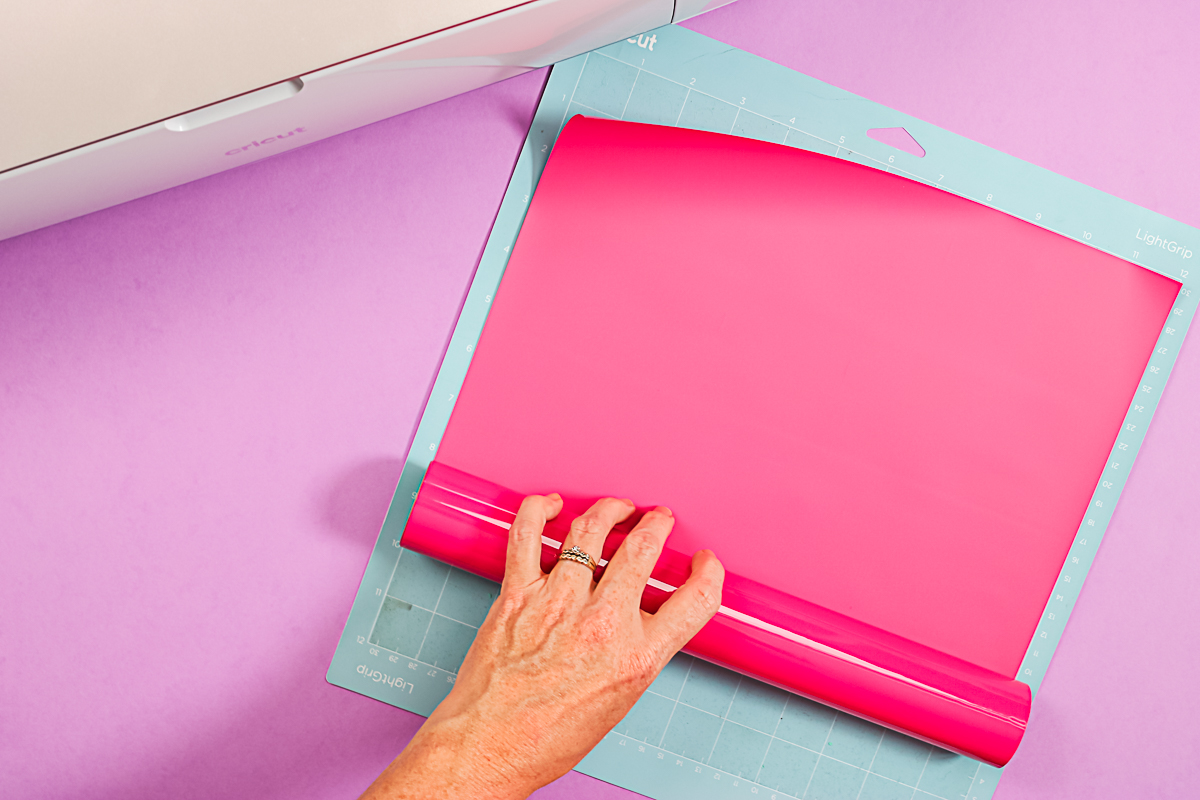
Load the mat in the same manner as before, with a fine-point blade installed in clamp B. Press the go button to cut.

Once the cut is complete, remove the mat from the machine. Use scissors to cut around the design to save the rest of the roll.
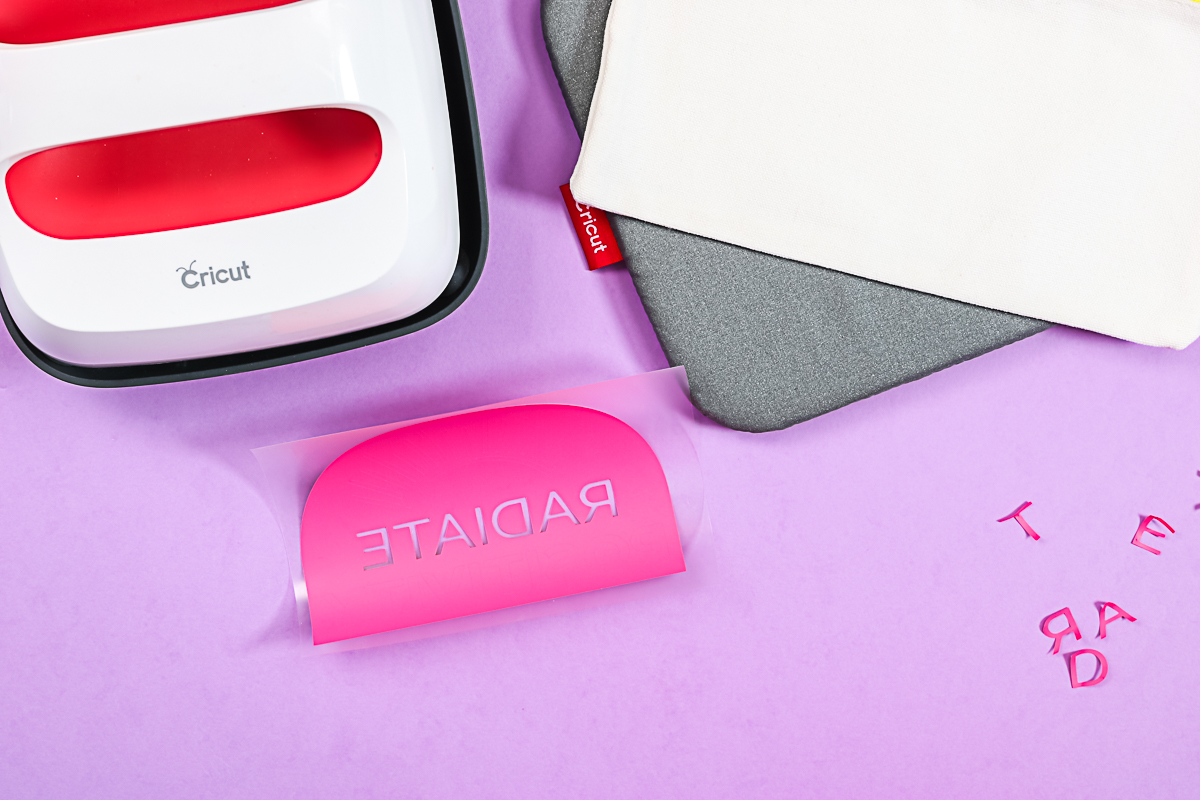
Step 4 – Weed the Vinyl
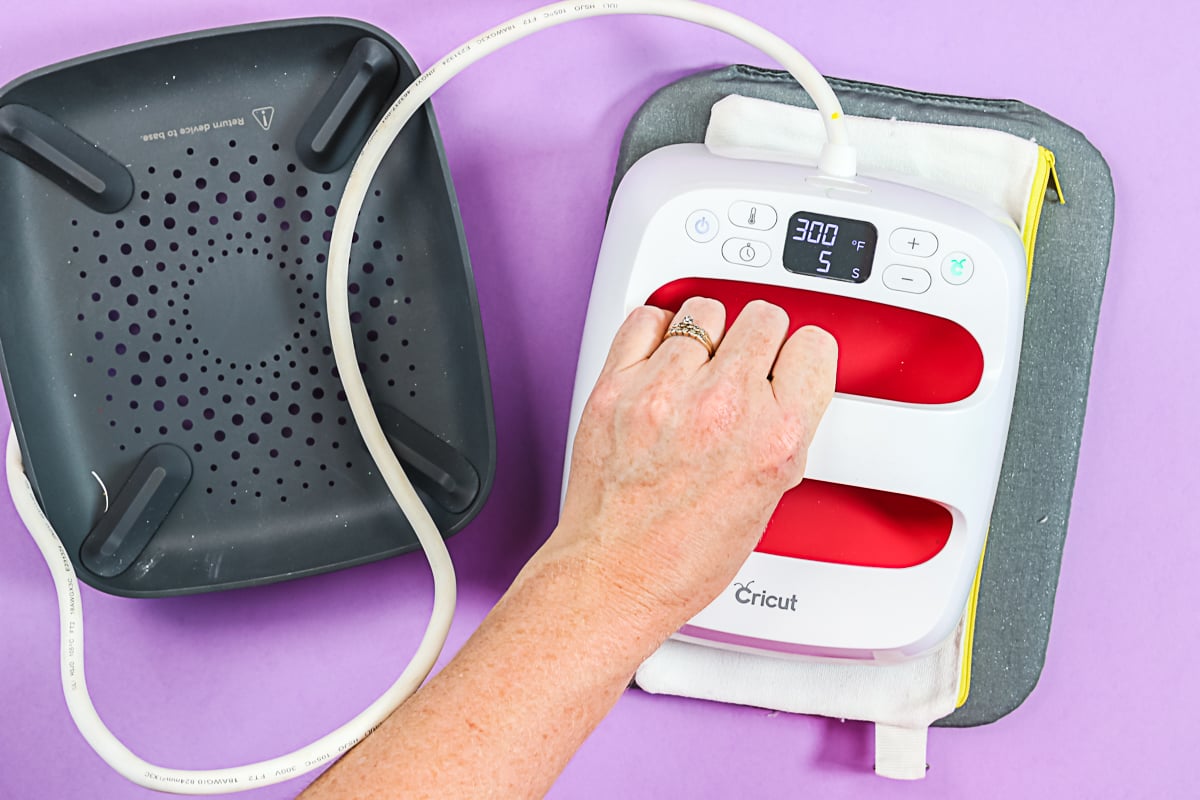
I have my Cricut Easy Press heating up, and I always refer to the Cricut Heat Guide to check the recommended time and temperature for the materials I'm using. This ensures I achieve the correct heat settings.
Next, we need to weed the iron-on vinyl. Weeding iron-on vinyl is quite similar to weeding regular vinyl with a few important differences. Remember to place the shiny side down. Start peeling back the excess material. The liner on the iron-on is sticky, so use a weeding tool to carefully remove all the pieces you don’t want to transfer to your project. In this case, I will leave the centers of the letters intact because of the design I've chosen.
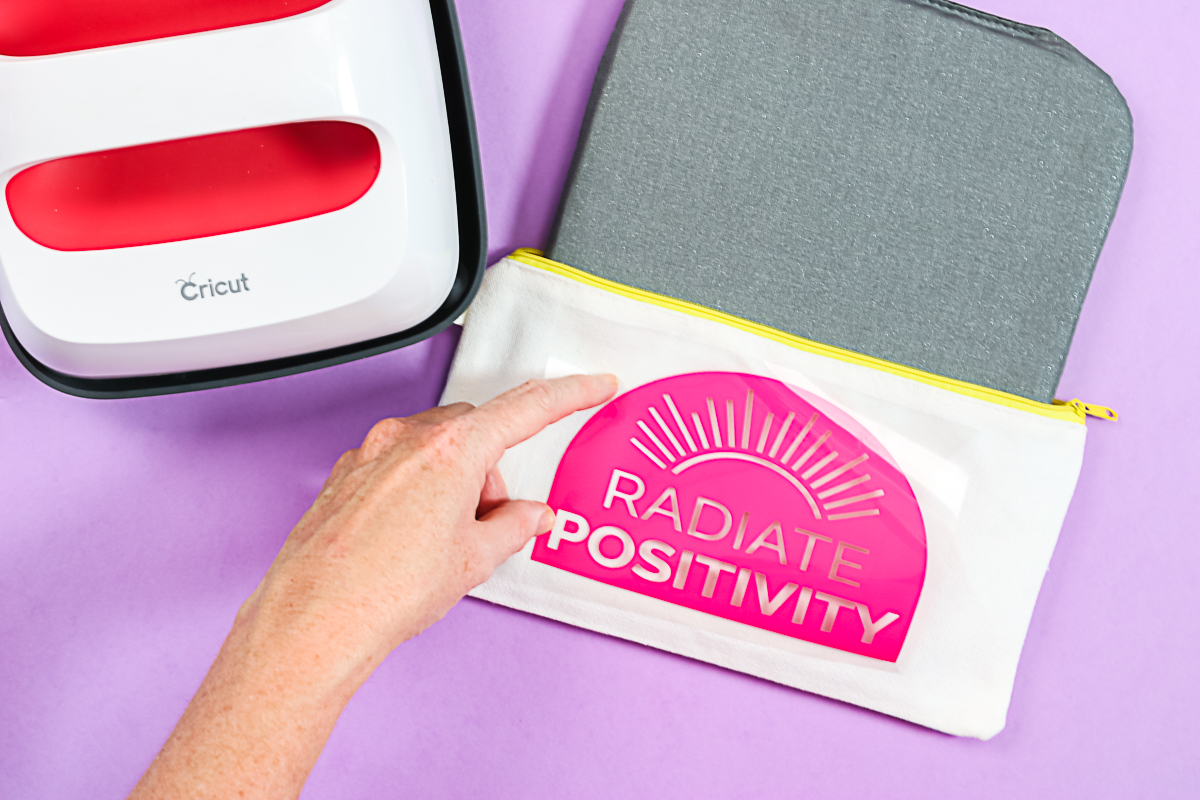
Step 5 – Prep the Zipper Pouch
I recommend placing your EasyPress mat or a folded towel inside your zipper pouch. This addition will greatly simplify your pressing process. Before you start, use the EasyPress to lightly pre-press the surface of your blank to eliminate any moisture or wrinkles.
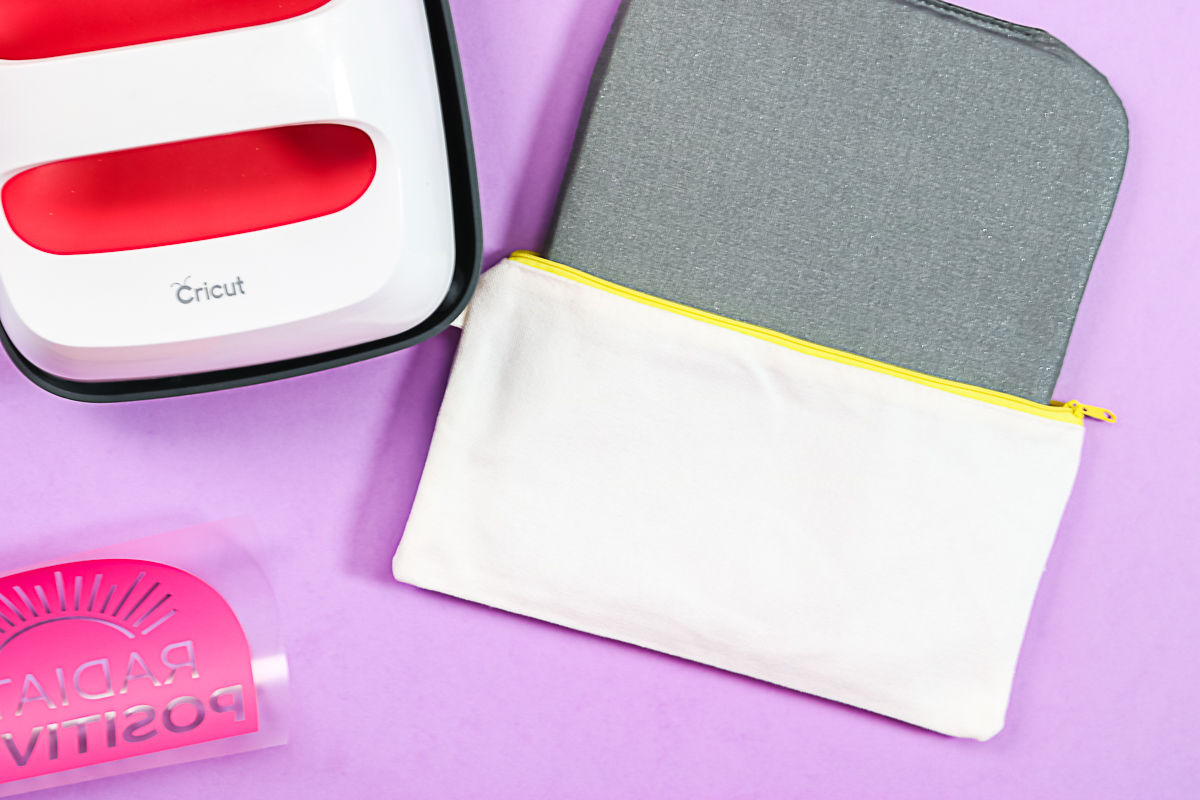
Step 6 – Apply Iron-On Design
Place the weeded iron-on design with the sticky side facing down in the correct position on the pouch. If your design includes text, ensure that it is oriented properly. To help with alignment, you can use a measuring tape or ruler to locate the approximate center of your zipper pouch. Once you find the center of the pouch, align it with the center of your design. Additionally, make sure that the design is straight. The liner has a slight stickiness to hold the design in place while you adjust it.
Press the design all at once. Simply place the Easy Press down, start the timer, and apply pressure. If you can't cover the entire design in one go, you can press it in two sections. Just make sure to overlap slightly to ensure complete coverage of the design.
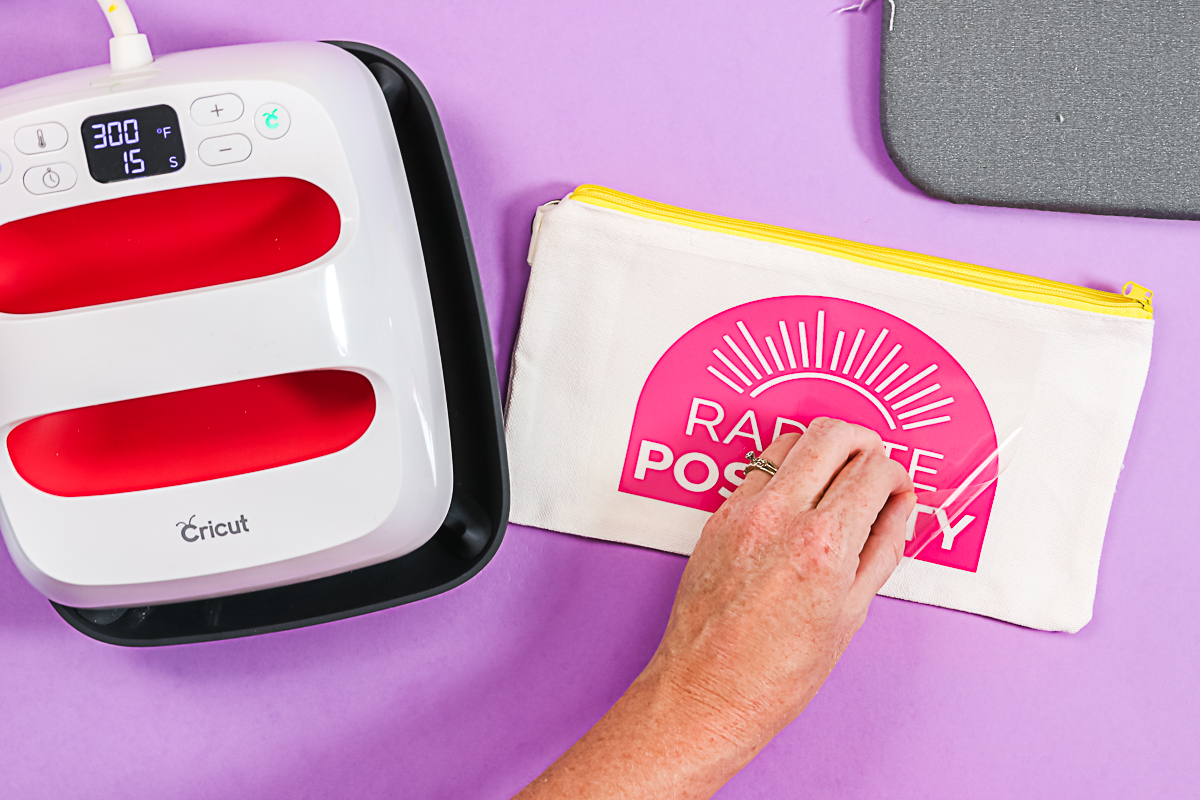
Step 7 – Remove the Carrier Sheet
Once the EasyPress beeps, remove it from your project. Next, following the instructions provided in the heat guide, press it from the back as well. Be sure to adhere to the specific instructions for your brand of heat transfer vinyl (HTV). Allow your project to cool completely; this is one of the most common mistakes I see with Cricut iron-on projects. It’s essential to let it cool fully to the touch before you remove the carrier sheet.
One trick to speed up the cooling process is to remove the mat, which will help it cool a bit faster. Once your project is cool to the touch, gently peel back the clear carrier sheet. Ensure that the iron-on material is firmly stuck to your project and not on the sheet anymore. If any part of the HTV comes up with the sheet, reapply the carrier sheet and press it again for the full recommended time to help it stick properly.
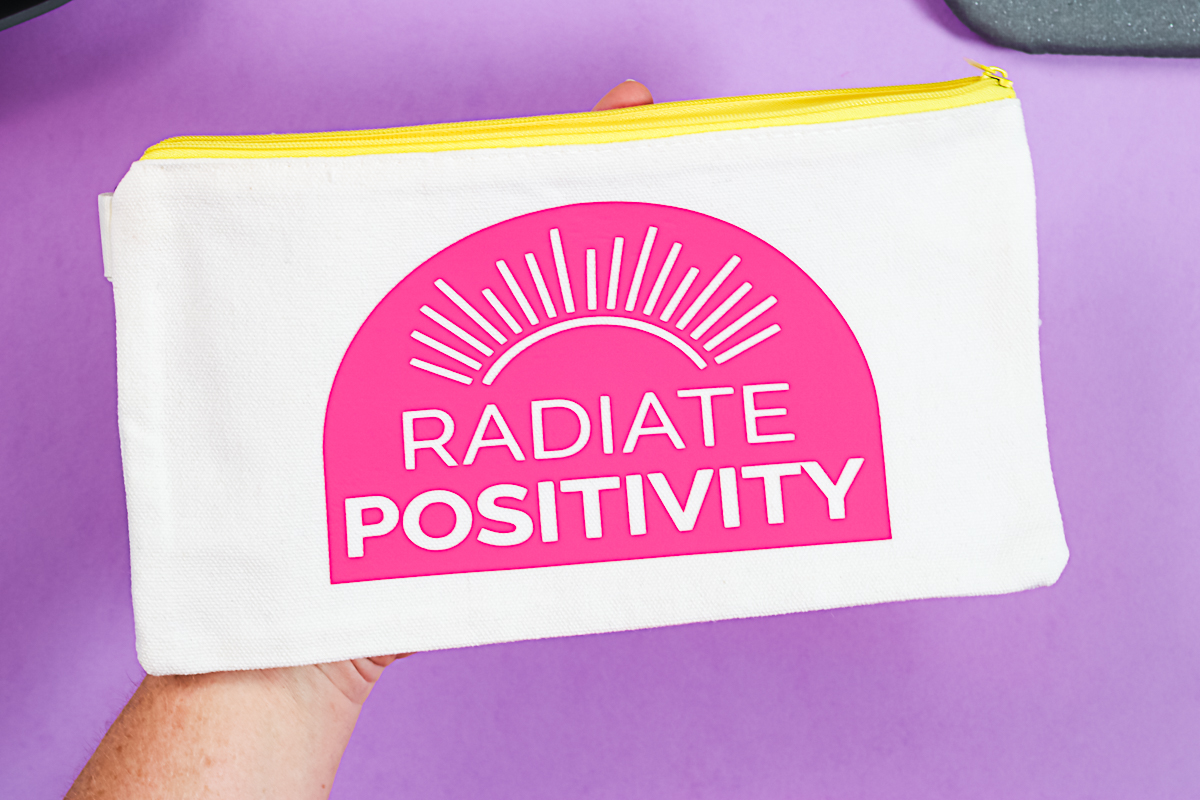
Now the zipper pouch is complete!
More Advice for Cricut Beginners
We have created three different Cricut projects that are perfect for beginners. Whether you're having difficulty with iron-on application, learning how to weed vinyl and apply it to surfaces, or facing challenges with the basics of cutting paper, I hope this post provides you with helpful tips and tricks for each of these projects.
Do you need more help? I have even more resources for Cricut beginners. You can join my free Cricut class here or purchase my Cricut book here to find the answers to your Cricut questions.