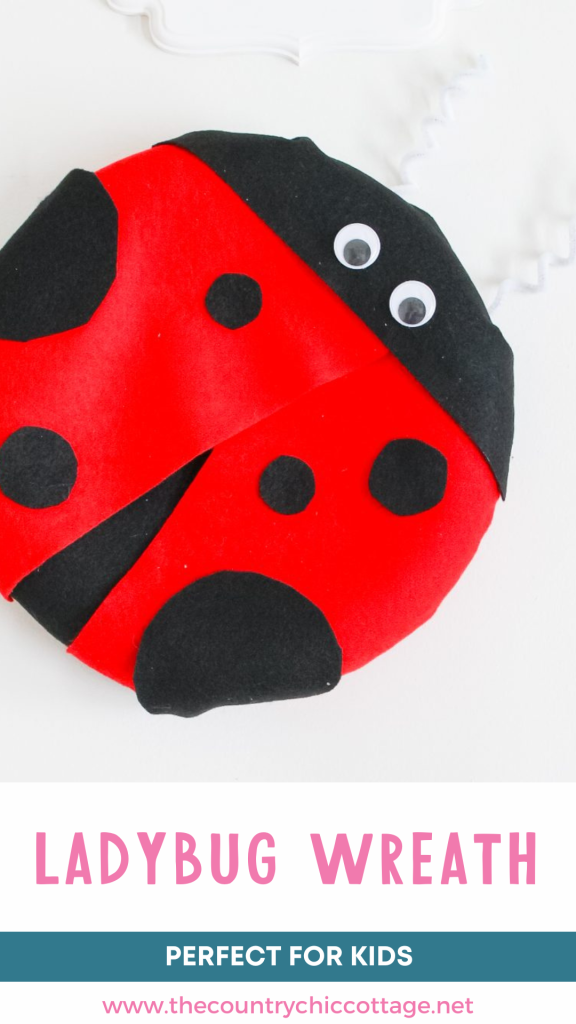
Create this adorable ladybug wreath in under ten minutes! You only need a few simple craft items to make it. This ladybug-shaped wreath is a delightful addition to a kid's room or your front door for the summer. It's a fun project that you can make with the kiddos!

Ladybug Wreath Video Tutorial
In the video below, you can watch how I create the ladybug wreath. Just click play!
Can’t watch the video or missed some of the steps? Just follow along with the steps below!
How To Make Ladybug Wreath
A while back, I partnered up with my friend Carolina from 30 Minute Crafts to show you how to make this adorable wreath in less than 10 minutes.
This would be great for a kid's room or your front door this summer. You can change up the colors on the felt and make lots of bugs for wall art in a fun room.
You can also find my vintage quilt flower wreath, gone fishing wreath, fairy garden wreath, and burlap bee wreath to make as well. Now, get ready to learn how to make my ladybug wreath!
Supplies Needed To Make Ladybug Wreath
- Wreath form by Styrofoam
- Paper plate
- Hot glue
- Felt fabric in black and red
- Scissors
- Large googly eyes
- White pipe cleaners
Step 1: Glue Paper Plate To Wreath Form
To start, glue a paper plate in the center of the wreath form. This will add stability to the wreath and will make it easier to glue the felt on.
Step 2: Cut Felt
Next, cut two half-circles in red felt. These pieces will each be a wing of the ladybug. Then, cut a rectangular piece of black felt for the head. You will use the remainder of the black felt to place under the wings for separation and for the ladybug dots.
Step 3: Hot Glue Felt To Wreath Form
Lay your felt pieces out on the wreath form before you begin hot-gluing. Once you are happy with the arrangement, start hot-gluing each piece to the wreath form.
Step 4: Secure Felt Onto The Back Of The Wreath Form
After all of the pieces are glued down, flip the wreath form over and glue down on the back for extra stability. Then, cut away the excess with scissors.
Step 5: Cut & Glue Spots To Ladybug
Next, cut out a few circles from the black felt for the ladybug spots and glue them down in the pattern of your choice.
Step 6: Create & Glue Antennas To Ladybug
Next, wrap the pipe cleaners around a pencil or a narrow dowel rod to make the antennas curly. Then glue them to the back of the wreath so they poke up at the top.

You can make a few different types of bugs and hang them on the wall, or add to a fun frame wall if your little one loves ladybugs!

FAQs About Ladybug Wreath
Here are answers to some of the most common questions I get about making this Ladybug Wreath. If your question isn’t listed, feel free to drop it in the comments, and I’ll be happy to help!
Can I Change The Size Of The Wreath?
Absolutely! You can make this wreath any size you like. The only thing to keep in mind is that you may need more or less felt depending on the size of the wreath form you are using.
Can I Use Other Types Of Glue For This Project?
You can, but I think hot glue is the best option for this project. It makes the project easier to put together and will give you a stronger hold.
If you are looking to find the right glue gun for you and your projects, check out my Best Glue Gun for Crafts blog post.
How Did You Hang The Wreath?
I just hung the wreath on a nail. However, you can glue a hanger on the back if you wish.
5 More Wreath Crafts
Do you love this ladybug wreath and want more wreath crafts? Then check out the projects below!
- How to Make a Tulip Wreath for Spring
- Bandana Wreath
- DIY Round Wood Door Hanger with a Cricut Machine
- How to Make an Easy Rag Wreath in Under an Hour
- Easy Burlap Sunflower Wreath