

Does your outdoor space need a little boost of lighting at night? These DIY solar mason jar lights are easy to make and will add a special touch to your yard.
When the sun goes down, the lights come on!
We love spending time in our backyard in the evenings. In the summer, the warm breezes and fireflies make it hard to go inside. And as it cools down, the crisp air feels so good.
Over the years I've tried many different types of lighting to find that ideal balance between being able to see each other (or where we're walking) and being able to enjoy the gifts of the darkness. We've tried strings of lights, fairy lights, lanterns, and more.
Now I can say that I've finally found my favorite outdoor lighting when we just want to hang outside! Pair it with my Globe Solar Light for the ideal nighttime porch lighting.
Today, I'm showing you how to make some super fun solar mason jar lights. These lights will be the perfect addition to your yard, plus they are solar powered, so there's no need to worry about running electricity.
I made these winter-themed, but you can easily adapt them up for the seasons.
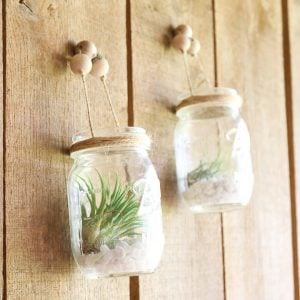
Note: If you love lit-up mason jars, also check out our Christmas Mason Jar Candles, Fairy Nightlight In A Mason Jar, and DIY Lantern Project ideas!

How To Make Solar Mason Jar Lights
For this project, you'll be using special solar mason jar lids instead of the standard lids that come with your mason jars. Instead of throwing those lids away, save them for other projects!
Supplies Needed
Here’s everything you’ll need to make this mason jar filled with solar lights! I’ve included some handy links to make finding certain items a little easier and faster.
- Quart size regular mason jars (you will need jars with a standard size mouth)
- Mason jar solar light lid
- Aleene’s Glitter Snow
- Iridescent Snow
- Foam pouncer brush
- 18 Gauge 18″ Floral Wire
- Pliers

Note: Your solar light will come packaged as shown above. You will need to remove the pull tab for the light to work and charge it in the sun for a few hours prior to use.

Instructions For Making Mason Jars With Solar Lights
The solar lids make this project so easy! Just follow these simple instructions.
Step 1
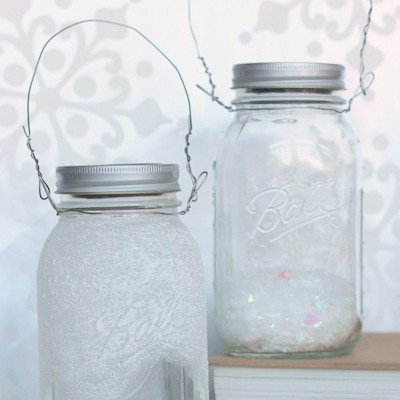
There are two winter versions for preparing the jars of these solar mason jar lights. I am going to show you both of them.

Version #1: Use a foam pouncer brush and add glitter snow randomly to the jar. Allow it to dry completely before continuing.

Version #2: add loose snow to the bottom of your jar. This is the non-permanent version that will be easy to change with each season if you like. Because the light is in the lid and does not get hot, adding items to the jar is fun and easy.

Now let's transform the jar into a hanging solar-powered lantern. Here's how:
Step 2
Grab your floral wire and some pliers. First, start by adding a loop with your pliers.

Step 3
Place the wire around your jar mouth and get the location for your second loop, which should be directly across from your first.

Step 4
Place a second loop in your wire and then stretch it around the mouth of the jar. Use the pliers to secure, twisting very tightly.

Step 5
Cut off any excess and bend the twisted wire down to avoid injury.

Step 6
Use a second wire to create a handle by putting it through the loops and twisting it to secure it in place.

Now, once you add your lid, you are ready to light up the night with your new solar mason jar lights! Look at the way the light sparkles from these simple mason jar lanterns.

FAQs
Here are a couple of questions that I see readers ask about making this solar light mason jar lantern project. If you have a question, please check to see if I’ve already answered it below. Don’t see your question? Leave it for me in the comments!
I can't find solar mason jar lids. Can I use solar lights instead?
Solar mason jar lids make this project quick and easy. However, if they aren't in stock anywhere when you want to make this project, you can adapt it to use solar lights. Crafts By Amanda has a great example! Just know that it will be a slightly more complex project.
In order to make solar mason jar lights with regular solar light yard stakes, you'll need to glue the mason jar band onto the solar light. Then after a couple of other adaptations, your solar mason jar lights will be ready.
Can I turn these solar lanterns off when I'm ready to go inside?
No. There's no way to turn them off, but you don't need to worry about wasting electricity or running out of batteries. These lanterns charge up in the sunlight during the day and then shine at night.
When you're ready to call it a night and go inside, you can leave your lanterns in a safe place outside (or along a walking path) and let them shine throughout the night.
I hope you love this solar mason jar light project! What items will you add to the inside of your solar mason jar lights? Will you go with snow or something less seasonal?
More Mason Jar Crafting Inspiration
If you love mason jars and crafting, why not combine those two loves and create something amazing? Check out these popular projects:


Supplies
- Quart Size Regular Mason Jars
- Mason Jar Solar Light Lid
- Aleene’s Glitter Snow
- Iridescent Snow
- Foam pouncer brush
- 18 Gauge 18″ Floral Wire
- Pliers
Instructions
- Prepare your jars. For this winter theme, I made two versions.Version #1: Use a foam brush and add glitter snow to the jar. Allow it to dry completely before moving on.Version #2: add loose snow to the bottom of your jar. This is the non-permanent option you can use, so you can change your lanterns with each season if you like.
- Now, take your floral wire and use your pliers to make a loop.
- Place the wire around the mouth of your jar mouth as you find a spot directly across from your first wire to add your second wire.
- Place a second loop in your wire and then stretch it around the mouth of the jar. Use the pliers to twist it very tightly and secure it.
- Create a handle with your second wire by putting it through the loops and twisting it to secure it in place.


