
Do you have a wooden chair that you'd like to refresh and repurpose? Painting a wooden chair is easier than you might think! Follow this tutorial to discover all my tips and tricks, ensuring your painted chair looks and feels brand new.
Painting A Wood Chair
I have a chair that I bought at a yard sale several years ago. We are currently giving my teen daughter's bedroom a makeover, and I would like to revive this old yard sale chair to fit into her new room decor.
Over the years, I've refinished several pieces of wood furniture with wood stain and colored stain. But for this project, I wanted to move away from the wood look to make the chair colorful and fun for a teen girl's room.
That meant that I needed to paint the chair. I decided to use a process similar to what I did when I made this DIY Nautical Whale Dresser, and it turned out so well. This yard sale chair was a great bargain when I bought it, and it's even better now as a fun, painted chair!
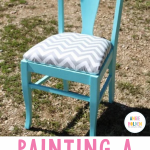
Painted Chair Before And After
No transformation post is complete without a before and after picture, y'all. So here it is! When I first bought the chair, I spruced it up and put that neon-striped fabric on it.
This time, I removed that fabric, gave that chair a fab paint makeover, and recovered the seat in chevron. Doesn't it look so much better?

How To Paint A Chair
Here's everything you need to know to turn an old wooden piece into a “new”, beautiful, painted chair.
NOTE: This post focuses on the painting portion of this project, not refurnishing the upholstery. I hope to get another post up soon about how I did that, so keep your eyes peeled for more!
Supplies Needed To Paint A Chair
Notes About Paint Color
- Wooden chair you want to makeover
- Fine sandpaper
- Glidden High Endurance Plus Paint and Primer
- Paintbrush
The paint color I chose for the chair is one of the colors used in my DIY gradient color wall.
We chose gray for the majority of the room, but the focus wall is the gradient wall with various shades of aqua. I grabbed the middle shade for this chair to tie it in with the rest of the room makeover.

Just in case y'all need the details on that color (I had them match off of a competitor's paint chip), here is the formula you can give to your paint counter.

Step 1: Clean Your Piece
Anytime you go to refinish furniture, it's important to take a little time washing it with soap and water to make sure there isn't anything on it (like food, etc.) before you start working.
Give your piece time to dry after cleaning it before moving on to the next step.
PRO TIP: If you have a cushion on there that hasn't been removed, take that off so you don't get paint on it.
Step 2: Lightly Sand The Wood
When you paint wood, you usually need to lightly sand the surface so that the paint will adhere properly. Use a piece of sandpaper and just lightly rough up the surface of the wood.
Step 3: Paint Your Chair
Take your paint and paintbrush, and paint your wood carefully. Ensure you cover all the angles and crevices! You may need to paint one side, let it dry completely, then flip it upside down to reach different areas.
If you need more than one coat of paint, allow it to dry thoroughly between coats. I used just two coats to cover the ugly brown color on my chair.

The seat covering is a whole other story (for another day), but I did it!
Now, the painted chair for my daughter's room is ready to use. Isn't it fun!

FAQs About Painting A Wood Chair
Here are answers to some of the most common questions I get about painting a wooden chair. If your question isn’t listed, feel free to drop it in the comments, and I’ll be happy to help!
Do I Need To Sand The Wood Before I Paint It?
Yes, you need to lightly rough up the wood with sandpaper before you paint it – unless you're going for a chippy look or using chalk paint. Paint doesn't stick well to finished or smooth wood, so sanding it creates a rougher surface that the paint will adhere to.
Could I Use Spray Paint Instead Of Glidden High Endurance Plus Paint and Primer?
Yes, you can! You can use any paint that you like (as long as it can be used on wood) for your chair.
Do I Need To Seal A Painted Chair Before Using It?
Nope! Once you add as many coats of paint as you need and let it dry completely, your chair is ready to use! There's no need to add a sealant or top layer.
5 More Furniture Makeover Ideas
Do you love learning about painting a wooden chair, and want more furniture ideas? Then check out the projects below!
- Painting Wicker Furniture Tutorial
- IKEA Hemnes Bookcase Hack
- DIY Footstool You Can Make from a Crate
- Converting Furniture with Chalky Finish Paint
- Paint Chair Fabric


What a difference a few changes can make Angie! I love LOVE your finished product!
LOVE! The color combination and fabric is GREAT! So much better! 🙂
I have been on a grey kick lately too and that aqua is a great complimentary color, love it!
Loving the color combo! And great tips in the video.
The grey chevron looks perfect with that paint color! Very fun, Angie!
What a difference! I love those colors together!