
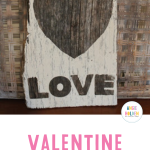
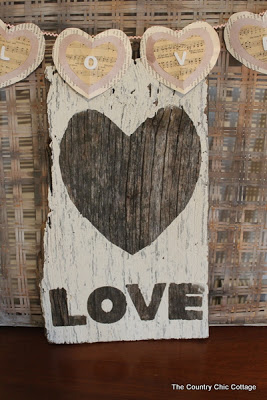
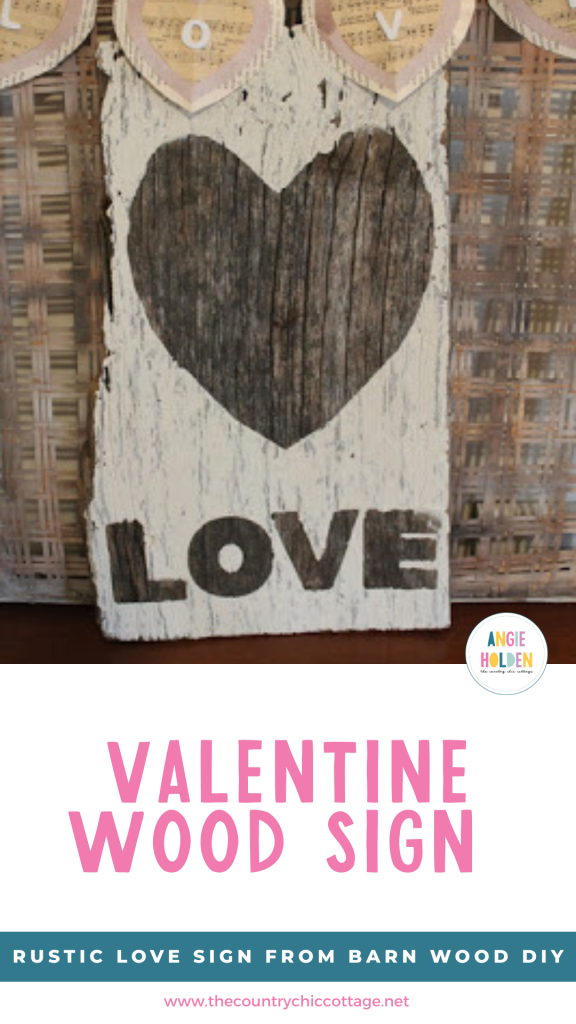
Y’all are going to love this Valentine wood sign made from barn wood. If you’ve been around here for any length of time, you already know I have a serious soft spot for barn wood signs. I realized I didn’t have one for Valentine’s Day yet, so of course I had to fix that! This rustic love sign is perfect for Valentine's Day, so I just had to make one! My rustic love sign is perfect for Valentine's Day or leave it out all year long in your rustic farmhouse decor.
How To Make A Valentine Wood Sign
If you're a fan of farmhouse decor like me, this quick and easy DIY rustic love sign is the craft for you! Perfect for Valentine's Day, a holiday gift, or just to have around all year long, this beautiful sign needs minimal supplies and (minus dry time) only takes about 20 minutes.
Supplies Needed To Make A Valentine Wood Sign
- Paper – Any paper will do! You can use brown butcher paper, copy paper, or construction paper.
- Scissors – I free-handed most of my stuff, but you can always trace with a pencil first.
- Letters (optional) – You'll need pre-made letters or construction paper to make and cut out letters. The letters I used came from a pack of Post-It letters for poster board signs.
- Paint – I used Martha Stewart Living Crackle paint (which may not currently be available), but any white crackle paint made for wood will do.
- Paintbrush – If you're using the Martha Stewart Crackle paint (or something similar), I'd actually recommend a putty knife because it is VERY thick.
- Barn wood – You can use any size, depending on the space you have.
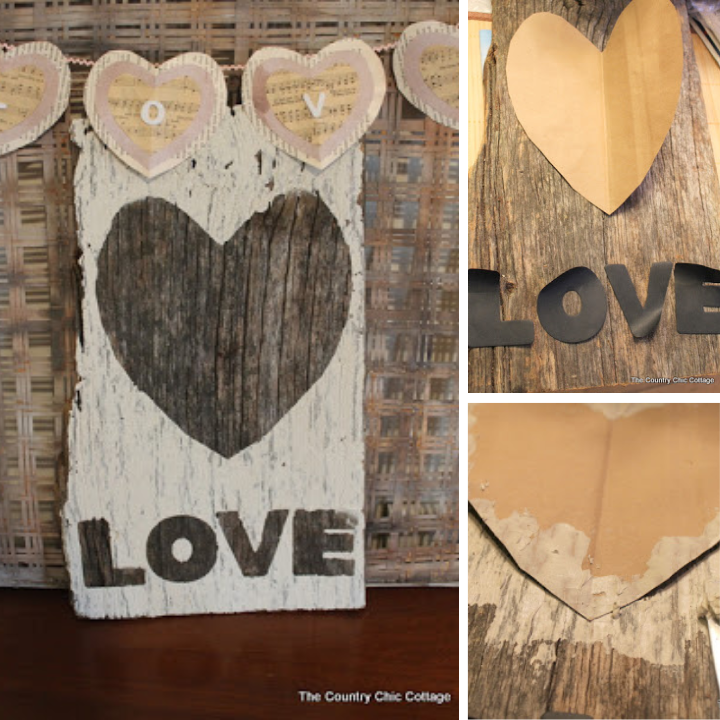
Step 1: Cut Heart & Letters
First, we are going to cut out our paper heart and letters!
For The Heart:
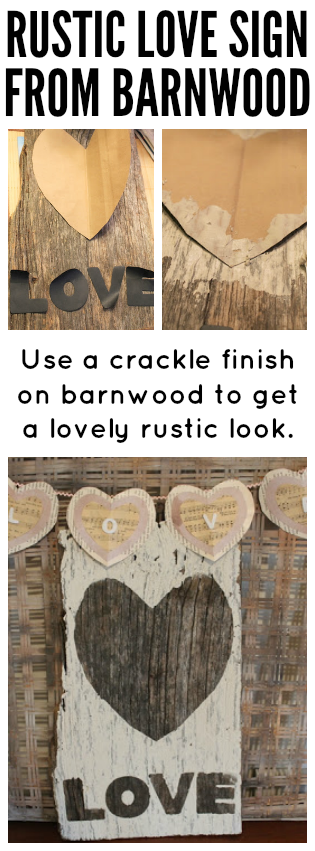
I cut out a heart from brown butcher paper, but you can also use regular construction paper, copy paper, or even a paper grocery bag. This heart is just a homemade stencil, so it doesn't need to be fancy!
I free-handed my paper heart, but you can also print out a template and cut it out or trace an outline.
For The Letters:
I used some Post-It letters to write out the word “LOVE” (see the image below). You can use any letters you have around or print and cut them out. Just like the heart, these are going to act as more of a stencil.

Step 2: Paint Barn Wood
Place your heart and letter cutouts on the barn wood to mask the area that won't be painted. I chose not to tape anything down, and it worked out, but if you're worried about the cutouts moving, you can use painter's tape.
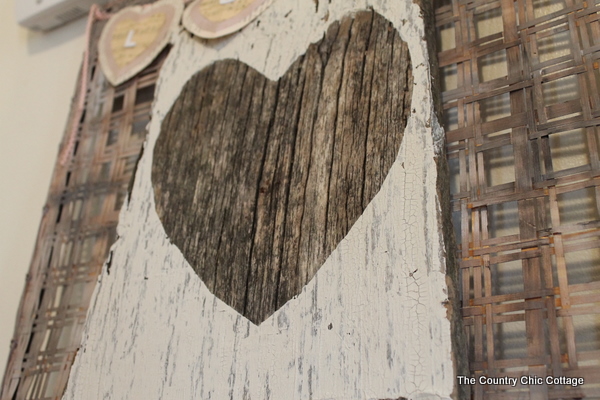
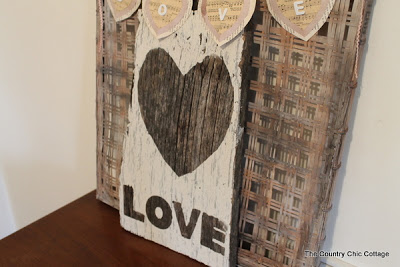
Apply an even coat of paint and then sit back and watch the magic. As it dries, it crackles! Lovely chippy paint in one simple step, no sanding required.
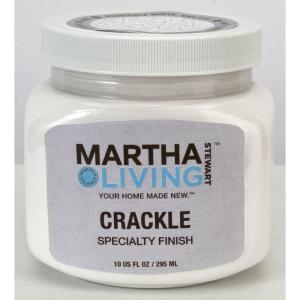
For this craft, I tried the Crackle Finish paint from Martha Stewart, available at The Home Depot. The directions said to apply over a primer, but I didn't because I wanted the barn wood to show through the cracks.
The Martha Stewart product is THICK, so if you're painting with something similar, it may need to be applied like spackle with a putty knife — that's what I had to do.
NOTE: The Martha Stewart paint does not appear to be available any longer. I'd recommend trying this Folk Art Crackle Paint as an alternative.

You can see the crackle in this up close pic. Plus, the barn wood peeking through! Yippee…..I heart rustic farmhouse decor, don't y'all?
Step 3: Allow to Dry
Give your Valentine wood sign a good several hours to dry, or just leave it to dry overnight. You do not need to paint a second layer unless you want to cover more of the barn wood. I wanted the barn wood to peek through, so I left the paint in a single, thin layer.
Pair With Your Favorite Home Decor
I added this Valentine wood sign to my Love banner and DIY tobacco basket on a little table in our foyer. However, you could hang this sign on the wall, prop it up on a shelf, or even place it on your porch (if you have an enclosed porch, since you don't want the sign sitting in the rain).
If you love barn wood signs, don't miss our Hunger Games love quote sign! And, you can see a whole collection of farmhouse-style signs here!
Happy barn wood crafting!
FAQs About Valentine Wood Sign
Here are a couple of common questions I get from readers about making this Valentine wood sign. If you have a question but don’t see it below, please leave it in the comments so I can answer it.
Do I Have To Use Crackle Paint?
If you want the crackle effect, then yes, you will need crackle paint. However, if you want to skip the crackle look, you can use regular paint instead.
Does Crackle Paint Come In Different Colors?
Yes, it does! If you are not a fan of the white paint, you can choose a different color of crackle paint that fits your rustic home decor style!
Can I Use My Cricut Machine For This Valentine Wood Sign?
Yes, you can! You can use your Cricut machine to easily create a heart and letters to use for this project. If you want to learn how to make your sign using your Cricut machine, you can check out our Easy DIY Rustic Wood Signs For The Holidays post!
How Would I Add A Hanger To This Sign?
To add a hanger to this sign, all you need to do is pick out your hanger of choice and glue it to the back of the sign using industrial-strength glue.
5 More Valentine Wood Crafts
Do you love this Valentine wood sign and want more Valentine wood crafts? Then check out the projects below!
- Love Bug Marbling Paint Technique Used on Wood
- Valentine’s Day Decor on a Scrap Wood Budget
- DIY Farmhouse-Style Love Wall Art
- Valentine’s Day Wood Shim Wreath
- DIY Love Pallet Art in Minutes


Great project, this is why I love blogging, we all stumble on some new product and then share it! Thank you
Carol
Looks good angie! I like how the heart and word is NOT painted and the rest is, kind of the opposite of what is typically done.
Thank you for showing how the crackle works w/o primer. I’ve been wanting to try the crackle w/o the primer and now I now it’ll be great.
Hi! You make people happy! You have so lovely things!!Greetings Riitta Sinikka.
cute sign! thanks for sharing!
It is awesome! Thanks for sharing!
I love this! I would love it if you would share this at my link party over at Rustic Crafts
So beautiful! Love the simplicity of it – the paint job is perfect!
Love this! Thanks for sharing the instructions!
Terry
http://www.classycutupscreations.com
Thanks so much for sharing…I love your Rustic – Sweet sign LOTS! XO, Aimee
So fun Angie! I’ll be featuring this on Craft Gossip this afternoon 🙂
LOVE!!!!