
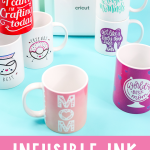
Let’s make some Infusible Ink mugs using the Cricut Mug Press! In this post, I’m covering everything you need to know to get started, including the basics of Infusible Ink, how to create full-wrap mug designs, and how to layer Infusible Ink sheets and pens for professional-looking results. By the end, you’ll feel confident making all kinds of custom mugs — and I have a feeling you’re going to love the mug templates Cricut has designed. You might even walk away with a few gift ideas for someone special!
If you’re brand new to the Cricut Mug Press, be sure to start with our Cricut Mug Press Basics post first, so you’re familiar with how the machine works before diving in.
This post is sponsored by Cricut; however, all projects and opinions are my own.
Infusible Ink Mugs Video Tutorial
I wanted to show you all the Infusible Ink options in one huge post, which can get a bit overwhelming. So, I made a YouTube video to go along with this. If you would rather watch me make some Infusible Ink mugs, just click play below. You will also see me make the designs in Design Space, so you know just how to create your own fabulous creations.
Can't watch the video or missed some of the information? Keep reading to see everything you need to know about making mugs with Cricut's Infusible Ink.
How To Make Infusible Ink Mugs
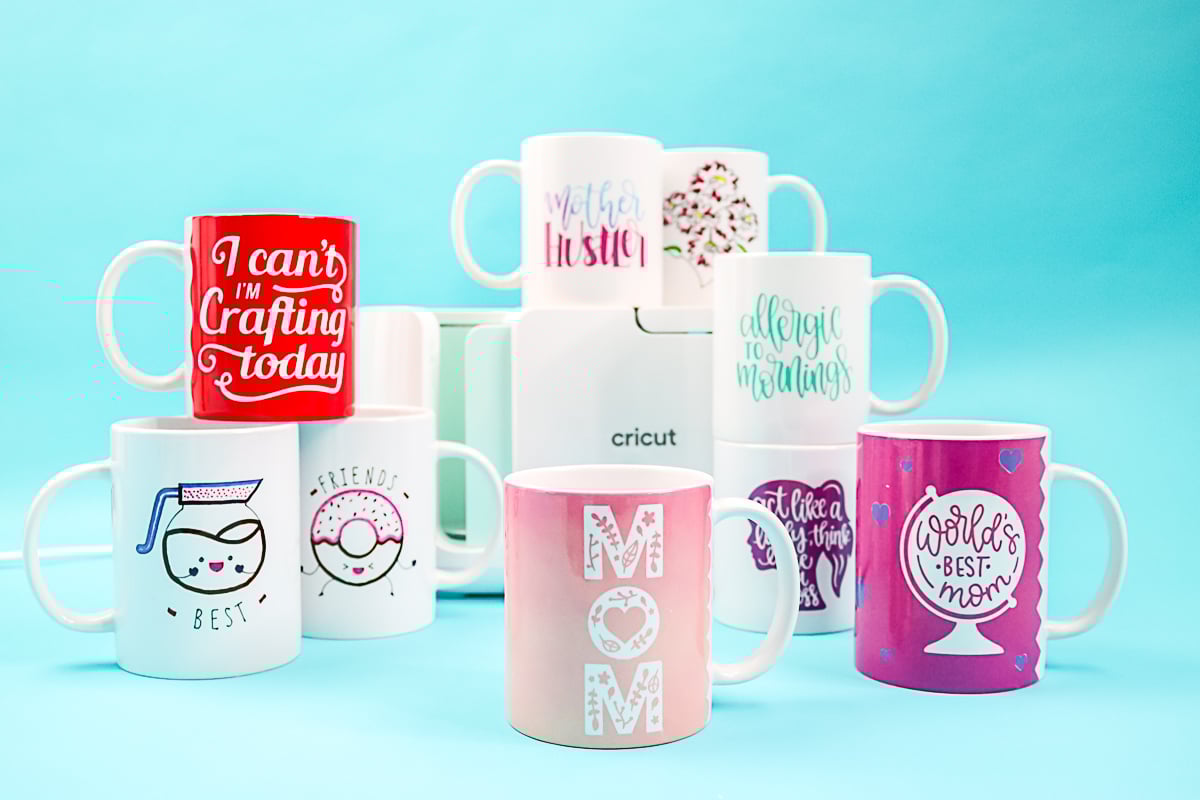
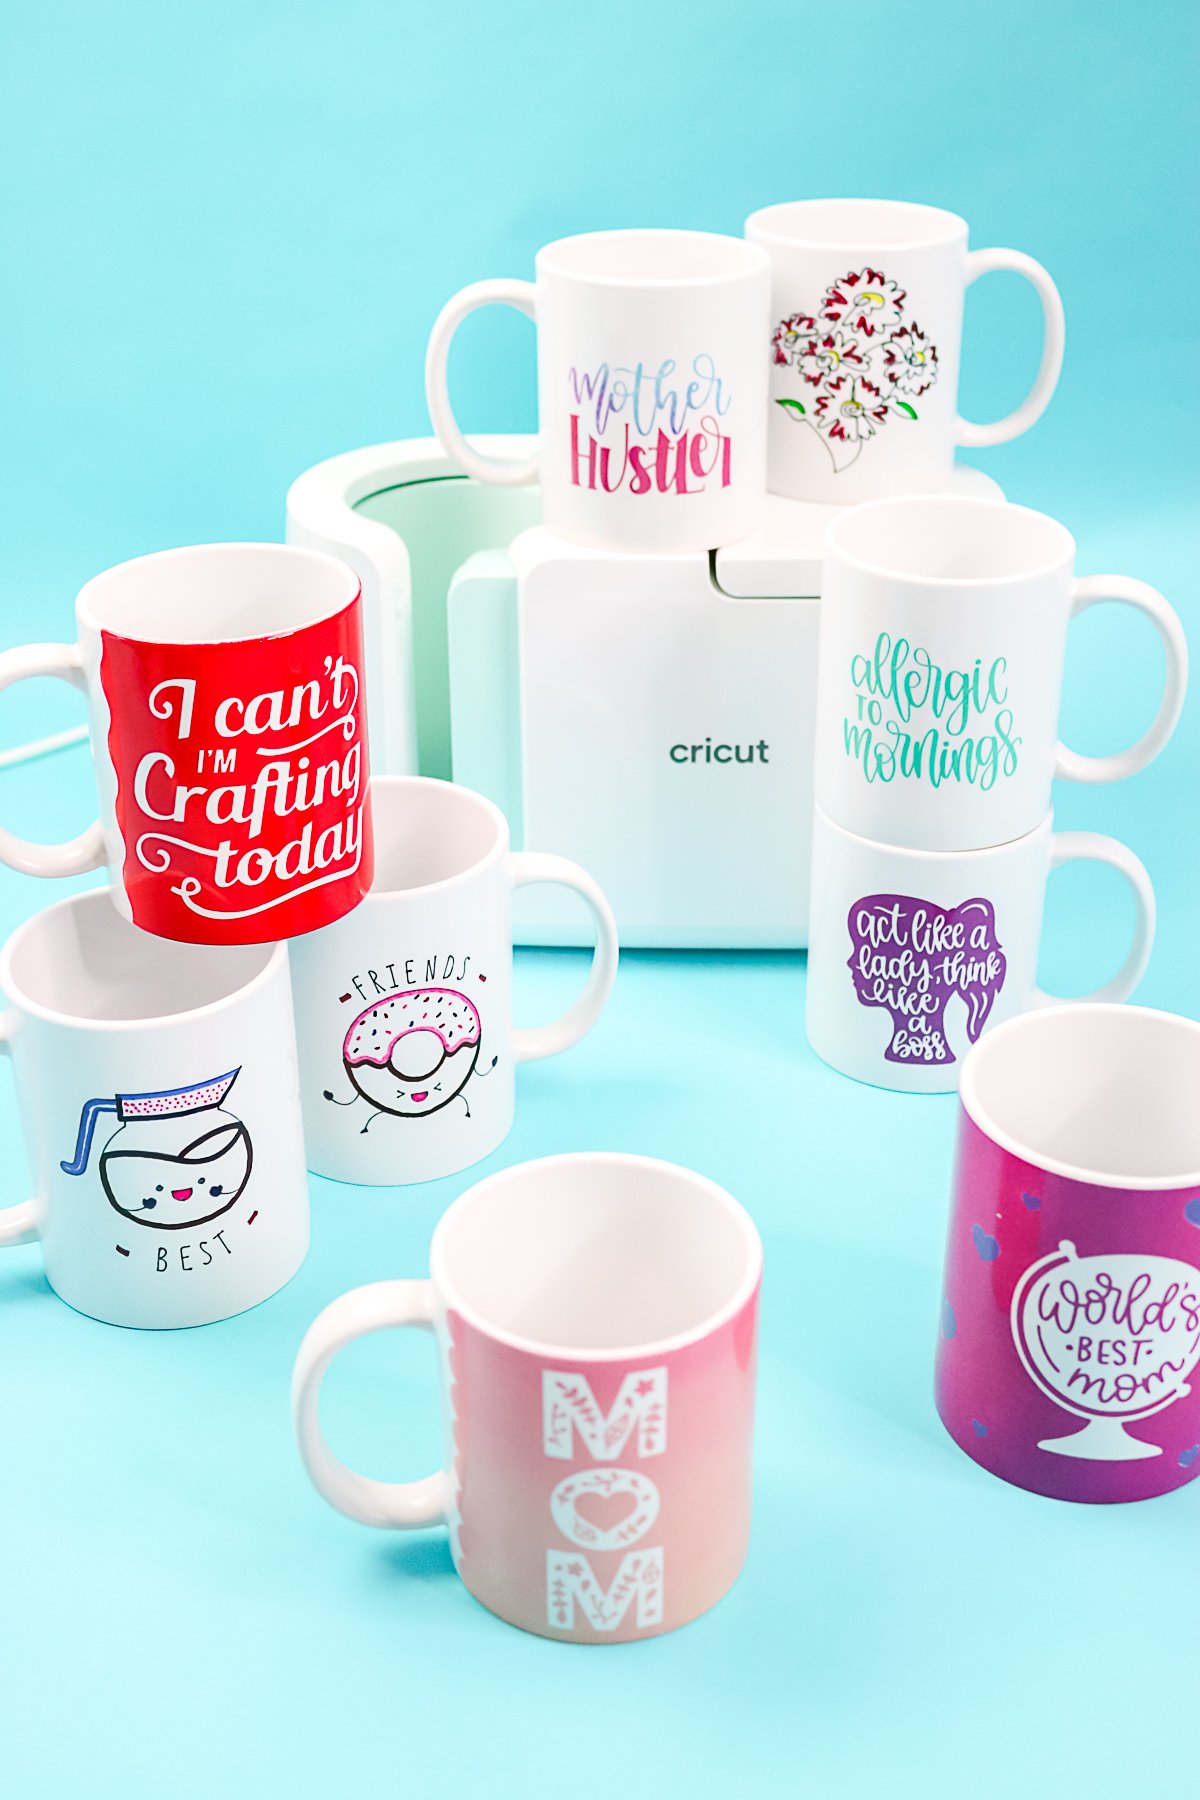
Now that I have been using the Cricut Mug Press for a while, it is time to jump in with some ideas for making Infusible Ink mugs with this machine!
As I mentioned before, we are going to cover full wrap mugs, layering Infusible Ink, and using pens with the Cricut Mug Press. I have a ton of ideas for you to make your own personalized mugs in minutes! So, grab your Cricut Mug Press and some Infusible Ink Sheets, and let's make some mugs!
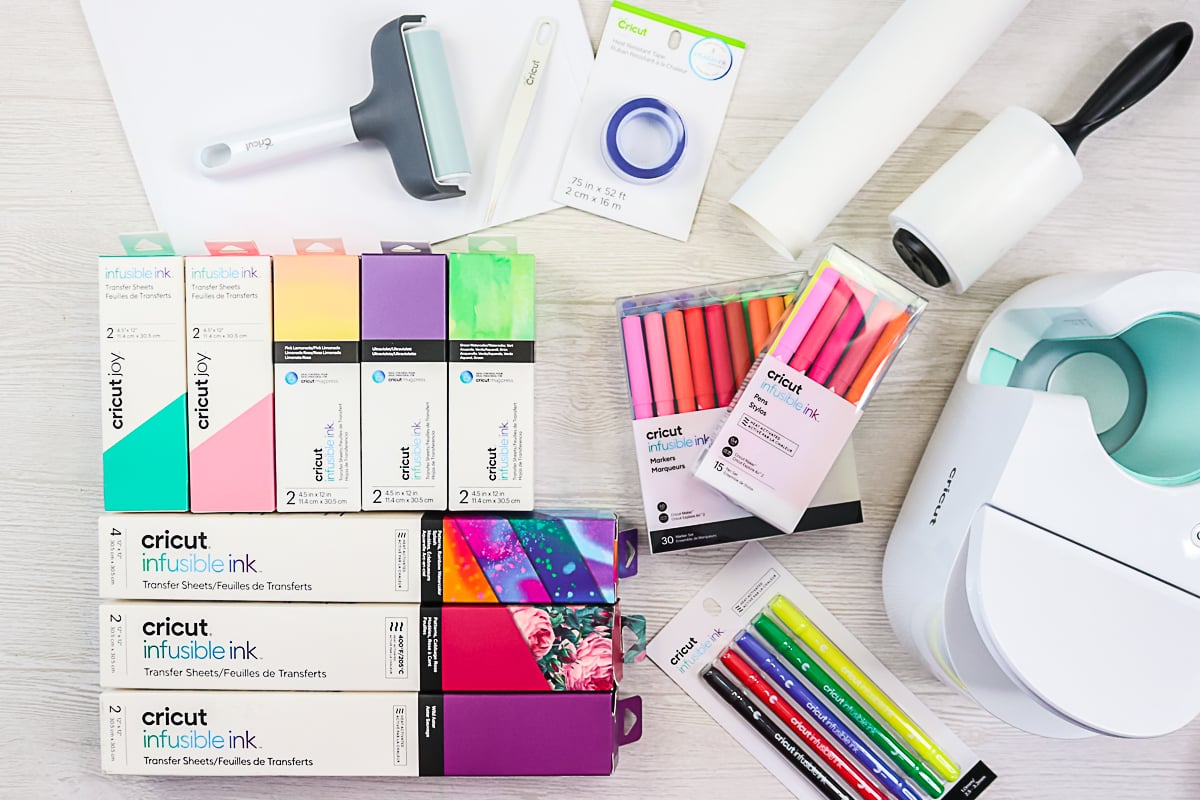
Supplies Needed To Make Infusible Ink Mugs
- Cricut Mug Press
- Cricut Mugs (small or large) (see more about the mugs below)
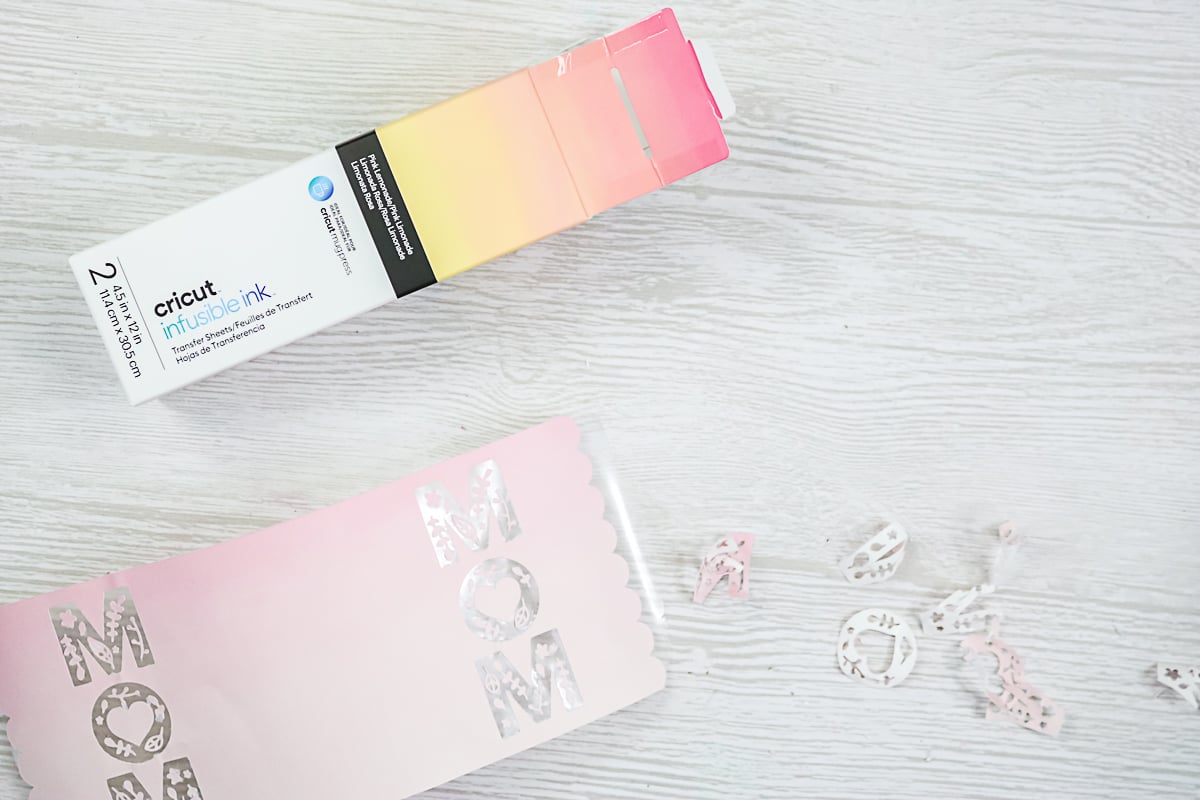
- Infusible Ink Sheets
- Infusible Ink Pens/Markers
- Cricut machine
- Cricut Mug Template
- Lint Roller
- Heat-Resistant Tape
- Butcher Paper (mugs with pens and markers only)
- Copy Paper (mugs with pens and markers only)
- EasyPress mat
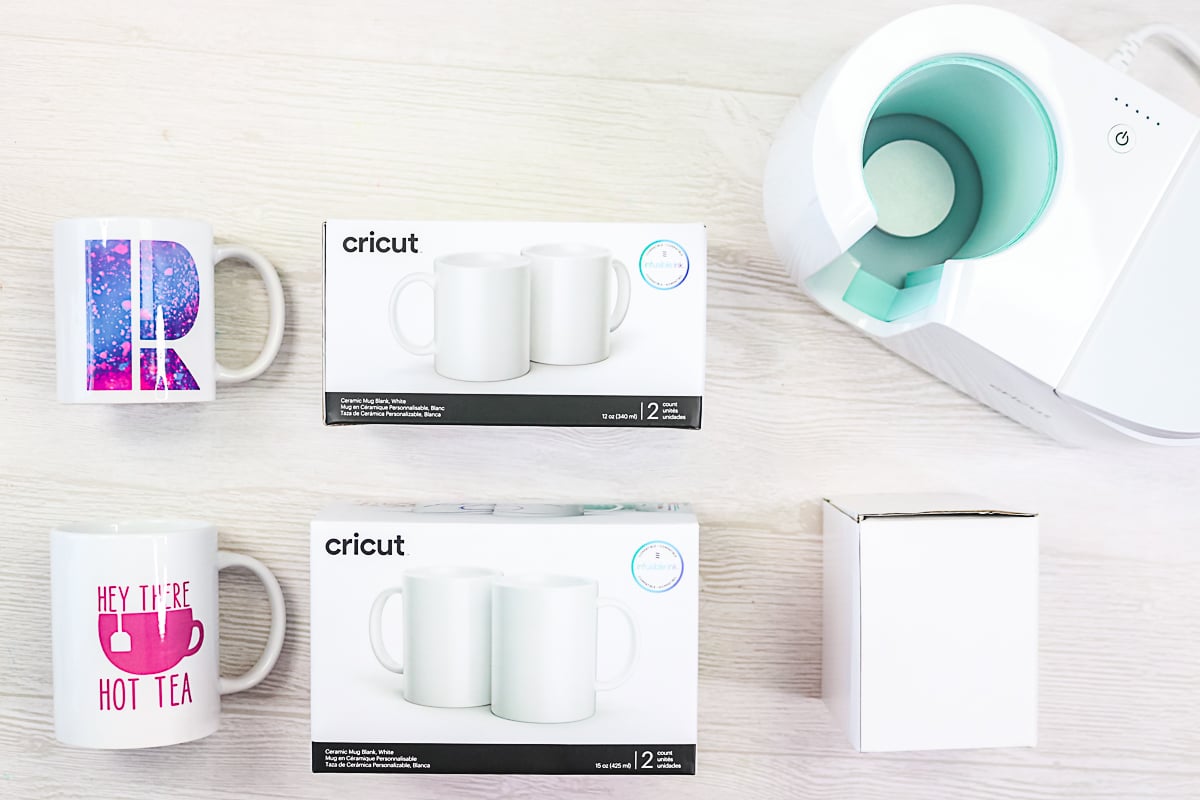
Types Of Mugs
Let's talk a little about the types of mugs that will work with this process before we get started. You cannot just buy mugs from the Dollar Store and expect them to work. Here are a few things to keep in mind.
- Mugs must be polyester-coated or have a sublimation coating.
- Capacity of 10 – 16 oz (300-450ml)
- Straight-walled drinkware only, avoid curves and uneven textures
- Outer Diameter between 3.2″ – 3.4″ (82 – 86 mm)
- Maximum height of 4.72″ (120 mm)
The Cricut brand of mugs works perfectly with the mug press if you don't want to hunt for other mugs that fit that range. They come in several sizes. I find the coating on them very even, with very few imperfections, both of which are important when working with sublimation.
They do come in a variety of package sizes. When you buy the larger 15-oz mugs, you will also get a gift box for every mug included in the package. This makes that size perfect for gift-giving.
Full Wrap Mugs With Infusible Ink Transfer Sheets
I love the full-wrap designs on these mugs. You are restricted to designs with a 1/2-inch gap from the handle on both sides. But otherwise, you can wrap your design around the mug and make something really amazing. Cricut has made this process really easy with templates you can open and add your own design. Let's look at the process!
Designing Your Mugs
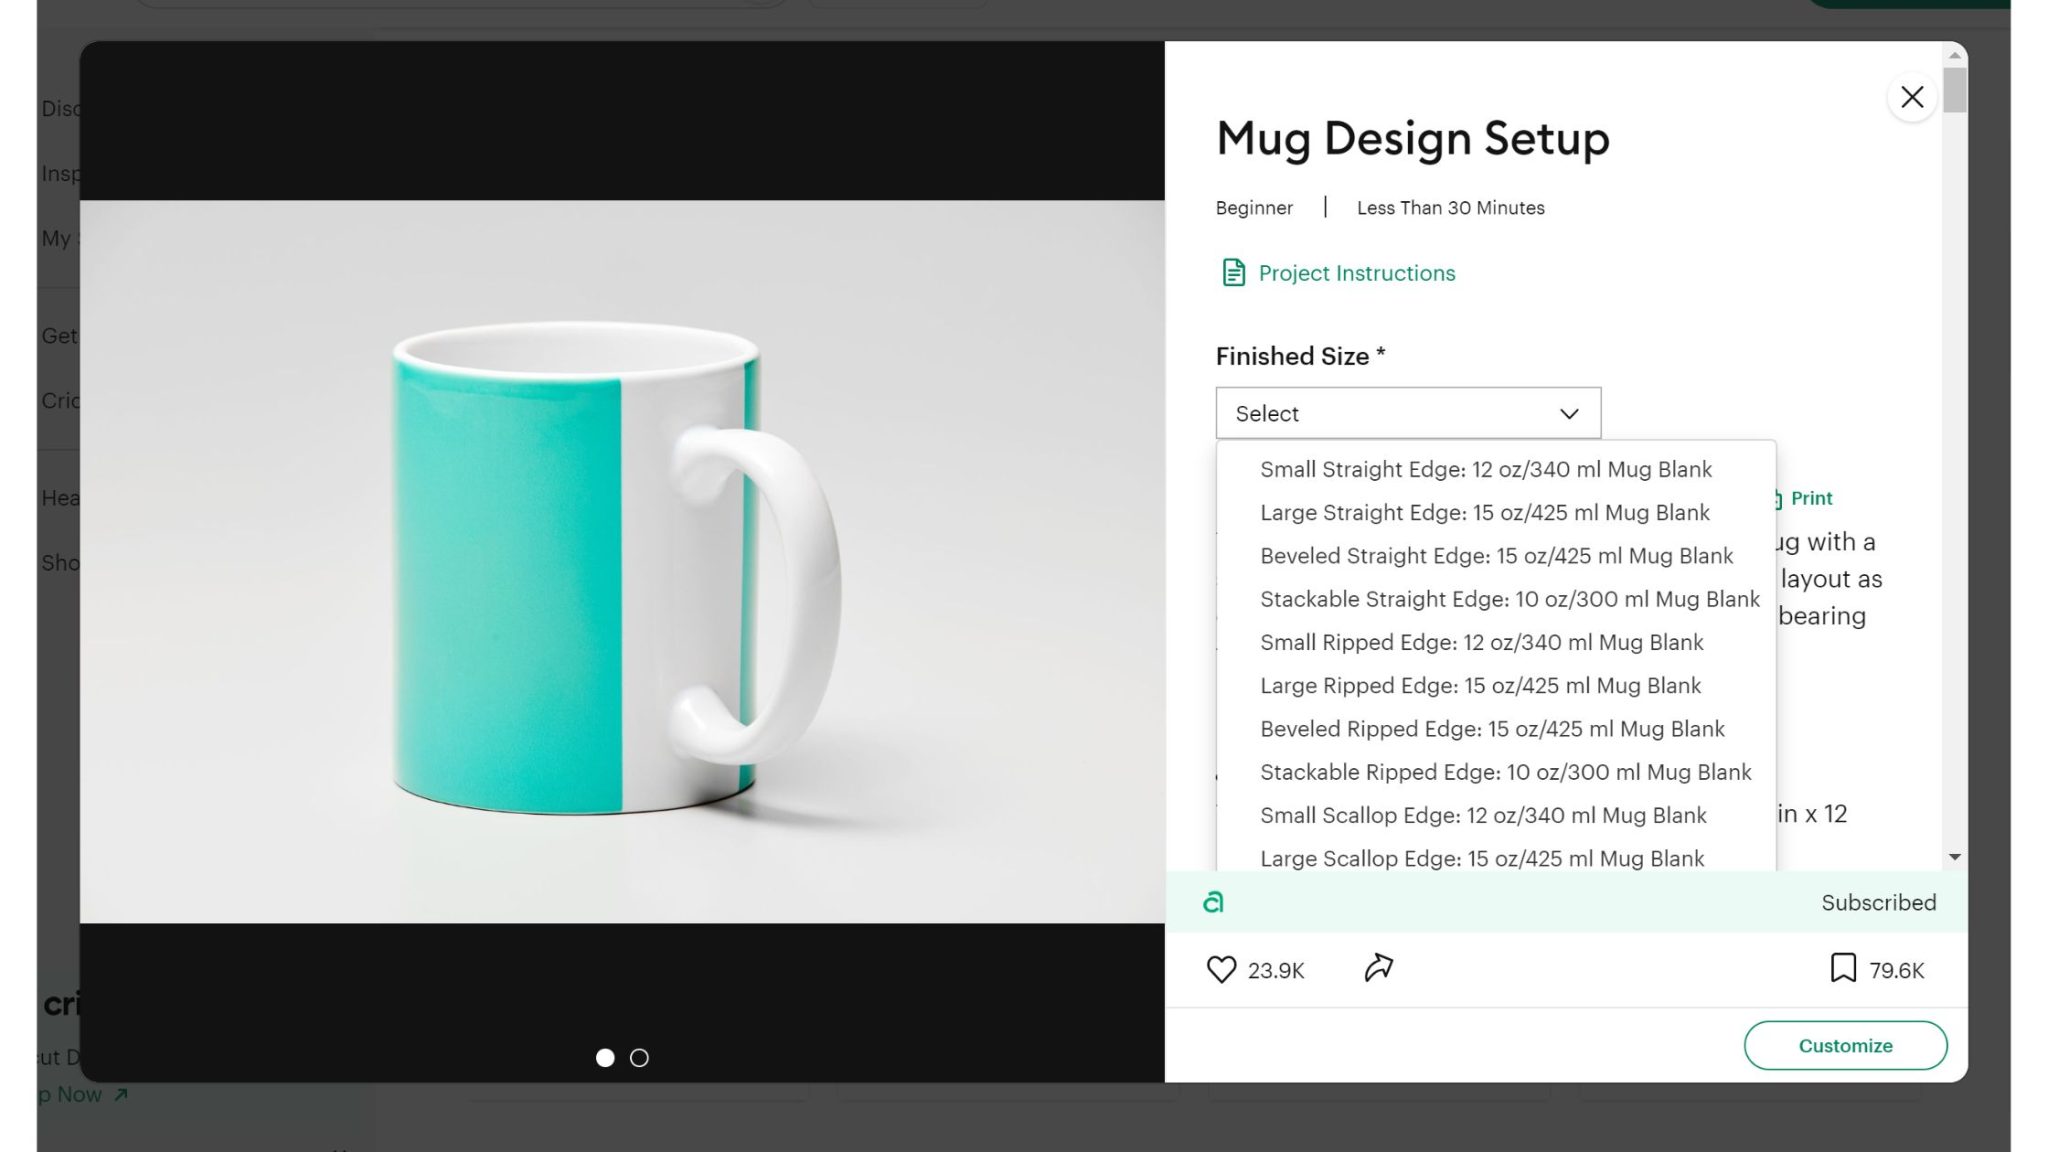
Start by opening Cricut Design Space and searching for “Mug Design set up” in Projects to open up the template for making mugs. You will need to choose the mug size to continue.
Mug Design Sizes
The sizes for the area in which you can add a design for the Cricut mugs are as follows:
12 oz (340 ml) mug blank
- Max length – 8.75 in (22.52 cm)
- Max height – 3.79 in (9.62 cm)
15 oz (444 ml) mug blank
- Max length – 8.75 in (22.52 cm)
- Max height – 4.25 in (10.8 cm)
15 oz (444 ml) beveled mug blank
- Max length – 8.75 in (22.52 cm)
- Max height – 4.17 in (10.59 cm)
10 oz (300 ml) stackable mug blank
- Max length – 8.75 in (22.52 cm)
- Max height – 2.95 in (7.49 cm)
For best results, leave at least 0.5 in (1.27 cm) between the edge of your design and the mug handle.
If you want a different edge for your design, search for “Mug Design Set Up.” You can choose whatever look you are going for. There are some really fun edges available.
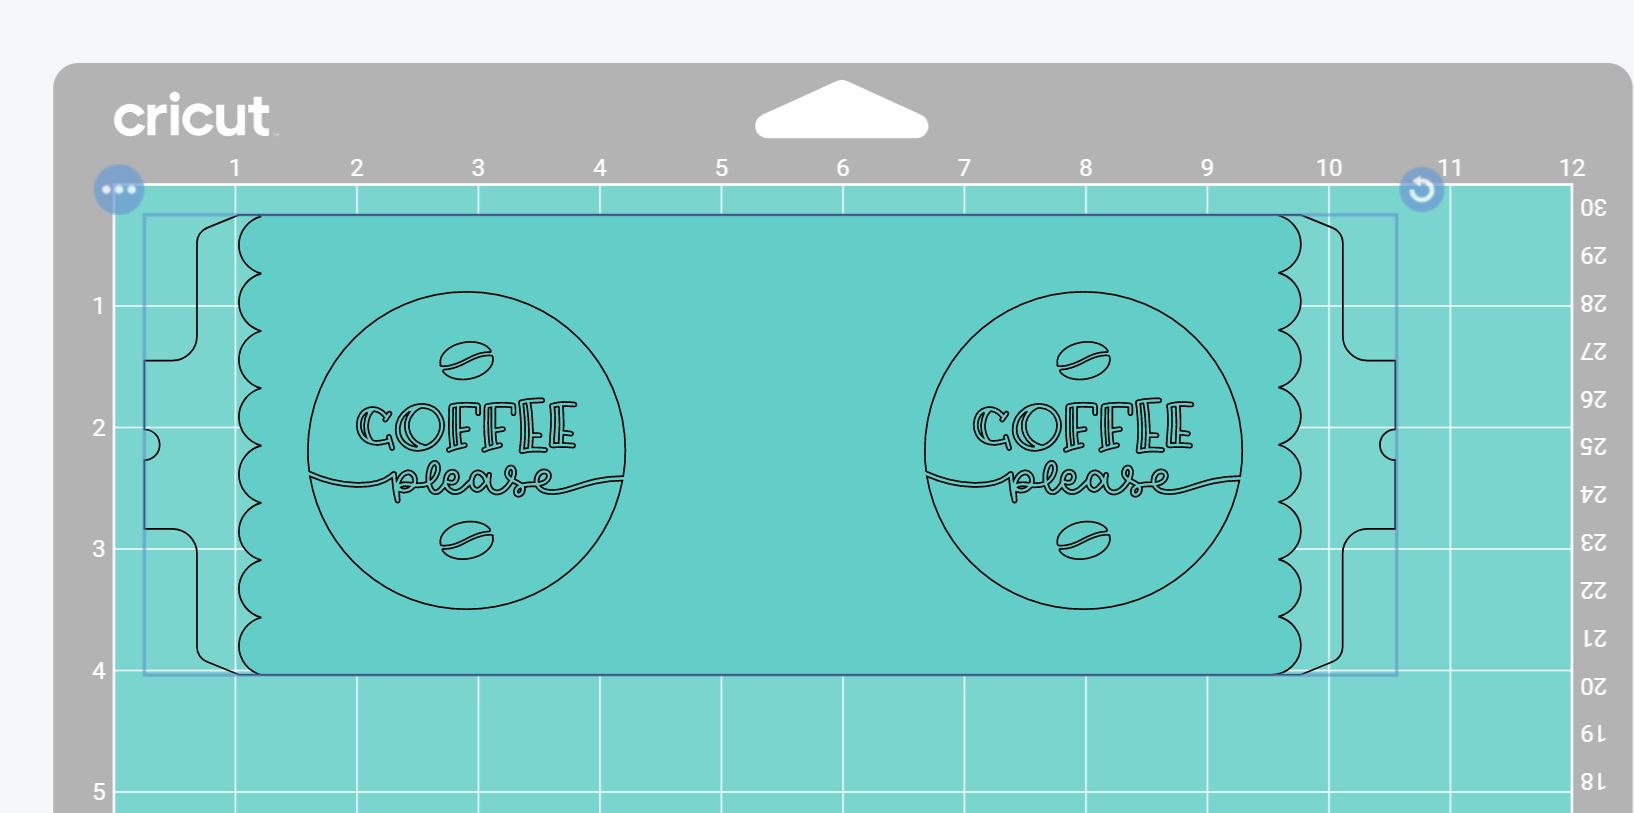
Pick the one you would like for your mug, then click “Customize” to start designing. Let's look at the layers of this template and what each of those is used for.
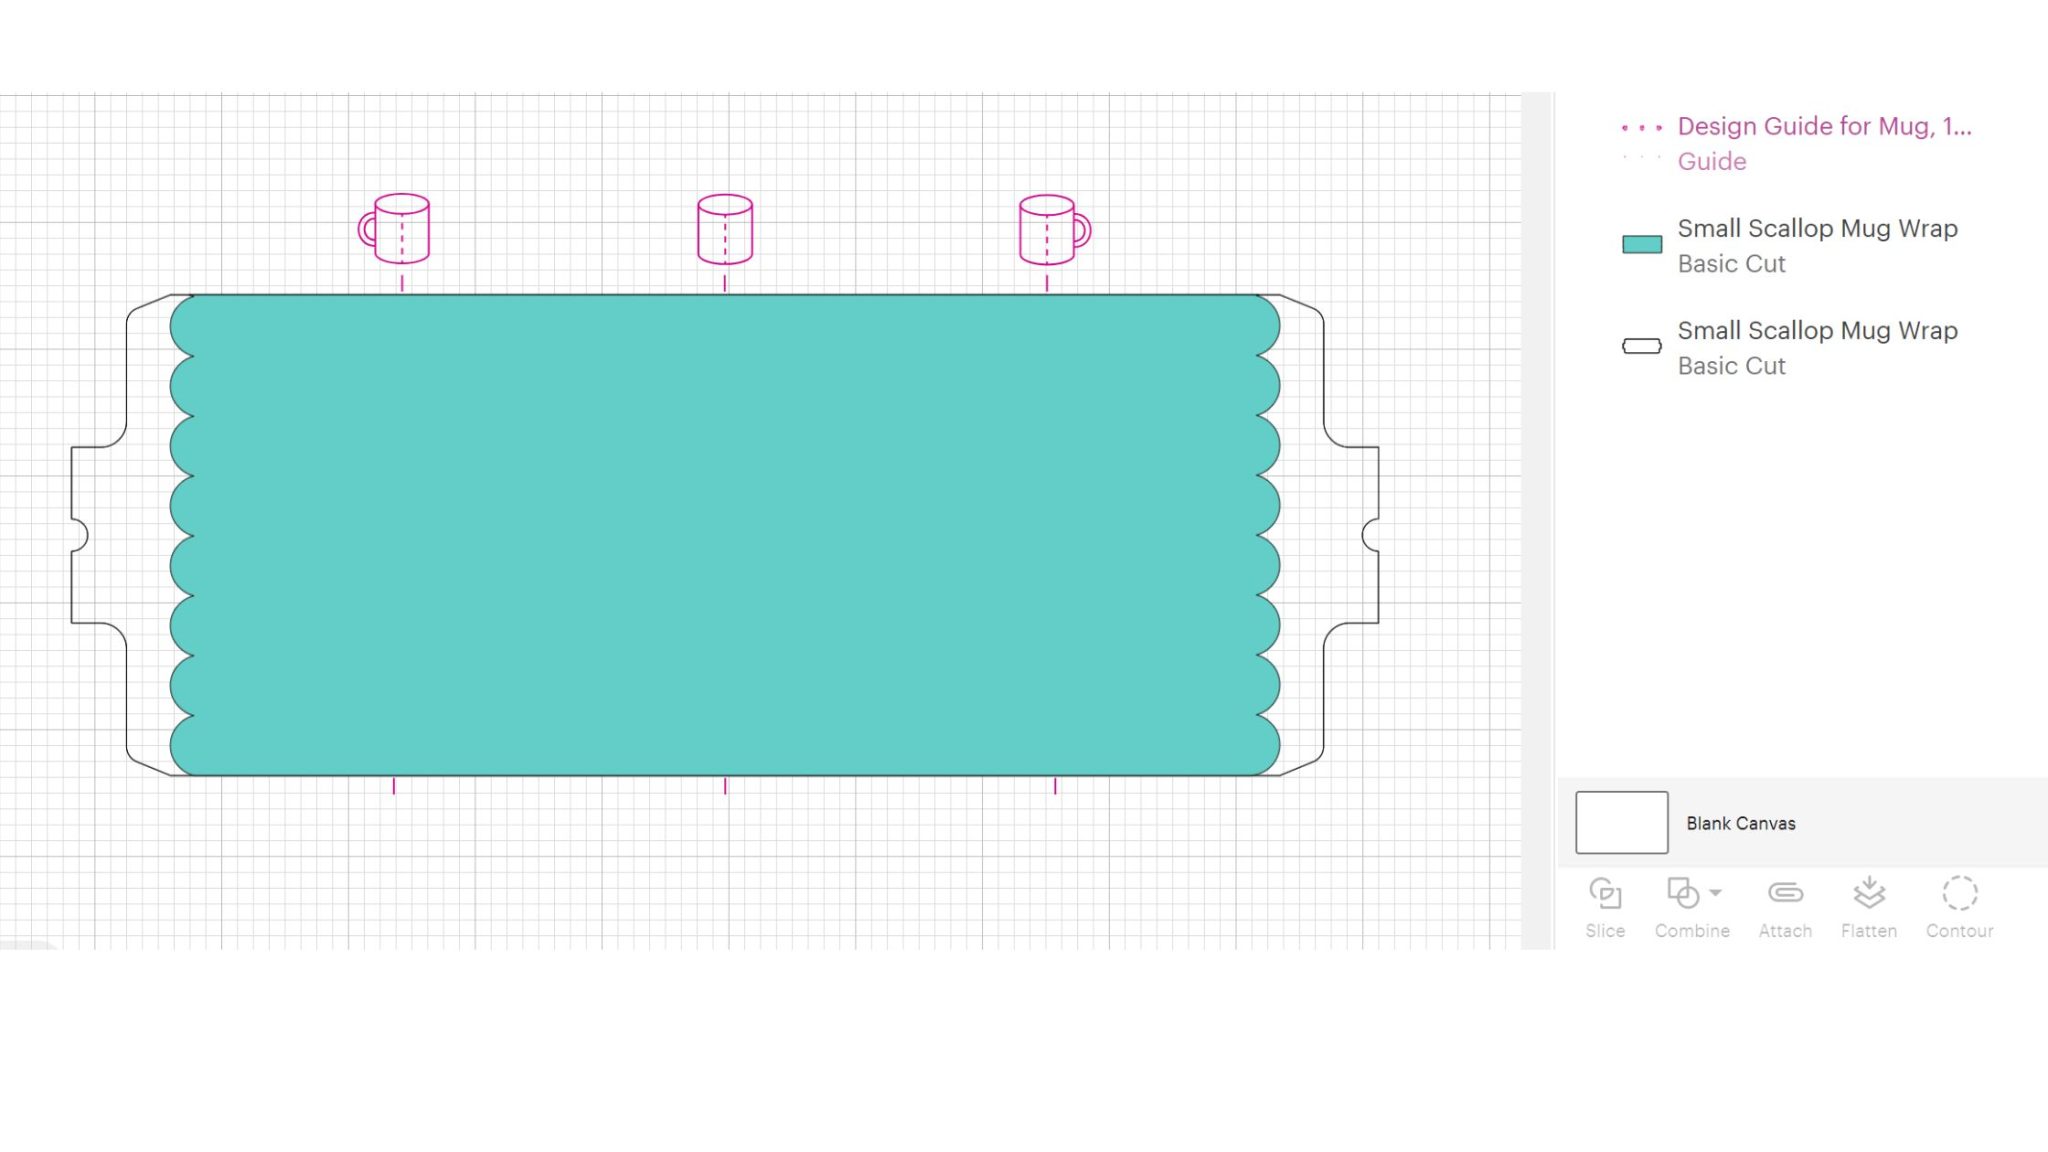
- Red layer – this is named “Design guide for mug” for a reason. It is only used for your reference. The lines mark the center of the front, side, and back of the mug, respectively, and will not cut or print.
- Teal layer – this is the area where your design should be. You should add any elements you want to this area and use the red layer to help you locate those.
- White layer – this cut layer will cut the TRANSFER SHEET from your Infusible Ink sheet, leaving you with a perfectly sized sheet to wrap around your mug.
Creating Mug Design
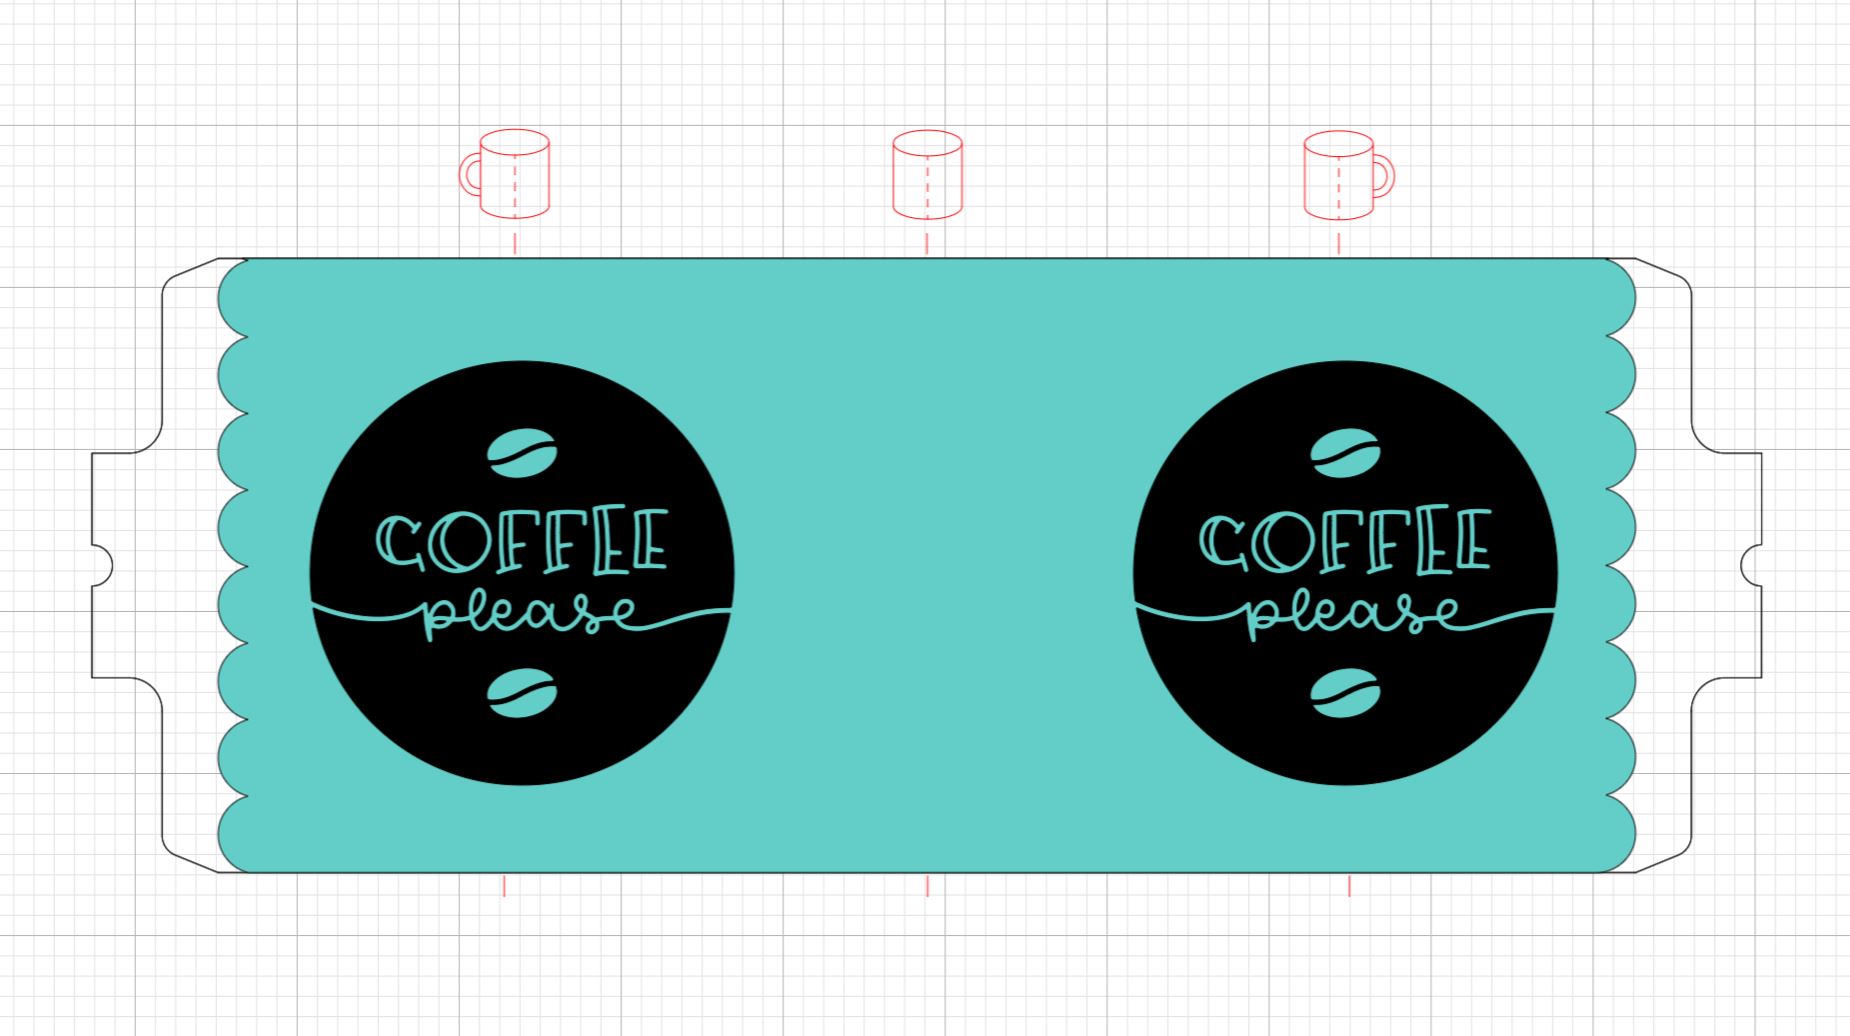
To make a design, add whatever you would like to cut from the Infusible Ink to your canvas. You can choose a Cricut image or upload a file. Then duplicate it for both sides of your mug, or put different designs on each side. Use the template to locate your design. I also recommend using the align function to make sure everything is lined up.
You can hide the red layer by clicking the eye in your layers panel. Pick up all remaining pieces, then click “Attach.” You should see something like the image below once you click “Make.” If you don't, try attaching again to fix the issue.
NOTE: Infusible Ink can be challenging to weed with smaller cuts. Consider using the Contour feature to remove small pieces that you don't really need in your design. I did that with the letter inside the cutouts in the example project. You will need to select Detach to use the contour feature, then attach your design again before cutting.
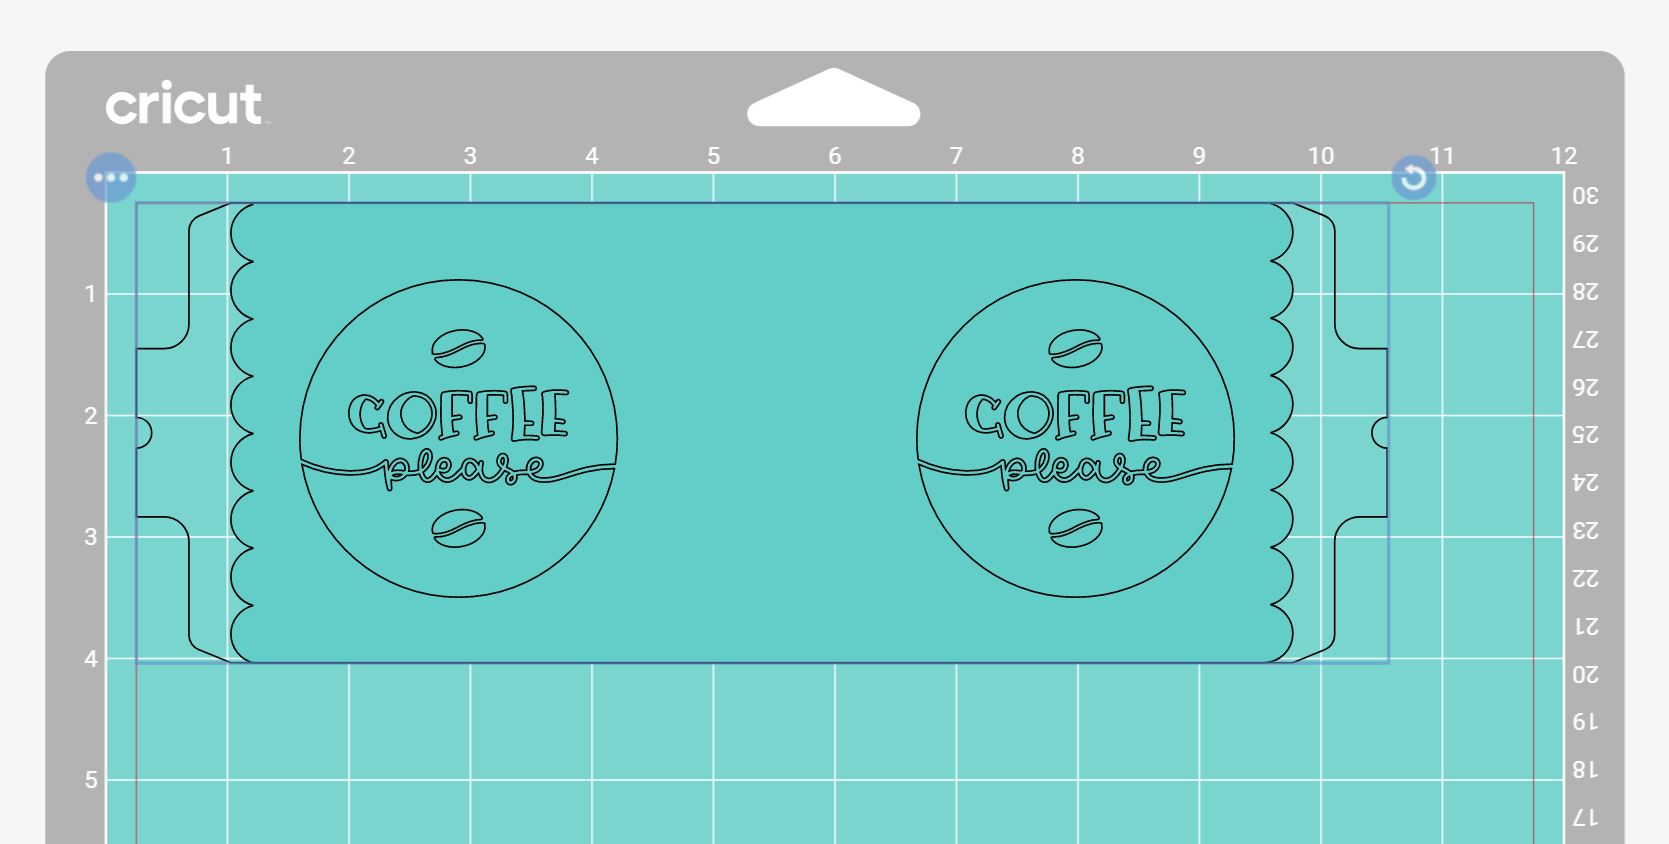
Now you just need to mirror your cut and choose the Infusible Ink Transfer Sheet material option to cut your design. Keep reading for more tips on cutting the sheets. Do you want this Coffee Please design? It's design #M1D75A89E in Cricut Design Space.
Single Color Mugs
Now that you have your design, it is time to cut and make a mug! The Infusible Ink sheets that are labeled for the mug press are sized to minimize waste for these full-wrap designs, so I do recommend them. However, you can use any size of Infusible Ink sheet you like to make these mugs.
NOTE: The mug press-sized sheets will work with all Cricut machines, including the Cricut Joy models.
Step 1: Cut Mug Design
Place the sheet down, ink side up, on the mat, and be sure to mirror your cut in Design Space before cutting. You will also want to make sure the material is pressed well onto the mat. I often use my brayer to get it to adhere to the mat.
Step 2: Weed Mug Design
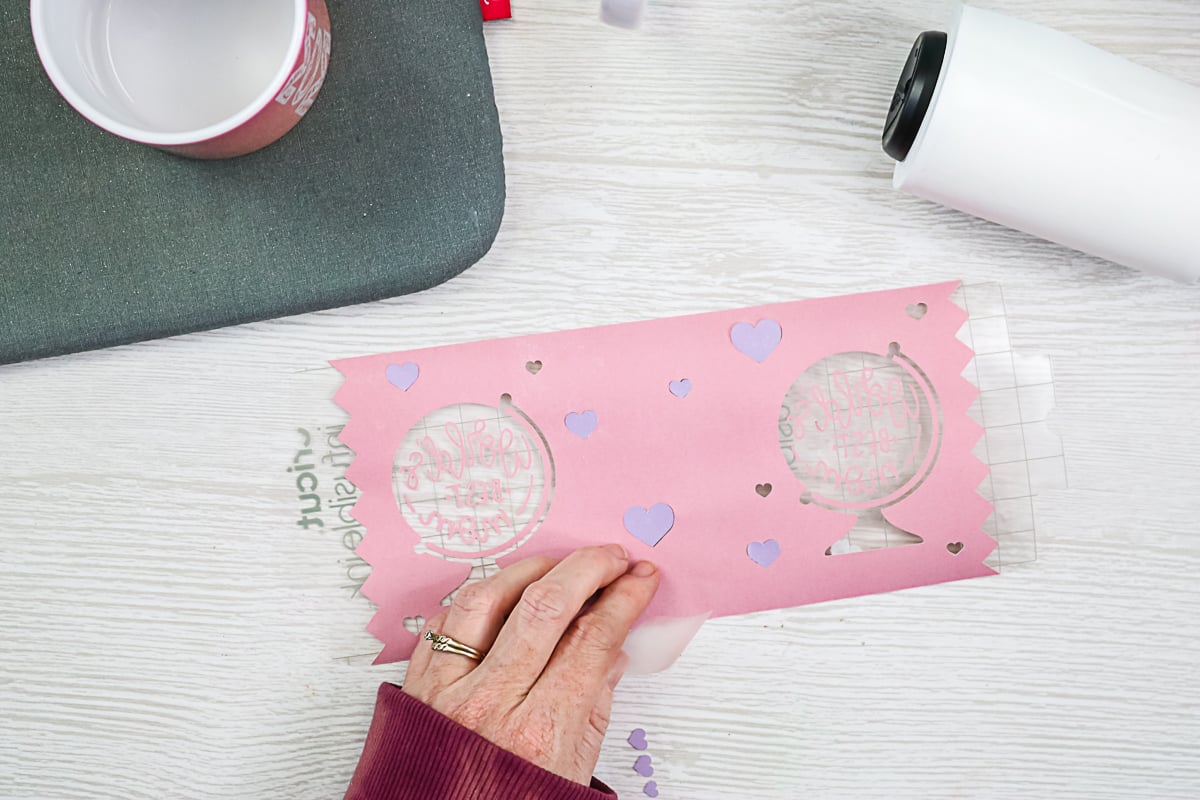
Once your Cricut is done cutting your design, it is time to weed. Bend and crack the Infusible Ink to get it to weed as easily as possible. There is a bit of a learning curve, but I actually love to weed Infusible Ink! Just be patient, take your time, and remove all of the excess pieces. It is recommended that you use only tweezers to weed Infusible Ink, avoiding traditional weeding tools.
You will also notice a color difference between the sheet and the box. It will look more vibrant, like the colors on the box, after it is pressed. Once your entire design is weeded, it is time to add the sheet to the mug.
Step 3: Wrap The Design Around The Mug
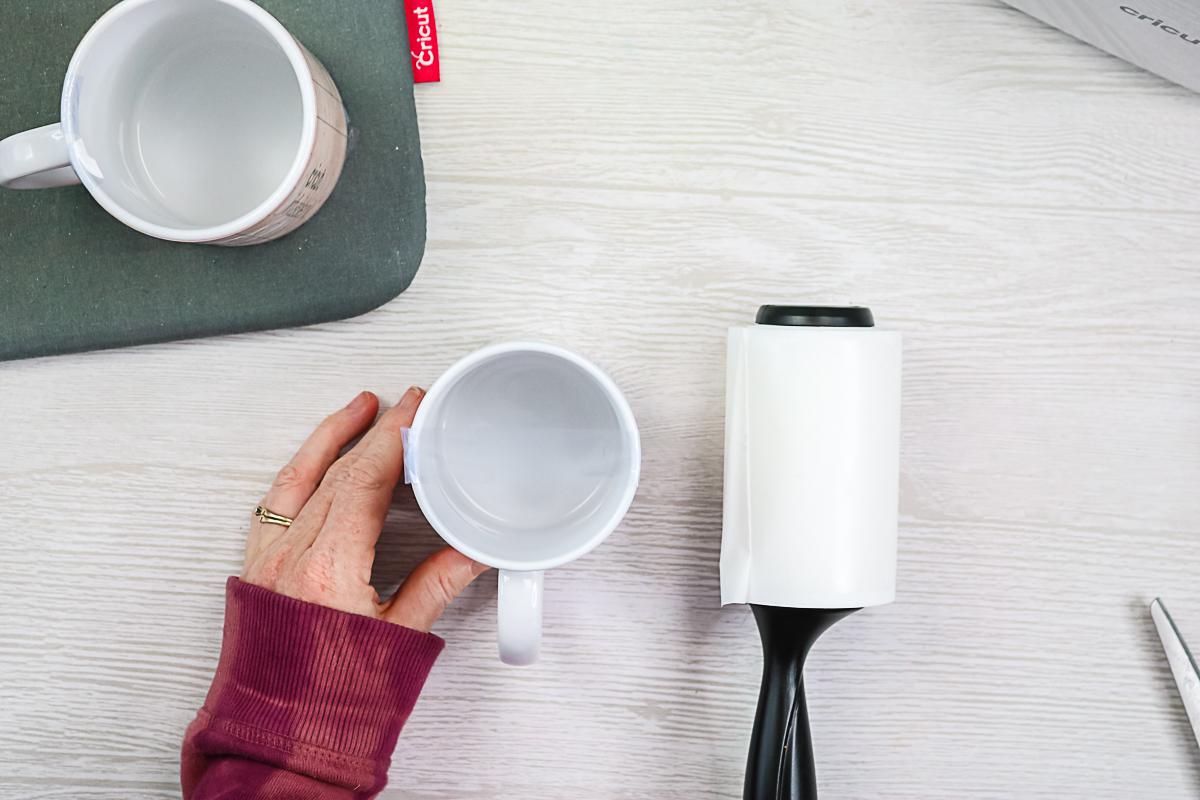
Be sure to lint-roll the entire mug WELL before adding your design. Any debris will mess up your mug! Wrap the sheet around the mug as tightly as possible. Make sure the sheet is positioned all the way down to the bottom of your mug.
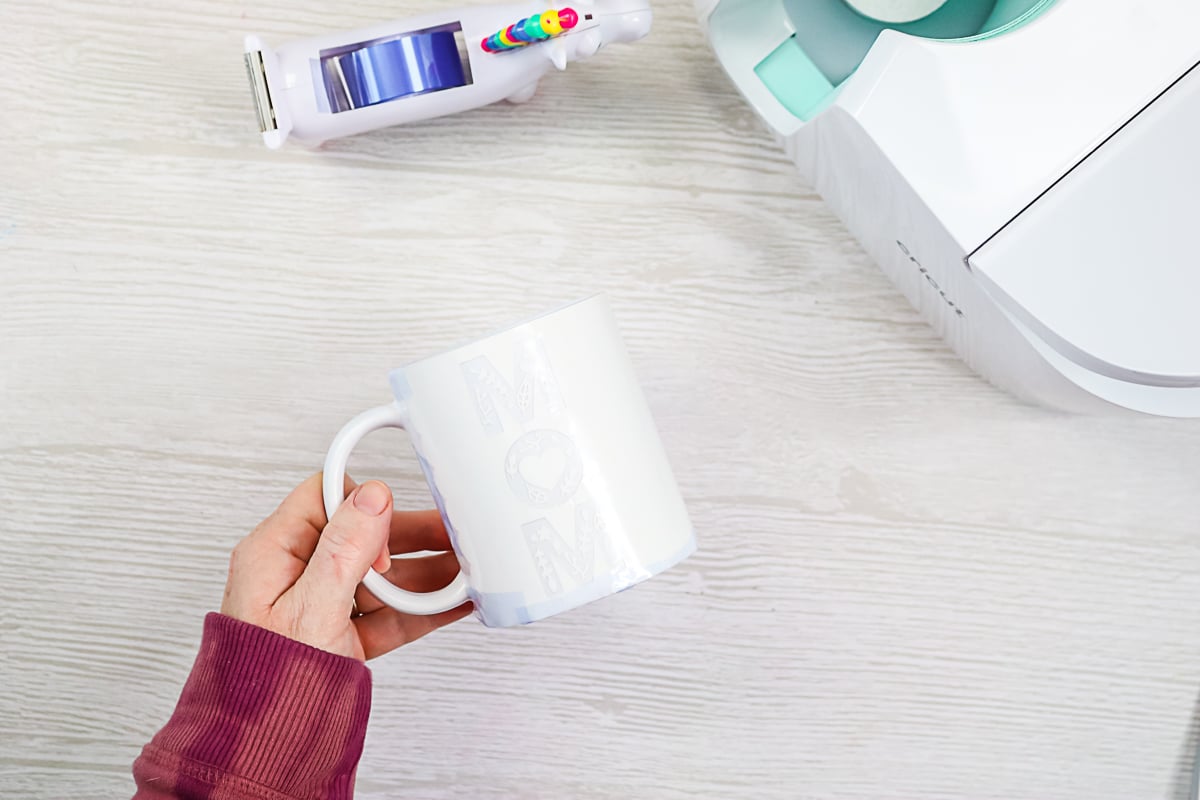
The sheet itself is sticky, but you will want to use more heat-resistant tape to keep the design in place. You want it to stay tight against the mug without moving. Use tape where the design meets under the handle, along the bottom, and add a few pieces along the top.
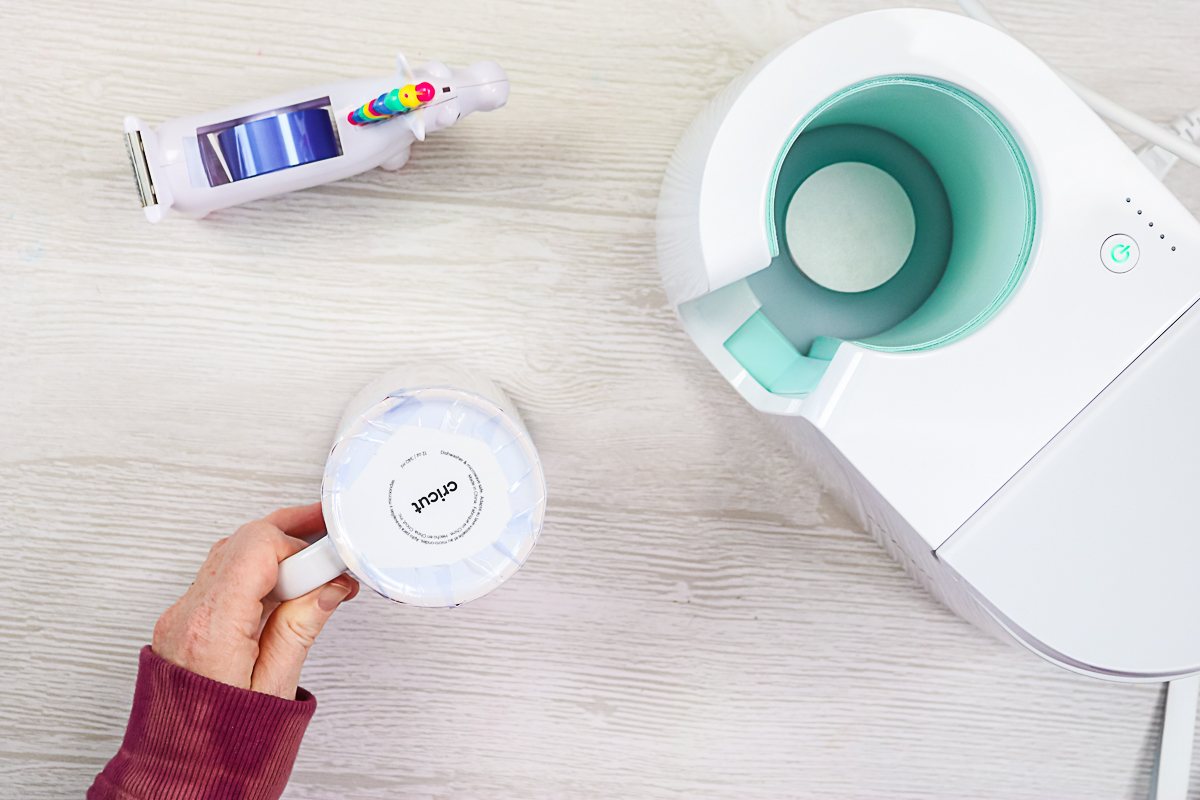
Step 4: Press Mug Design
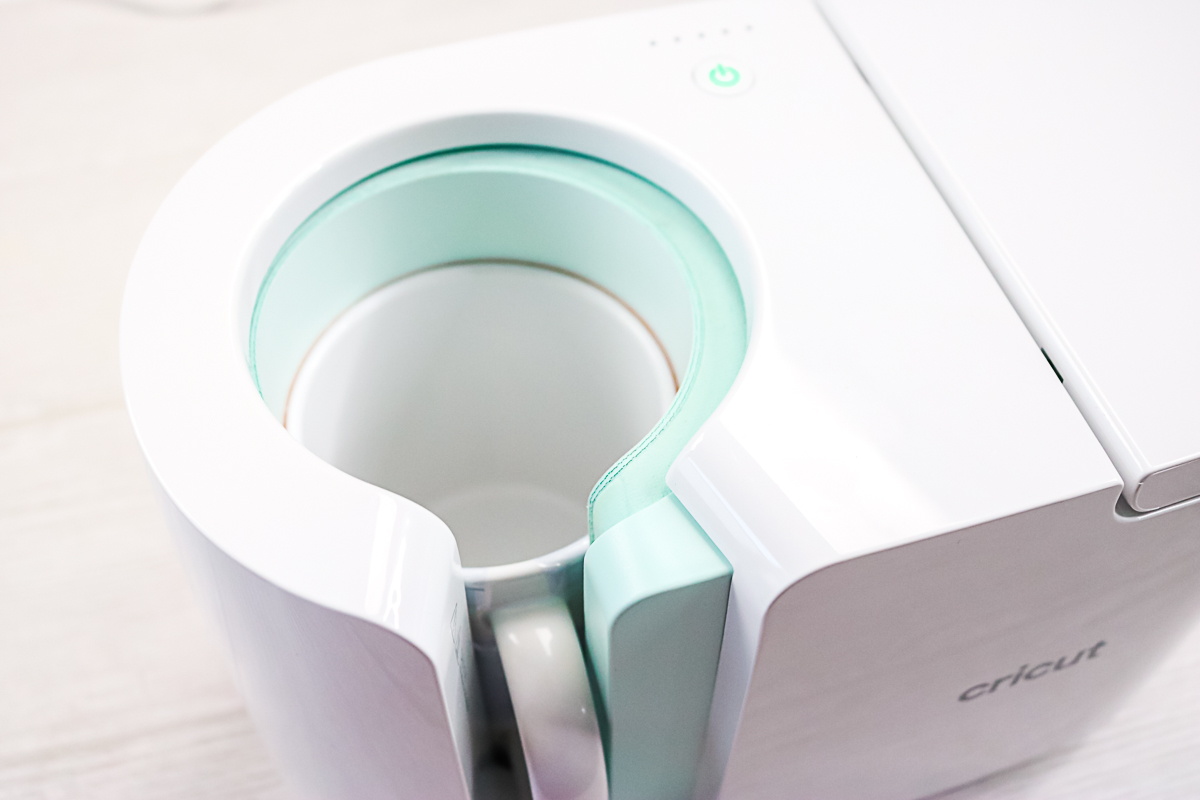
Then add your mug to the preheated Mug Press with the top facing up. Just close the lever to start the mug press. Be sure your handle is centered in the opening and that the heat plate covers the entire design.
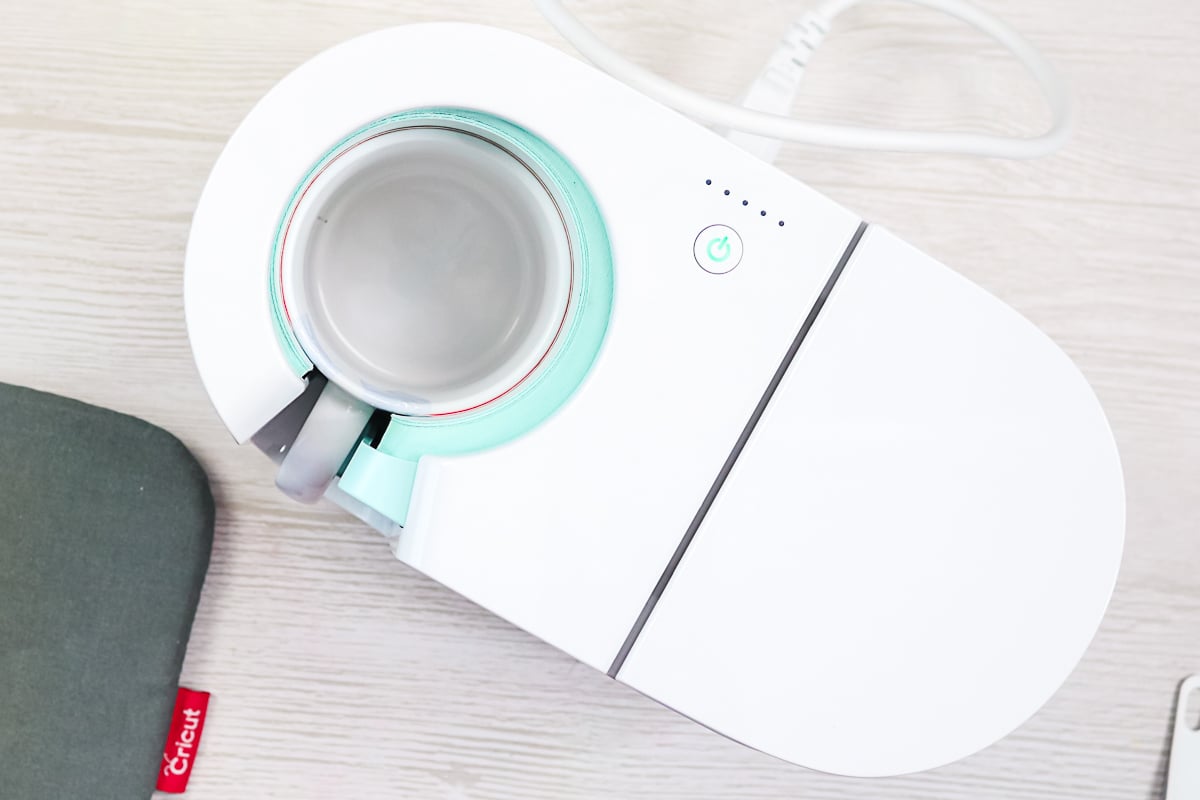
The LED lights on the progress bar will start to light up, and the press will beep when it is done. The average time is 6 minutes, but it accounts for factors like the temperature of your room when pressing, so it can vary.
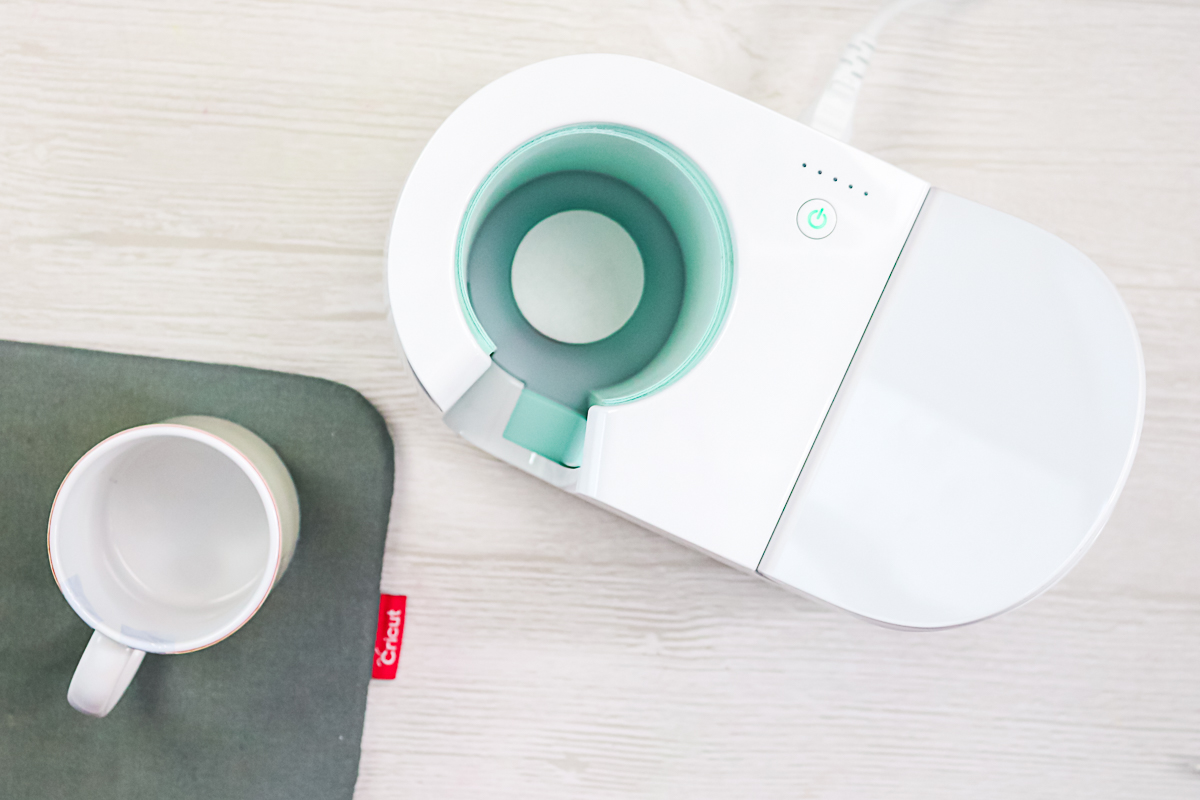
Step 5: Let Mug Rest
Once the press beeps, remove your mug and transfer it to a heat-resistant surface to cool for 15 – 30 minutes before you touch it. The mug handle will stay cool, so you can remove it from the press.
Step 6: Remove Transfer Sheet
Once cool, you can remove the transfer sheet to reveal your gorgeous design!
Working With More Than One Color
Want to add a second color? That is easy! Make your design in the same way, but this time add another color or even two. Cut them both in the same manner as above. Once weeded, remove the pieces from the second color and put them in the cut holes on the transfer sheet for the first color.
Then you can just press it in the exact same way. This is a way of layering Infusible Ink, but you only need to press it once to get your design on your mug.
Smaller Designs With Infusible Ink Transfer Sheets
What if you don't want to create a design all the way around your mug? No problem! You can simply add a design to the front, the back, or both sides of those Infusible Ink mugs instead.

Designs And Sizing
You can use the template as a guide for sizing your design, but it's not required. If you do choose to use it, be sure to delete the entire template before cutting to avoid wasting any Infusible Ink. I typically make my designs between 2 1/2 and 3 inches tall, as that size tends to work best. However, feel free to choose whatever size works for you.
Single Color Designs
Step 1: Cut & Weed Design
Cut and weed your Infusible Ink Transfer Sheets in the same way. Remember to mirror your cut! I also suggest trimming the sticky carrier sheet close to your design to minimize dirt that may be trapped on it.
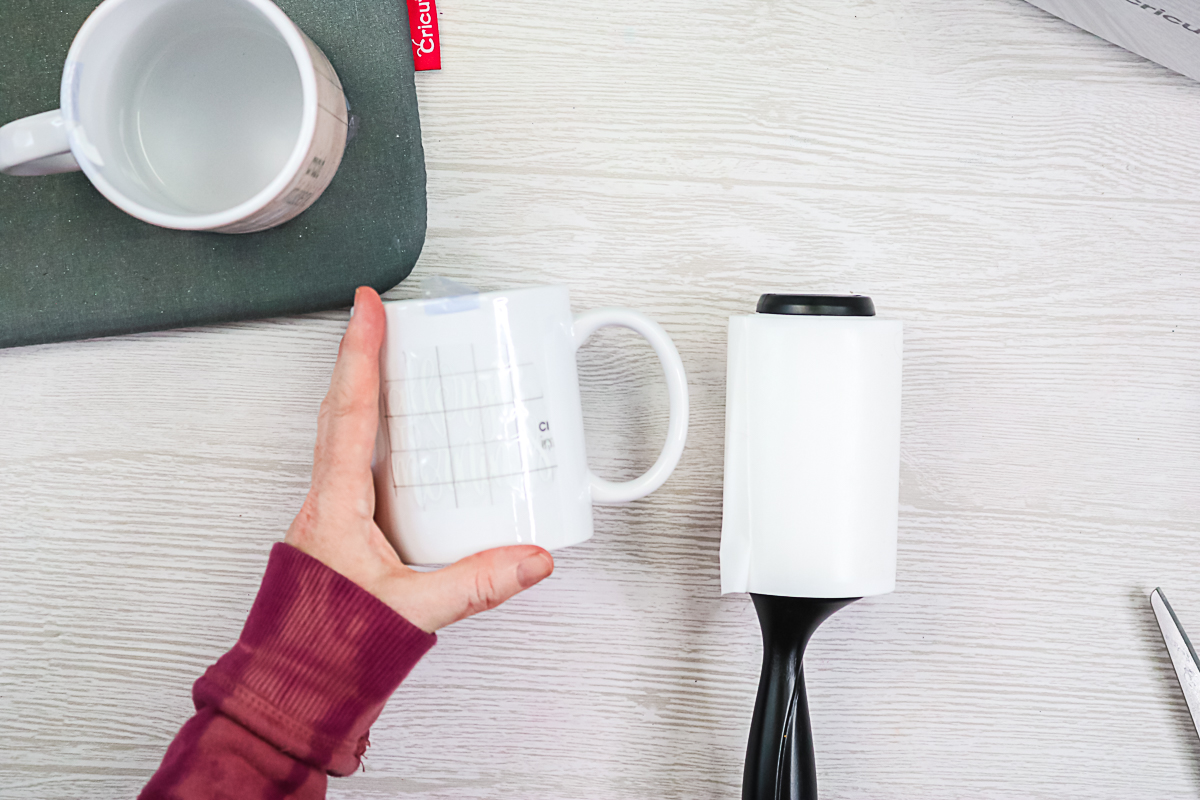
Step 2: Find The Center Of The Mug
Then you will need to find the center of your mug to get your placement as correct as possible. I like to take a piece of tape and place it across the top at the center, while looking at the mug from above.
Step 3: Tape Design To Mug
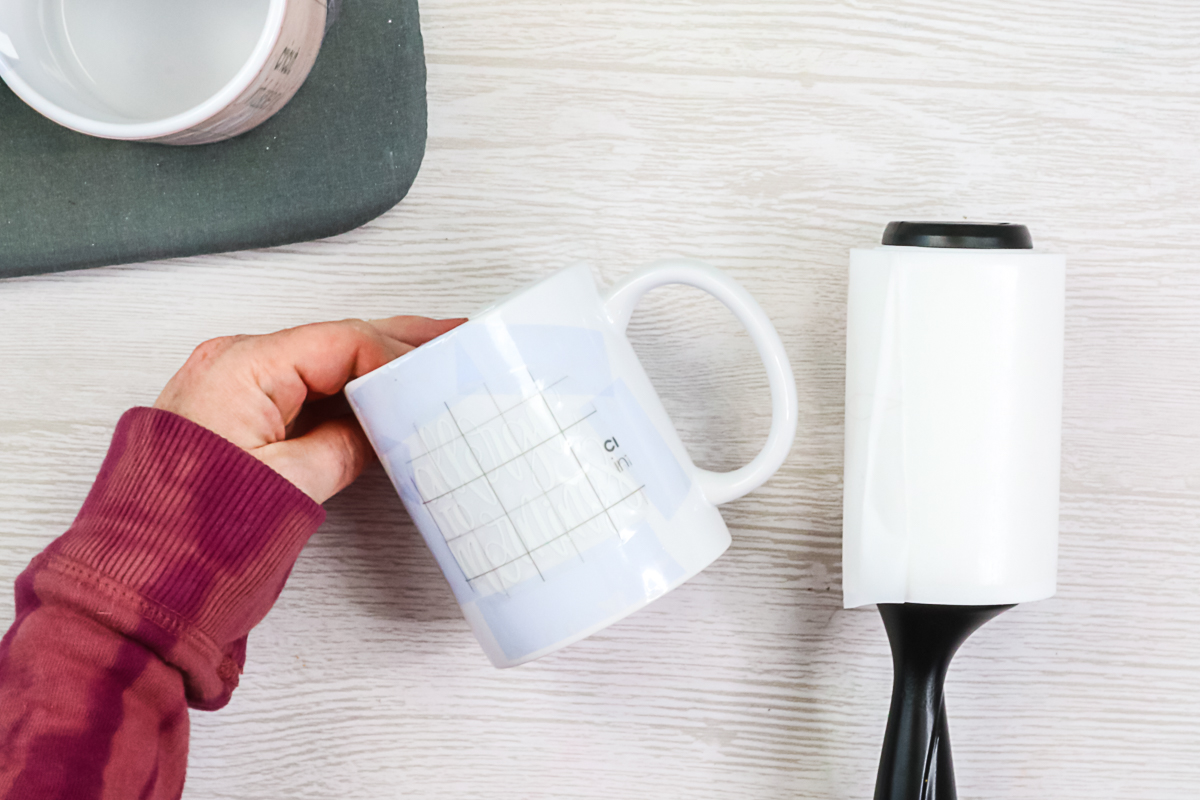
Then you can use that tape on the side of the mug to place your transfer sheet in the right spot. BE SURE TO LINT ROLL YOUR SURFACE FIRST! Always remember that! Place the design in the right location, press it down firmly with your fingers, and add additional tape to hold it in place. Be sure to get it taped tightly against your mug.
If you'd like, repeat the process on the second side. I also recommend measuring the distance from the bottom on both sides to ensure they are positioned similarly. When applying the second side, you can use the tape you placed on the top to secure it in place, avoiding wasted tape.
Step 4: Press Mug Design & Remove Paper
Press these designs using the same method as mentioned above. Once pressed, peel back and reveal your gorgeous design!
Multi-Color Designs
If you want to add multiple colors using smaller designs, you can do so in a similar way to the full-wrap technique described earlier. For this particular project, I trimmed the carrier sheet closely around both colors and applied them to the mug together. I aligned them visually and used tape to secure them. Be sure to tape across the middle where the two carrier sheets meet to keep them in place.
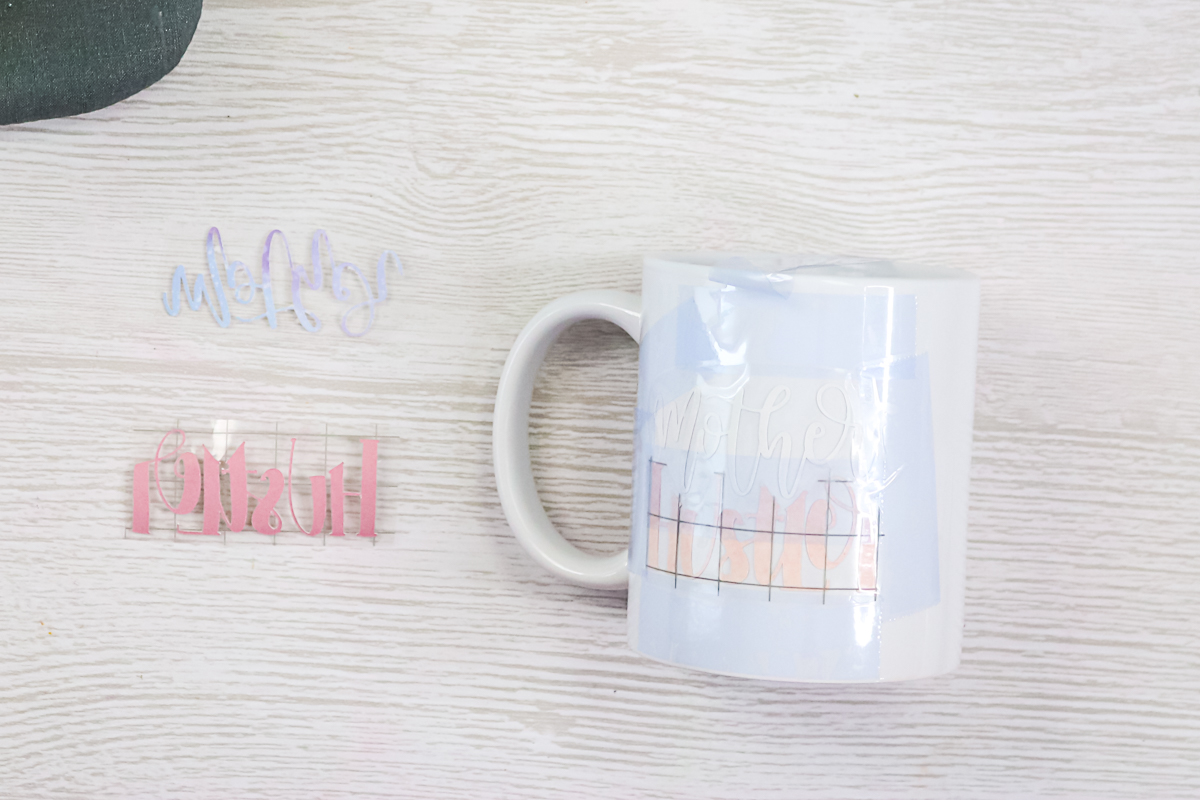
After taping both sides securely to a clean, thoroughly lint-rolled mug, you can proceed to press it. I mention lint rolling frequently because it is crucial for this process! Once you have finished pressing, allow the mug to cool, then carefully peel back the tape to reveal your beautiful design!
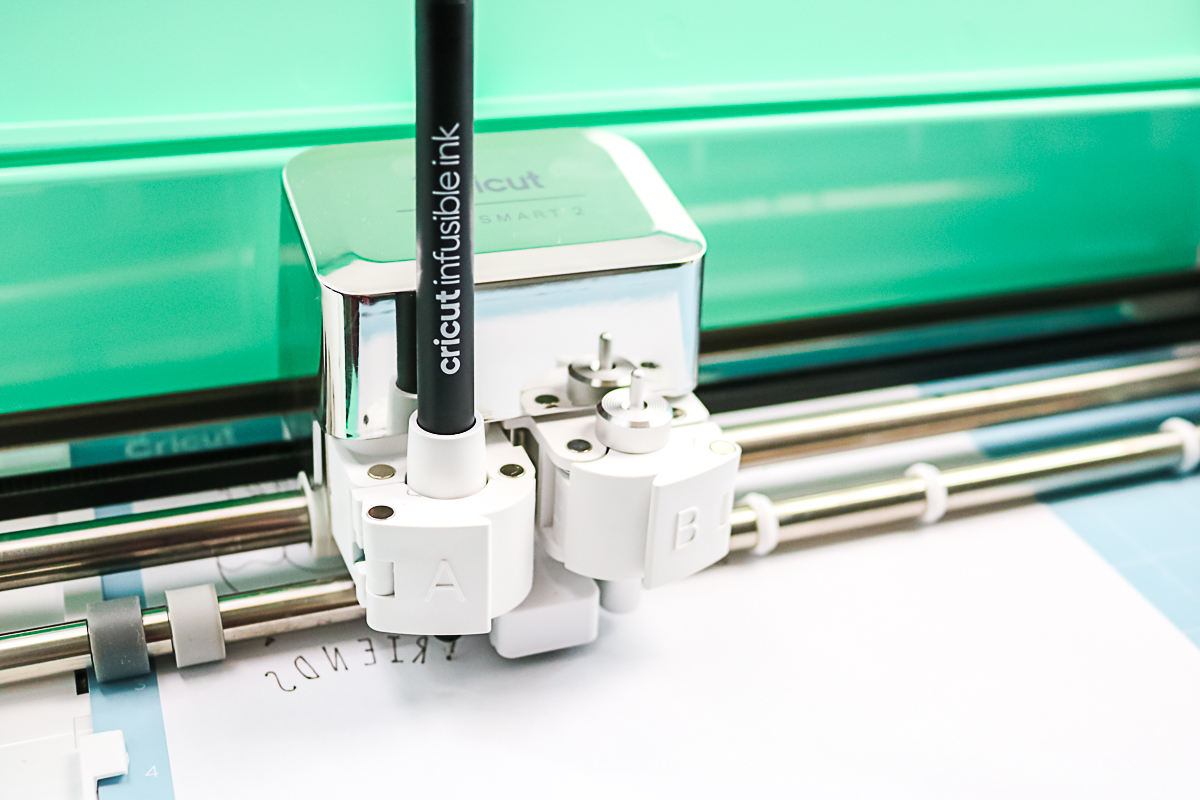
Mugs With Infusible Ink Pens And Markers
Infusible Ink sheets are not the only option for these mugs. You can also create designs using Infusible Ink pens.
Designing And Sizing
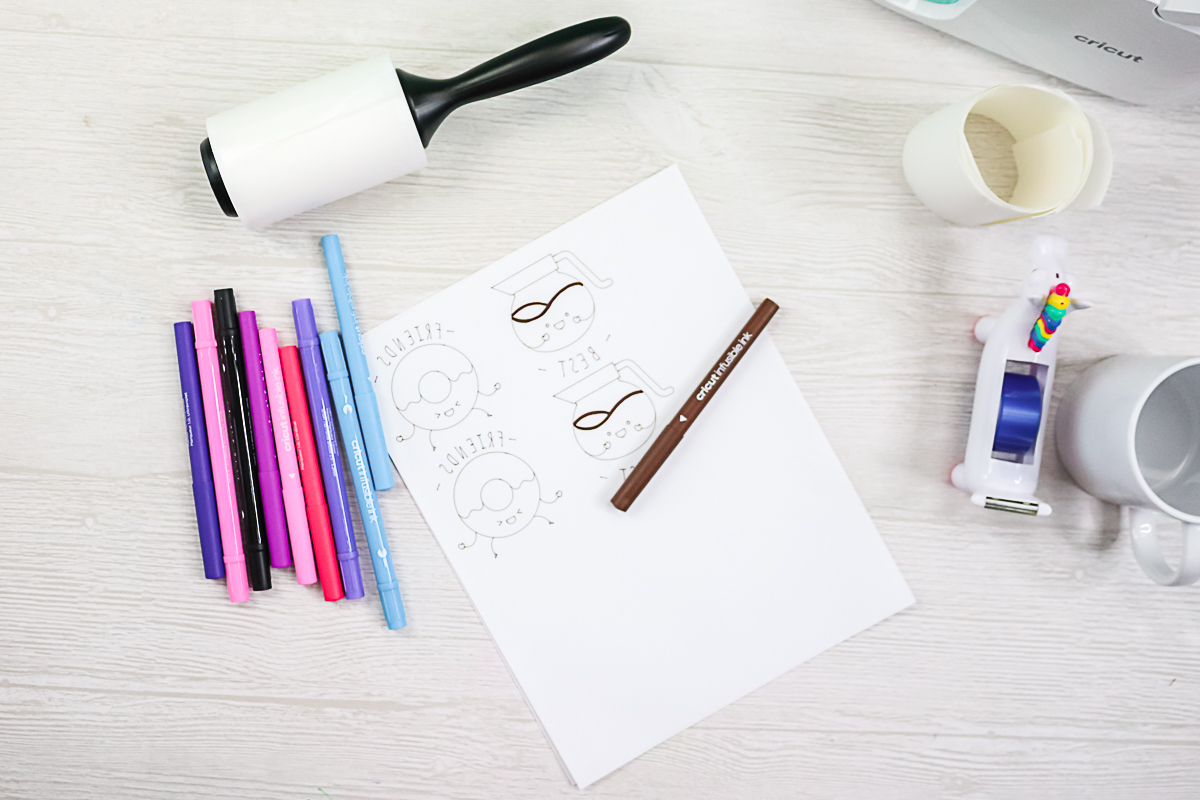
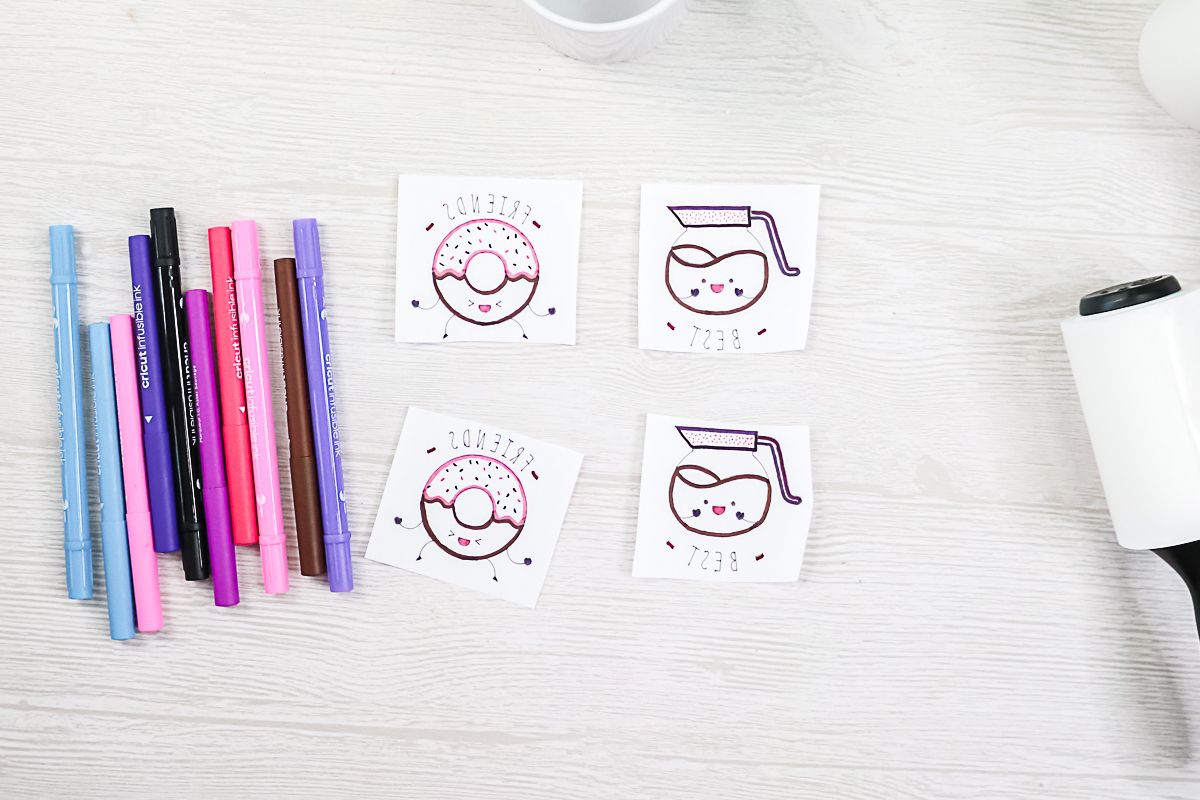
Again, you can use the template to locate your design and set the sizing. If you are not making a full wrap design with pens, you may want to remove the template before drawing. Then just draw the design on copy paper using your Cricut. Remember to MIRROR!
You can use several colors in the design just by changing the line colors right in Cricut Design Space. Or you can use more pens and markers to hand-color the design. However, you prefer!
Pressing A Mug With Pens And Markers
Making Infusible Ink mugs with pens and markers takes a few more steps, but it is totally worth it!
Step 1: Cut Out Design
First, cut the copy paper close to your designs to avoid any spots where ink may have accidentally gotten on your paper.
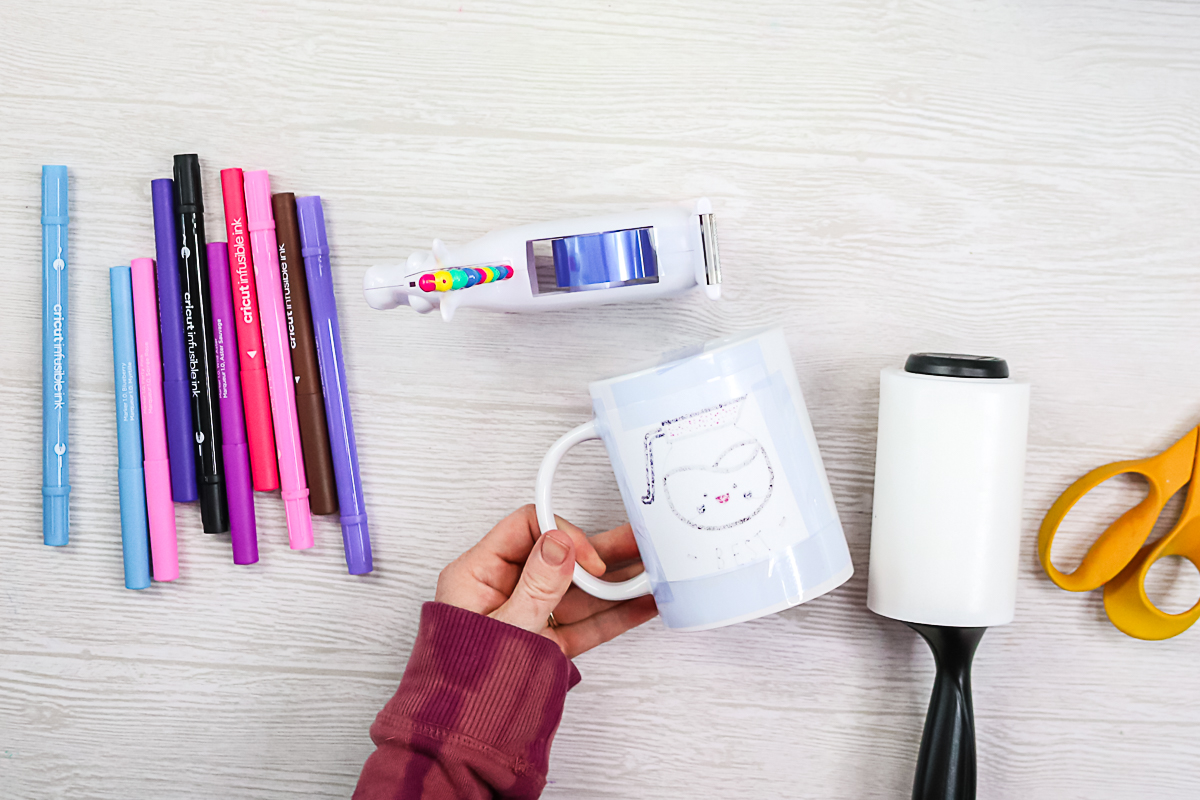
Step 2: Tape Down Design
Then lint-roll your mug to clean it, and add your design, ink side down, to the side. You can find the center of your mug in the same manner as we discussed above. Tape your design well on the side. Be sure it is tight against your mug! Repeat for both sides if you are adding a design to the back.
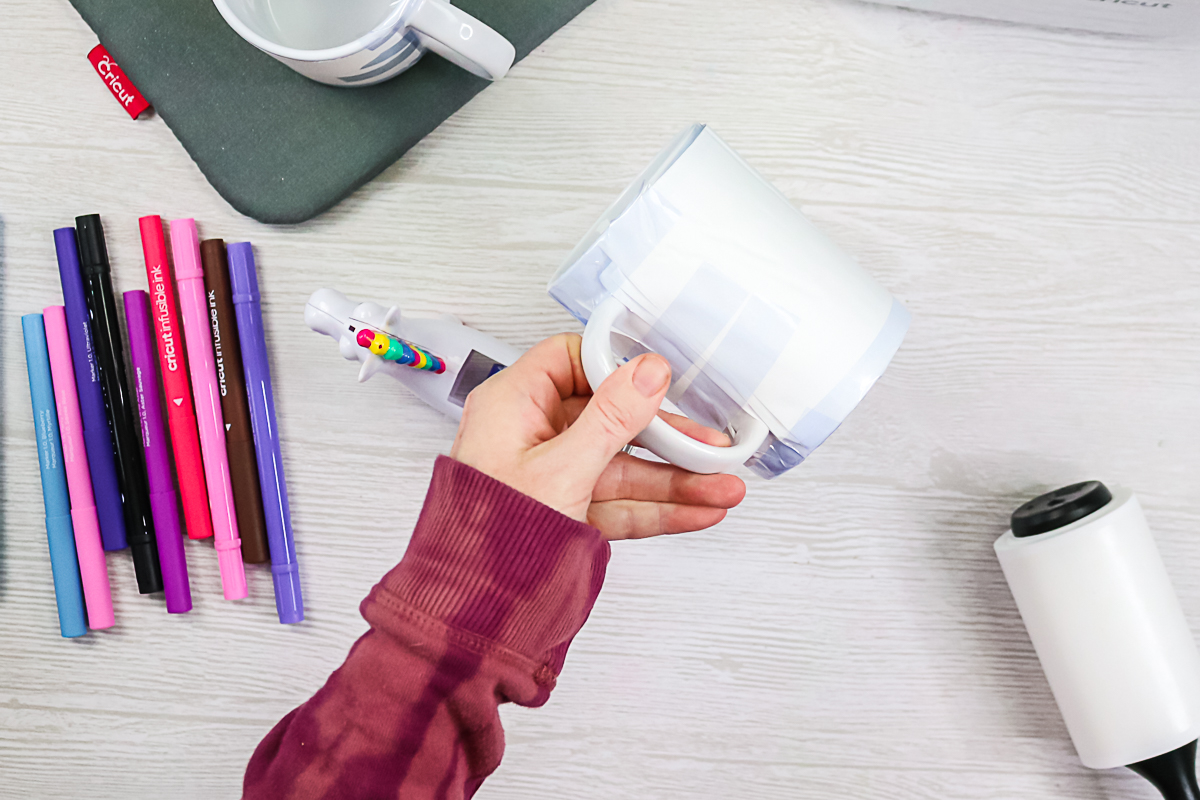
Step 3: Add Four Layers Of Butcher Paper
Then add FOUR layers of butcher paper to your mug. Trimming your butcher paper to the approximate size of the mug works best. Then tape the butcher paper down really well. You will want to tape it all the way around the bottom to ensure it doesn't get caught when trying to put it in your press.
Step 4: Press Mug Design
Then press your mug with the Cricut Mug Press.
Step 5: Remove Butcher Paper & Copy Paper From Mug
Once cool, peel back the butcher paper and your copy paper to reveal the gorgeous design. The butcher paper is not reusable and must be thrown away because it will have ink on it.

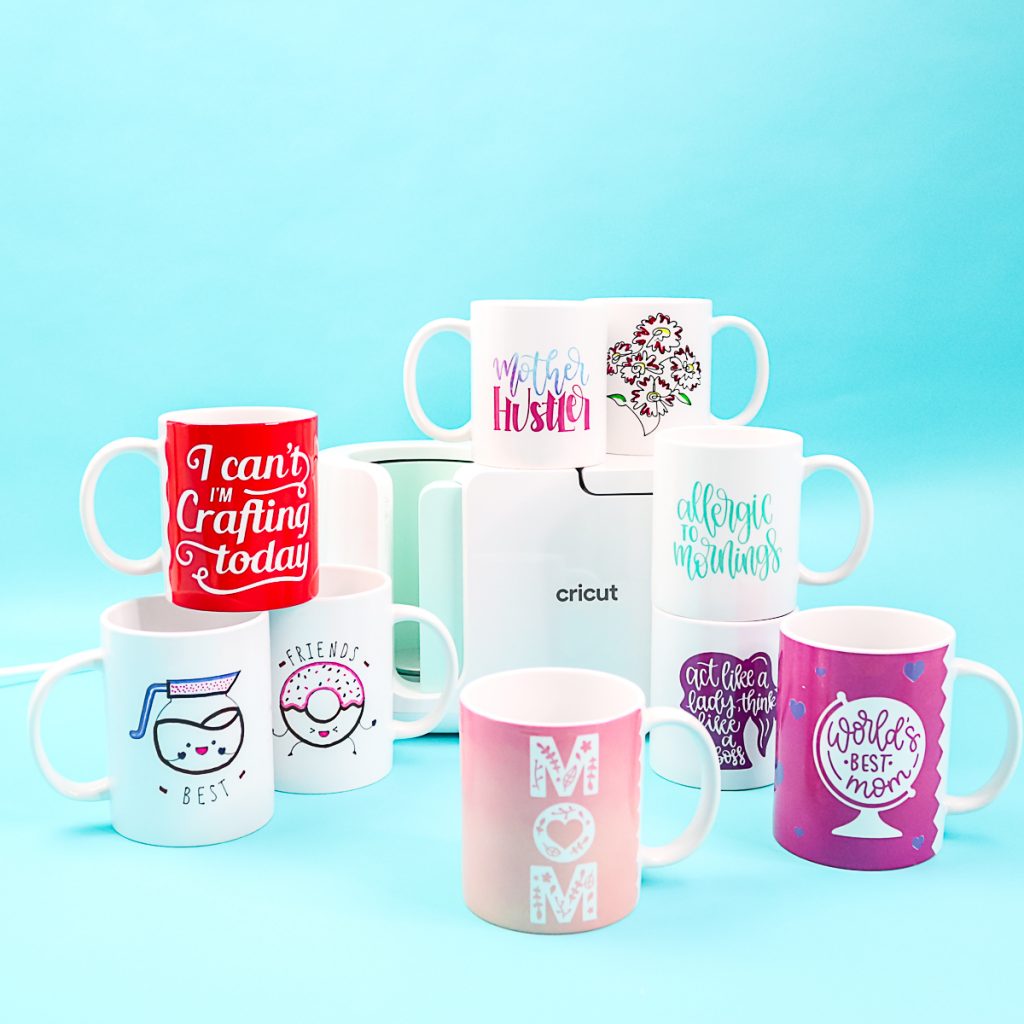
There are so many ways to make Infusible Ink mugs! I love this idea for giving as gifts and so much more. I literally already have ideas for every holiday!
So if you need me, I will be cleaning out my cabinets to make room for my new mugs and wrapping up others for friends and family.

The Cricut Mug Press has me hooked on making ALL the Infusible Ink mugs! Stay tuned for more posts about this incredible little machine!
FAQs About Infusible Ink Mugs
Here are answers to some of the most frequently asked questions I receive about Infusible Ink mugs. If your question isn’t listed, feel free to drop it in the comments, and I’ll be happy to help!
What Mugs Can I Use?
We talked about the Cricut mugs above, but I also gave you mug sizes that will work in the Cricut Mug Press. As long as the mug is a sublimation blank and within those sizes, it will work in this press.
Can You Use Alcohol To Clean, Or Must You Use Only The Lint Roller?
You can use alcohol. Allow it to dry completely.
What Designs Can I Use?
Any! Use designs in Cricut Design Space or your own designs. I do think the template directions above will really help you create mugs that you love.
What Is The Size Of The Design Area?
The small mug is 8.75″ x 3.79″ (22.2 cm x 9.6 cm), and the big mug is 8.75″ x 4.25″ (22.2 cm x 10.8 cm). That is for the Cricut mug brand. I cannot tell you the size of the sublimation mug that you purchase.
What Machine Will Cut Infusible Ink?
You can use any Cricut machine to cut Infusible Ink Transfer Sheets or to draw with Infusible Ink pens.
I Am Having Trouble Weeding Infusible Ink, What Can I Do?
My top tip is to be sure your blade is in good condition and that you get your ink down on the mat well. Then be sure to bend and crack your design as you weed. Practice makes perfect in this situation, and the more you do it, the better you will get at it.
Will Dollar Store Parchment Paper Work? Or Oven-Safe Reynolds Parchment Paper? Or Do I Need Something That Says Butcher Paper?
I would do butcher paper or just copy paper in a pinch. Parchment paper doesn't release as well.
Are These Designs Dishwasher Safe? Microwave Safe? Food Safe?
Yes, yes, and yes. All of the above!
Do I Need To Seal These Mugs?
You do NOT need a sealer for mugs made this way. They are permanent right out of the press, without any additional processing.
Where Can I Find The Designs You Used In This Post?
Here are the design numbers for the images I used in Cricut Design Space:
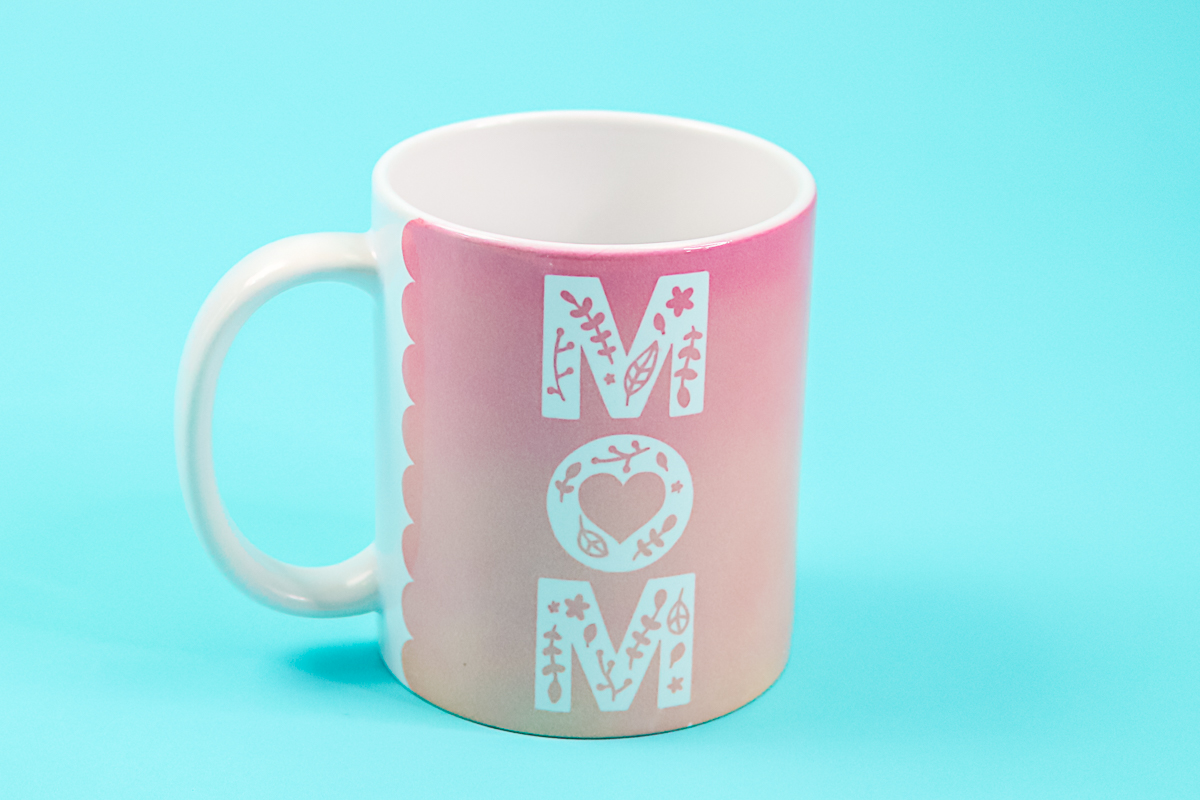
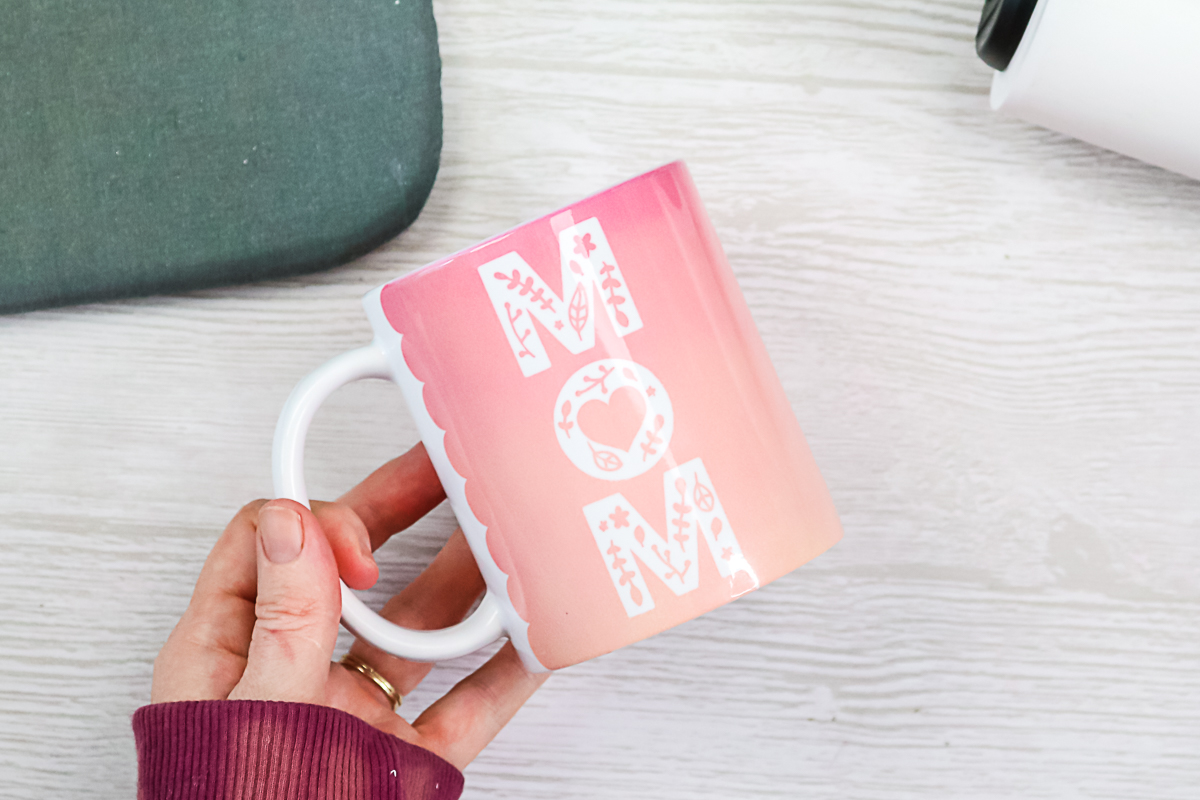
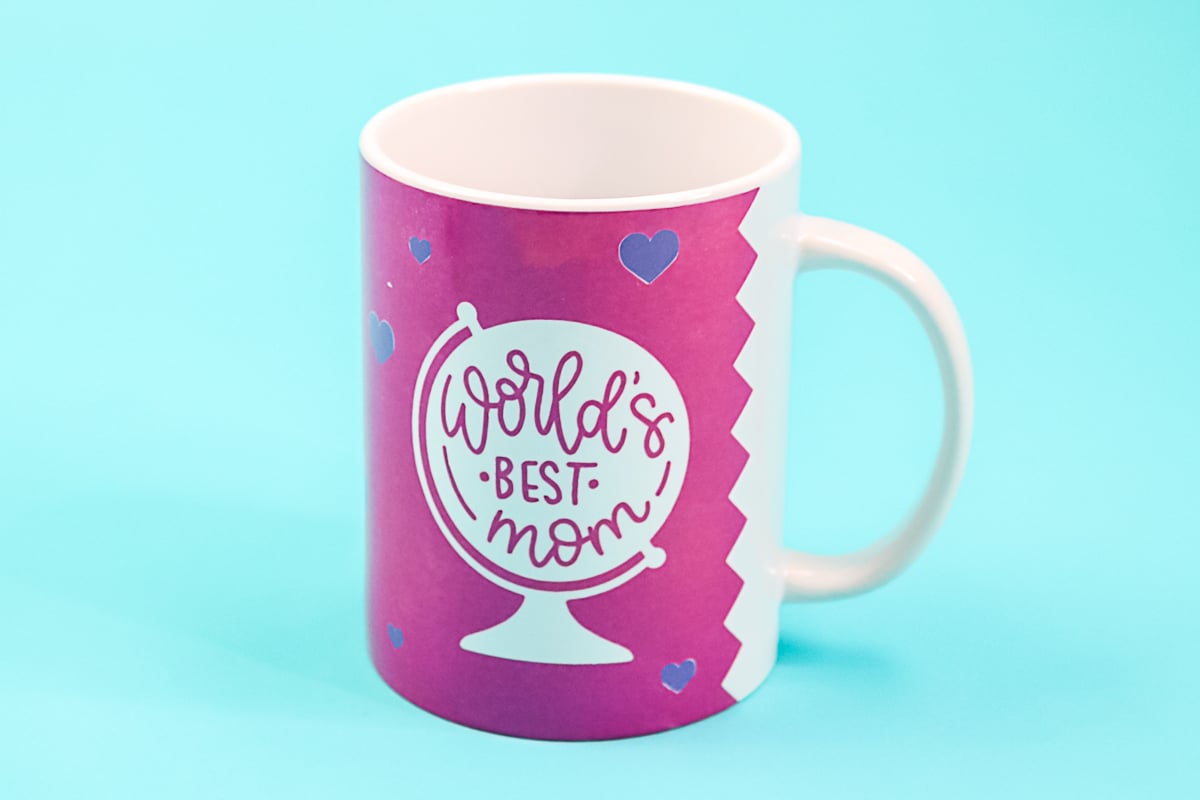
- MOM mug – DS #MA56025F
- World's Best Mom – DS #MA560574
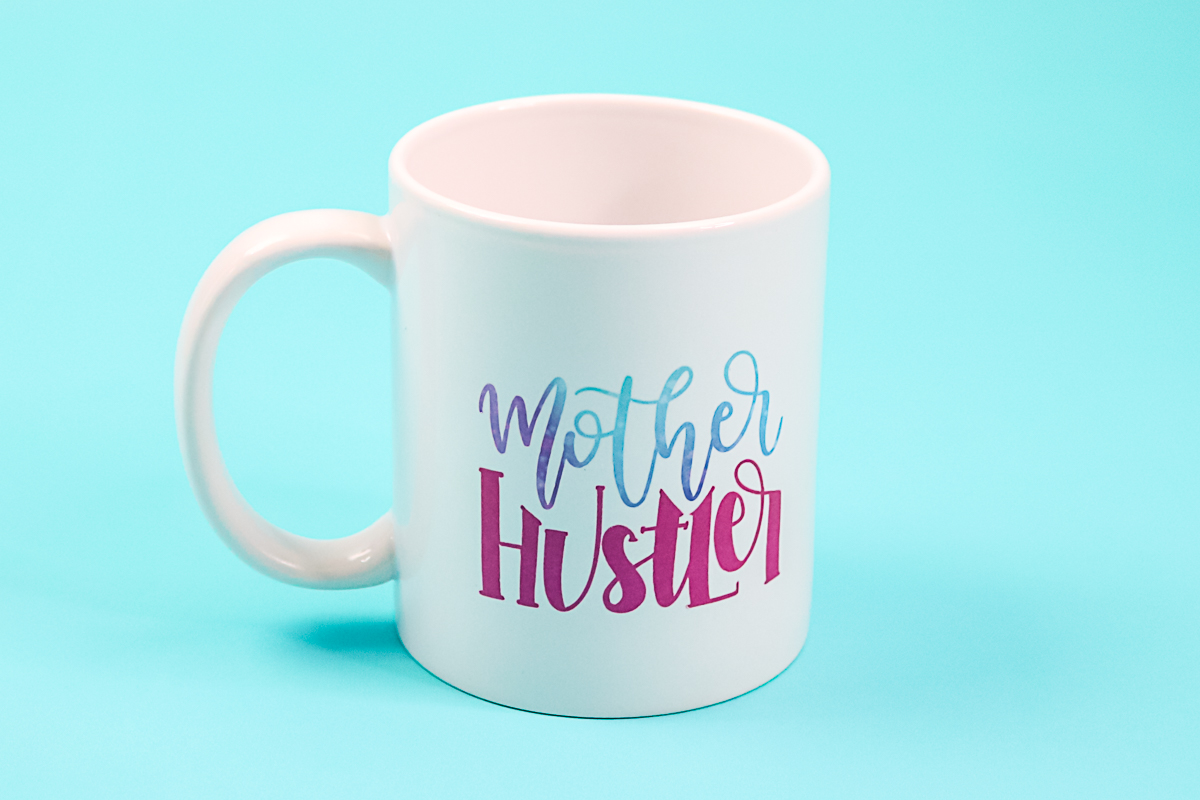
- Mother Hustler – DS #MBE212A1
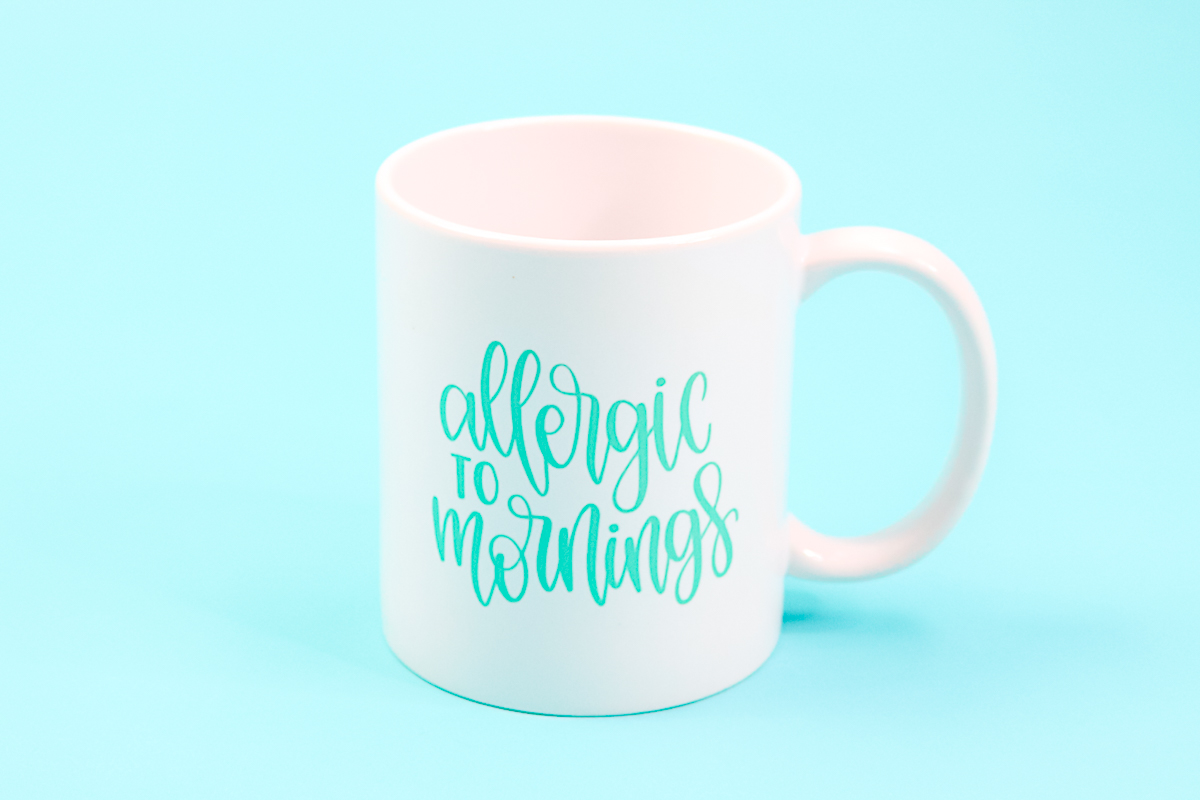
- Allergic to Mornings – DS #MAE077AF
- I Can't. I'm Crafting – DS #M124060D7
- Think like a Boss – DS #MA9D97D9
- Coffee and Doughnuts – DS #M174BDB0E
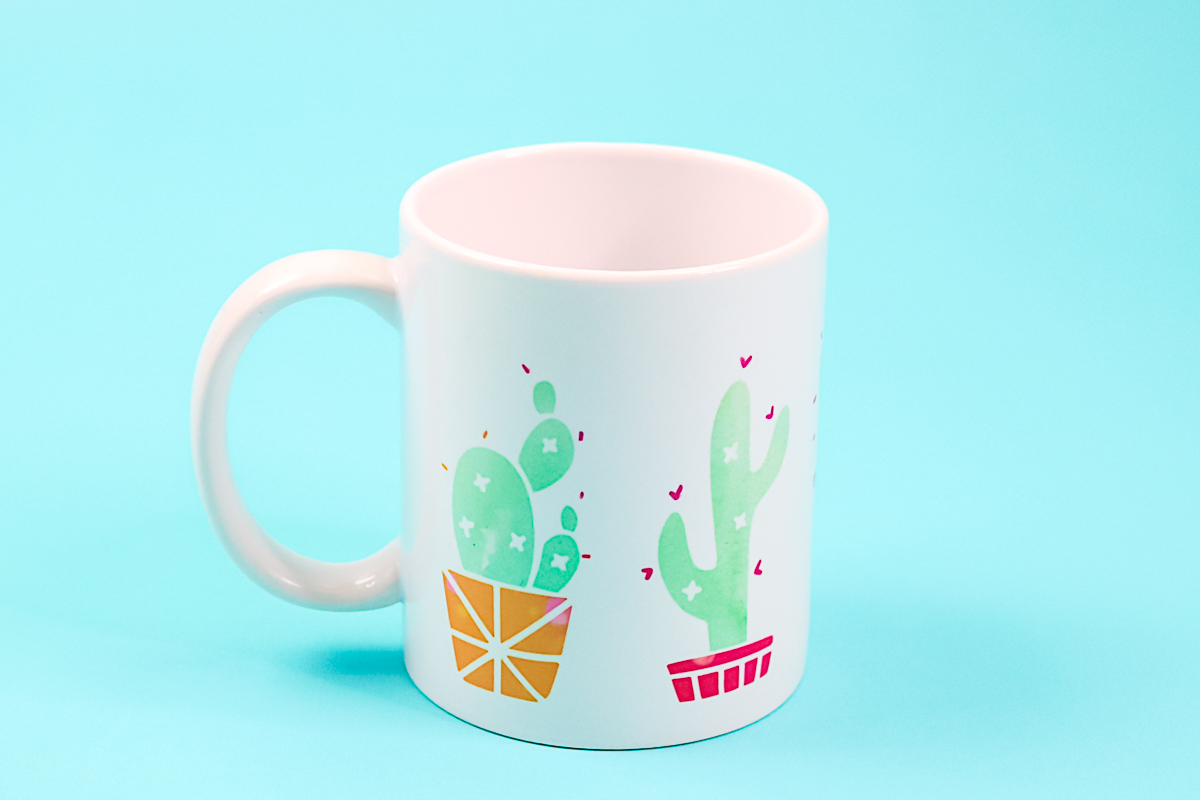
- Cactus – DS #M6DFDC08 and #M6DFDBF8
That includes my favorite cactus design that I made in my Instagram video here!
5 More Infusible Ink Crafts
Did you love these infusible ink mugs, and are now looking for more infusible ink crafts? Then check out the projects below!
- DIY Makeup Bag with Cricut Infusible Ink
- Cricut Infusible Ink Adorable Baby Onesie Instructions
- Constellation Craft: Cricut Infusible Ink Coasters
- Cricut Infusible Ink Tote Bag
- DIY Mouse Pad with Cricut Infusible Ink


Hi Angie,
I’m looking for your tea cup design. Is it available somewhere on your site?
TIA
Yes it is here: https://shrsl.com/2u290
I have seen people using just the regular infusible ink with the grid and cricut name on the backside of the ink sheet. They are saying the word cricut is showing up on their mug. Any way to stop this from happening, besides just buying the infusible ink made for the mugs
The new larger Infusible Ink sheets don’t have the grid either. But I would just trim the sheet close to your design and tape it down to use up any that you have on hand.
Can you use your own designs for Mugs? Can you Print on Butcher Paper to use on Mugs? Thanks
Yes you can use your own designs. To print and get it on the mug, you will need sublimation printer.
Hi Angie!
I found a mug design for a large mug in Cricut Access images, but when I try to print and cut it for sublimation it says that it’s too big to print. Have you run into this? Is there a way around it or to get it to print?
Oh did you leave the outer piece on it? There is a piece on the outside that is for cutting a template but you don’t need it for sublimation. Delete that portion.
I did delete that, but then the box around the design still acted like it was there so it was still accounting for that space.
Try flattening it again and see if that gets it.
It didn’t give me that option either. I tried to size it to the dimensions that you listed above, but with the box still so big around the image it shrinks the image so much that it wouldn’t fit the mug. When I put in 8.75″ for the width the actual image is only 7″, the rest is dead space. In order to get the image to be 8.75″ the dead space makes it too big to print.
Did you upload the SVG file? You can’t upload the PNG and JPG file and get the same results most likely. The SVG file might look like an HTML file on your computer but picking that will give the best results.
It is a cricut access mug design. It comes up as a cut file, does that mean it won’t work as a print and cut? I wanted to print it out from my sublimation printer and color it in with infusible ink.
You can flatten it to print it.
can you 2-3 colors of infusible ink on your cup if this can be done How would I do it
I use two colors on some of these and have instructions for doing that. Just follow the same procedure for more colors.
I always learn so much from your videos. I’m new to following blog posts but I’m sure that this will now be my “go-to” place for ideas and knowledge! Thank you so much!
Hi Angie, I just watch your how to video on sublimation mugs and I am looking for your mug wraps that you used in the video can you point me in the right direction.
Try this post: https://www.thecountrychiccottage.net/diy-photo-mugs/
Hi
i was looking at the infusible mugs and would like to know where to find the svg with “Worlds Best Mom”?
Click the link for the design space file and all of these mug designs are on it.
Thank you
Angie, In one of your videos, you mention that the templates for the scalloped edge, jagged edge and straight edge templates can be found in Design Space. I have looked and looked and I can’t find them. Do I need to upload them?
Thanks!
Donna
They are still there. I have a tik tok video on how to find them if you need it.
Hey! Love the article – super in-depth and helpful! We’re looking to start doing more transfers/cricut type of designs for our shop (currently sell bowbands and limited apparel), and I had a question on the mugs:
Do you know of any other places to get the mugs that are for the cricut press here? And do they come in other colors (and have you used other colored mugs before, or just the white ones?)
Thanks so much!
You can try my list of blanks here: https://www.thecountrychiccottage.net/sublimation-blanks/
Hi Angie,
Thank you for all your videos! You have saved me lots of money. Just need clarification on the paper you use when using the infusable markers to make your own designs. Regular, butcher paper or sublimation paper?
Just regular copy paper. I just make sure on the back it says okay for a laser printer so it is okay with the heat.
Thank you!
If I want to use both pens and transfer paper, is there a certain process? Thanks
I have seen people do it before but I have not combined the two.
Newbie for the infusible ink pens here. 🙂 Is there a rule of thumb on the size of the pens? I noticed the pens came in fine point or marker and .4 and .1 Which size works best for wording under a design on a mug and which one works best for a word design? Thanks and love your site!
It depends on a ton of factors. I would say if your wording is small, the smaller pen would work best. Larger letters could handle the thicker pen.
I am new to cricut mug press and infusible ink transfer sheets. I was wondering if before I cut my design on the sheets if I can cut the sheet down to the joy size sheets?
If you have a Joy you can. Otherwise, you don’t have to.