

Are you in the market for a Cricut machine and trying to decide between the Cricut Maker and Cricut Explore? Choosing the right machine can feel overwhelming, especially when each option offers different exciting features. In this post, I’m breaking down everything you need to know to compare the Cricut Maker vs. Cricut Explore so you can choose the best machine based on your crafting style.
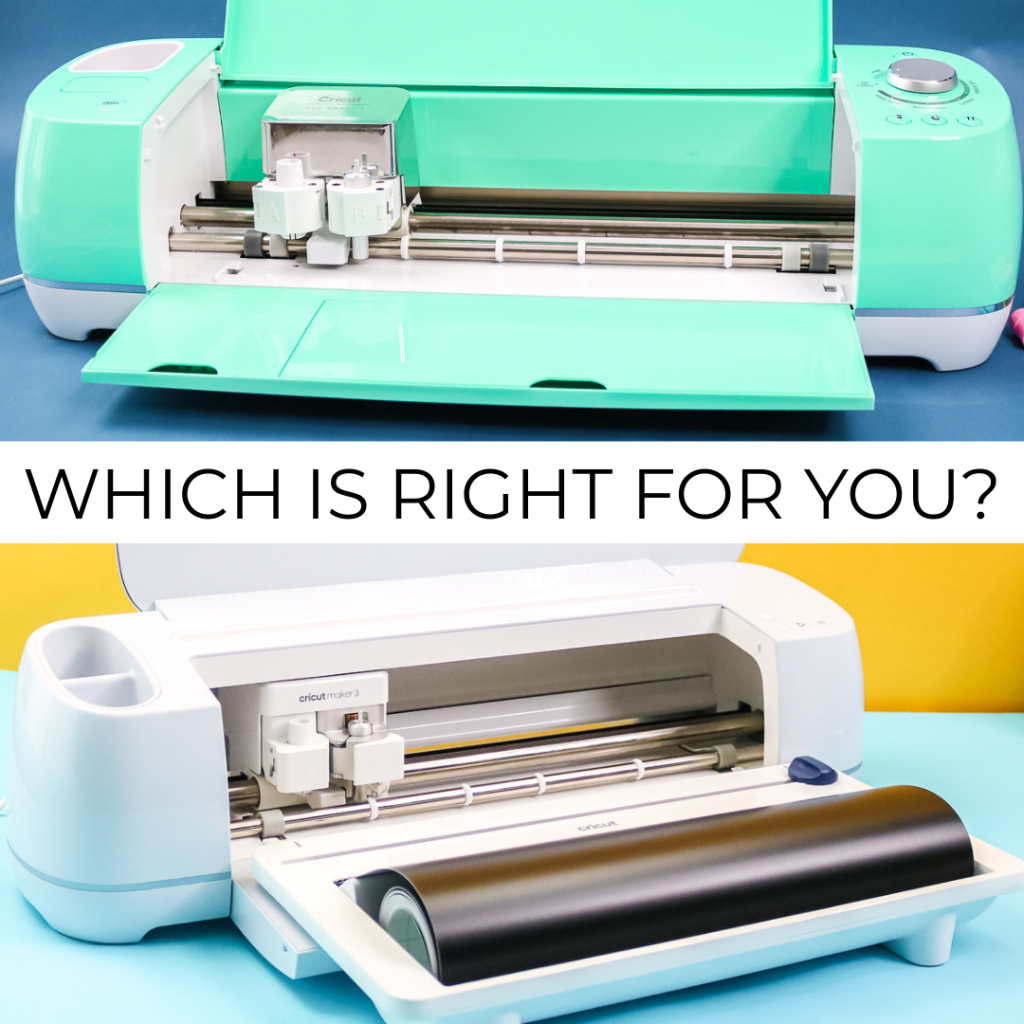
Once you decide which machine fits your crafting style, you can order the Cricut machine of your choice or put it on your wishlist for the holidays. Let's take a look at what each machine can do to elevate your crafting projects.
Note: This post only compares the Cricut Maker and Cricut Explore machines, but you can find my full review of all Cricut machines here.
Cricut Machine Breakdown
First, what are the details of these Cricut machines? Here is a brief breakdown to get you familiar with each one.
- Cricut Explore: Includes the Cricut Explore Air 2, Cricut Explore 3, and Cricut Explore 4. The Explore series cuts a hundred different materials – everything from the most popular craft materials like cardstock, vinyl, and iron-on to specialty materials like glittery paper, polished foils, and bonded fabric. Versatile Fine-Point blades enable Cricut machines to cut light-to-medium-weight materials quickly and accurately, down to details smaller than a nail decal. And with Cut Smart™ technology, you’ll get the same results cut after cut. Compatible with Fine Point Blade, Deep Point Blade, Scoring Stylus, and Cricut pens.
- Cricut Maker: Includes the original Cricut Maker, Cricut Maker 3, and Cricut Maker 4. The Maker series does everything the Cricut Explore does and so much more! It quickly and accurately cuts hundreds of materials, from the most delicate paper and fabric to the tough stuff like matboard, leather, and balsa wood. Basically, it places more creative possibilities than ever at your fingertips. Want more tools? You got 'em! It is compatible with the same tools as the Cricut Explore above, plus the Rotary Blade, Knife Blade, and the Quick Swap Tools, including the Scoring Wheels, Engraving Tip, Perforation Blade, Wavy Blade, and Debossing Tip.
Now, are you ready to learn more about both machines and see what they can do? We have all of that and more!
The Blades
The heart of any Cricut machine is the blade. I thought the simplest way to illustrate the differences between the machines was to show you the blades. Below, you will find all the available blades, and immediately, you will notice a dramatic difference in the tops.
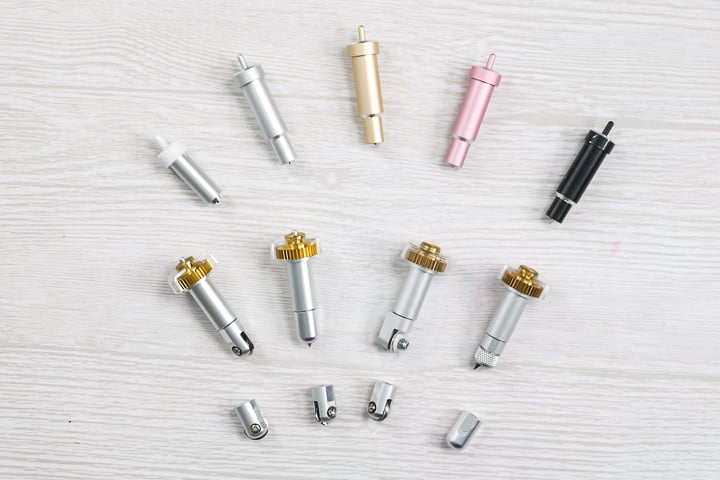
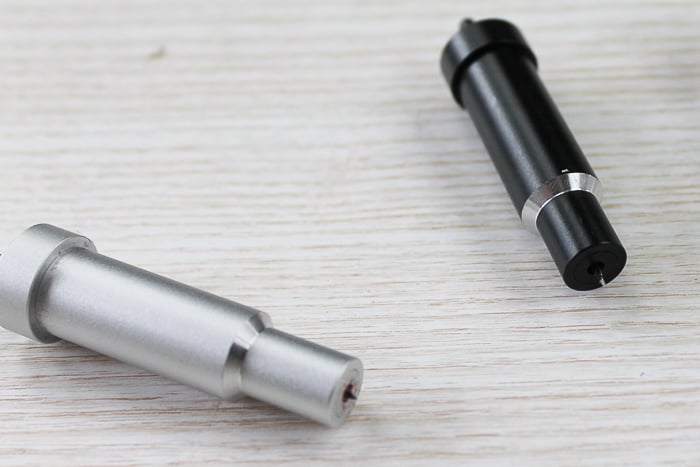
The blades on the top are the Fine Point and Deep Point Blades. The far left top is the Cricut Joy Fine Point Blade, followed by three variations of the Fine Point Blades. The black housing is for the Deep Point Blade. Other than the Joy Blade, these work with either the Explore or the Maker models. The Fine Point Blade actually comes with both machines. You can see that the Deep Point lets you go a little deeper, but not by much. We will actually use this one on a few projects listed below.
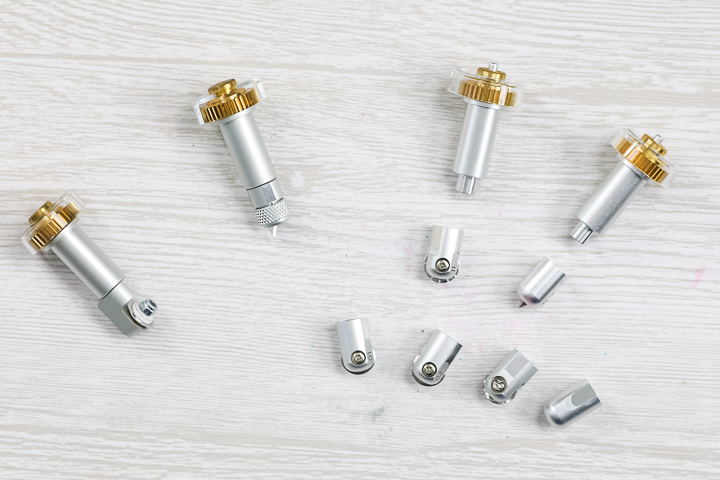
The rest of the tools are way different. They are for the Maker only and work with the Adaptive Tool System. This system is compatible only with the Cricut Maker and helps control the blade direction and cut pressure. It's easy to tell by the gear on top. The Rotary Blade comes with the Maker, while the others need to be purchased separately. So what do they do? I am glad you asked!
- The Rotary Blade is similar to a larger rotary blade you would use to hand-cut fabric. Now you can use it with the Cricut Maker to cut fabric like never before. You don't have to add anything to the back; just place the fabric right on the fabric mat and start cutting. You can cut cotton, fleece, denim, and more, from the very delicate to the very thick and robust. It is truly my favorite blade of all time. You can see a few of my trials cutting with the rotary blade by clicking here.
- The Knife Blade is next, and you can think of this as a craft knife for your Cricut. Combined with the 10X more cutting power that the Maker provides, it really is a powerhouse. The extra-deep Knife Blade cuts through dense materials up to 2.4 mm (3/32”) thick with unprecedented ease and safety. It’s ideal for thicker materials, such as balsa wood, matboard, and heavy leather. It may very well tie with the rotary for my favorite. Okay, I will admit it would be a close race! Would you like to see a few test cuts with the knife blade? Click here for my experiments with this one.
- The Adaptive Tool System is the latest addition to the Maker family. With one housing option, you have access to numerous possibilities. I dive deep into all the Adaptive Tool tips in this post here. Scoring Wheels are great for sharp score lines for all your paper crafting projects. Wavy Blade gives you wavy cuts. The Perforation Blade is perfect for tearaway projects. The Debossing tool works on a variety of materials, including chipboard, cardstock, and some types of leather. The Engraving Tool is perfect for engraving aluminum, leather, and more.
Cricut Machine Video Comparison
Now that you have a good background of both machines. I want to share even more details about some of the differences in the video below.
Want to see how to make each of the projects mentioned in the video and get some more details? Just keep reading!
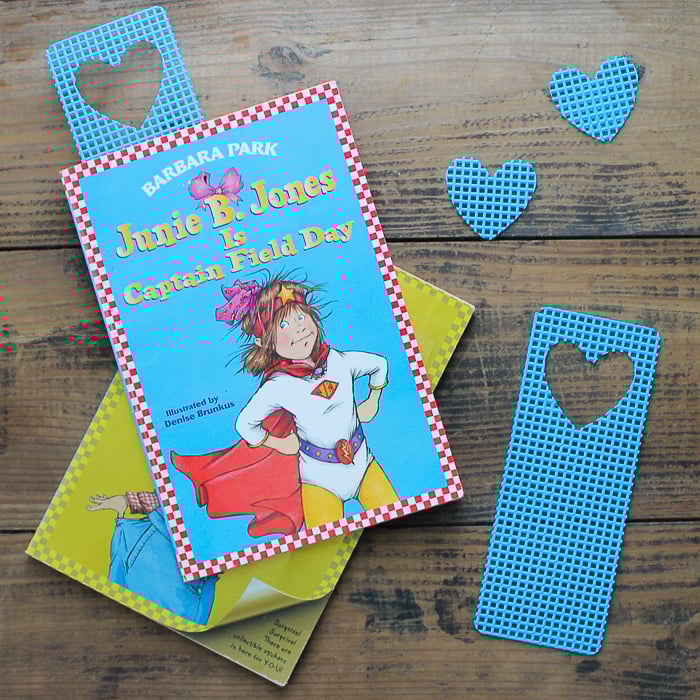
Cutting Plastic Canvas with Your Cricut
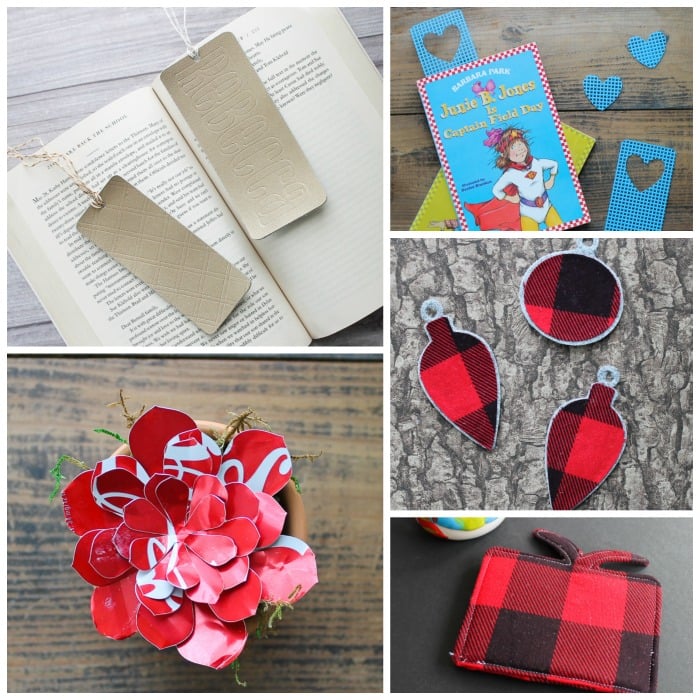
I actually take requests from time to time for materials that I should try to cut on my Cricut machine. Plastic canvas was one of those materials. So why not? You can find the cut file for the bookmarks below here if you would like to cut them yourself.
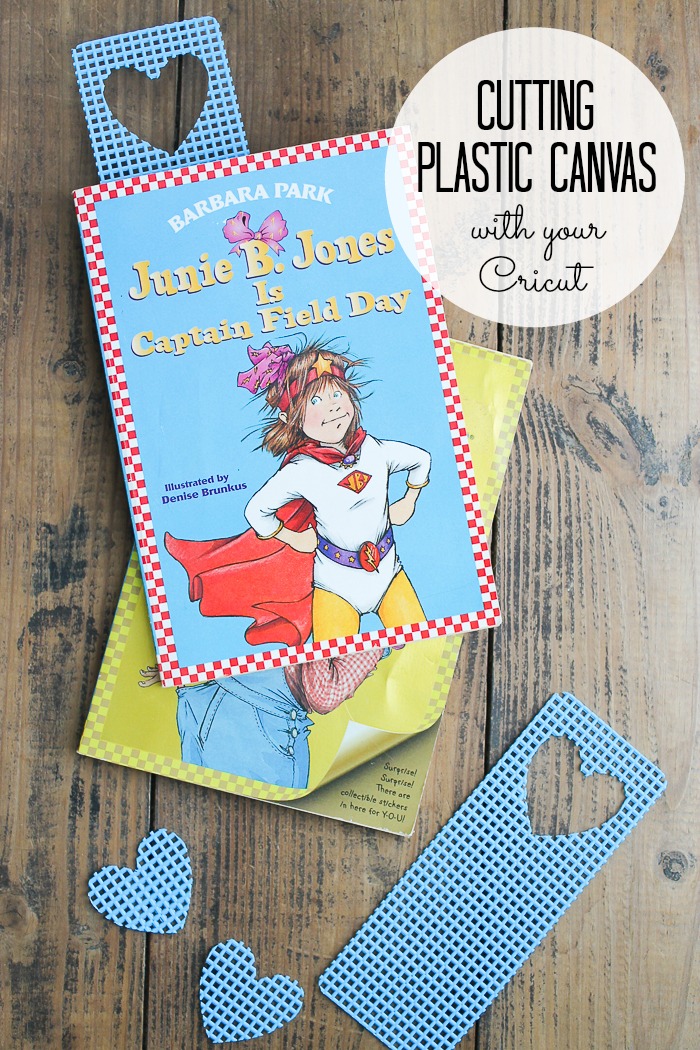
You can cut plastic canvas with the Deep Point Blade, and it cuts super easily. I did have to choose more pressure in Cricut Design Space to get a good cut, however. I would also recommend avoiding overly intricate designs. It cuts fine either way, but intricate designs tend to get lost in the open weave of the material.
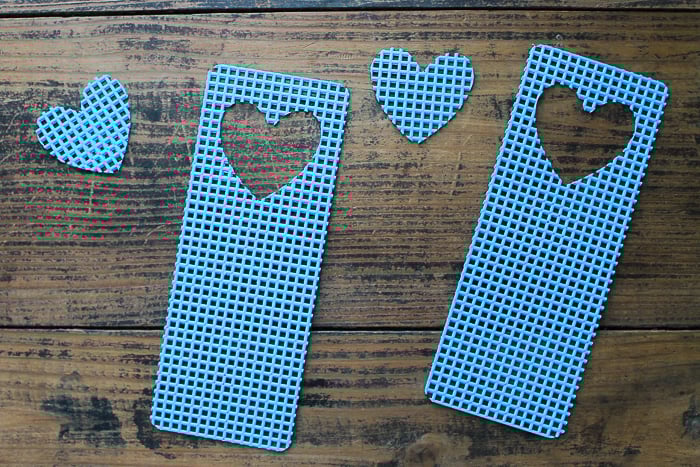
Since this one cuts with the Deep Point Blade, you can cut it with either the Cricut Maker or the Cricut Explore. Simply select “plastic canvas” when choosing your material, and I also recommend using a strong grip mat to keep the material in place. If you are having trouble with the material moving, use masking tape on all four sides.
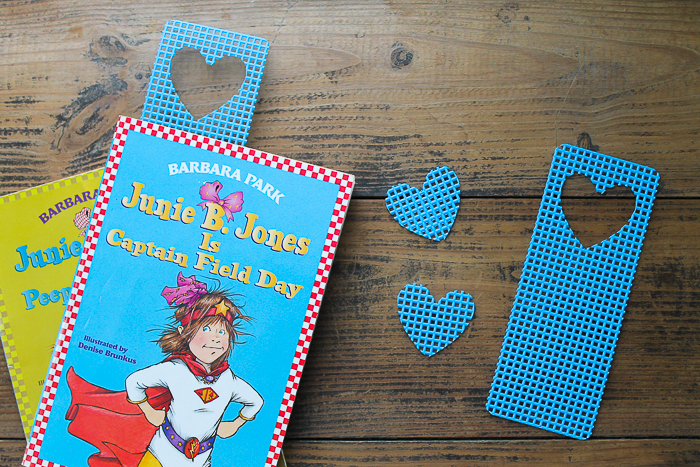
This is one fun material to cut with your Cricut Maker or Cricut Explore machine. Grab some plastic canvas and make a few projects!
Cutting Aluminum Cans with Your Cricut
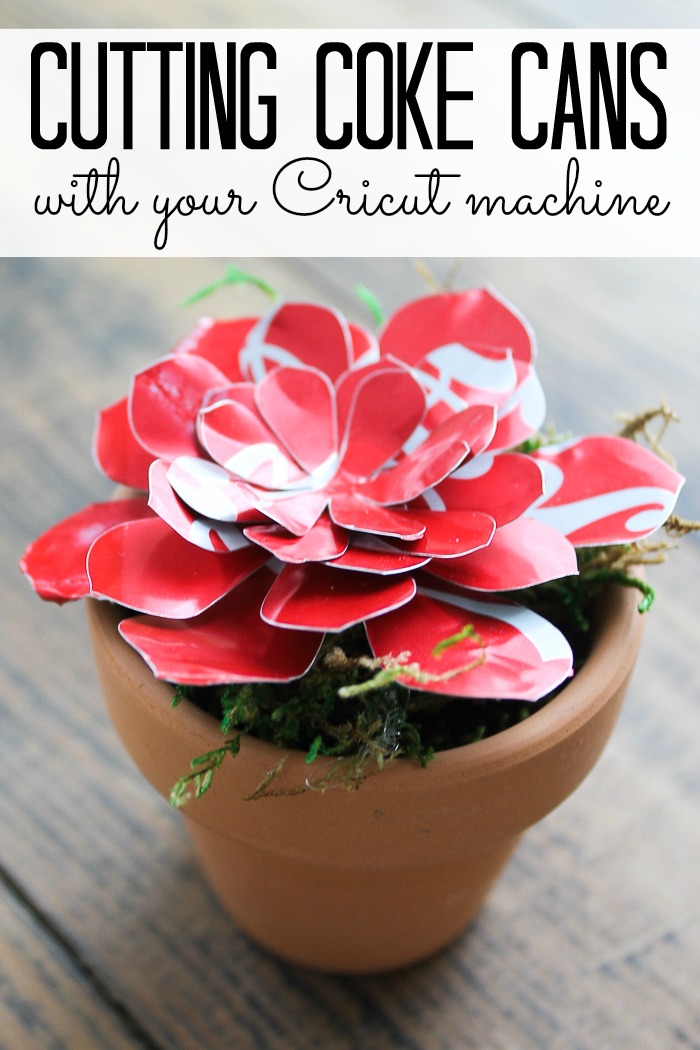
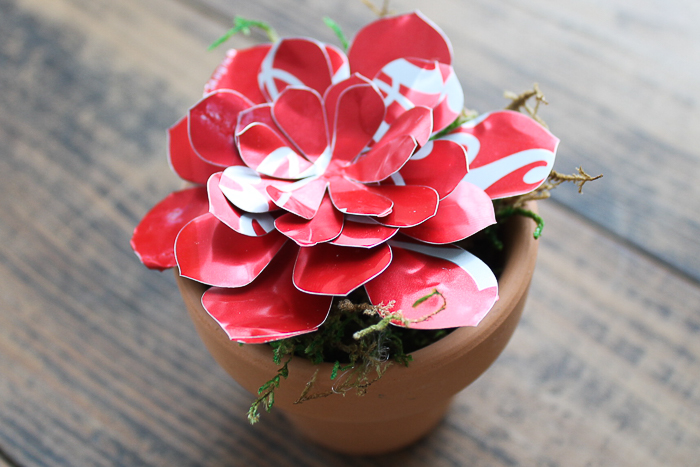
Can a Cricut machine cut metal? Oh yes, it can! I actually cut thin copper in this post and wanted to expand on that a bit. I wasn't even sure if this one would work, but I was excited to try. You will want to read on and follow all pointers below if you're going to try to cut Coke cans. You can also click here to get the cut file for the succulent I used.
First, cut the top and bottom off of your cans and cut a slit all the way down them with metal shears. Flatten them as much as possible. Add them to a strong grip mat. You can also tape down the edges with masking tape, especially if they are not lying down well. You will then need to use the Cricut SnapMat to position your cuts. This means you will need a smartphone or tablet with the Cricut Design Space app.
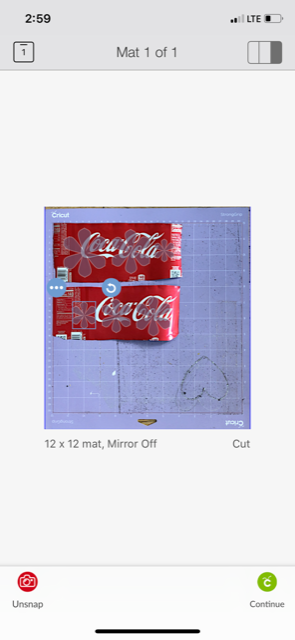
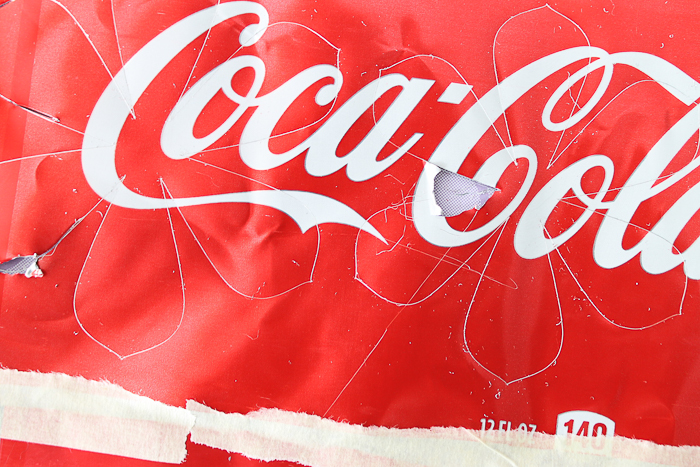
I actually used the 4-ply mat board setting, which requires the deep-point blade, but sometimes I had to run my material through once more to achieve a good cut. Now, I think the inconsistencies in the cans, as well as the fact that they will never be truly flat, really affect your cut. If you get some cuts that are not quite all the way through, you can actually just bend them slightly, and they will break right out. The video below shows me doing this if you need to see it.
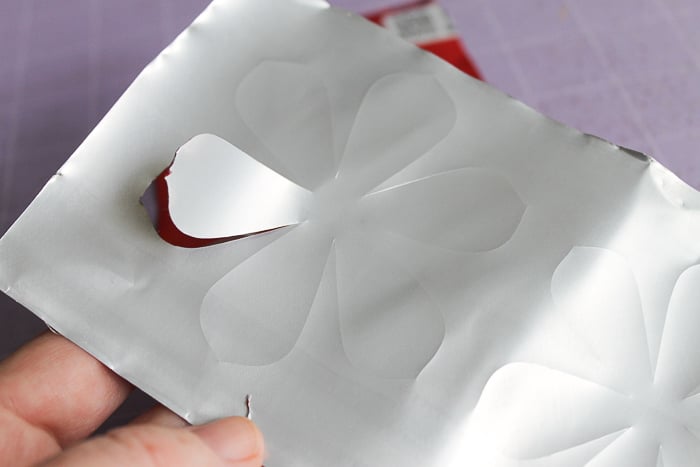
However, the inconsistencies also lead to issues with the cuts. You may have some ruined pieces. Do not expect to get perfect cuts every time with this material. You will also want to watch your Cricut machine carefully when cutting this, and stop it if it starts to mess up.
I got enough pieces for a pretty good-looking succulent, however. I think it is amazing that I can cut materials like this with my Cricut machine!

This one is also cut with the Deep Point blade, so you can use the Maker or Explore for it. Think way outside the box with your Cricut machine. There is so much you can do with them besides just cutting paper and vinyl!
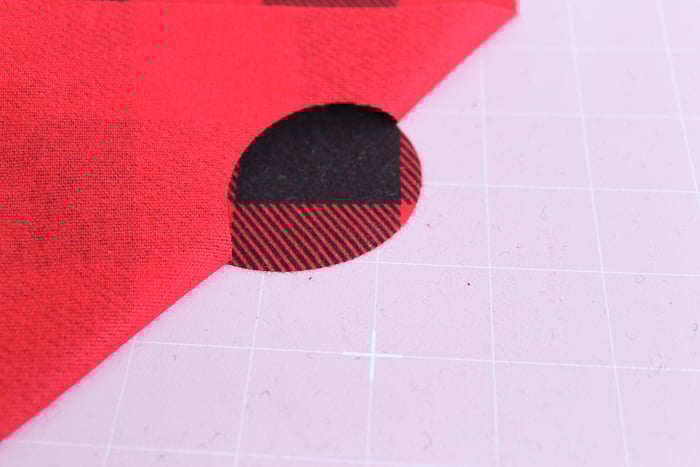
Cut Wool Felt and Flannel with Your Cricut Maker
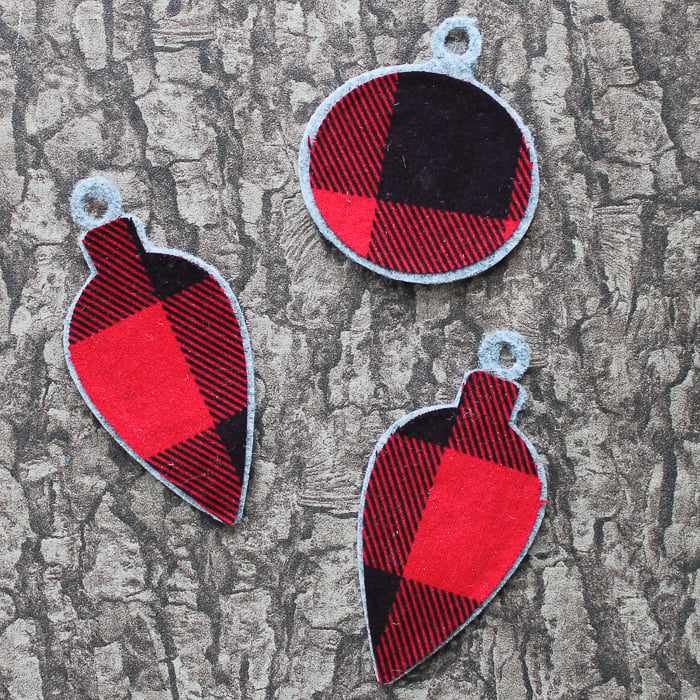
I wanted to show a couple of projects above that could be made with either the Cricut Explore or the Cricut Maker. Yes, the Cricut Explore can make cool things. But you can do so much more with the Cricut Maker! Now, we're going to explore some projects that you can only cut with your Maker machine. First up is cutting wool felt and flannel to make the cute ornaments below. You can find the cut file for these by clicking here.
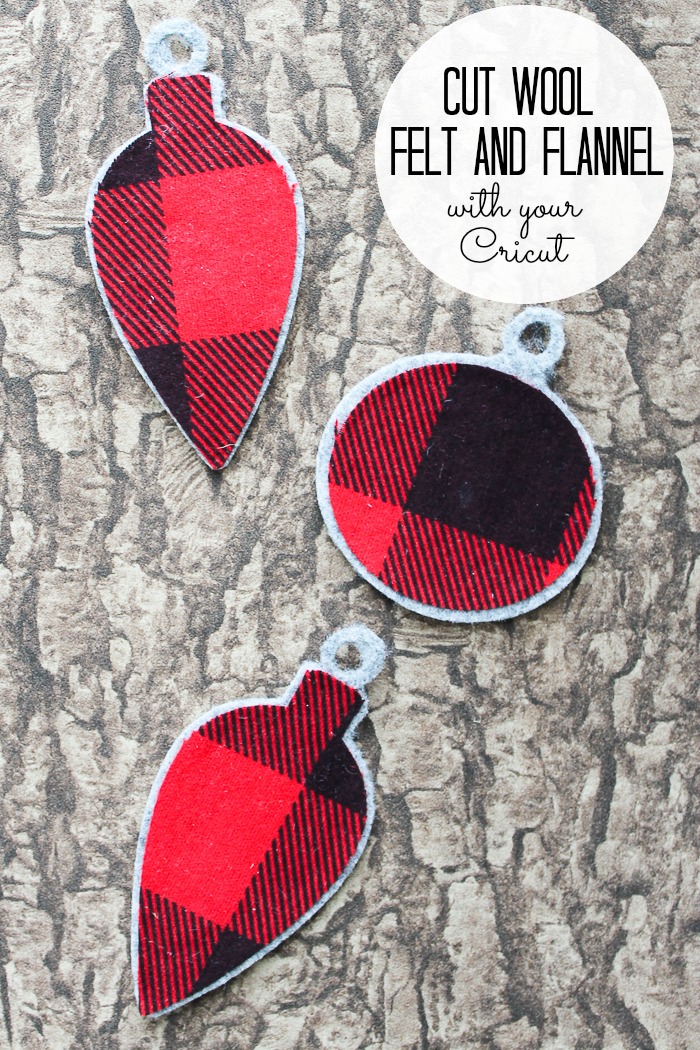
The Maker cuts felt like a dream! Simply place your felt directly on the mat and use your Rotary Blade for optimal results. I wanted to stretch the limits on this, however. I picked up some 3 mm thick wool felt. Now it is true that the Maker can cut materials up to 2.4 mm thick. But I have actually cut 3 mm craft foam before as well (you can see that here). Materials like these, which compress when going into the Cricut machine, usually work great, even if they are a little thick.
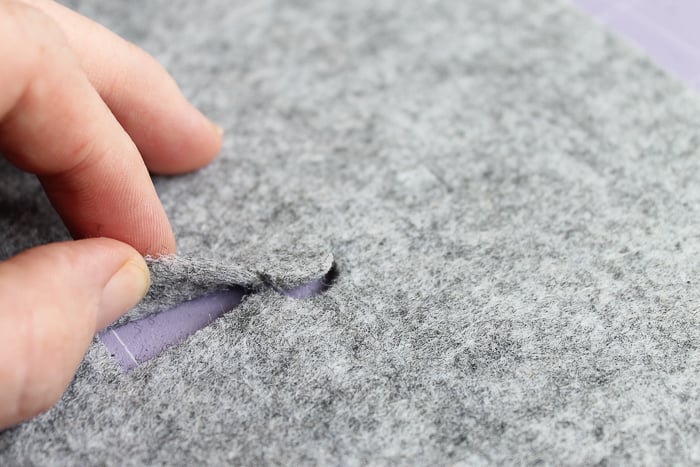
To cut this thick felt, I used a heavy fabric setting. Then, after each cut, I would check the cuts BEFORE unloading the mat from the machine. If it didn't cut through, just hit the green “C” on your machine to make another cut right over the top of the first one, if needed. I actually did 4 passes to get my wool felt to cut. It also struggled with extremely intricate cuts, so keep that in mind when designing.
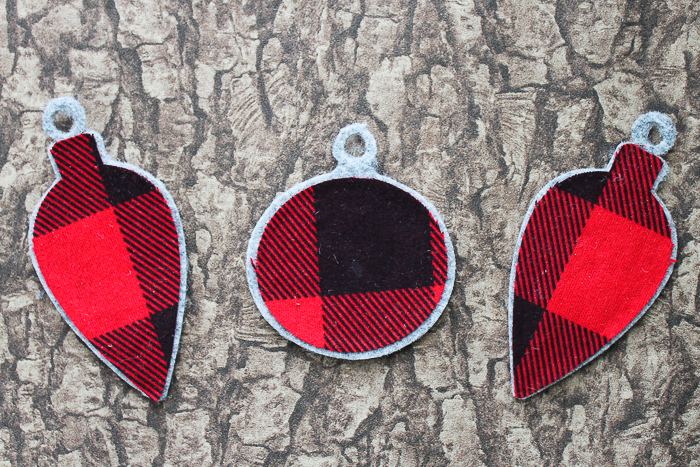
I wanted to add a layer of flannel to these ornaments as well. Cutting flannel is as easy as putting the fabric on your mat and cutting away on the flannel setting. Remember that the Cricut Maker requires no backer on fabric when cutting, so it is great for projects like this one.
I then used glue to put the two pieces together and had a few cute ornaments in no time at all….thanks to the Cricut Maker.
Cut Thermal Barrier Fabric and Batting with Your Cricut Maker
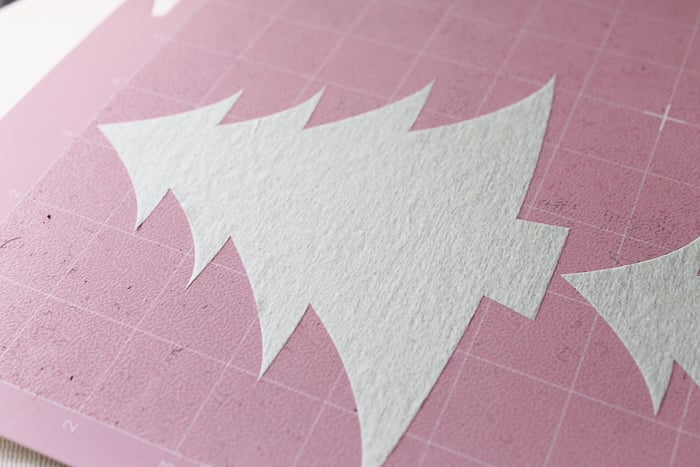
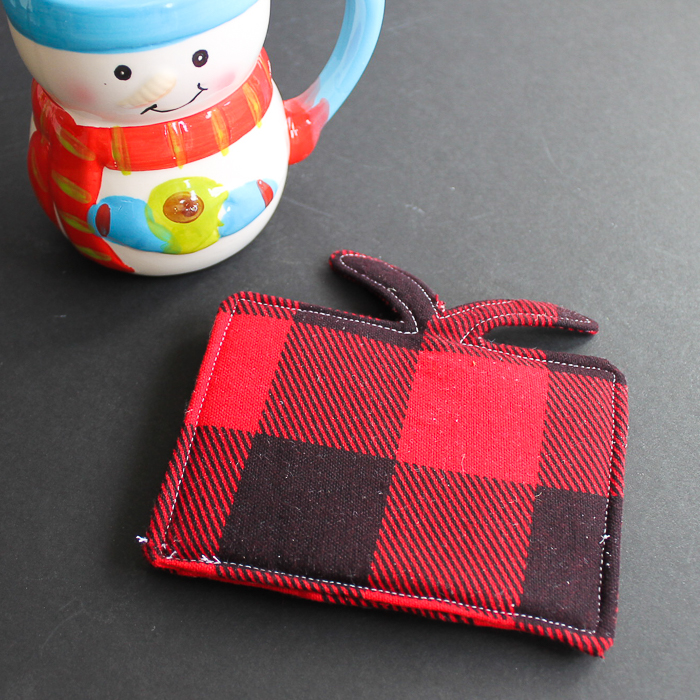
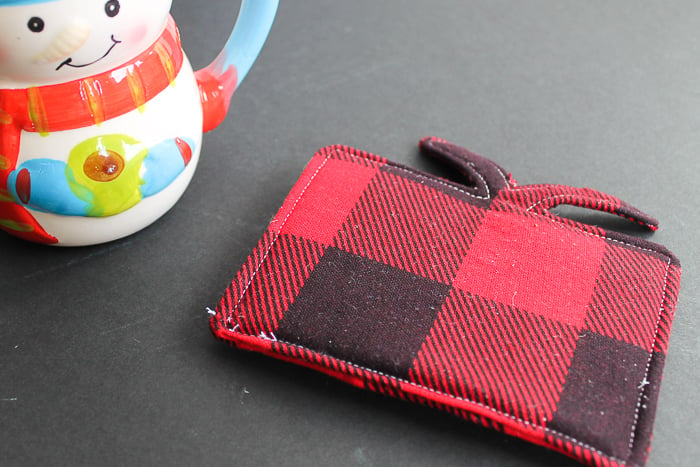
I wanted one project that would really showcase the wide variety of fabrics the Maker can tackle, and the pot holder or mug rug is the perfect choice! I actually cut a file for this Christmas-shaped one, but just think of all the shaped potholders you can make for yourself and to give as gifts. Making gifts is actually one of the best parts of owning any Cricut machine.

So, how does this little project show versatility? This project features three different fabrics. The first is this thick batting that goes in the middle. Yes, I cut that with my rotary blade, and it worked perfectly! Try the Insulbrite setting for this one, and remember to check your cut before removing your mat from the machine.
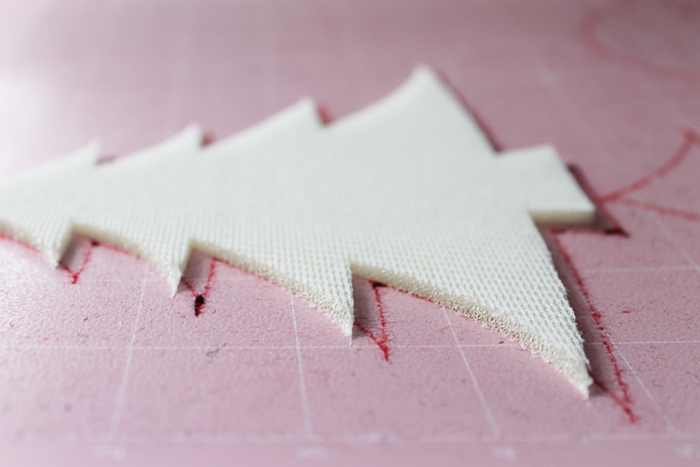
Next is this super-thin thermal barrier fabric. From thick to thin, the rotary blade cuts it like a dream! I used the lame setting for this one.
Then, of course, the flannel itself, which we already talked about above. Then just stack your layers and sew up your project.
I really love how easy the Cricut Maker makes sewing projects. You can easily find hundreds of patterns in the Cricut Design Space digital library. Pick a project, and the machine cuts all the pieces for you. It doesn't get much better than that!
Embossing and Cutting Leather with the Cricut Maker
This wouldn't be a complete post on a Cricut machine without mentioning the Knife Blade and Scoring Wheel. I was so excited to try this technique, and I was beyond excited when it worked! You can both emboss and cut leather with your Cricut Maker. You can find the cut file for the one bookmark here, but as you can see, I also created a more customized version. Actually, this technique opens up so many possibilities with your Maker!
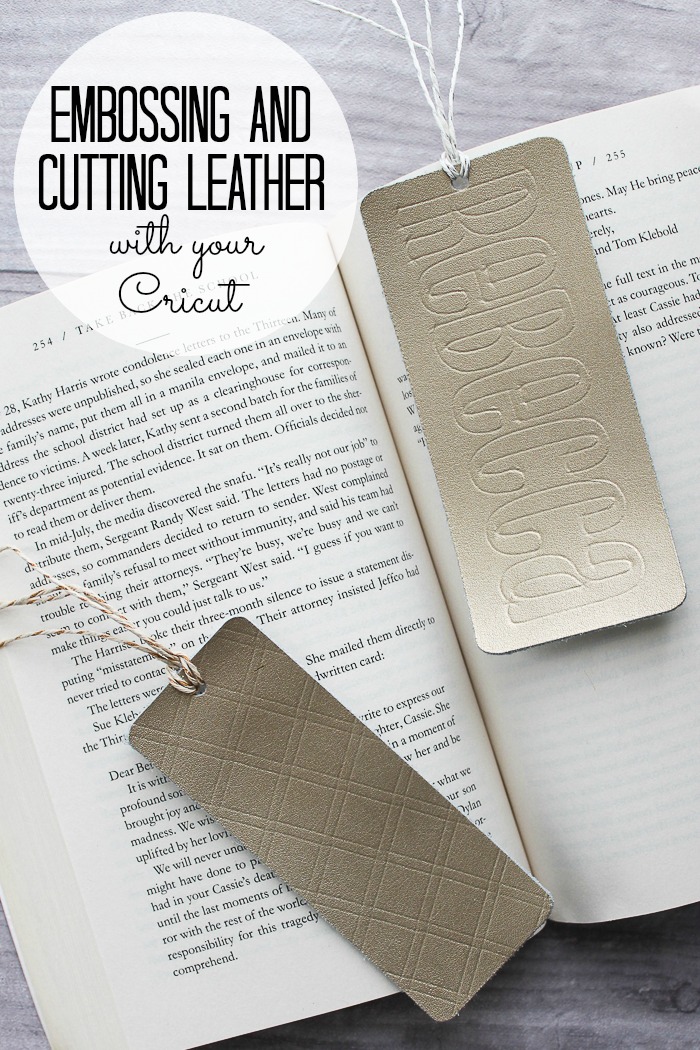
The scoring wheel, combined with the Maker's force, allows it to emboss leather! My mind is spinning with ideas! The Maker will first score your project, then the software will prompt you to change blades. In this case, I used the Knife Blade to cut genuine leather.
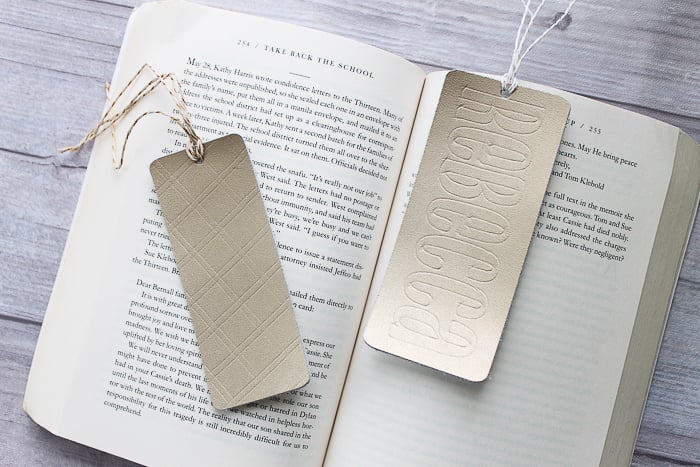
Once cut, I punched a hole and added some string. This quick and easy gift idea is sure to impress anyone! All you need to do to start designing your projects is to learn how to add score lines. We have a tutorial for that here.

So, which Cricut Machine is for you?
Now that you have all of the information, how do you decide? I have a few pointers!
- Make a list of all of the craft projects you have made in the past 6 months and what materials those projects used.
- Add to that list any materials you would love to work with but haven't had the chance to yet.
Now, look at your list. Can those materials be cut with the Cricut Explore, or will you need the Cricut Maker? If the answer is that you will eventually want the Maker, then just jump in now and get it! Spending the extra money now will make you a happier crafter in the long run. You seriously can't go wrong with either Cricut machine. As a girl who loves ALL crafts and ALL materials and enjoys experimenting with them, I would pick the Maker every single time. It is the Cricut machine for me.
Once you decide on which Cricut machine to buy, be sure to click here and download our free beginner's guide to get started with Cricut Design Space. That is the software you will use to both design and cut your projects. It is super user-friendly and easy to use, even for novice computer users. Remember that you can also upload your own designs to either machine. Click here to learn how to do that. You can run the Design Space software on iOS, Android, Windows, and Mac. (Note: Criut Design Space does NOT work with Chromebooks.) Please note that you will need a computer to use the Knife Blade, as it is not compatible with mobile devices.
So, tell us, what is the first project you will make when you get your Cricut machine? Or perhaps you already have a machine? Then tell us your favorite project of all time!


Hi Angie!
I am a quilter and make wool applique quilts. Can the maker cut felted wool (wool that has been washed) that has been backed with a light weight fusible like steam a seam 2 lite or heat and bond light? I would also like to use it to cut wool strips (also prewashed) of different widths for rug hooking. I assume if it can do the first it can so the second. If it can do the first one I will buy it now!
Thanks!!!
I haven’t tried any of those but I am going to assume from this experiment with the wool felt that it would!
Great information, Angie. I’ve been thinking about getting a new machine and this really helped. Thank you for sharing at Party In Your PJs!
This comparison reminds me of all the things I haven’t tried with my Cricut Maker yet. So many crafts so little time. Thanks for sharing at Merry Monday!
They are both great, but I love the Maker! Thanks for such an informative post and for sharing at Celebrate It!
I wish Cricut had a recycling program. I got my Explore Air 2 just two years before the Maker came out. And to be honest, I only used my machine a handful of times (the horror!!). Only because it doesn’t have a dedicated spot to be set up and I’m lazy haha. Not that I don’t have projects or ideas mind you, just that it usually involves kitchen table clearing and extension cord. But I digress…..I really do wish they had a recycling program. I also have the very first version cricut machine with several cartridges. Now I have the EA2 and pay for access.
I enjoyed your video. I bought my maker last November. I’ve learned quite a bit and I also experimented with soda cans. I used the fine tip blade and made my own custom settings. I was ecstatic! I also used the engraving tool on it. Now I’m trying to think of what I can use this for, what kind of project. I’ll have to cut out your flower and make that. Any other suggestions? Thanks again. Elaine
I think it would be great for maybe some engraved etched art in a frame!
Hi! I am trying to cut plastic canvas with my Cricut Maker. Did you use a standard plastic canvas or ultra stiff for this project? I am trying to cut ultra stiff. I did 2 passes on standard pressure for plastic canvas and it’s still not cutting all the way through. Any advice?
This was regular, not stiff. You can try a few more passes and see if that helps but maybe that material will not cut as easily?