

Learn how to use epoxy resin to make a beautiful DIY epoxy tumbler. The process is easy, and the finished products make great DIY gift ideas!
I've been having a lot of fun working with epoxy resin lately, as you can probably tell by checking out my Resin Fishbowl Necklace and Resin Coasters projects, just to name a couple.
You may have seen a glitter tumbler floating around the internet and wondered how to make your own. Well, I have all of the instructions as well as tips and tricks for using epoxy resin. In just a little bit, you will be making resin tumblers for yourself and all of your friends!
Although many people are hesitant to use epoxy resin in their crafting projects, the process is actually really simple and creates incredible projects you just can't create any other way.
Today, I am experimenting with the Spin It from We R Memory Keepers and showing you how to make epoxy tumblers.
Note: If you love resin projects and want more inspiration, check out my DIY Wood Coasters, Summer Wreath with USA Cutout, and Donut Necklace and Earrings projects!
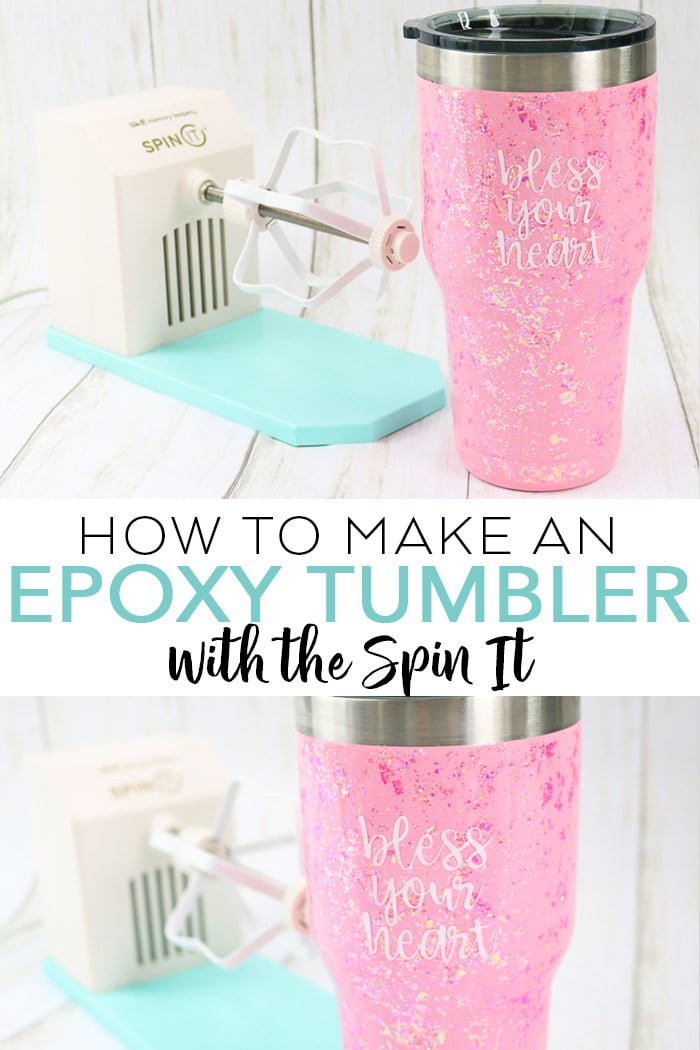
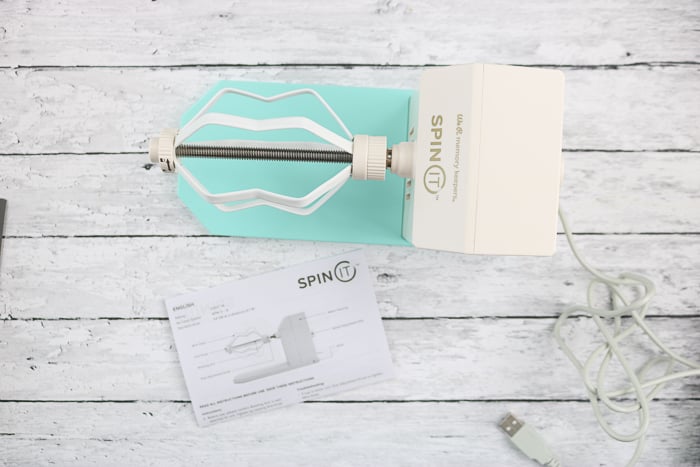
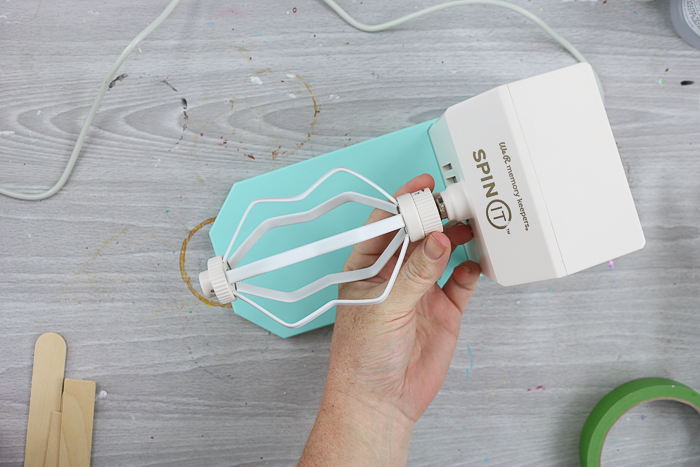
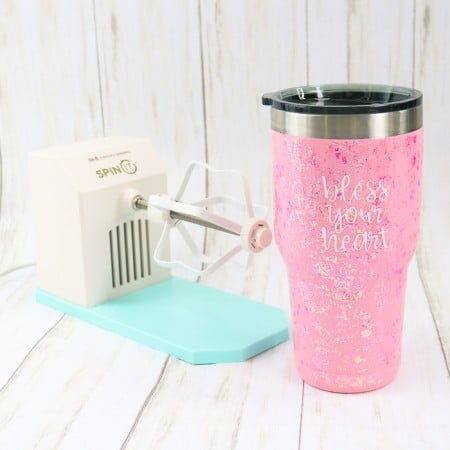
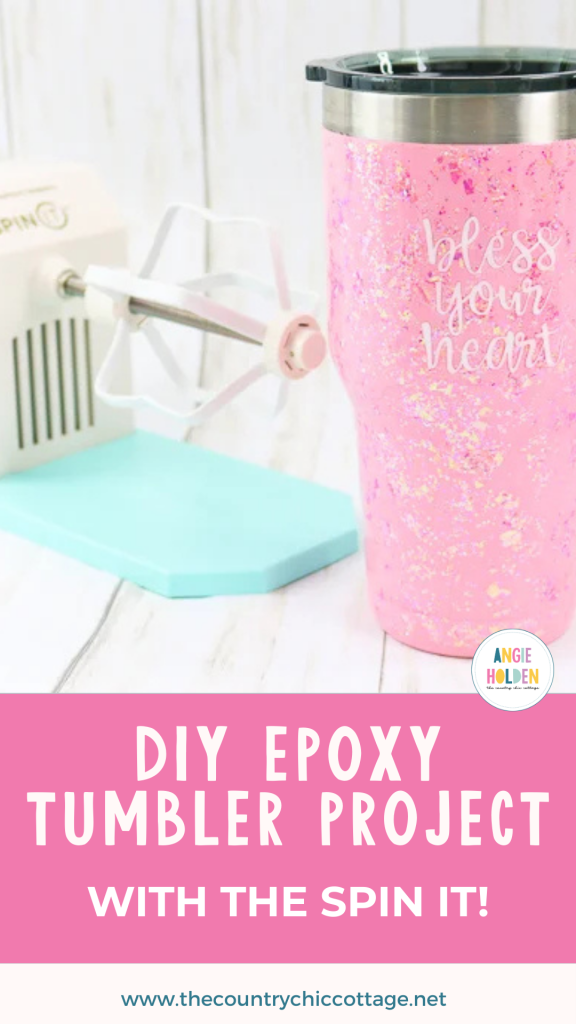
Spin It Tumbler Spinner From We R Memory Keepers
So, just what is the Spin It, and what does it do?
The epoxy coating needs several hours to set up on the surface of your tumbler. This can mean turning it every few minutes for at least an hour or two. That is where the Spin It comes in.
It is simply a tumbler turner with a motor. It will constantly spin your tumbler during the drying process so that you are left with a nice and even coat of resin (without having to spin it yourself).
You can adjust the speed on the Spin It as well as the holder for the tumbler itself. Using it is simple: just adjust it to fit the cup you are making, plug it into the wall, and get started spinning! The concept is super simple, but this product really is indispensable when making DIY epoxy cups.
Don't want to buy a tumbler spinner? Find out how to make a tumbler turner here.
How To Make Epoxy Tumblers
If you are familiar with epoxy resin and how to use it, making these will be a breeze! And if you've never worked with resin before, I think you'll be surprised at just how simple this is.
Safety Note: you do need to be careful when working with resin. However, if you follow today's instructions, you won't have any problems!
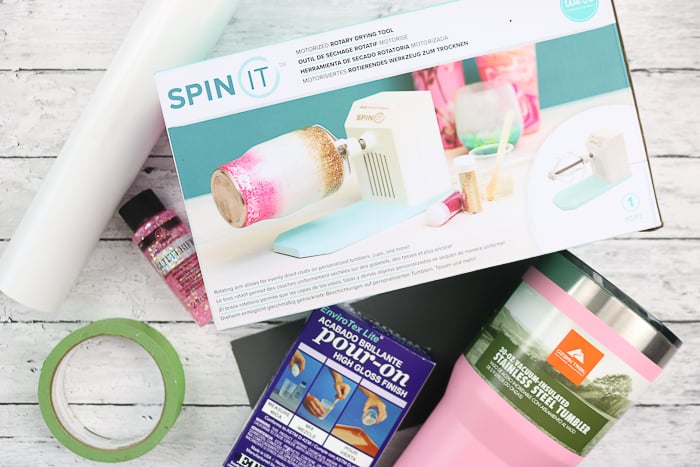
Epoxy Tumbler Supplies Needed
- Tumbler (I am using this pink version.) (NOTE: Doing this project will void any warranty that is on your tumbler.)
- Glitter paint – I love the Glitterific paint for projects like these.
- Spit It from We R Memory Keepers (You can find it here.)
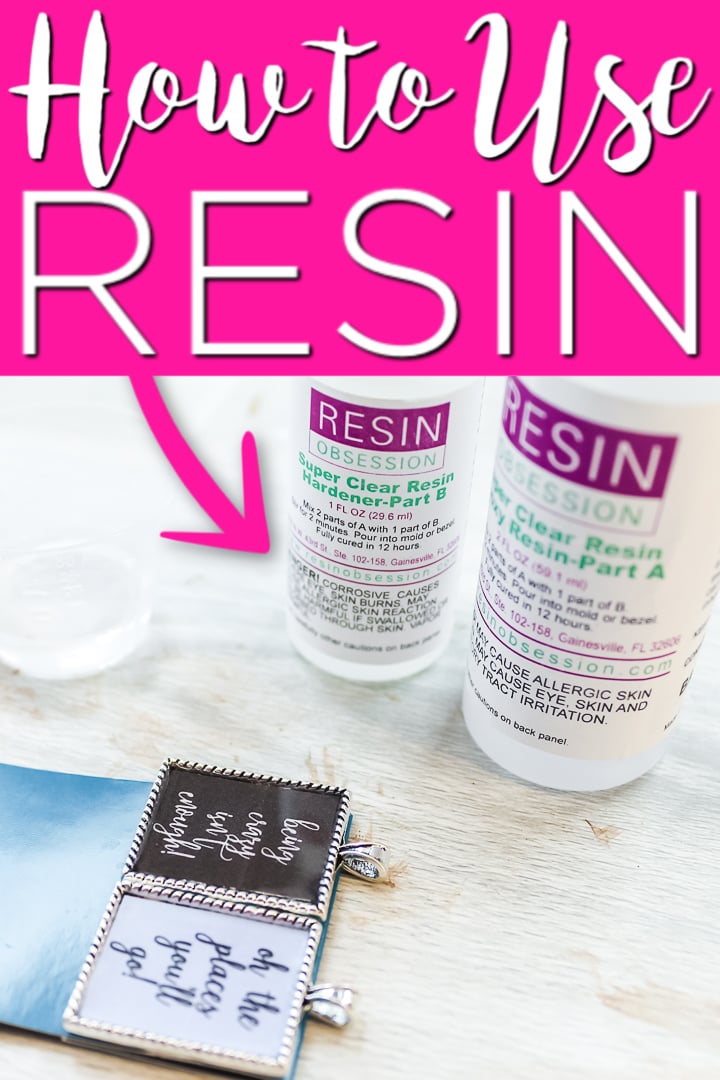
- Epoxy resin – I would recommend doing a few small projects with this before you jump into making a tumbler. (Here's my favorite product for making tumblers)
- Measuring cups
- Mixing cups
- Stir sticks
- Painter's tape
- Fine grit wet sandpaper
- Paintbrush
- Vinyl
- Transfer tape
- Cricut machine – This model is my favorite.
- Bless your heart file (if you would like to make the same quote)
Video Tutorial
Want to watch the process of making an epoxy tumbler? I have a helpful video for you!
If you can't watch the video or want to see pictures instead, just keep following along below!
Painting A Steel Tumbler
Before you can add the epoxy, you will need to paint your tumbler.
I started with a pink tumbler version, but you can also paint the plain steel versions.
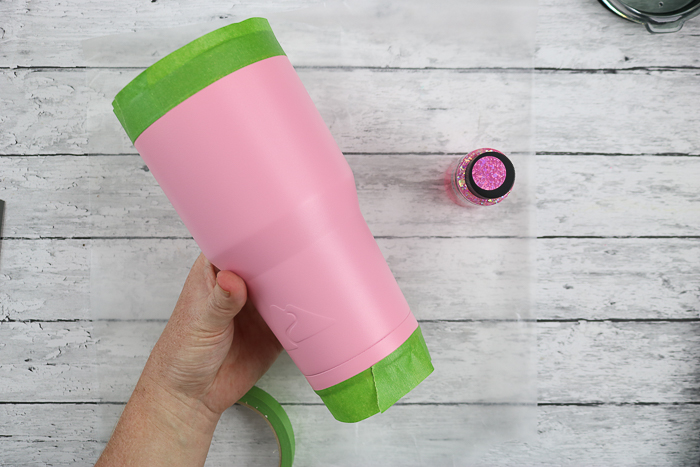
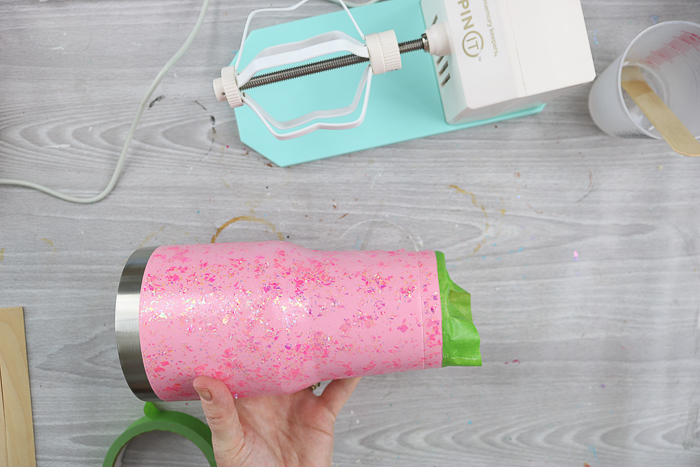
Note: Be careful to leave a lip at the top for your mouth to come in contact with because most paints are not food safe even though they are non-toxic (see the green tape on my tumbler?).
Step 1
Once you have a painted (and dry) tumbler, it's time to add glitter! You can do this in a variety of ways, including loose glitter and decoupage. However, I am obsessed with the Glitterific paint!
I used one coat all over my tumbler, and it came out perfectly. Be sure to use painter's tape around the top and the bottom before painting. I went in slightly so that I would have room to come out with my epoxy and seal everything.
Step 2
Then, just brush on a nice and even coat of the Glitterific.
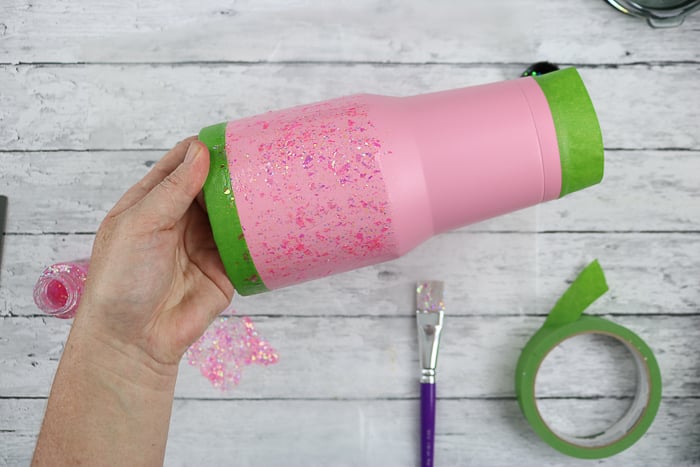
This paint does have a tendency to sag when drying, so you can either put it on your Spin It or turn it occasionally as it dries. I love that this paint has both small glitter and large glitter pieces all in one bottle!
Step 3
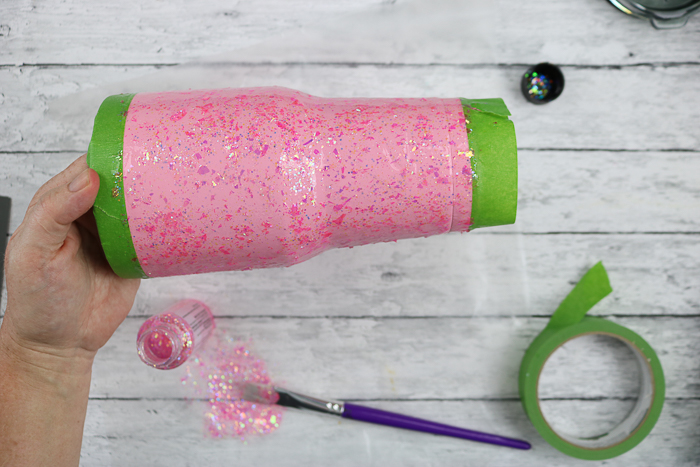
Once your glitter is dry, you can remove the painter's tape and get ready to add your epoxy resin.

Adding Resin To Your DIY Epoxy Tumblers With Glitter
Now it's time to add the epoxy resin to seal your tumblers!
Step 4
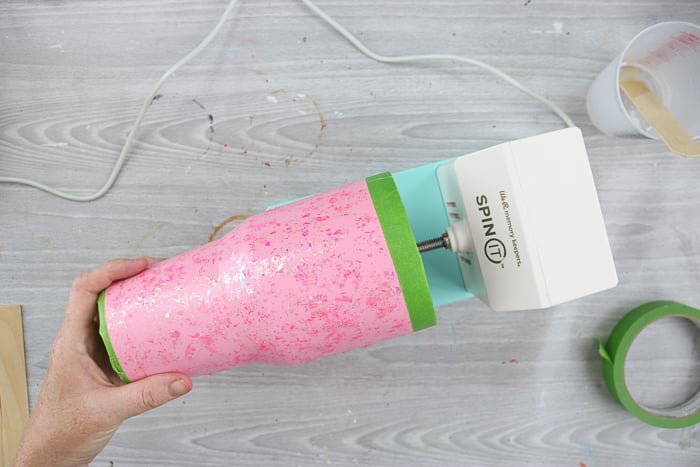
Adjust your Spin It. Make sure the nut on the very end is tight. Then use the adjustment knob to make the turner itself larger or smaller. You want the steel cup you are making to fit tightly so it doesn't fly off as it spins!
Step 5
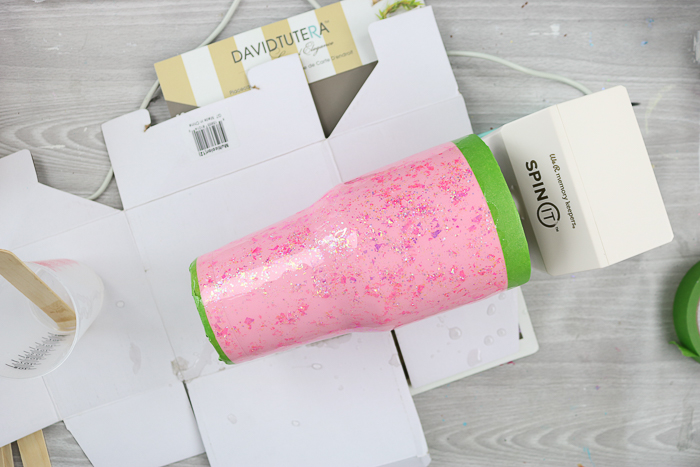
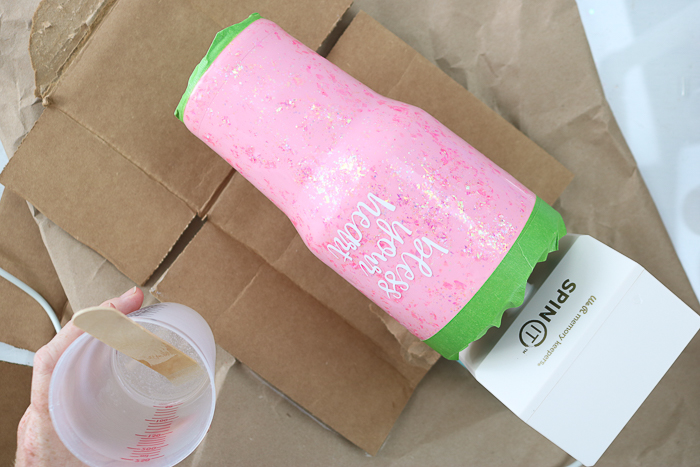
Let's apply the first coat of epoxy. You will need to add more painter's tape to your tumbler on both the top and the bottom. Put it a little outside of your glitter line so that the epoxy will lock in all of the glitters. Remember to press the tape down well.
Step 6
Next, add the tumbler to the turner. Make sure it is both tight on the machine and level. Move and adjust it as needed. You can also shim the base of the Spin It to level the tumbler if needed.
Step 7
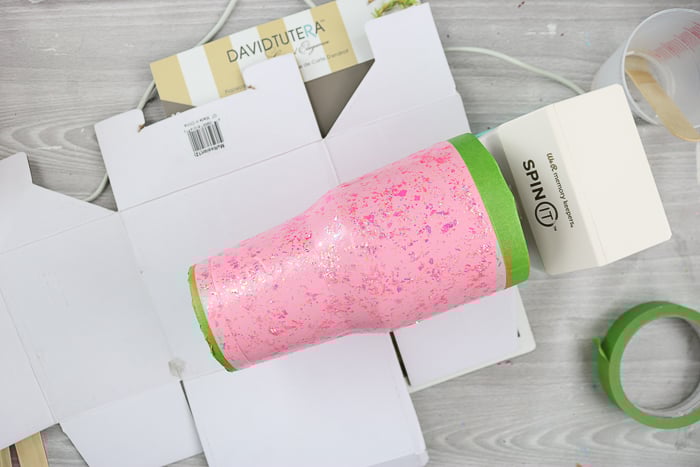
Cover and protect both your work surface and the base of the Spin It before you begin spinning. The epoxy WILL get everywhere.
Step 8
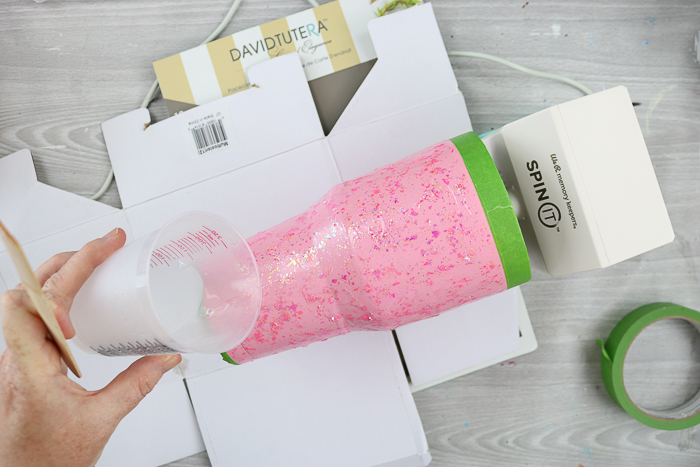
Measure and mix your resin according to the package directions. The steps included are crucial to your success.
Step 9
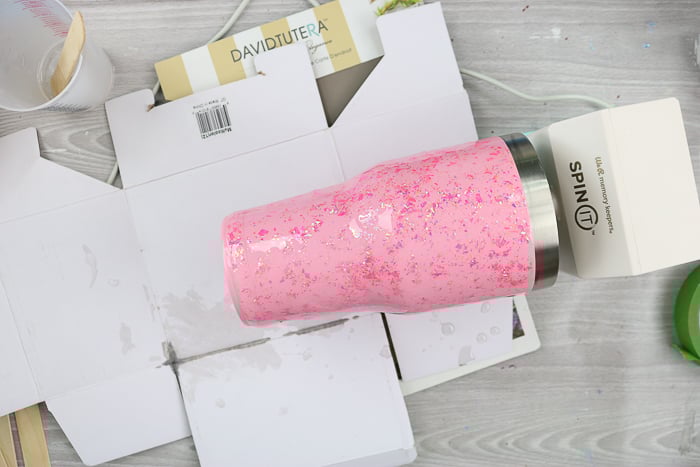
Turn the Spin It on and start spinning at a low speed. Then start pouring the mixed resin onto your tumbler.
You will need to get an even coat over the entire surface. I used a stir stick to push the resin around to make sure I had complete coverage.
Step 10
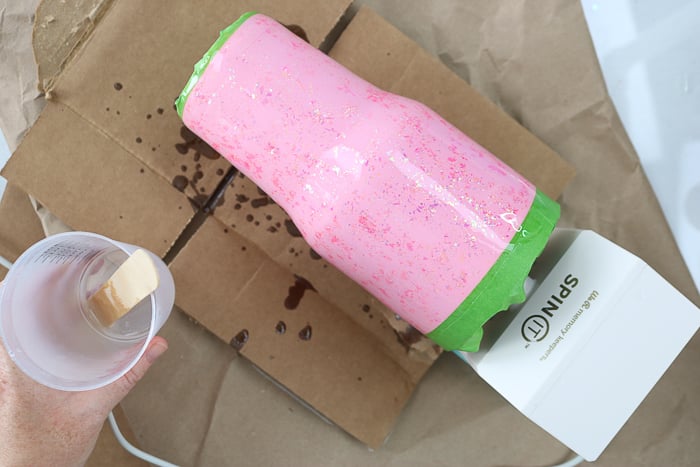
Allow the epoxy tumbler to spin while it cures. You will want it to remain on a flat surface during this time and keep it away from any dust and debris (which will permanently adhere to your tumbler).
Step 11
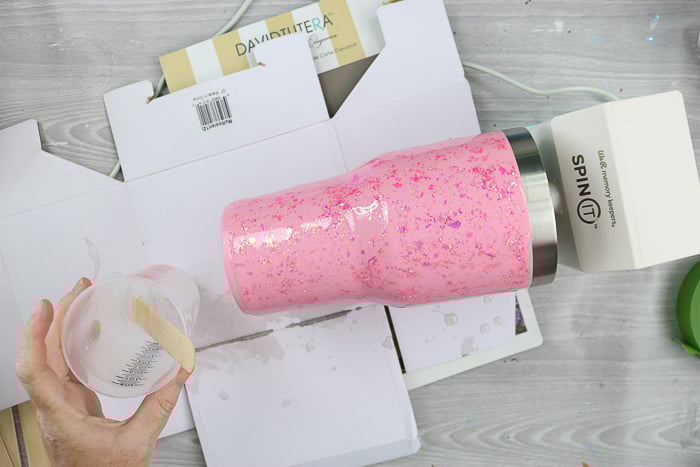
Leave any unused resin in the cup and set it to the side. You can use it to gauge how hard the resin on your tumbler is.
After an hour or two, the epoxy should be set up enough that you can remove the tape from the top and bottom. Try to remove it while spinning or just stop for very short intervals.
Step 12
Keep spinning until the resin left in your mixing cup seems set enough not to run. Note: Keep in mind that the Spin It is not designed to rotate more than 6 hours at a time.
Once the resin is set up, you can stop the spinning. Leave your epoxy tumbler on the machine. You will want it to continue to cure without touching any surface.
Step 13
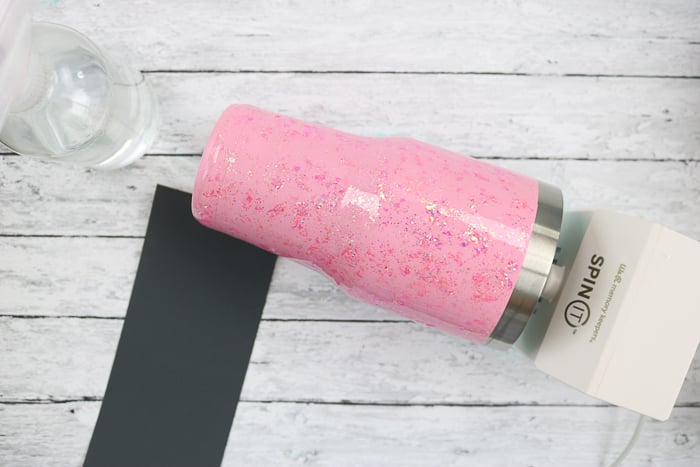
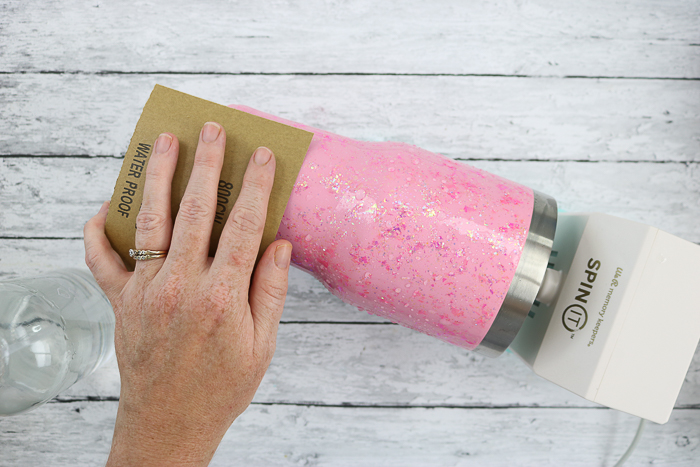
Now it's time to sand your epoxy tumbler. I allowed my Spin It tumbler to cure overnight. Then comes sanding it down with some water and wet sandpaper.
Note: I used 800 grit. You can find this on Amazon or in the automotive section of your store.
Step 14
Spray your epoxy tumbler with water and sand down the entire tumbler, making sure to sand down any imperfections.
Once you are done sanding, thoroughly clean the entire surface (rubbing alcohol is good for this). Dry well before continuing.
Step 15
You can now add a vinyl design to the outside of your glitter tumbler. I cut a quote with my Cricut machine, but you can use any cut design that you like. Then just weed away any excess vinyl and apply a transfer tape.
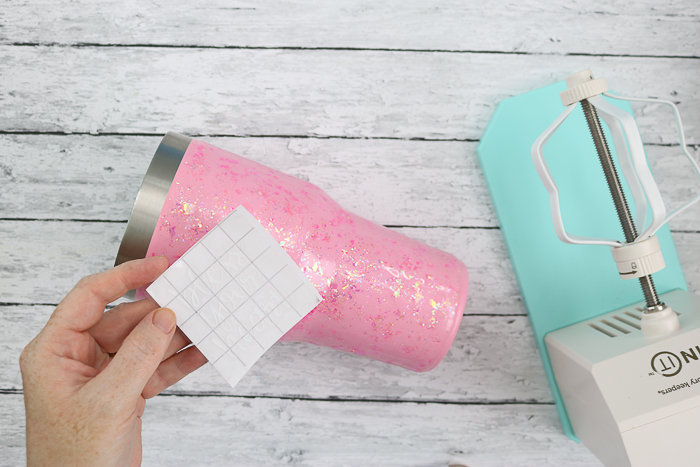
Step 16
Peel back the backing paper and apply the design to your tumbler with the transfer tape.
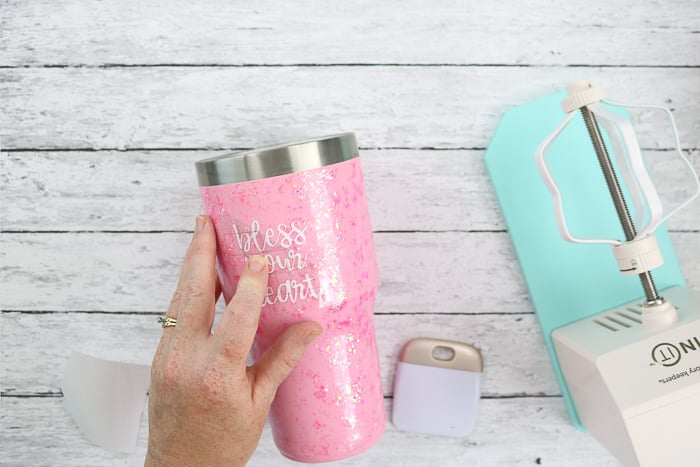
Step 17
Burnish well, then peel back the transfer tape to reveal your design on the tumbler.
Step 18
You can seal the vinyl on an epoxy tumbler!
Often when we add vinyl to projects, we can't seal it. However, with this project, you can!
To do this, you'll need to add a second coat to your epoxy tumbler to complete the project. Just follow the same process you used to add the first coat.
Be sure to add painter's tape to the top and bottom once again. I added it slightly outside of my first coat to seal everything in. Then add to the tumbler turner just like you did before.
Measure and mix another batch of resin, then start pouring on your resin tumbler while it turns. Again you want to make sure you get complete coverage with a nice and even coat.
You are going to cure in the same manner as you did your first coat. Remove the tape after an hour or two, then continue turning until set up. Turn off the Spin It after the epoxy has set and allow your tumbler to cure on the machine until hardened.
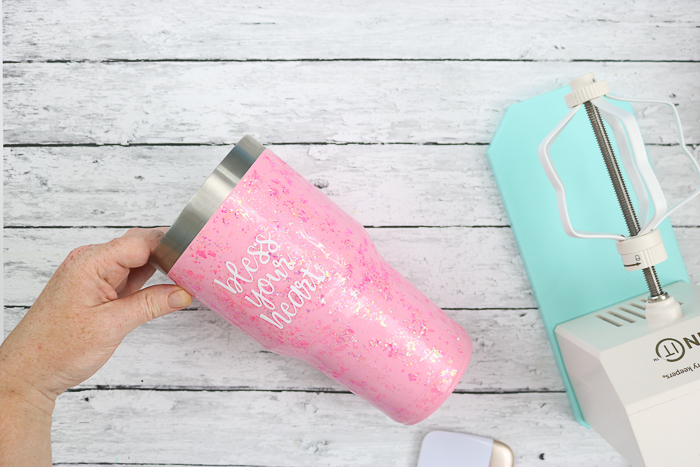
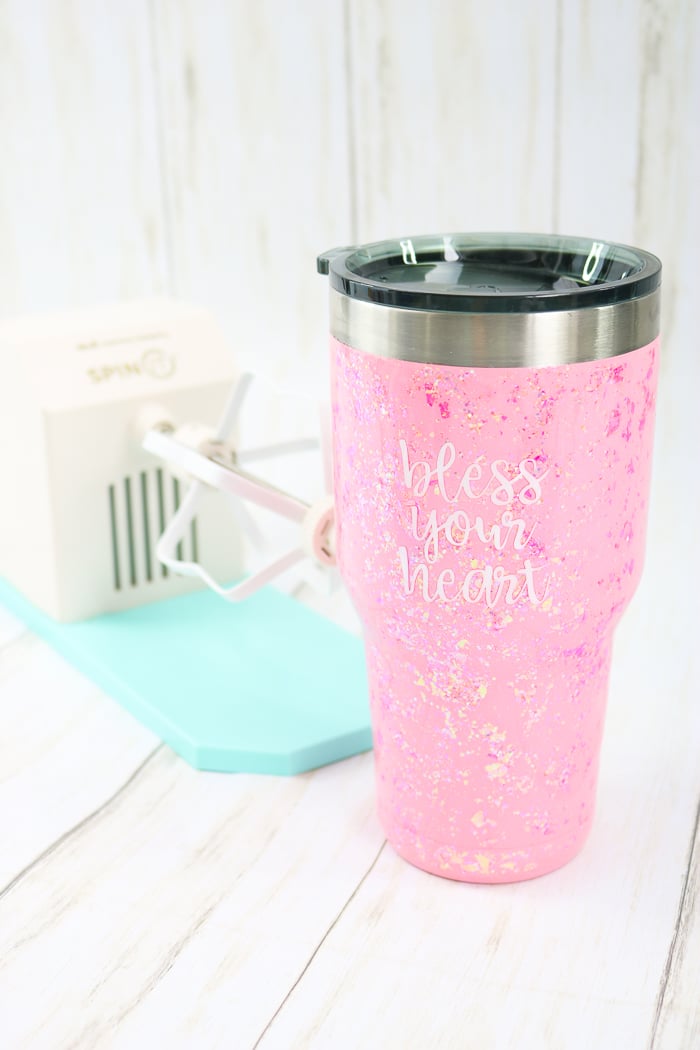
Once this second coat has cured, you have an epoxy tumbler that is ready to use or give as a gift. Doesn't it look amazing?

I personally thought the Spin It from We R Memory Keepers did an amazing job!
FAQs
Here are a couple of questions that I see readers ask about making these epoxy tumblers. If you have a question, please check to see if I’ve already answered it below. Don’t see your question? Leave it for me in the comments!
Which is the best epoxy to use for tumblers?
You need to pick a really good, high-quality epoxy for your tumbler. Here are a few that I have used over the years and how I feel they work with epoxy cups:
- Resin Obsession – I like this one the best, but it is pricey. The color is super clear, and it dries fairly fast, making minimal mistakes.
- Envirotex Lite Pour-On – This has a slightly yellow tint to it right out of the package, so I would not use it on a white tumbler. It also takes longer to cure, so be prepared to leave your tumbler turner on a bit longer. On the pros side of the column, it is less expensive.
Can I make my own DIY tumbler turner?
Yes, if you don't want to purchase the Turn It, you can definitely make your own! I've done it, so check out my tutorial for How To Make A Tumbler Turner to see how to do it yourself.
Is my epoxy tumbler dishwasher-safe?
Unfortunately, no. Resin has a maximum temperature it can withstand, and that temperature is lower than what dishwashers use. To keep your tumbler in great shape and looking its best, only handwash it.
If you give this as a DIY gift idea, please make sure to let the recipient know so they don't toss it into the dishwasher and ruin their awesome tumbler!
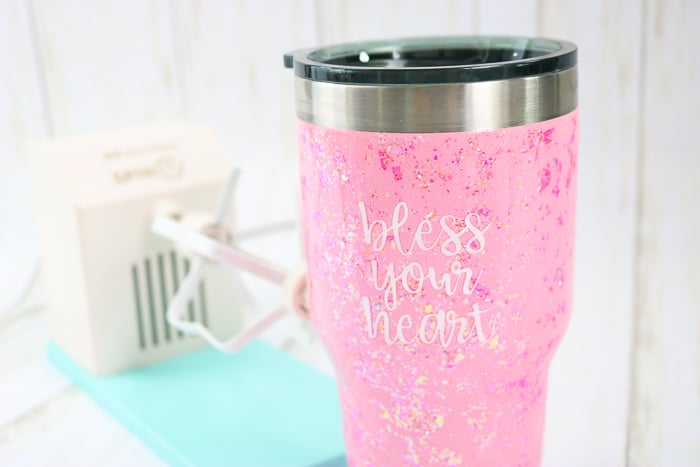
I love my new glitter tumbler – it's beautiful, cheery, and sparkly! Was it easier to make than you thought?
Make your own resin tumbler today and show off your love of glitter and all things pink (or your favorite color)!

More Inspiration For Working With Resin
Do you love this epoxy tumbler and want more ideas for working with epoxy resin? Try the links below!


Struggling with resin and need help?
I know that a ton of you are intimidated by resin. Don't be! You just need to know the basics and gain some experience with the medium. I have a course that will help you master epoxy resin and give you the confidence you need to tackle this project and so much more.
With unique insights drawn from more than a decade of creating and selling resin jewelry worldwide, this course is from an Amazon best-selling author on the topic. This class goes beyond making a few projects. You get thirty video lessons to give you clear directions on how to make resin jewelry you can confidently share and sell. Want to see more?
Supplies
- Tumbler
- Glitterific paint
- Spit It from We R Memory Keepers
- Epoxy resin
- Measuring cups
- Mixing cups
- Stir sticks
- Painter's tape
- Fine grit wet sandpaper
- Paintbrush
- Vinyl
- Transfer tape
- Cricut machine
- Bless your heart file or file of your choice
Instructions
- Paint your tumbler (if you want to).
- Once your tumbler is painted and dry, brush on a nice and even coat of the Glitterific.
- After the Glitterific is dry, you can remove the painter's tape and prepare to add your epoxy resin.
- Prepare your Spin It by ensuring the nut on the very end is tight. Adjust the turner to make it larger or smaller as needed.
- Let's apply the first coat of epoxy. Apply more painter's tape to the top and bottom of your tumbler. Put it a little outside of your glitter line so that the epoxy will lock in all of the glitter.
- Put the tumbler on the turner and make sure it fits tightly. Adjust it as needed.
- Epoxy will get all over the place, so cover and protect both your work surface and the base of the Spin It before you begin spinning.
- Prepare resin according to the package directions.
- Turn the Spin It on and start spinning at a low speed. tart pouring the prepared resin onto your tumbler. I used a stir stick to push the resin around to make sure I had complete and even resin coverage.
- Allow the epoxy tumbler to spin while it cures.
- After an hour or two, the epoxy should be set enough that you can remove the tape from the top and bottom.
- Once the resin is set, stop spinning. Leave the tumbler on the machine to continue curing overnight.
- Spray your epoxy tumbler with water and sand down the entire tumbler, making sure to sand down any imperfections.
- Use rubbing alcohol to thoroughly clean the entire surface and dry well before continuing.
- Apply transfer tape to add a vinyl design to the outside of your glitter tumbler.
- Peel back the backing paper and apply the design to your tumbler with the transfer tape.
- Burnish well, then peel back the transfer tape to reveal your design on the tumbler.
- Add a second coat to your epoxy tumbler to seal the vinyl and complete the project. Just follow the same process you used to add the first coat.


Thank you for the video. It has helped. But, I do have a question…..can I put a 3rd coat of resin on the tumbler? Lint got on the the finally drying, I tried to get it off and messed up the epoxy resin. Can I re-sand and put on another coat?
Of course! As many as you would like! One tip, cover the entire thing with a box while curing to prevent any dust from getting on your tumbler.
Roughly how much of the epoxy resin are you using for one coat?
I would say 3 oz mixed approximately. It will depend on the size of your tumbler too.
Can you add more glitter after your first coat of resin?
Sure! Just do another coat on top of it.
I have a tumbler that i bought that is a teal color putting a vinyl decal on it it is a permanent vinyl. How can I seal it it should I use epoxy or what would you use. Reason for wanting to seal it is wanting to make sure doesn’t peel off as we are always holding them a lot at work Design is at bottom and name on side to give you a idea where the decal is
I would put epoxy over the top of it just like in this tutorial. That would be the best protection.
Why resin do you recommend?
There is one linked above in the supply list that I recommend.
Where did you purchase the pink tumbler? It is the perfect color of pink for our business.
Amazon!
I think this is one of the most significant information for me. And i’m glad reading your article. Thanks for sharing wonderful information.