
Does your yard need a little something extra to show off your holiday spirit? A Christmas garden flag might be the perfect finishing touch! Follow this simple tutorial to create a quick, easy Santa garden flag that adds instant festive charm to your outdoor décor.

Santa Garden Flag Video Tutorial
The OlyFun material is perfect for outdoor use and makes this a super easy project. This no-fray material will not fray when cut, allowing us to cut the flag components without worrying about raw edges. I love that!
Watch the video below to see how to make this adorable Santa garden flag.
Can't watch the video or missed some of the steps? Just follow along below!
How To Make A Santa Garden Flag For Christmas
The Christmas season is full of inspiration for amazing craft projects! Whether you enjoy making your own DIY ornaments or holiday decor, or prefer to stick to cute Christmas crafts, there are plenty of ideas so everyone can have fun making something.
I particularly love decorating our house for Christmas, and every year, I add at least one new DIY addition to our collection!
We have tons of cute interior decorations, including my DIY wooden Christmas tree and Christmas gnome.
I've made some fun Christmas porch decor that we enjoy displaying. However, I find that simply decorating the front porch isn't quite enough – the yard looks too bare.
Lately, I've been infatuated with making DIY garden flags for every season. So, naturally, I came up with a Christmas design! I love this simple Santa garden flag, and I know you will too.
Supplies Needed To Make A Santa Garden Flag
- OlyFun in red, black, and gold
- Scissors
- Ruler
- Marker
- Sewing machine
Step 1: Cut Out The Belt
Cut a 3-inch strip of black OlyFun.
Step 2: Cut Out The Belt Buckle
Cut a 5-inch square of gold OlyFun.
Then, cut out a 3-inch square from the center of the gold OlyFun to create the buckle outline.
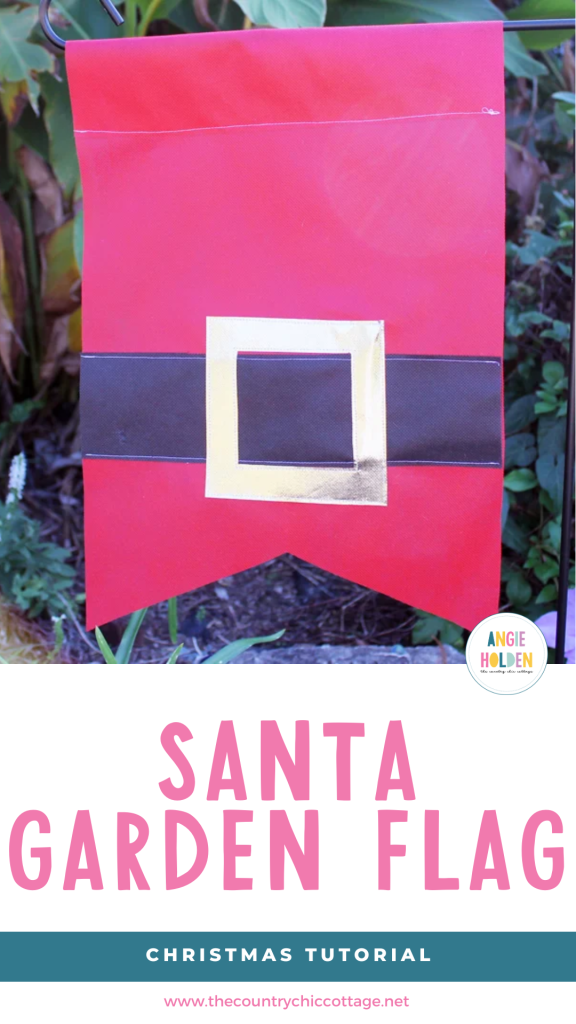
Step 3: Cut Out The Flag
Cut a flag shape from the red OlyFun. It should be as wide as your black strip and long enough to form a pocket for hanging.
I also cut the bottom in a “V” to give it that classic shape.
Step 4: Create The Pocket
At the top of your garden flag, fold the red OlyFun down 2 inches and sew it into place to create the pocket.
Step 5: Add The Belt
Sew the black OlyFun into place on the red Santa garden flag.
Step 6: Add The Gold Buckle
Sew the gold buckle into place on the flag.
Now you're ready to hang your Santa flag outdoors to enjoy this Christmas.
I love this Christmas garden flag, and I know that you will too! The best part is that it will last for a long time, so you can use it year after year.
FAQs About Santa Garden Flag
Here are answers to some of the most frequently asked questions I receive about making this Santa garden flag. If your question isn’t listed, feel free to drop it in the comments, and I’ll be happy to help!
Can I Adjust The Size Of This Garden Flag?
Absolutely! As long as you have enough OlyFun, you can make this flag any size that you prefer!
Can I Glue This Santa Garden Flag Together Instead Of Sewing It?
Yes, you can! You can use a hot glue gun (which dries faster) or super glue to assemble this project if you don't want to sew it. That said, this Santa garden flag is the perfect project for beginner sewers if you need an excuse for a little practice!
Could I Add Loops At The Top Instead Of Sewing One Long Pocket To Hang This Flag?
Yes, that's an option. However, in my experience, that will require more work and make it harder than hanging your flag from a single pocket.
Can I Change The Colors Of This Garden Flag?
Of course! For my garden flag, I chose a traditional Santa outfit. However, depending on your Christmas decor style (peppermint, woodland, bright, pastel, etc.), you can change up the color to match your theme!
5 More Christmas Craft Ideas
If you love this Santa garden flag project, I have many more ideas to share with you! Here are a few of my favorites!
- DIY Nativity Scene Made With Christmas Jars
- Santa's Belly Jar Luminary
- Embroidery Hoop Wreath for Christmas
- Santa and Christmas Gnomes Coloring Page
- Christmas Door Decor


These are all such cute ideas! Pinned.
Oh this is too cute!
I would love for you to share this with my Facebook Group for recipes, crafts, tips, and tricks: https://www.facebook.com/groups/pluckyrecipescraftstips/
Thanks for joining Cooking and Crafting with J & J!