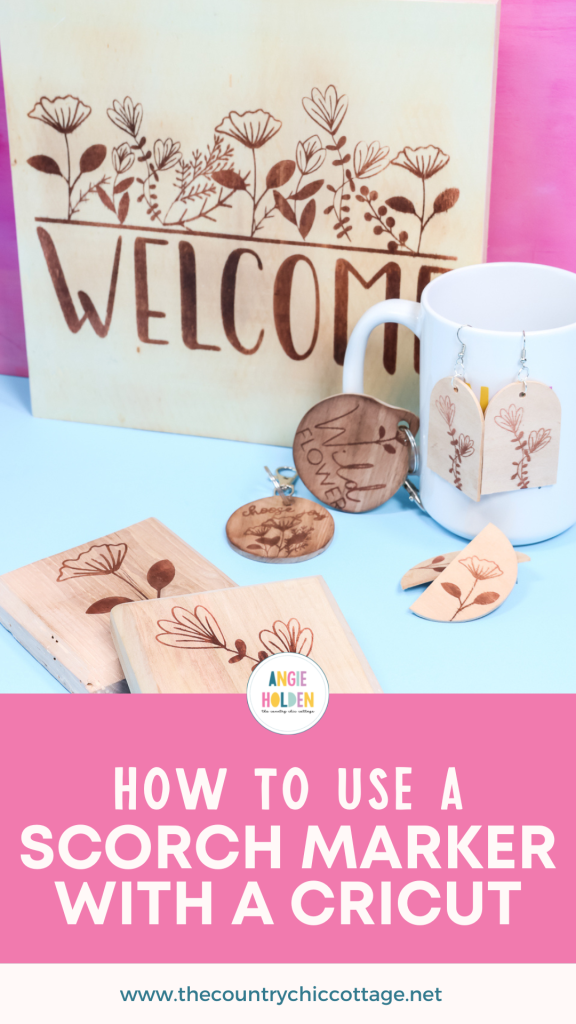
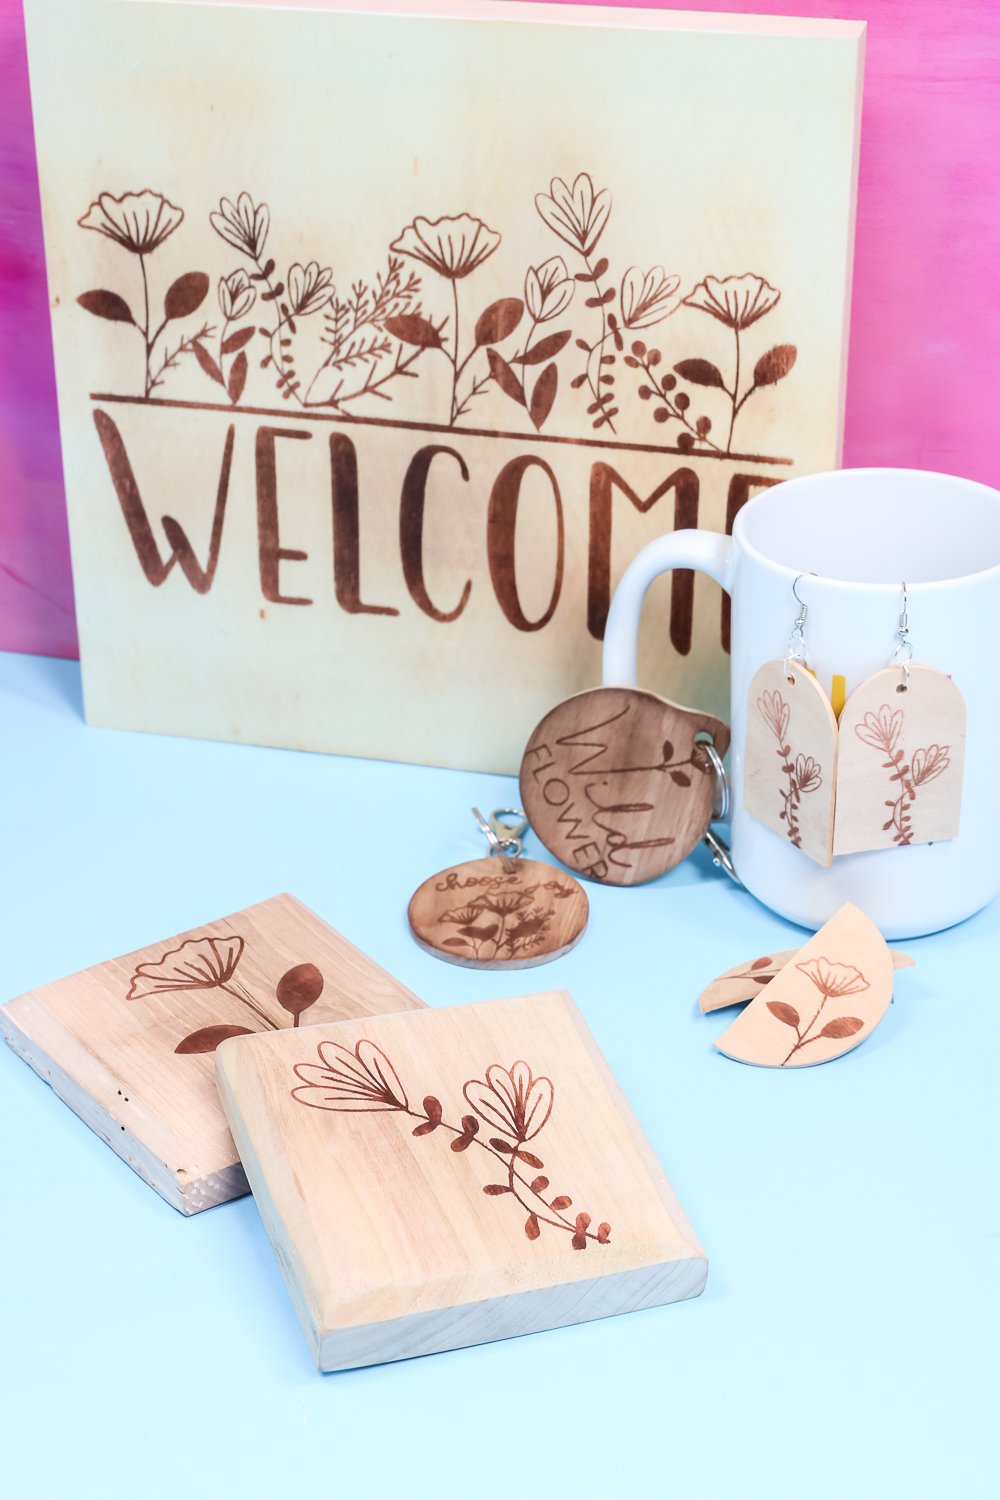
Learn how to use a wood-burning marker (also known as a Scorch Marker) to create wood-burning projects with your Cricut machine. This technique is an excellent way to create a variety of handmade gifts.
A Scorch Marker is a special pen that contains a chemical inside, which, when combined with heat, produces a wood-burned look on various real-wood surfaces. Use it in combination with a stencil film to add designs to wood to create simple, stunning gifts!
Wood Burning Marker Video Tutorial
Today, I will teach you how to create a variety of projects! From cutting boards to earrings. I'll show you the best woods to use for Cricut wood burning and share all my top tips for achieving beautiful, finished projects. Learning how to use a wood-burning marker is so easy, and you are going to love what you can create!
You can watch me prepare and make all of these projects by pressing play on the video below.
Can’t watch the video or missed some of the information? You can also follow along below!
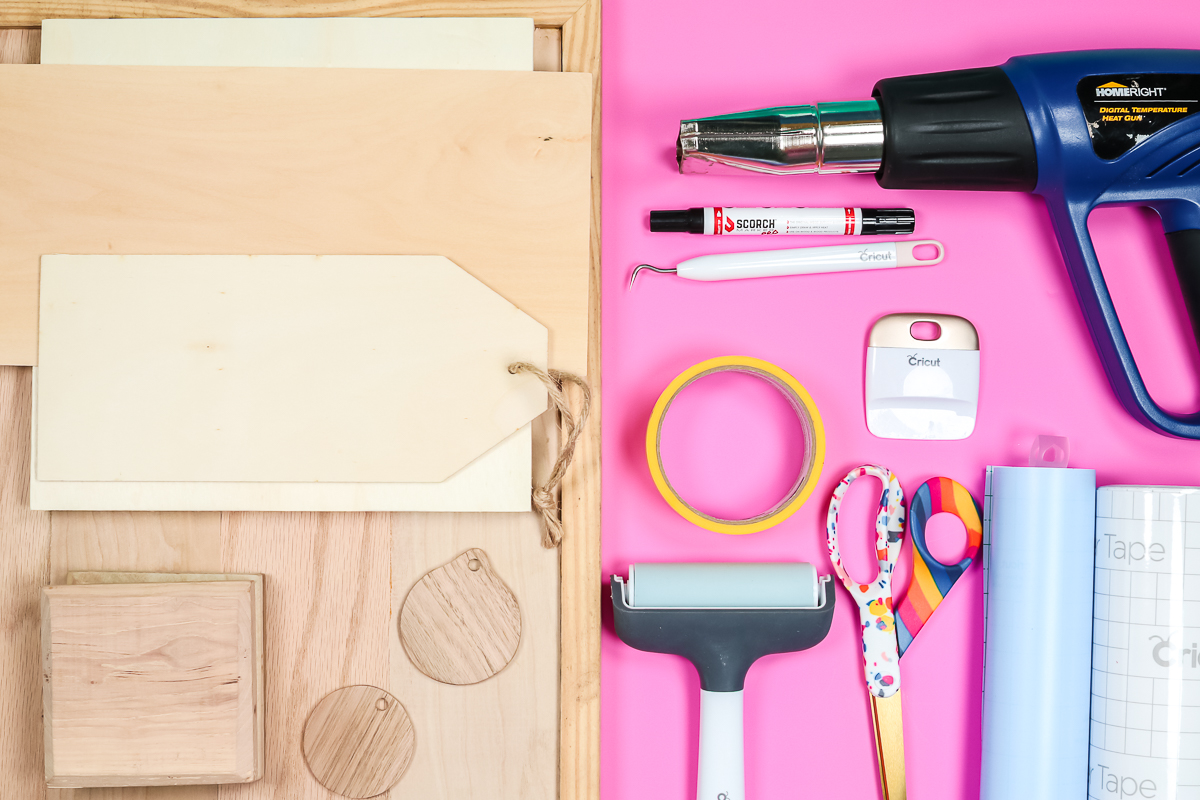
Supplies Needed For Wood Burning
- Cricut Machine
- Stencil Film
- Transfer Tape
- Scissors
- Brayer
- Painter's Tape
- Scraper
- Weeding Tool
- Scorch Marker (I'm using the Scorch Marker Pro, which has both a writing tip and a brush tip.)
- Heat Gun (Gets up to 1000 degrees F)
- Heat-Resistant Mat (to protect your work surface)
- Rag or Paper Towel
- Sealer (Polycrylic or Butcher Block Sealer)
- Free Cut Files
- Wood surfaces (see more below for options)
Wood Blank Options
How do you choose the right wood blanks? You want real-wood blanks, preferably ones with no finish on them at all.
If they have a finish, you can sand them lightly befoer attempting this technique. Personally, I have had mixed results with that option. Sometimes it works and sometimes it doesn't. Raw wood is definitely the best, and real raw wood is the best of those options.
Where Can You Find Wood Blanks?
Here are a few of my favorite sources:
- You likely have real wood options right at home. Cutting boards or even wood scraps that are cut into things like coasters and key chains.
- You can also purchase wood blanks. Signs, tags, etc, can all be found at local craft stores or even online.
- Another option is to use your Cricut Maker to cut basswood. I will also teach you how to do that below.
How To Create Stencils For Wood Burning
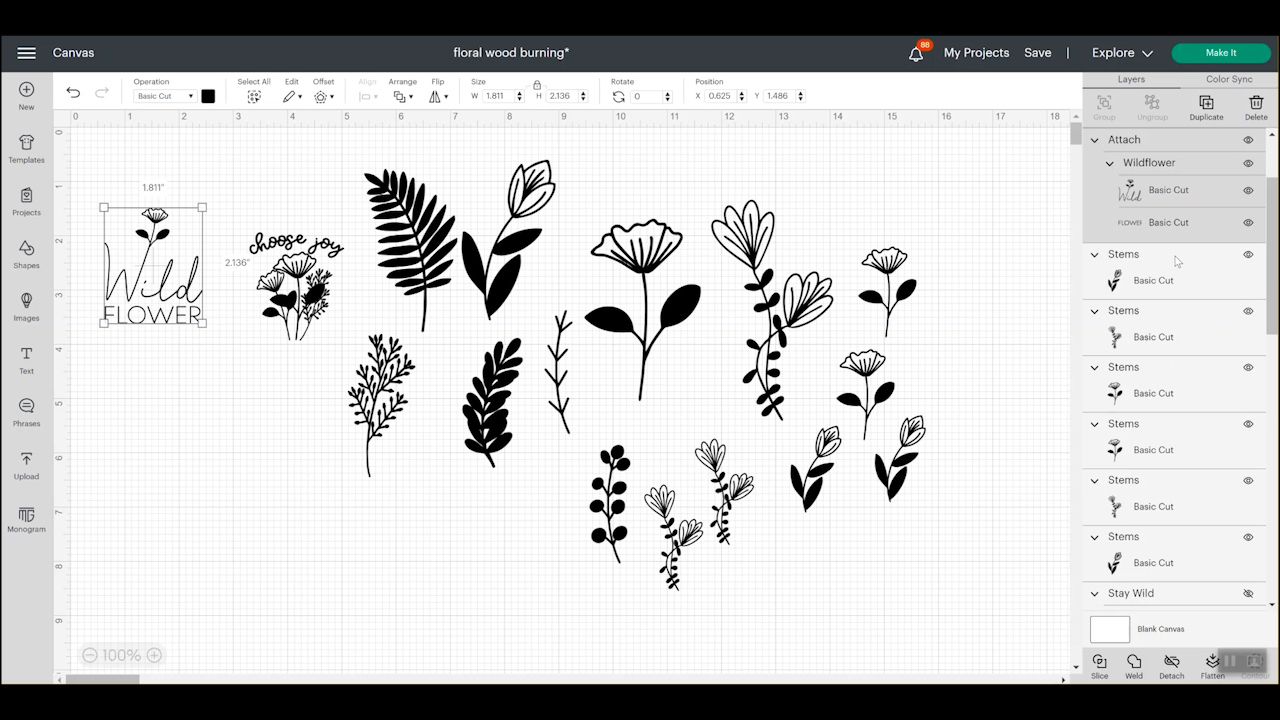
Before you can learn how to use a wood burning marker, you will need to make your stencils on a Cricut machine. Begin by opening Design Space. Download the free SVG file here and then upload it to Design Space.
In Design Space, click “Upload” and then “Upload Image”. Select the images you want to use from your computer, and they will then appear on the upload screen. From there, you can choose “Add To Canvas”.
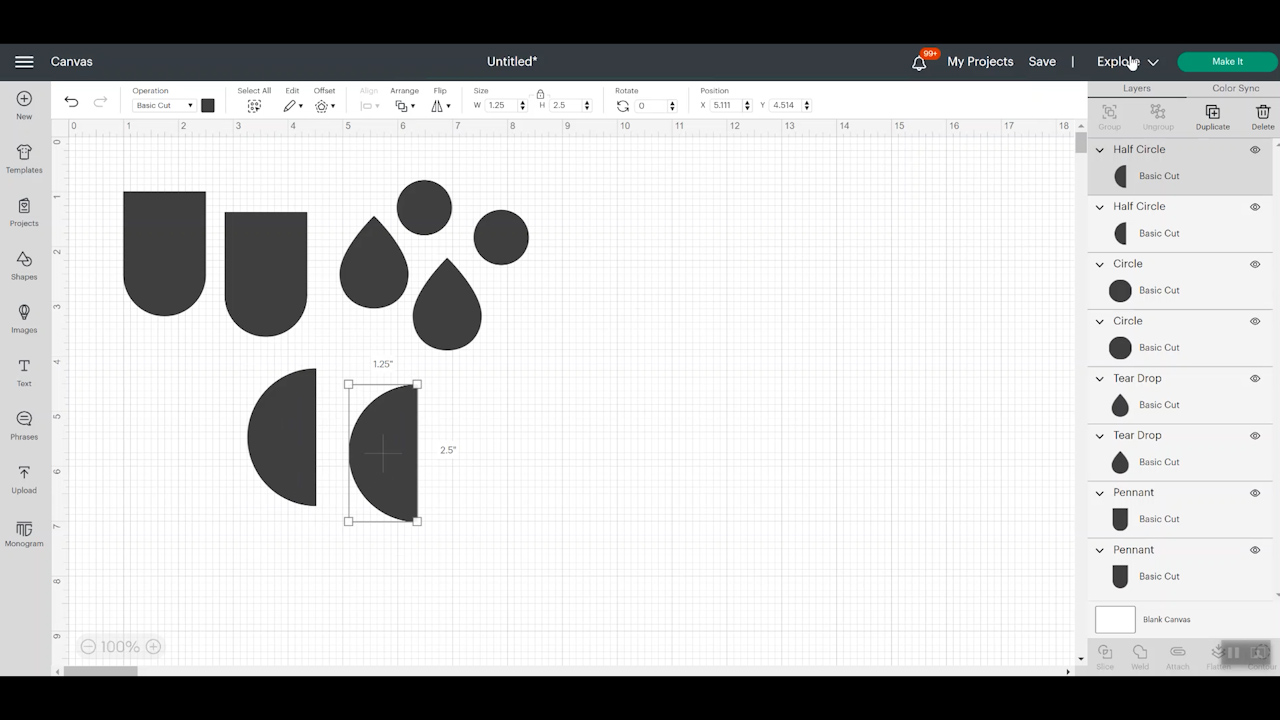
Resizing Designs for Wood Burning
Once the designs are on your canvas, resize them to fit your wood blank. To resize each one, you may need to ungroup the file and then select each individual image to resize it.
If you want to combine designs, lay them out how you would like, and then select each layer and click “Attach“. This will allow you to resize the pieces together as needed to fit your blank.
Cutting Out Stencil Film For Cricut Wood Burning
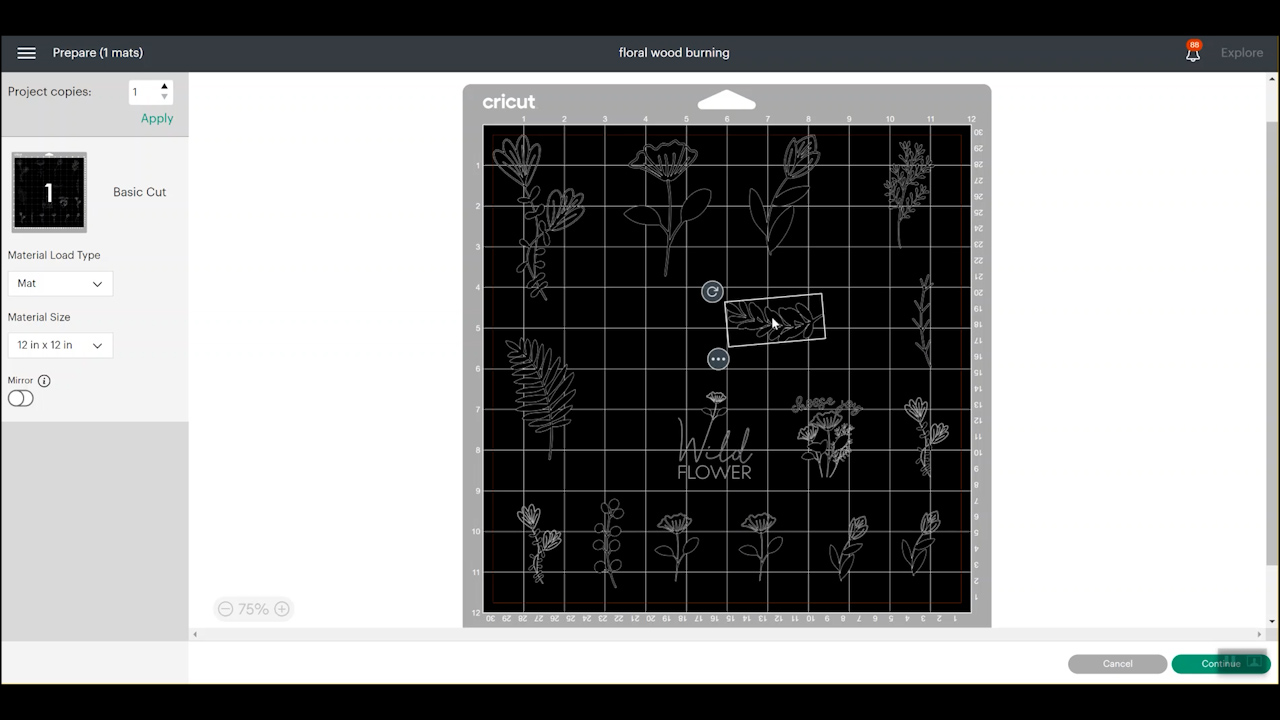
Once you have all the designs on your canvas, click Make. If you're using Cricut Stencil Film, you'll select “On a mat” unless you're using Smart Stencil Vinyl.
Design Space lays out designs to preserve materials. This means they'll be laid out very, very close. I like to move them around so there is more room between designs.
You can do this right on the mat screen. Click any image, and you can drag it around on the mat screen so there is more room between images. You will want an inch or so all the way around your design after you cut them apart. This doesn't have to be perfect or exact, but you need to be able to cut in between the images.
Once everything is spaced out on the mat, click “Continue” to cut and then select stencil vinyl as your material.
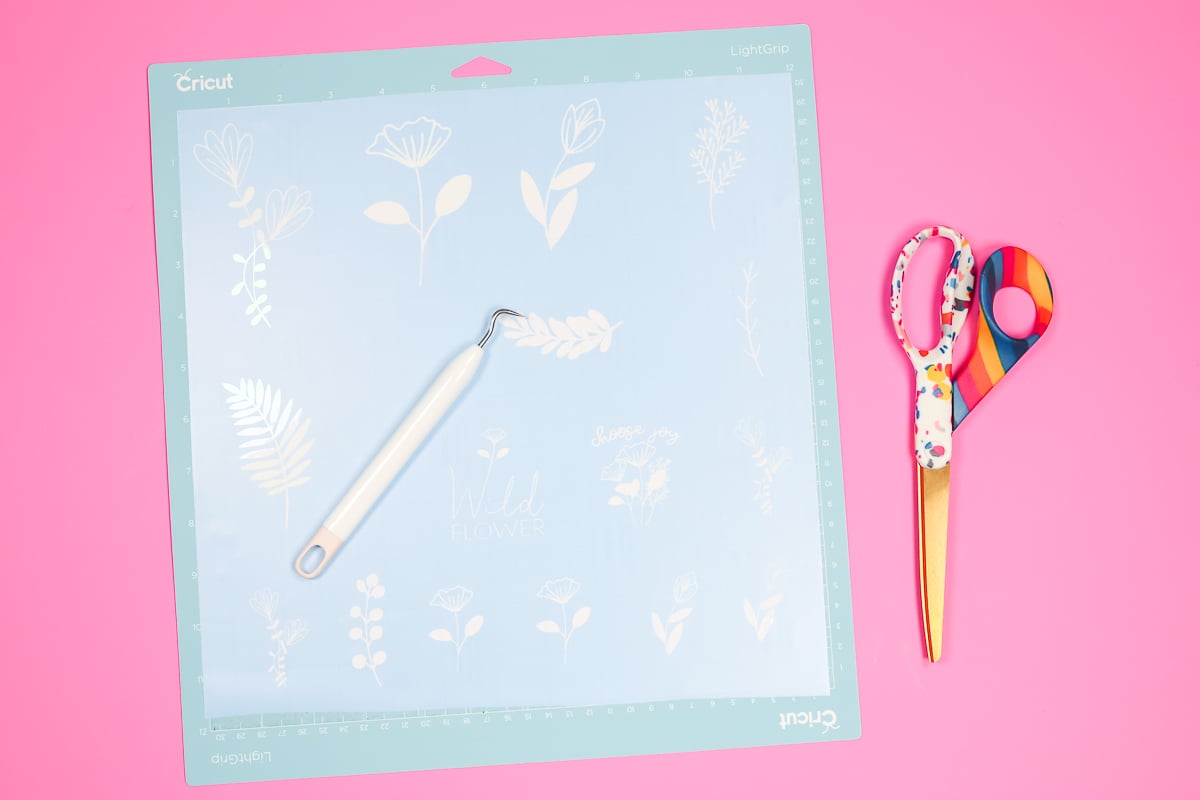
How To Cut Cricut Stencil Vinyl
To cut Cricut Stencil Vinyl, place your material liner side down on a cutting mat. I like to use the LightGrip Mat for this material. Make sure your material is stuck down really well. You can use a brayer if you'd like. It's not necessary, but it does help ensure the material is stuck down to the mat well.
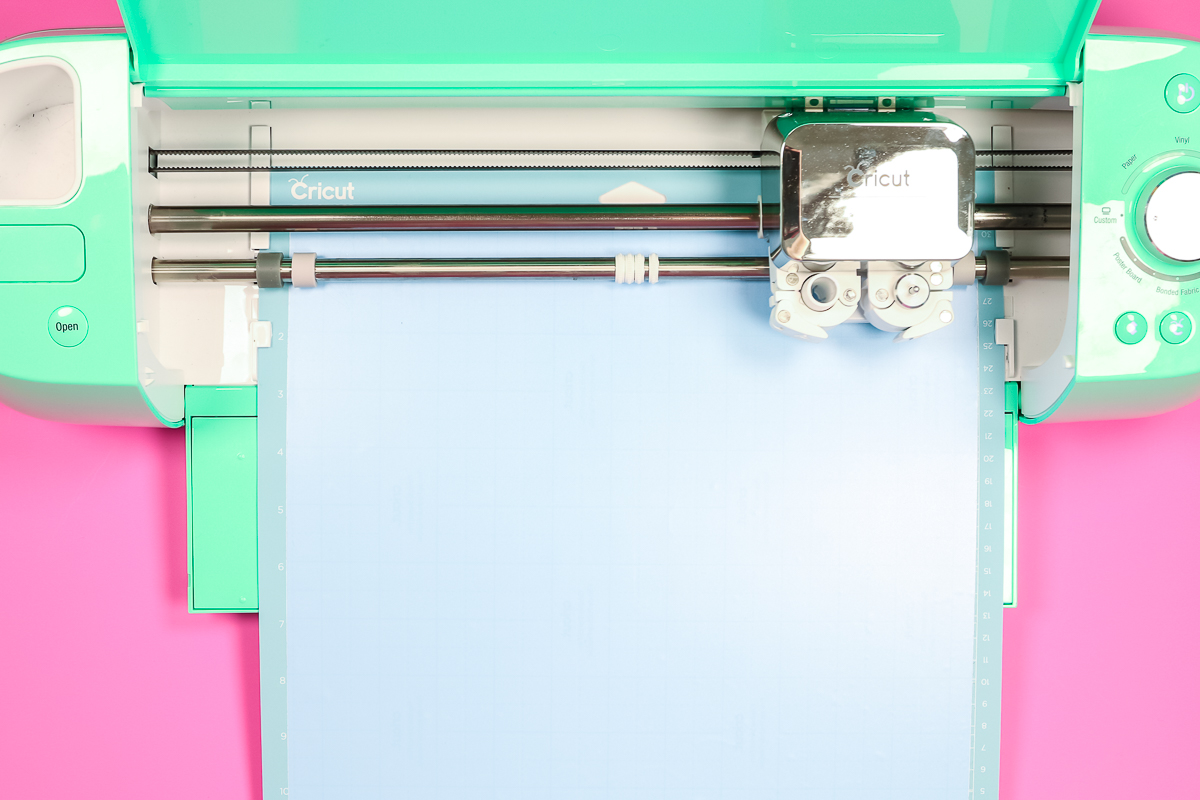
Choose the material you're cutting. I am choosing flexible stencil film as my material. Because this is a vinyl material, it requires a fine-point blade, which means you can cut it with any Cricut machine.
You do not need to mirror your cuts for this material. Load the mat into the machine and press “Go” to cut. When your machine is finished cutting, you can unload the mat and proceed to the next step.
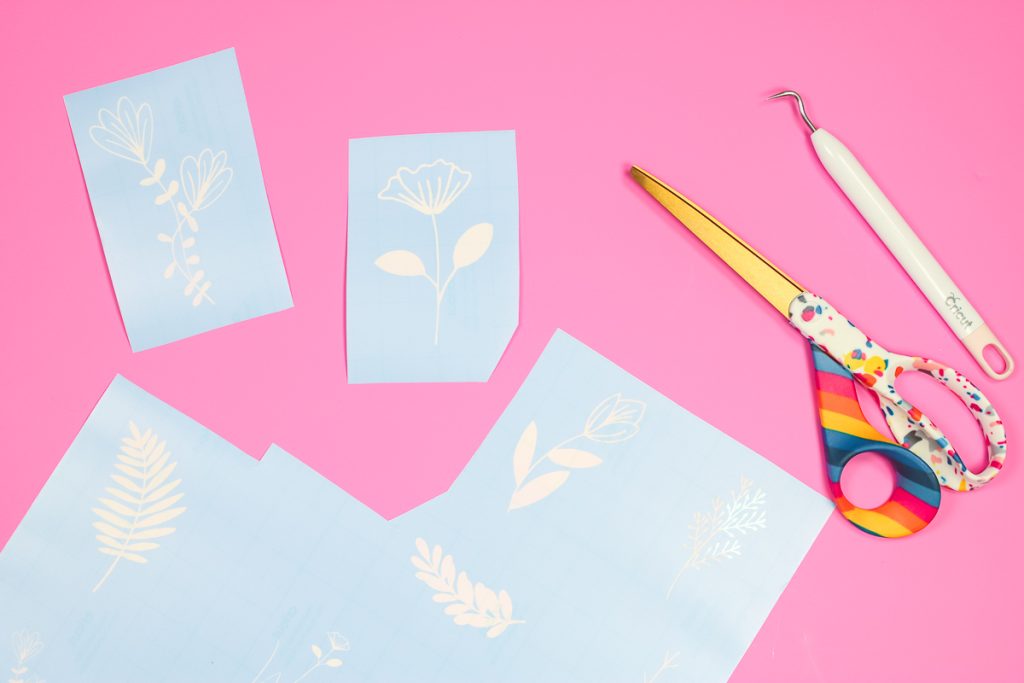
How To Weed Stencil Vinyl
Weeding stencil vinyl for Cricut wood burning is similar to weeding other vinyl materials. The difference is that instead of weeding out the outside, we are going to weed out the interior pieces; this is called reverse weeding. All the parts of the designs that you want to burn onto the wood you want to remove from the sheet.
NOTE: I've had really good success leaving the material on the mat while weeding.
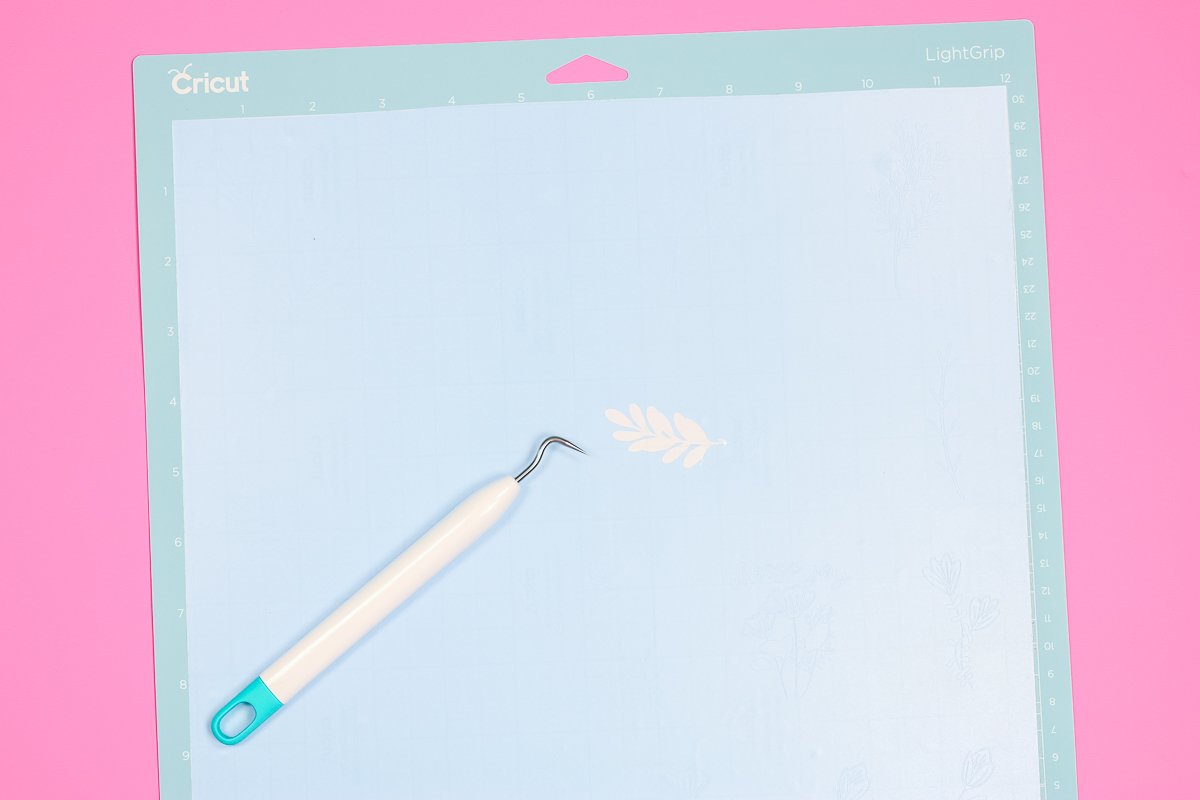
In the photo above, you can see that I've removed all the internal pieces of the leaf. I'll continue to weed out all the interior pieces to reveal the designs.
You can now see what I meant by reverse weeding. You do want to make sure to leave things like the centers of letters and other interior detail pieces in place. Once everything is weeded, remove the material from the mat.
Separating Weeded Stencil Vinyl
If you've cut more than one design to use for Cricut Wood Burning, use a pair of scissors to separate the designs. Make sure you cut down the middle of the two designs so you have stencil material all the way around the design.
How To Apply Stencil Vinyl To A Wood Surface
You are almost ready to learn how to use a wood-burning marker! For each stencil design, use Transfer Tape to apply the vinyl to a clean wood surface.
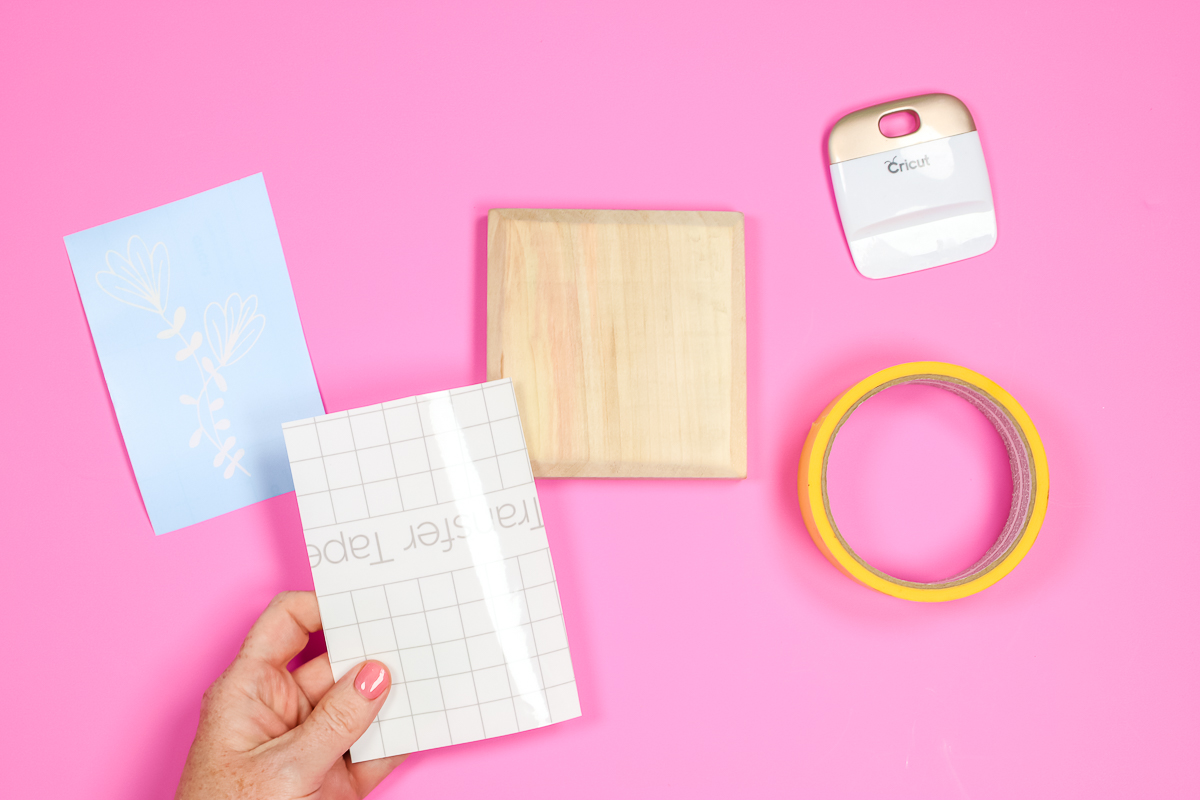
Add the transfer tape to the top of the stencil and burnish it well. Peel back the stencil liner, making sure the stencil film itself stays on the Transfer Tape.
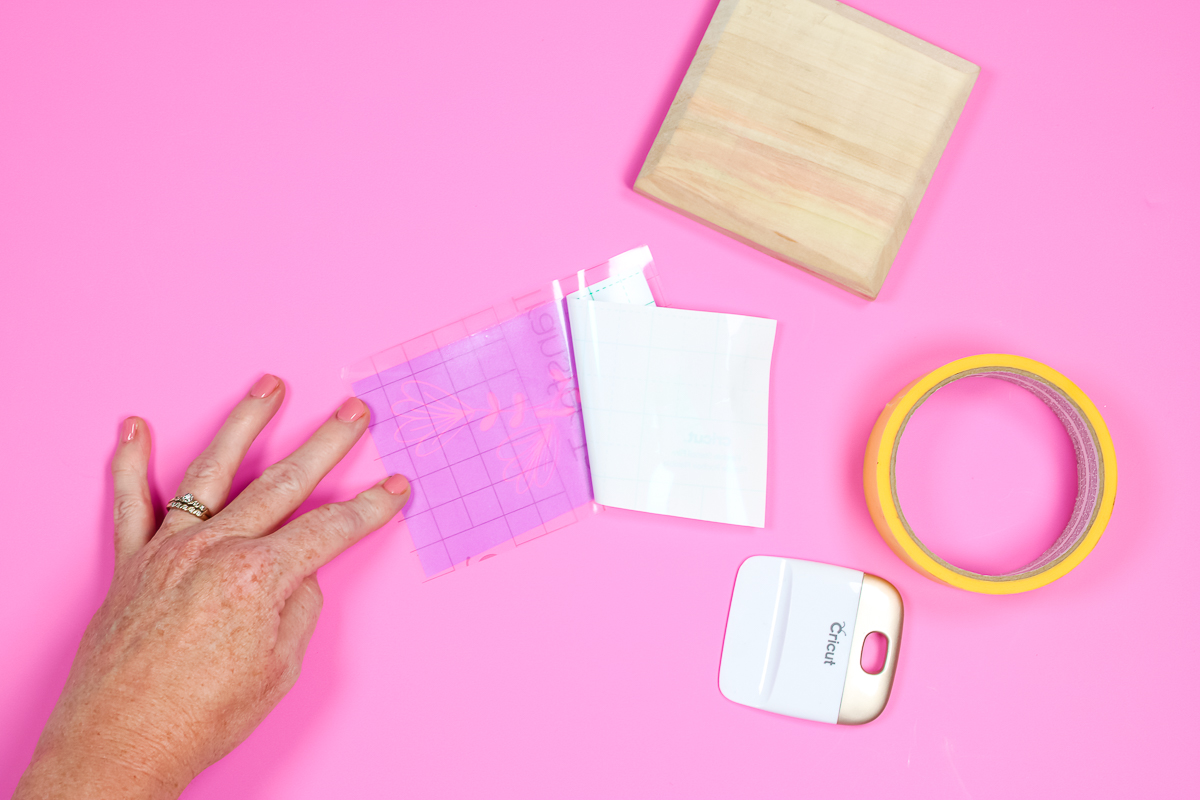
Locate your design on the wood surface. Once you have it where you want it, use the scraper tool to smooth it out thoroughly on the surface.
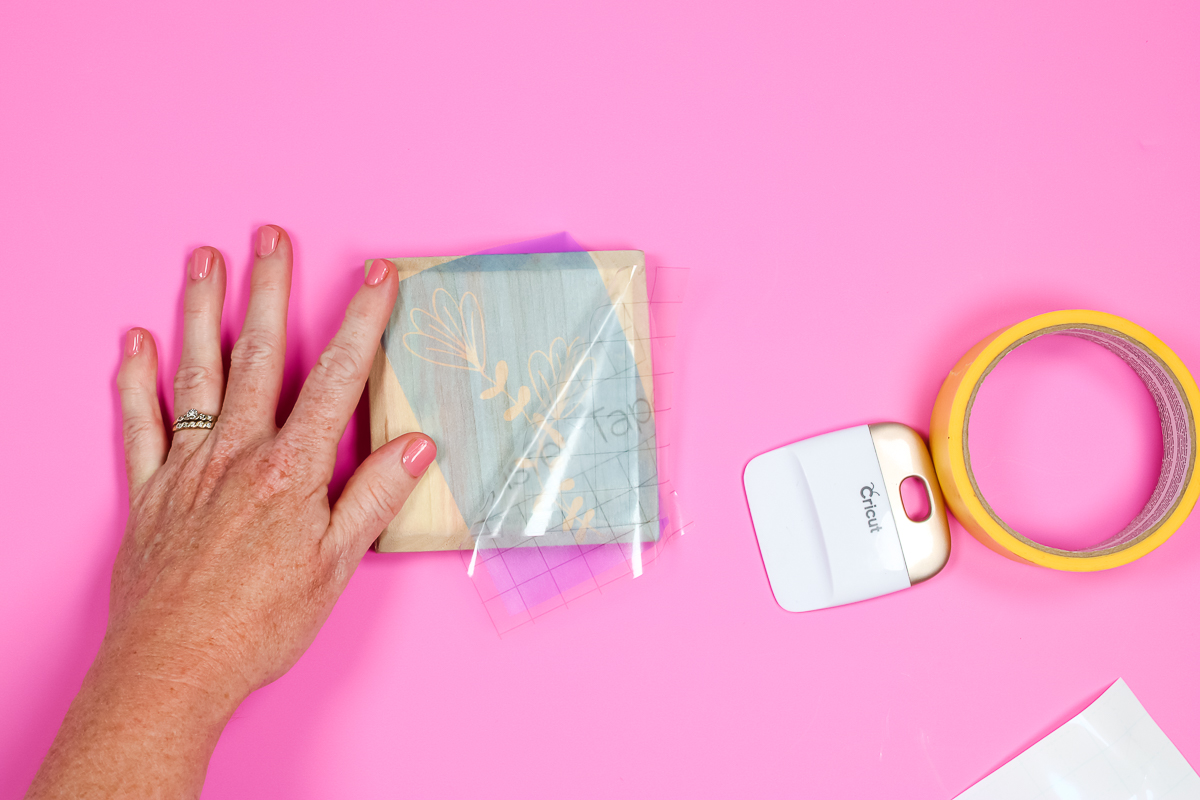
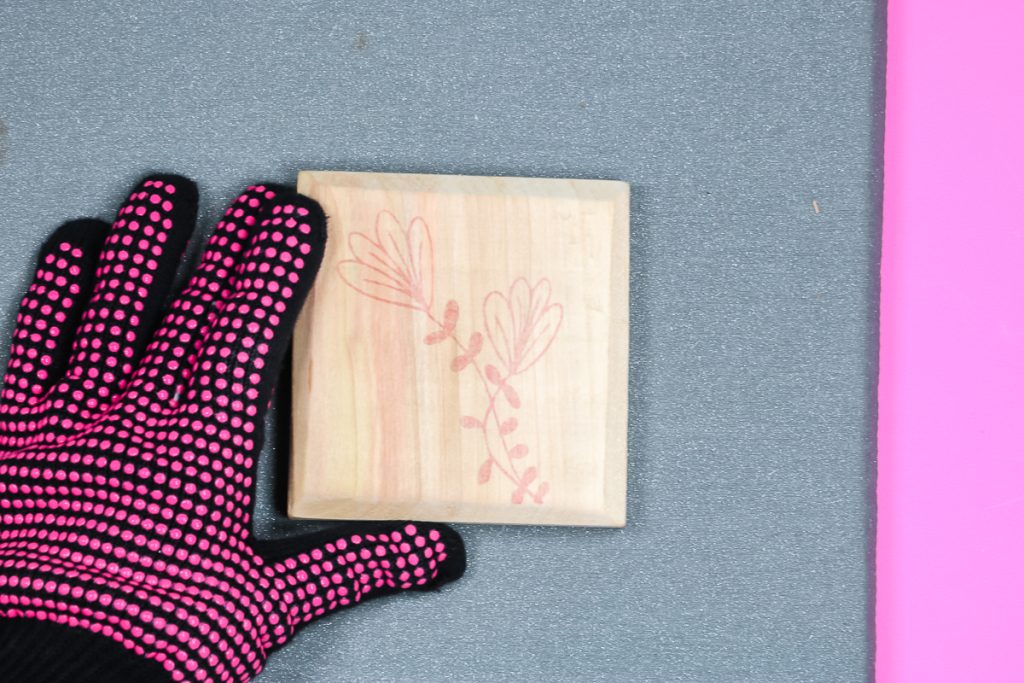
Peel back the transfer tape, ensuring that the stencil film remains on your surface. If you have any exposed wood area, cover it up with painter's tape. This helps protect the surface from the heat of the heat gun as well as any stray liquid from the wood-burning marker.
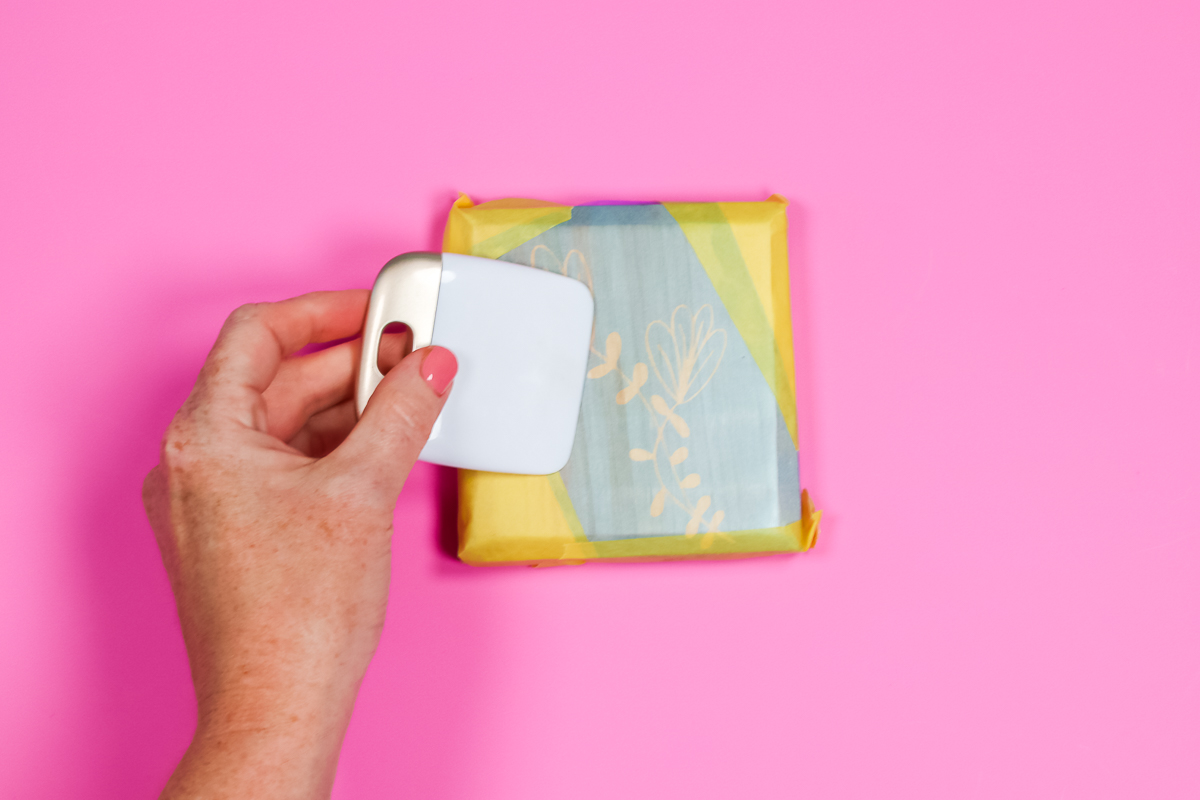
Once everything is taped off, go over the stencil material again with the scraper tool, making sure all edges around the design are adhered to help keep the wood burning marker liquid in place.
How To Use A Wood Burning Marker
To use the Scorch Marker Pro, you need to decide which end you want to use. One end has a bullet tip, and the other end has a foam brush. Personally, I think the foam brush end is best for applying the liquid to your stencil if it has larger open areas. The marker end is great for filling in thinner lines.
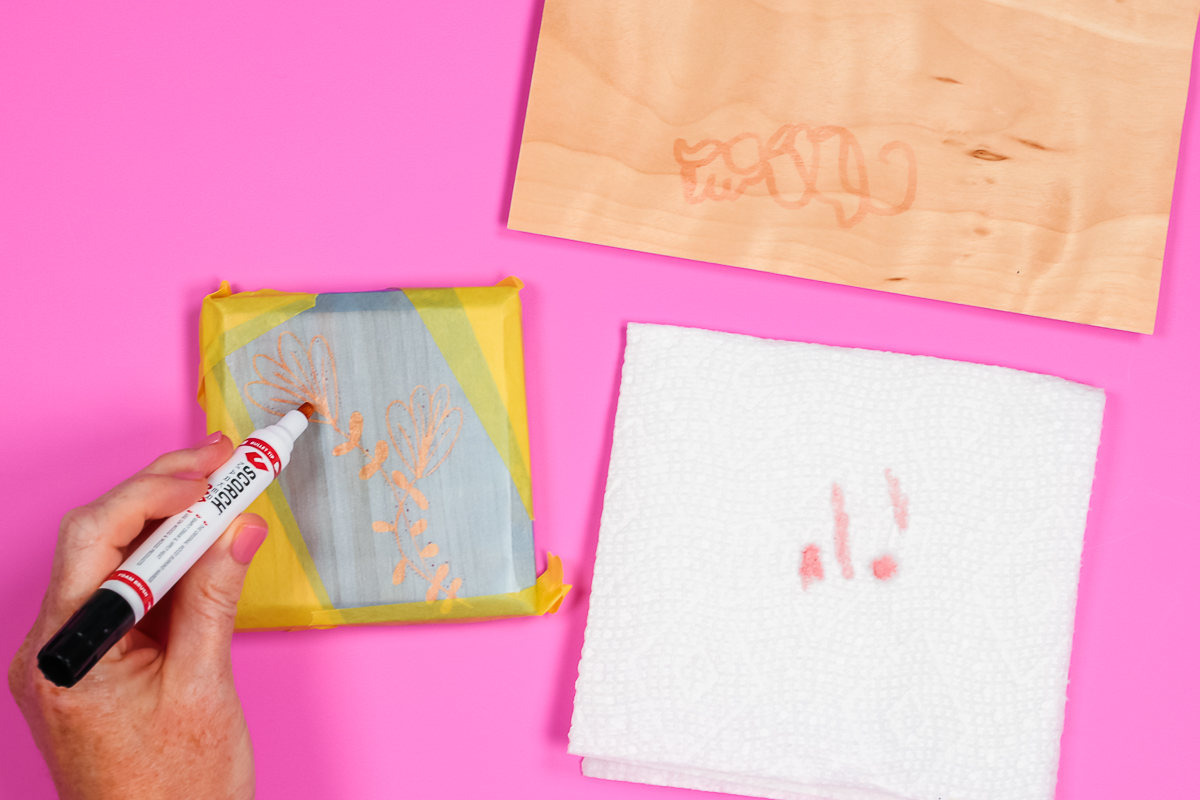
If your marker is new, you'll need to start the marker. I usually use a paper towel and press the end of the pen down a couple of times. As you can see, the liquid is pink, so you'll be able to see when it starts.
IMPORTANT: Never start the marker on your stencil.
I also suggest having a scrap piece of wood to practice using the marker. This will give you a good idea of how the liquid flows and what it looks like on your surface.
Once the wood burning marker is flowing, move on to your stencil. Filling in the stencil is just like coloring on a coloring book page. Color in the open areas on your stencil. I like to do two coats. Apply the first coat, allow it to dry, and then apply a second coat. That gives you plenty of liquid on the stencil, which will give you a nice look when it's burned.
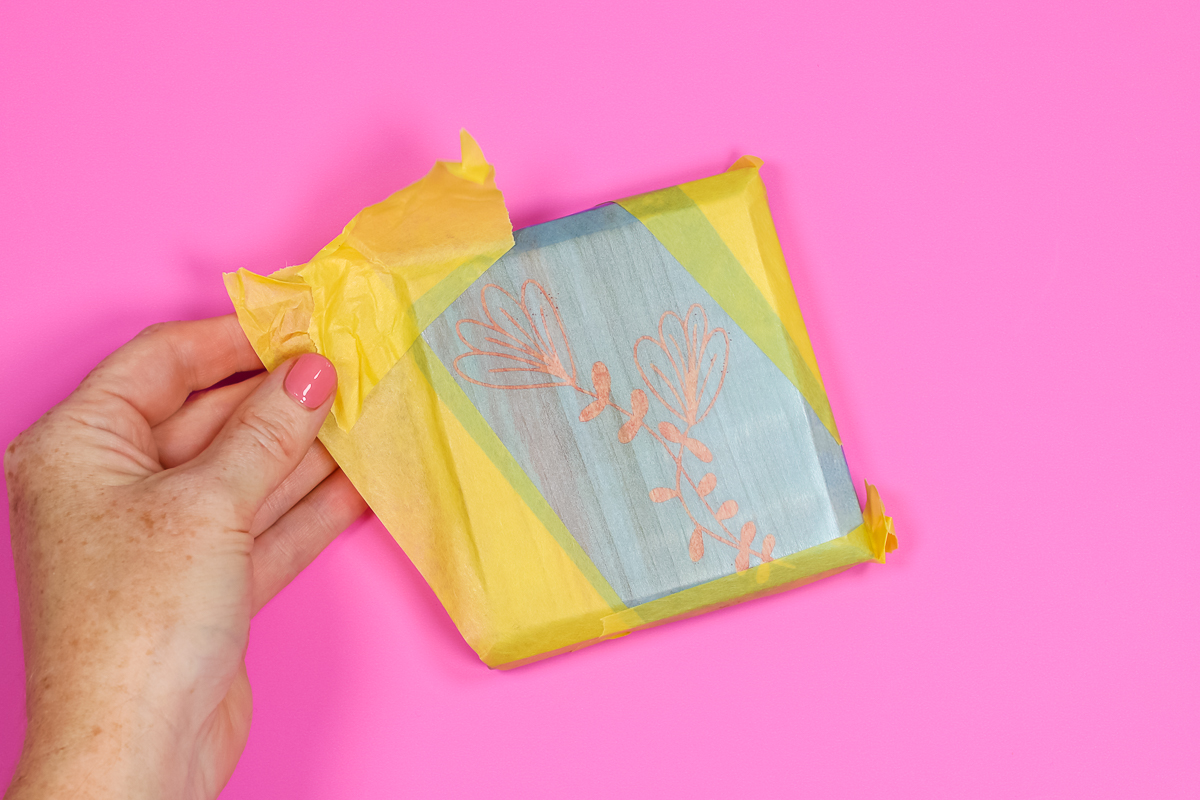
Allow it to dry completely with the stencil still in place, and then remove it. With the stencil and painter's tape removed, you should be left with just a pink outline of the design you've chosen.

NOTE: The Scorch Marker leaves a pink tint on the surface of your wood, indicating that it has been applied correctly.
How To Use A Heat Gun With The Wood Burning Marker
To protect my tabletop, I am using a Cricut EasyPress Mat under my wood blank. I am also using a heat-resistant glove to protect my hand from the high heat.
I have my heat gun turned up to about 1,000 degrees. Hold the gun at a consistent distance from the surface. Be sure not to get too close and avoid holding it in one spot for too long.
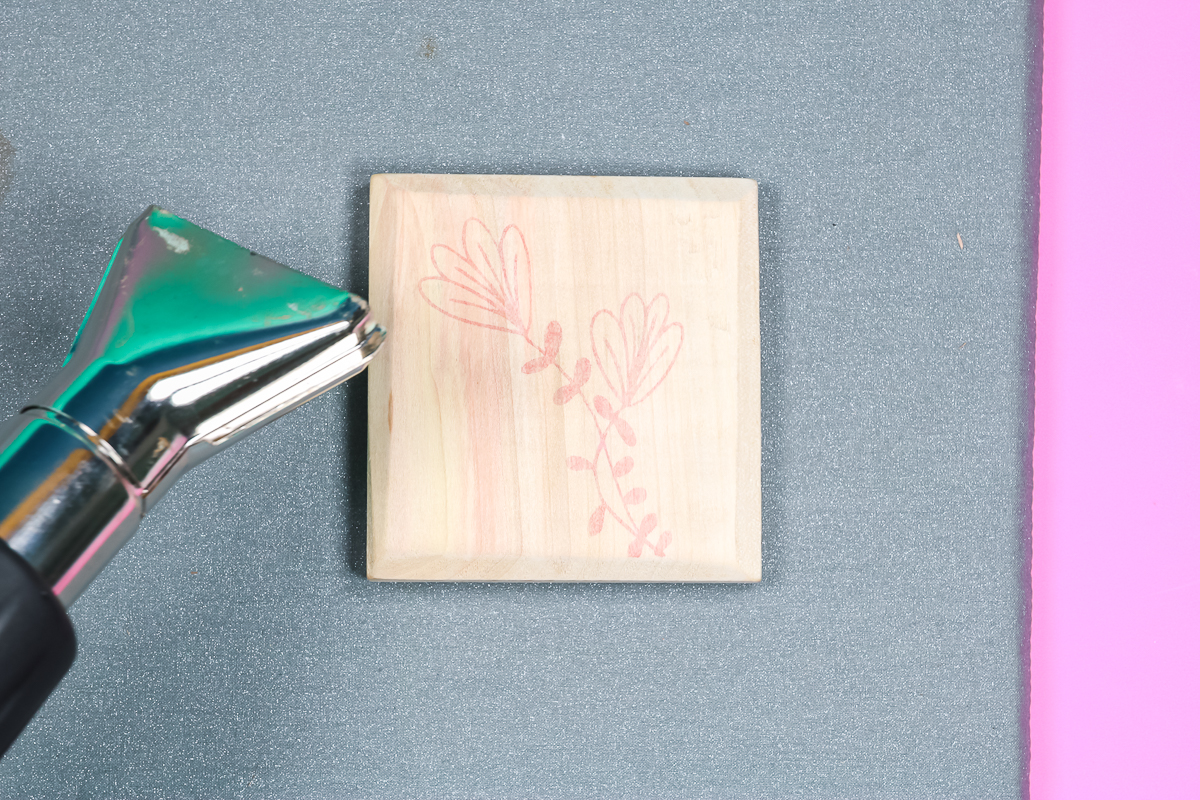
Move the heat back and forth over the entire surface until the wood has had adequate time to burn. You'll start to notice a change and a darkening in the area where you put the Scorch Marker. You can heat this as long as you need to achieve the desired darkness.
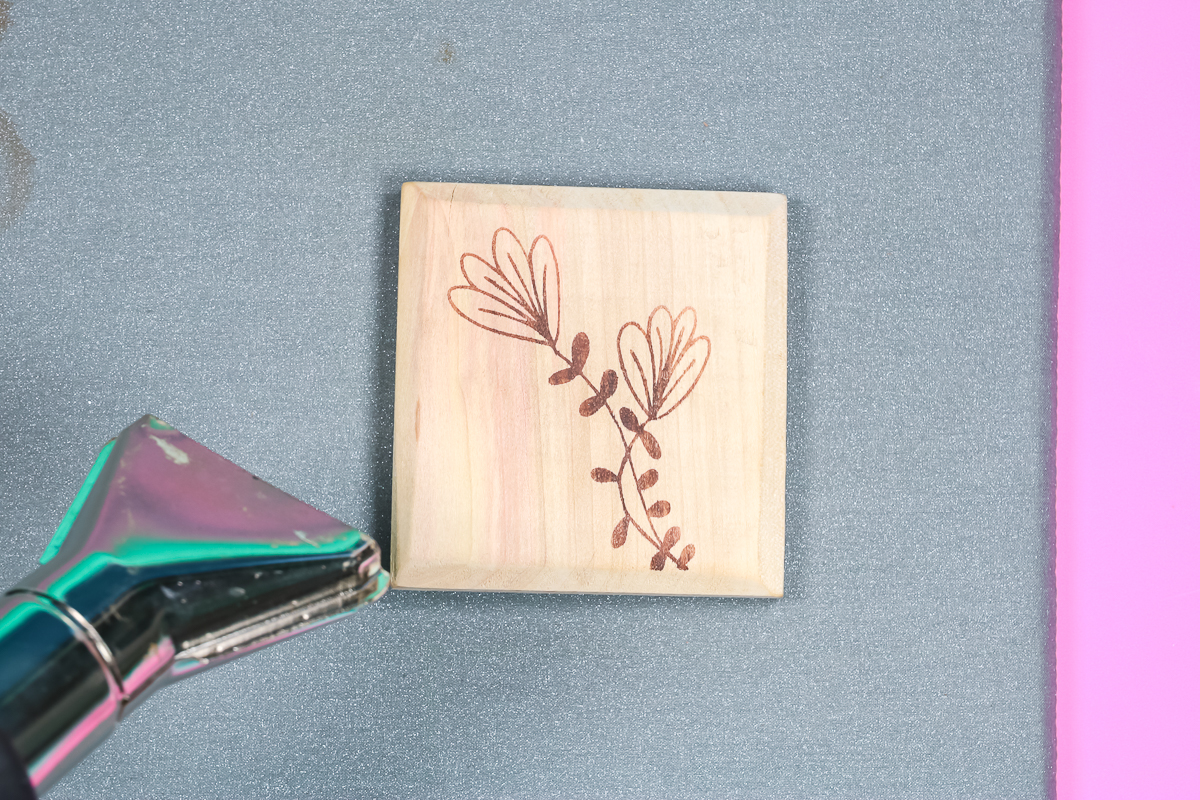
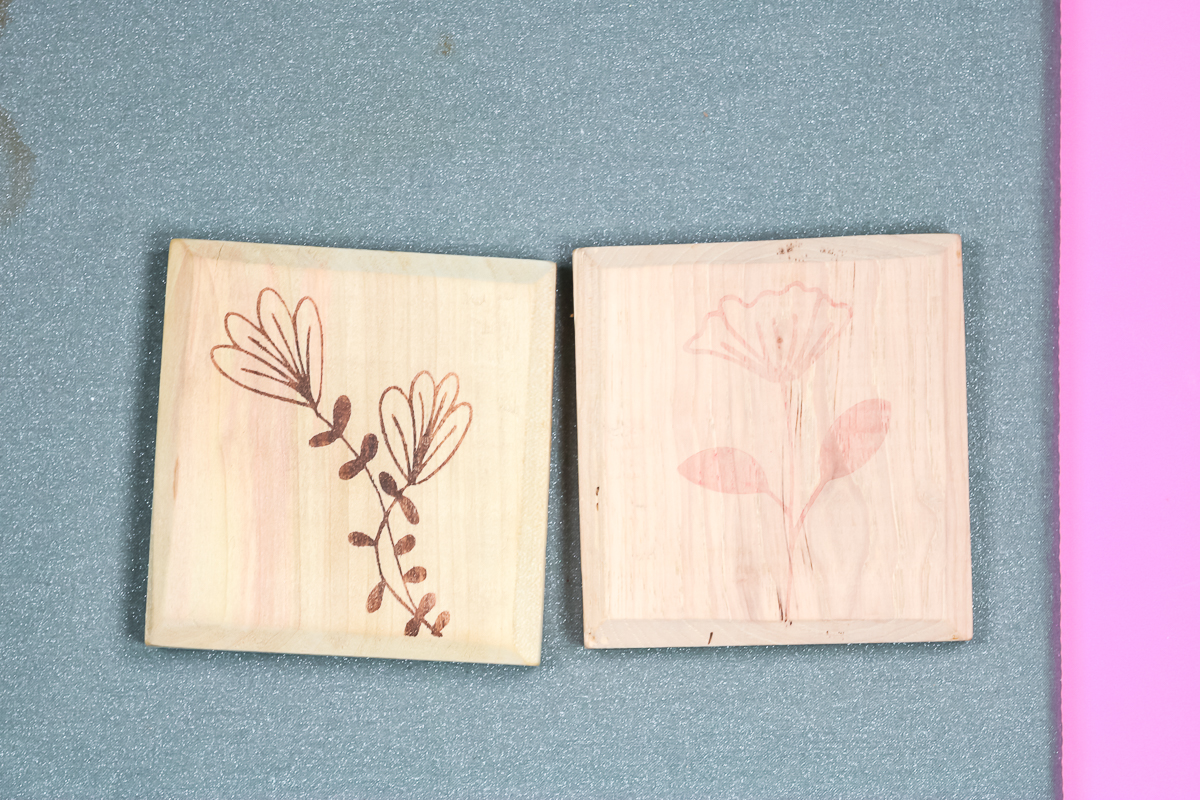
For comparison, below is a wood coaster that has the Scorch Marker liquid applied, which hasn't been burned yet. The other has been heated, so you can see how much darker it gets with the application of the heat gun. Now that you know how to use a Scorch Marker, you can make all sorts of handmade gifts!
Something I love about this technique is that it does not rub off. You will need to seal your finished product, so I'll share more on how to seal Cricut Wood Burned projects later in this post.
How To Create Wood Blanks With Cricut Maker And Knife Blade
Above, I used a wood blank that we made at home. If you don't want to use something you've made or purchased, you can also use your Cricut Maker with the Knife Blade and designs created in Design Space to make your own customized wood blanks.
NOTE: If you don't own a Maker, you can buy wood earring blanks instead of making your own.
Use Design Space To Create Wood Earring Blanks
The easiest way that I've found to make earring shapes is to use the shape tool in Cricut Design Space. You can also upload your own designs or try the images tab. I'm going to use a few free shapes, as well as some paid shapes, to make my earrings.
You can resize the shapes either by using the corners and the arrow button or by typing in an exact size number in the top toolbar. For each earring design, we'll duplicate them. That way, we'll have two of each earring type. Make sure you've selected either the Maker or Maker 3 as your machine from the canvas screen.
Can I Add Holes for Earrings In Design Space?
I do not add a hole to the earring design in Design Space. The Knife Blade requirements don't allow for a hole small enough for this design. To finish the earrings, you can add studs with jewelry glue or use a tool like a Crop-a-Dile to poke holes when they're done cutting.
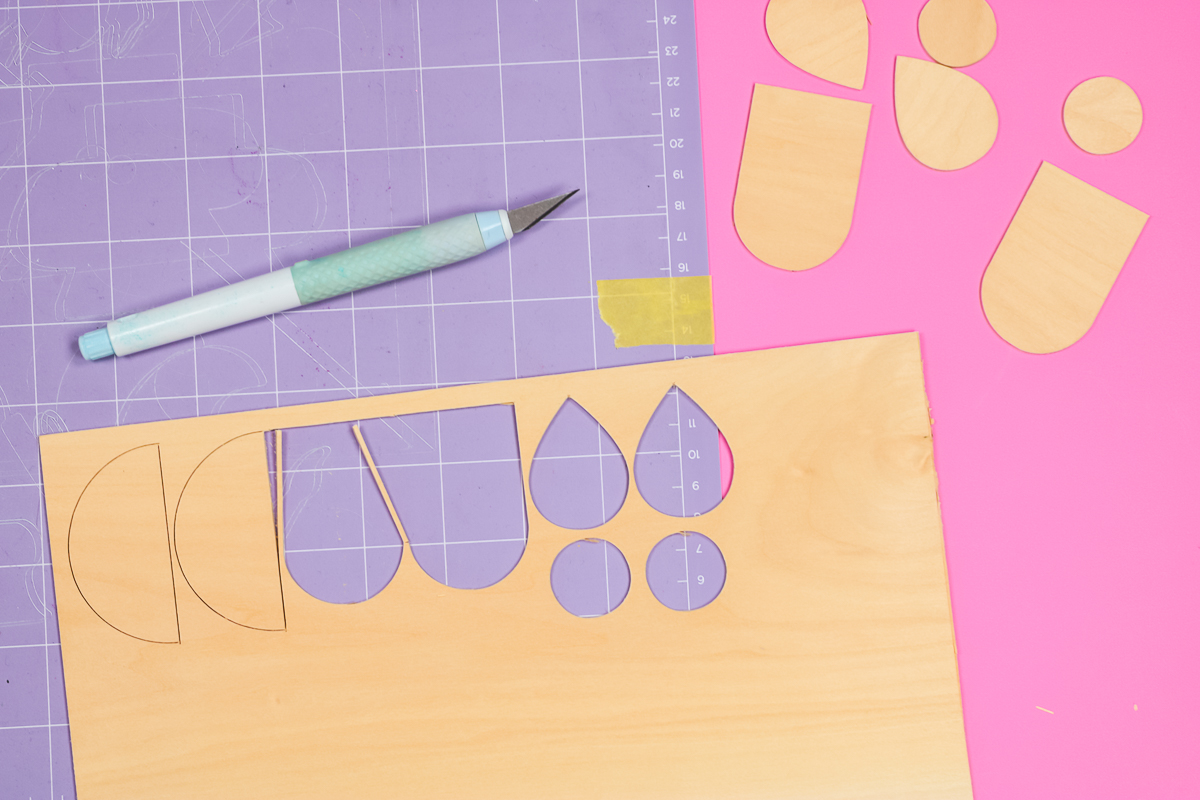
How To Cut Wood With Cricut Maker
Remember, you can only cut Basswood with a Maker or Maker 3. Wood burning with a Cricut can be done with any Cricut machine, but cutting Basswood requires the Knife Blade, so you need the Maker or Maker 3.
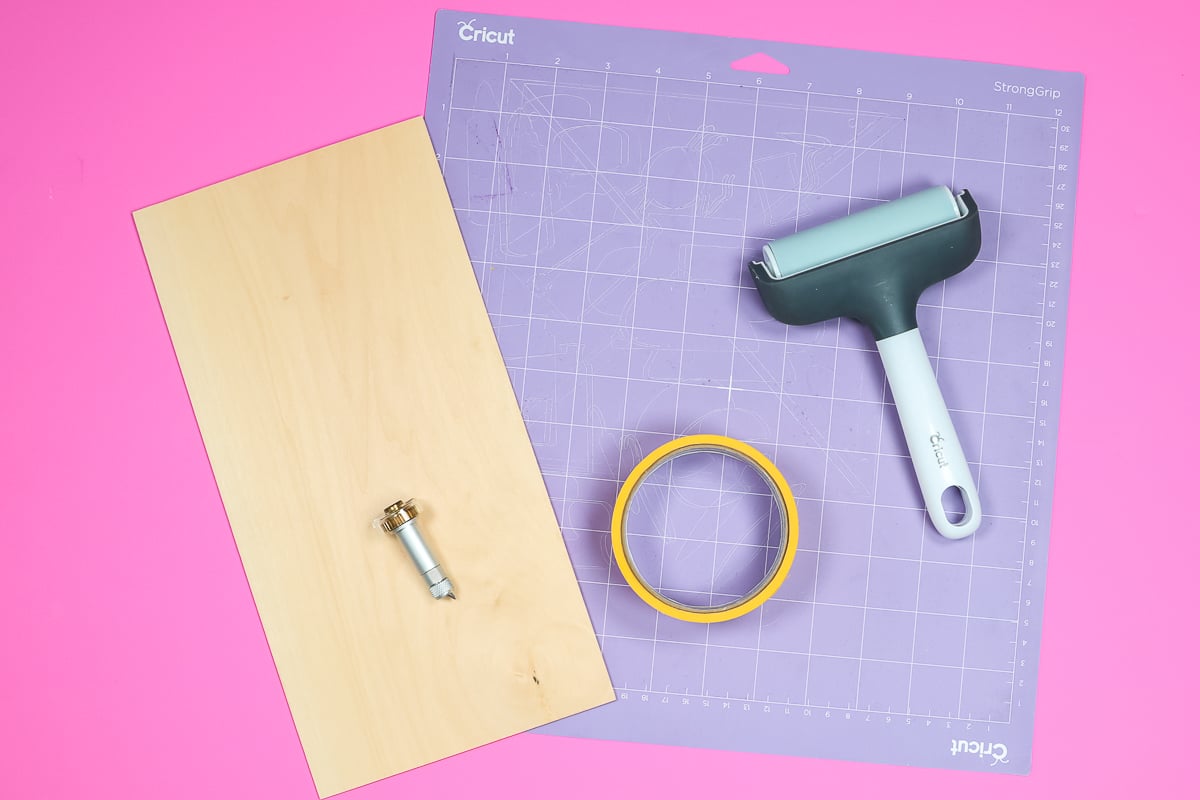
Supplies Needed To Cut Wood Earrings With Cricut Maker
- Knife blade
- StrongGrip Mat
- Painter's tape
- Brayer
- Wood piece
NOTE: You will need to cut wood on a computer or laptop as it is not an option on mobile.
How To Apply Wood To Cricut Cutting Mat
Place your piece of wood on the StrongGrip Mat. Ensure that you lay the wood out in the same way your design is laid out in Design Space. Use your Brayer to ensure the wood is firmly adhered to the mat.
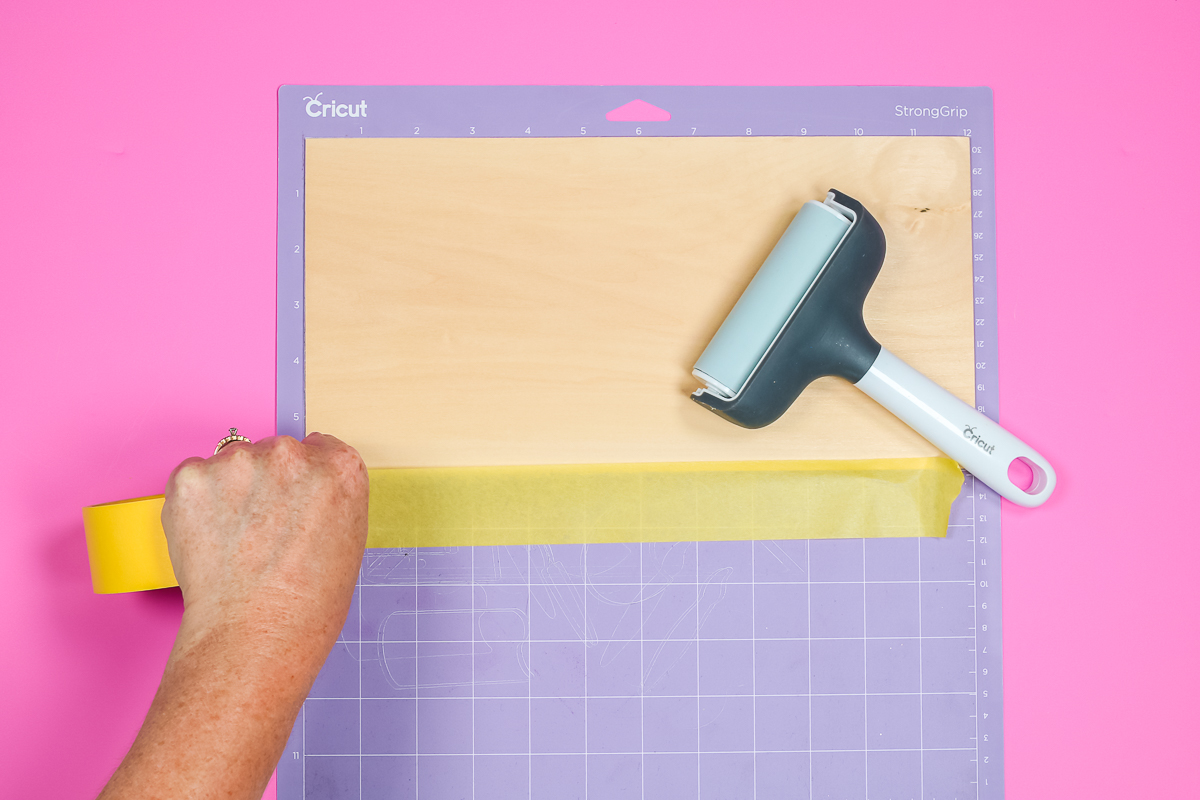
In the photo above, my piece of wood goes all the way to the 12″ mark on the mat. When cutting wood with a Cricut Maker, you actually can't cut to the 12″ mark. I used a TrueControl Knife to trim the wood to 11 inches.
Add painter's tape all the way around the wood, ensuring everything is securely in place. Painter's tape will keep the wood from shifting and ruining your cuts. I'm using wide painter's tape. The painter's tape will likely run over the side, so just use a pair of scissors to trim the tape and then press it down again.
Move the star wheels all the way over to the right – past the 11″ mark so they don't run over the wood. If the star wheels drag on the wood, you run the risk of your design not being cut correctly.
Cut Settings In Design Space For Basswood
Once everything is taped down and the star wheels are moved, load the mat into your Cricut machine. I chose basswood 1/16 inch as my material. Add the Knife Blade to the B clamp and then press C to cut.
The Maker will cut all of your pieces. About halfway through, I pause my machine to check the cuts. Pause your machine when the mat is out as much as possible so it's easier to check the cuts.
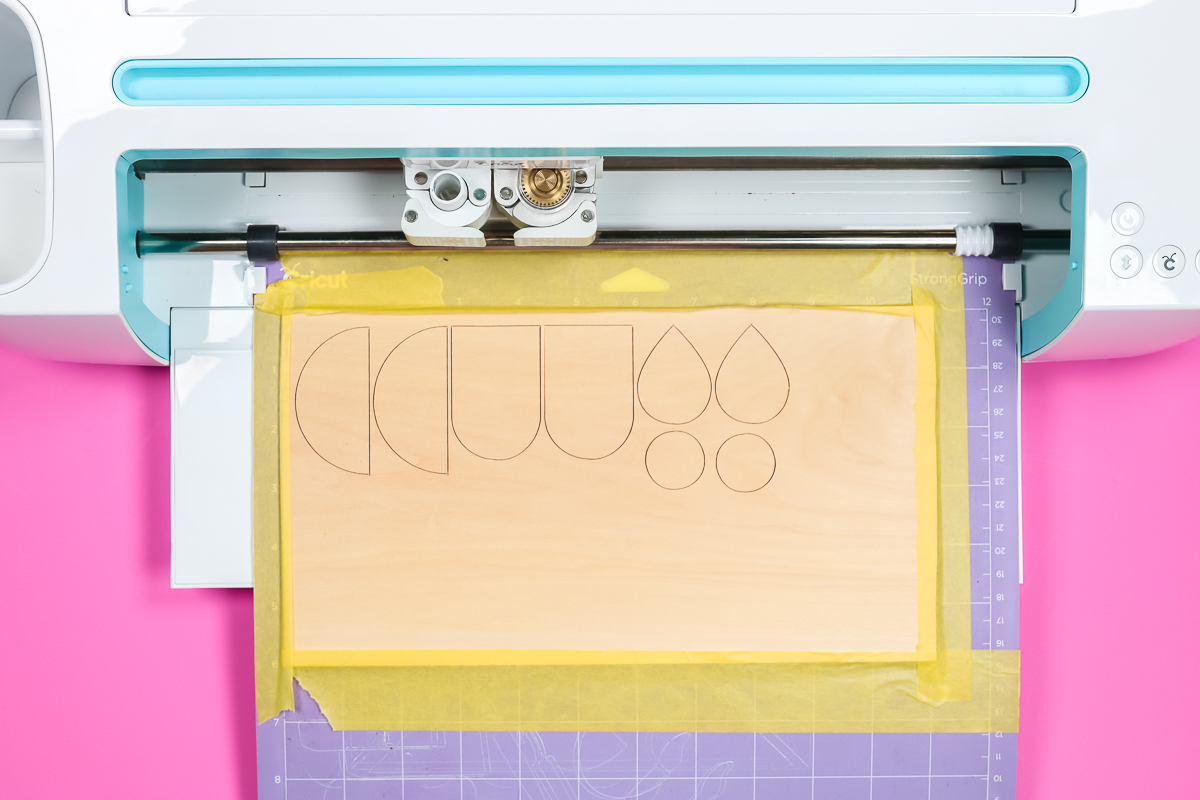
Use a weeding tool or something else to check the cuts; do not unload the mat! The last thing to cut through will be the corners of your design. On pass 10 of 14, my design is cut through except for the corner. I could press the Go button again and allow it to continue cutting, but that could cut into the mat.
You may need to cut the corners manually with a craft knife if you unload it early, but this can protect your mat and potentially your machine.
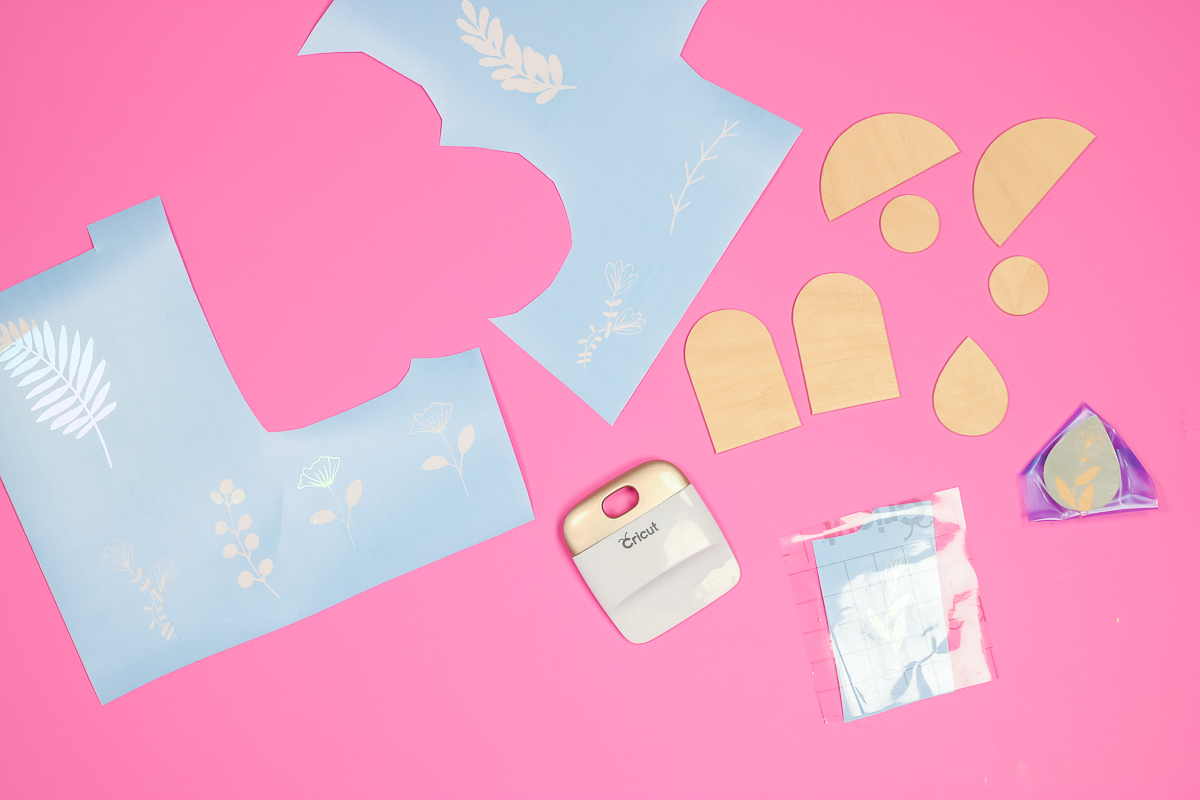
Removing Basswood From Cricut Mat
When you decide your design has cut through, unload the mat, and then remove the tape from around the outside of the basswood.
Flip the mat over and gently remove it from the wood. Several of my cuts fell right out of the wood piece, so they were definitely cut all the way through. A couple of the designs are still attached to the original wood piece. They weren't cut quite all the way through.
To remove these pieces from the wood, I will use my TrueControl Knife to follow the cut lines and determine where they are still attached. Go over the places where it's attached until it's cut through and releases from the wood.
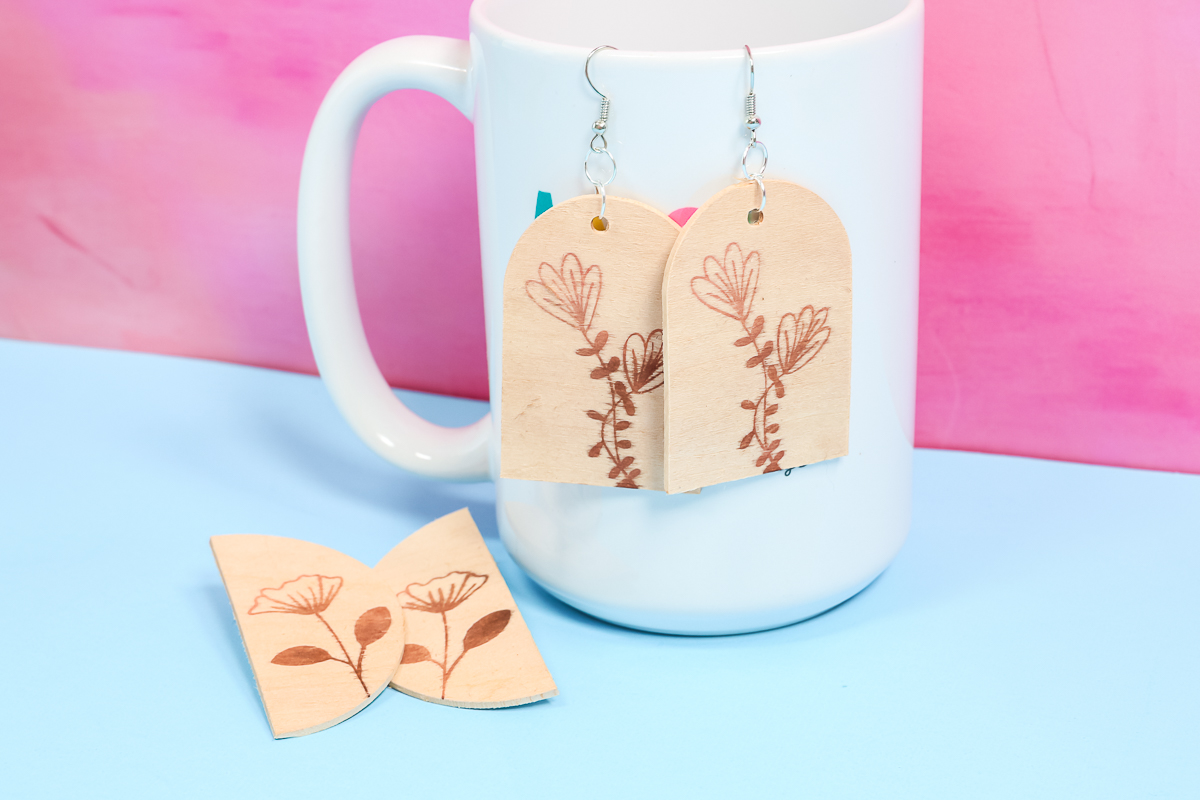
How To Use A Wood Burning Marker On Basswood Earrings
Applying stencils to earrings cut with your Cricut is the same as applying the stencils to other wood blanks. Add the stencil vinyl to the wood earring blank and use the scraper tool to go over the entire surface.
Since you learned how to use a wood-burning marker above, just follow the same steps here. Use the Scorch Marker to fill in the entire design, allow it to dry, and then remove the stencil vinyl. Then use the heat gun in the same way. Remember to protect your surface and your hand from the heat.
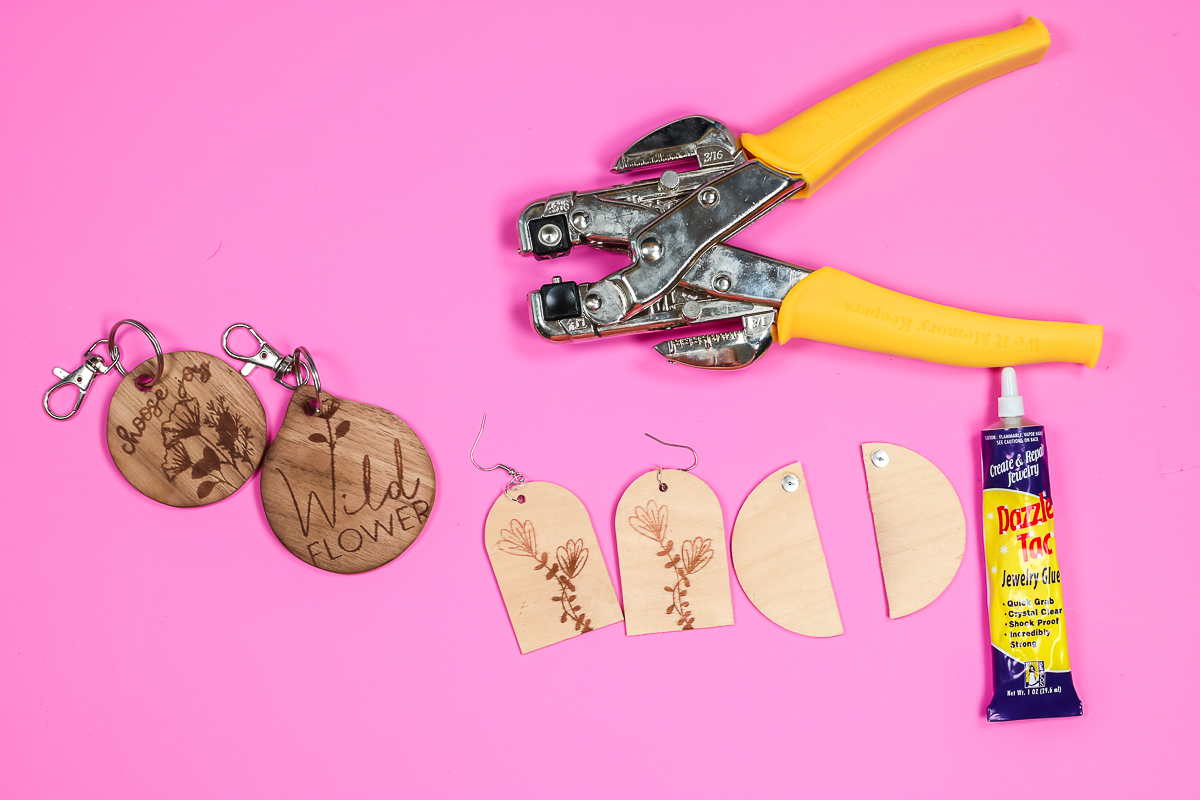
How To Finish Wood Earrings
To finish off the earrings, I used a Crop-A-Dile to punch a hole in each one. For these dangle earrings, I used jewelry pliers to attach jump rings and add some jewelry findings to complete the pieces.
If you don't have a Crop-A-Dile or don't want dangle earrings, you can use something like Dazzle Tack to attach studs to the back of the earrings. Allow them to dry completely, and they're done.
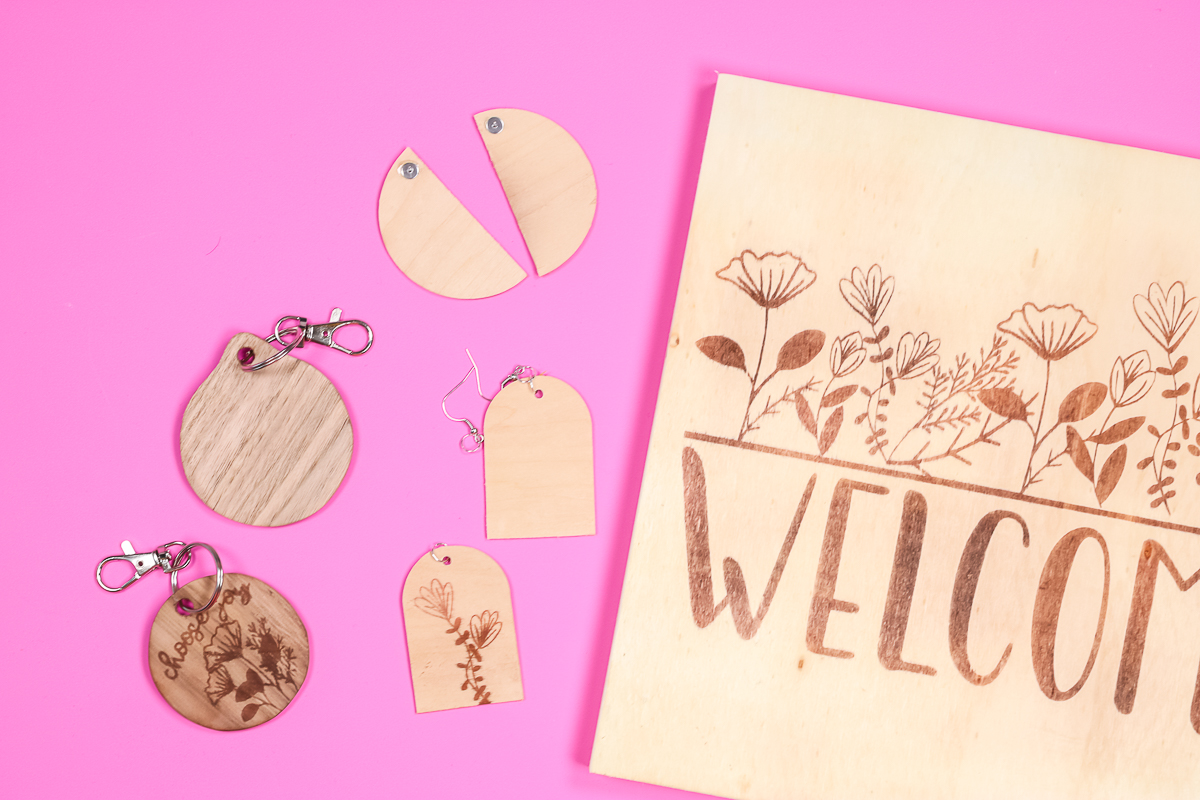
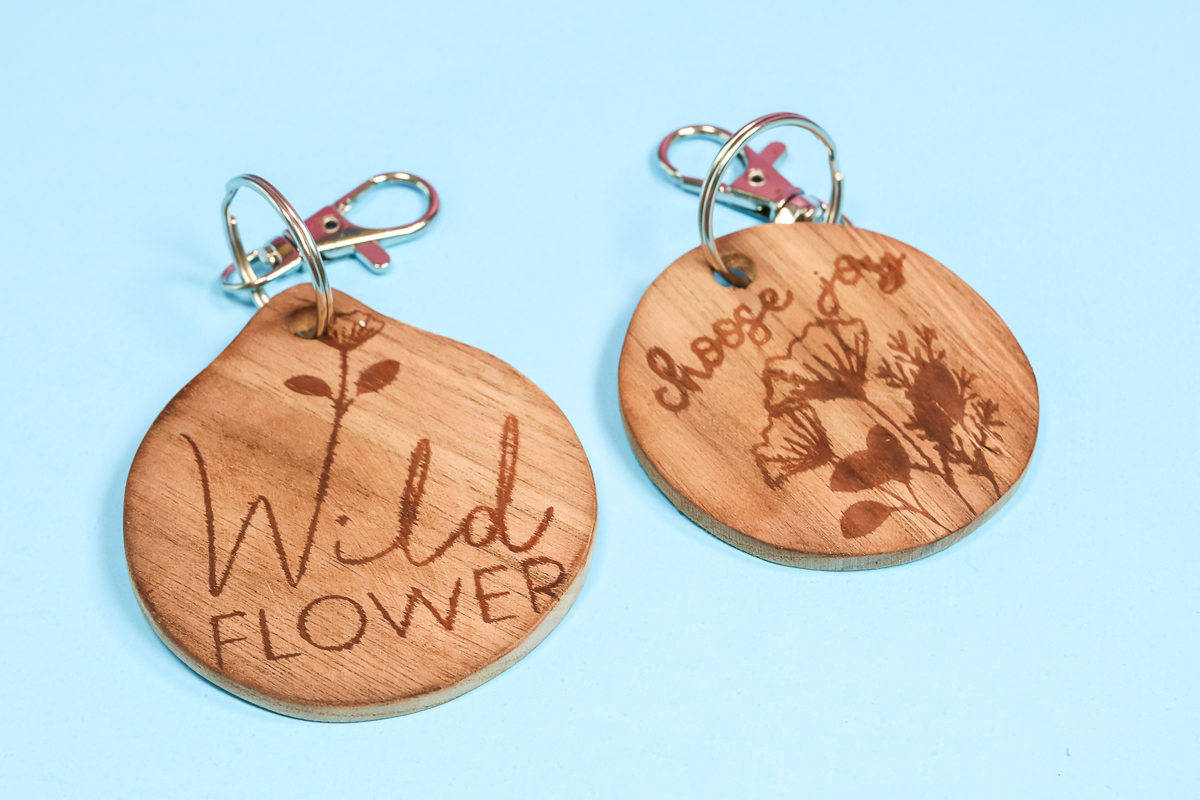
How To Make Wooden Key Chains
Along with earrings, I also made some key chains. Making key chains is the same as the other wood-burning projects. To finish the key chains, simply add a key ring through the existing hole in the key chain pieces.
NOTE: When using a Cricut for wood burning, I encourage you to wood-burn over the entire surface. When wood burning, the color of the wood can change. I like to cover the entire surface of the blank with one color when it's done.
Sealing Finished Cricut Wood Burning Projects
Once you have finished your wood pieces, a sealer is recommended. For something like a sign, if it's not in a high-traffic area, you could probably leave it unfinished. You can also use polycrylic over the top.
If you're making something with this technique that might be exposed to food, you will want to use a food-safe wood protectant. I like butcher block conditioner; however, there are also shellac products and things like that that are food-safe. Make sure to look for something that is food-safe if you're going to use it on something like a cutting board and want to burn it.

Make sure to apply the sealer you choose before using the cutting board itself. For key chains and earrings, I would use Polycrylic as a topcoat. For wood coasters, you could even add epoxy over the top, as they will be exposed to a lot of moisture.
Final Thoughts On Cricut Wood Burning
Now that you've learned how to use a wood-burning marker, I hope you're excited to give it a try. All of these projects I made today would be perfect to give as gifts, they're so fun and can be customized however you want.
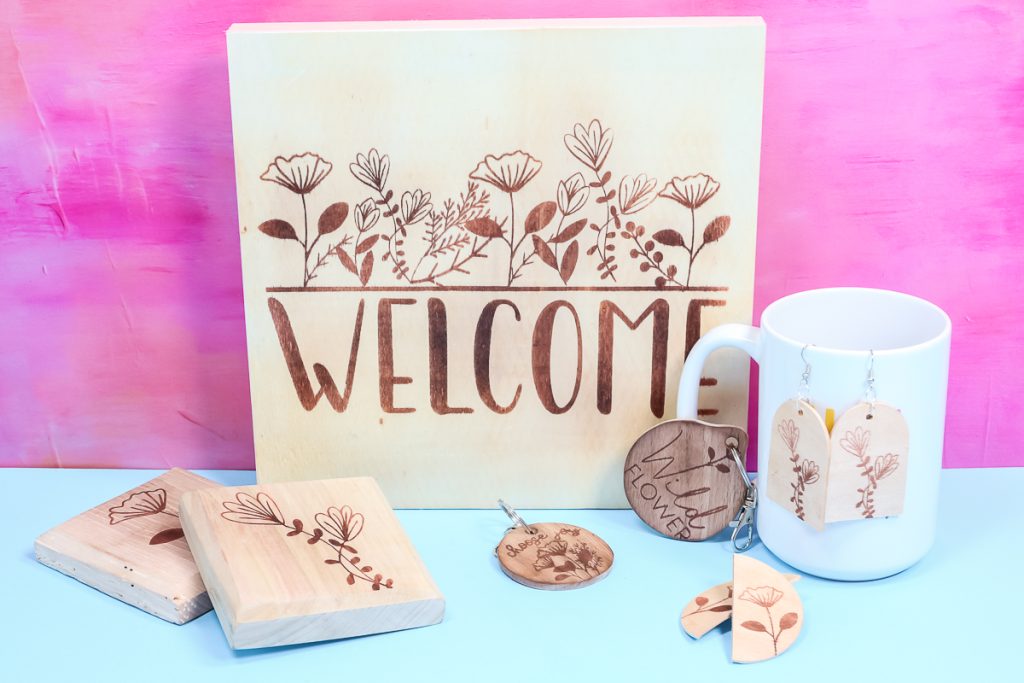
Some other options for Cricut wood burning include adding handles to wooden spoons and personalizing a favorite recipe on a cutting board.
There are so many ideas. Anytime you see an unfinished wood piece, think about using your Cricut machine to do a little wood burning!
FAQs About Wood Burning Marker
Here are answers to some of the most frequently asked questions I receive about using a wood-burning marker. If your question isn’t listed, feel free to drop it in the comments, and I’ll be happy to help!
Which Blade Did You Use To Cut The Wood?
Knife blade with Maker.
How Many Times Can The Scorch Marker Be Used Before It Is Used Up?
I am not sure how many times. I have used mine several times without issue.
Do You Let It Dry Between Coats? How Long Can It Sit Before You Apply Heat?
Yes, I just let it dry between coats, and I let it dry before burning. I haven't timed how long it can sit before you apply heat.
How Do You Prevent The Scorch Marker From Bleeding In The Wood?
Some woods bleed more than others, and I'm not sure how to prevent this.
Do You Know What Causes It To Almost Bleed Black Horizontally?
Usually a poor quality wood or rough surface. It is the marker bleeding out along the lines in the wood. You can try sanding with 1200-grit sandpaper a few times. Clean well and then burn. Or skip that type of wood altogether.
Can You Use Permanent Vinyl For The Stencil, Or Do You Have To Use Stencil Vinyl To Use The Scorch Marker?
Permanent vinyl works!
I Saw In The Supply List That The Heat Gun Needs To Go At Least 900 Degrees. Do Embossing Guns Go That High?
Embossing guns usually DO NOT get that high, which is why I specified.
Do You Have A Tutorial For How To Make A Recipe Cutting Board?
Yes, I do! Check out my video tutorial titled Watco Food Safe Sealer with Handwritten Vinyl Recipe!
4 Wood Burning Crafts
Did you love learning about how to use a wood burning marker, and want more wood burning projects? Check out the ideas below!
- How To Make Wood Burned Coasters (+ Extra Wood Burning Ideas)
- Wood Burned Leopard Print Frame
- Cricut Wood Burning Guide (+ Father’s Day Gift)
- Star Wars Wood Burned Coasters DIY!