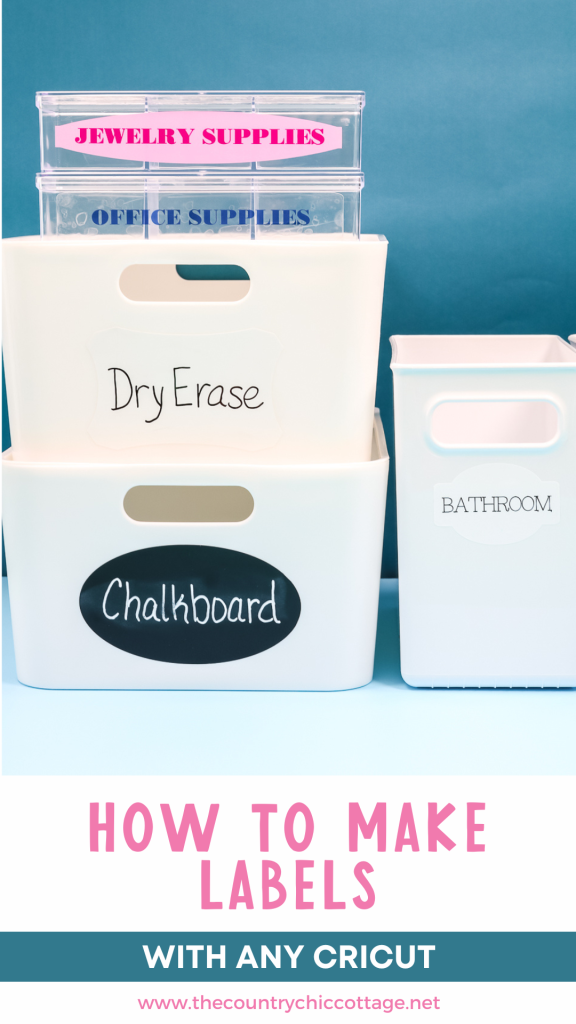
Are you ready to get organized this year? In this post, I’m going to show you how to make labels with a Cricut machine so you can create custom labels for every space in your home. I’ll be using three different Cricut machines and a variety of label materials to demonstrate what works best for various projects. Whether you own a Maker, Explore, or even a Joy, you’ll learn how to make professional-looking labels using any Cricut machine you have.
Are you brand new to Cricut? My Cricut Beginner's Guide is for you!
How To Make Labels Video Tutorial
You can watch me make each of these different labels by pressing play on the video below!
Can’t watch the video or missed some of the steps? Just keep reading below!
How To Make Labels With Any Cricut Machine
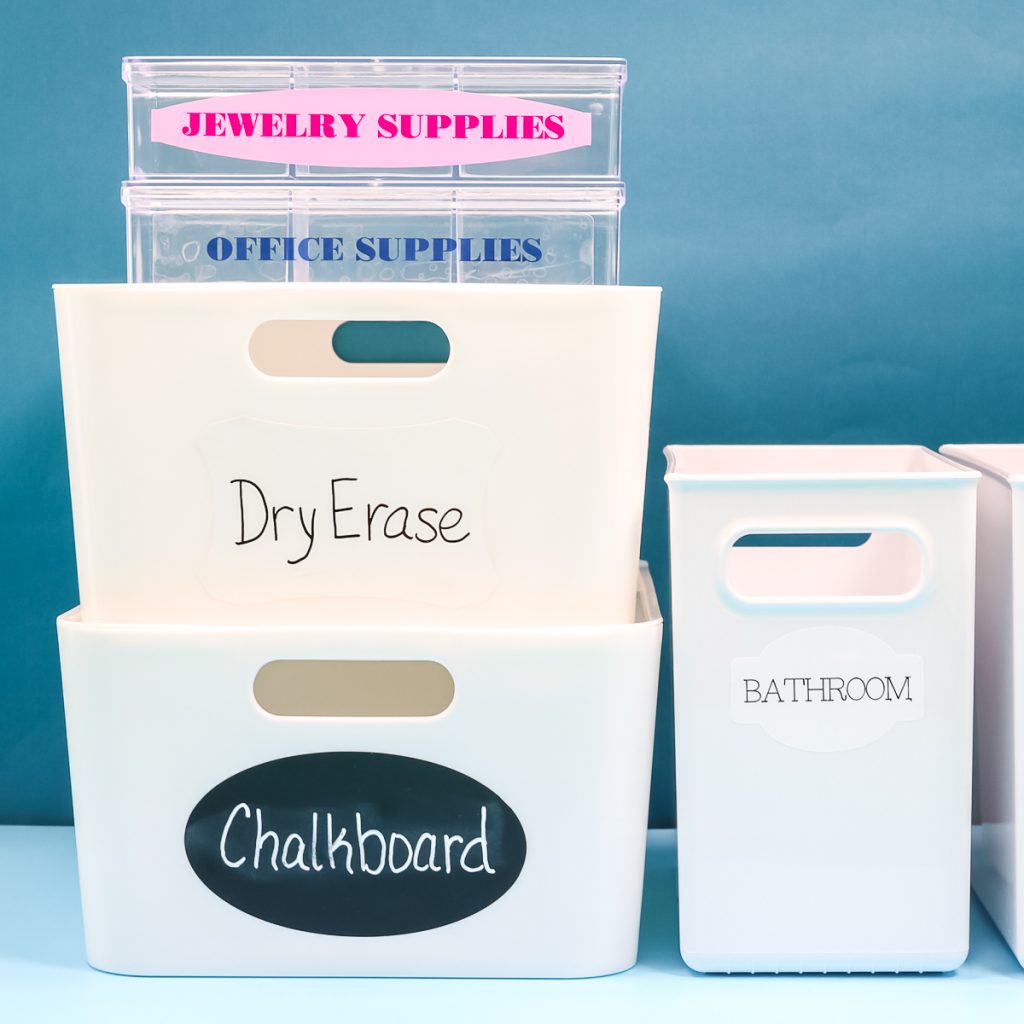
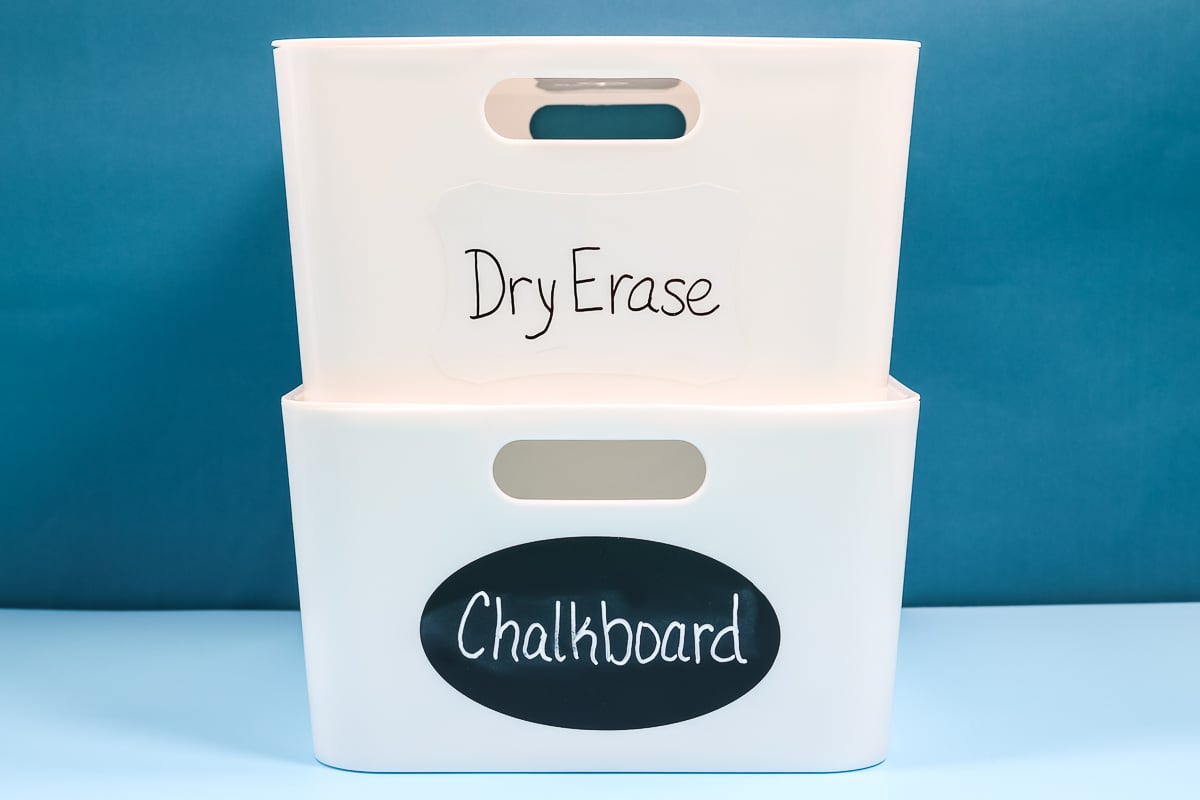
Today I'm using a Cricut Maker, Cricut Explore, and Cricut Joy. No matter what Cricut you own, you can make labels for your home. We're going to make vinyl labels using both chalkboard vinyl and dry-erase vinyl. Both of these options are semi-permanent and can be changed at any time.
I'm also going to show you how to use pens in your Cricut on both writable vinyl and sticky-backed writable paper. Both of these options are ready to go right after you make them because they're sticky on the back.
Lastly, we're going to cover printable vinyl and printable sticker paper to make print-then-cut labels. These print-then-cut options only work if you own a Maker or Explore series, as Joy doesn't have the sensor to do print-then-cut.
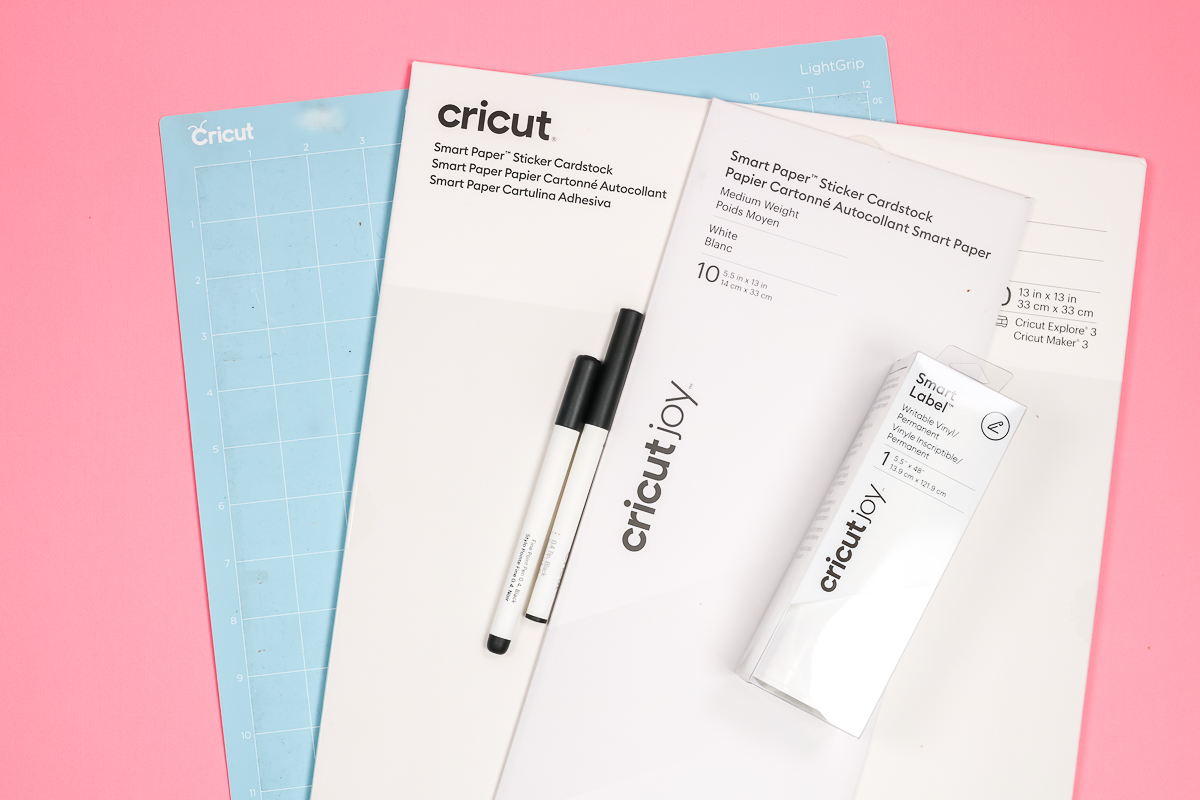
Supplies Needed To Make Labels With Cricut
NOTE: If you're only making one type of label, you won't need all of these supplies.
- Cricut Machine
- Cutting Mat
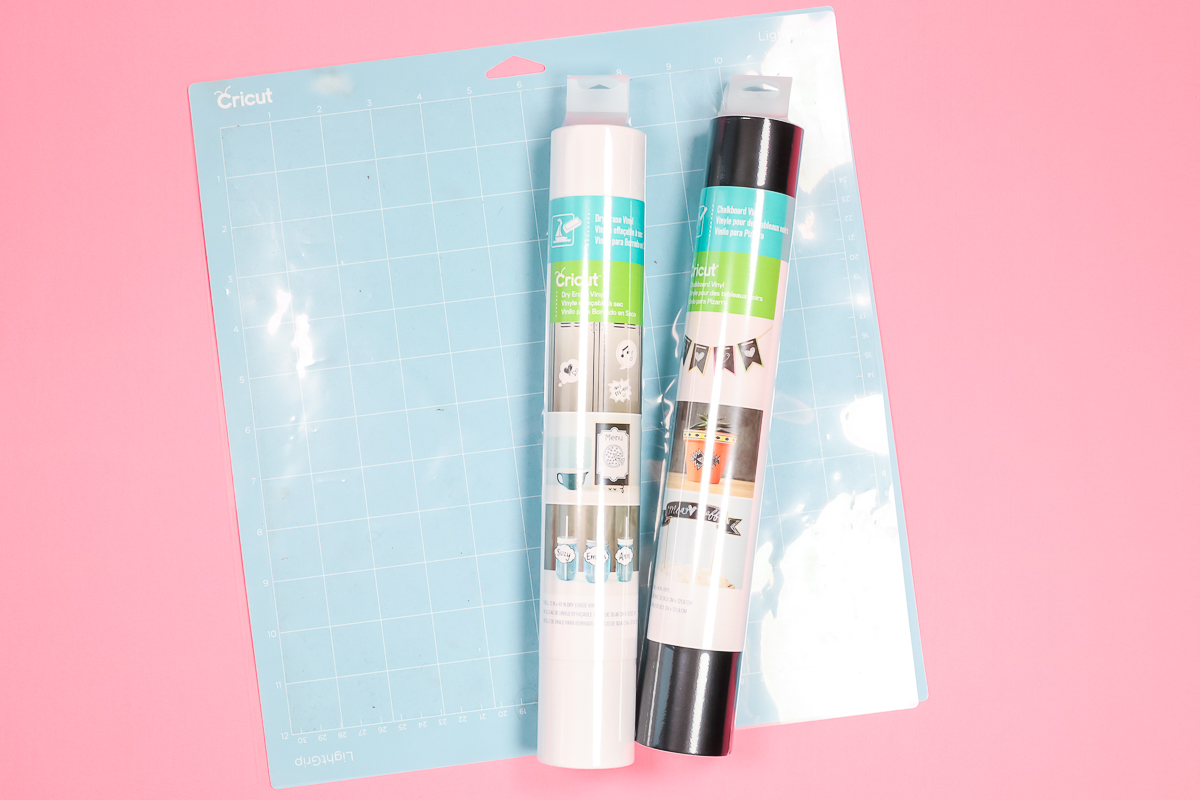
- Chalkboard Vinyl
- Dry Erase Vinyl
- Printable Vinyl and Sticker Paper
- Smart Label
- Smart Paper
- Cricut Pens
- Printer
- Chalkboard Marker
- Wet Erase Marker
- Free Label File
How To Make Vinyl Labels With Cricut
To begin, we're going to make vinyl labels. These are definitely the easiest DIY labels to make, and you can make them with any Cricut machine. For this project, we'll need any Cricut machine, chalkboard or dry-erase vinyl, and a LightGrip mat.
How To Upload Label SVG To Design Space
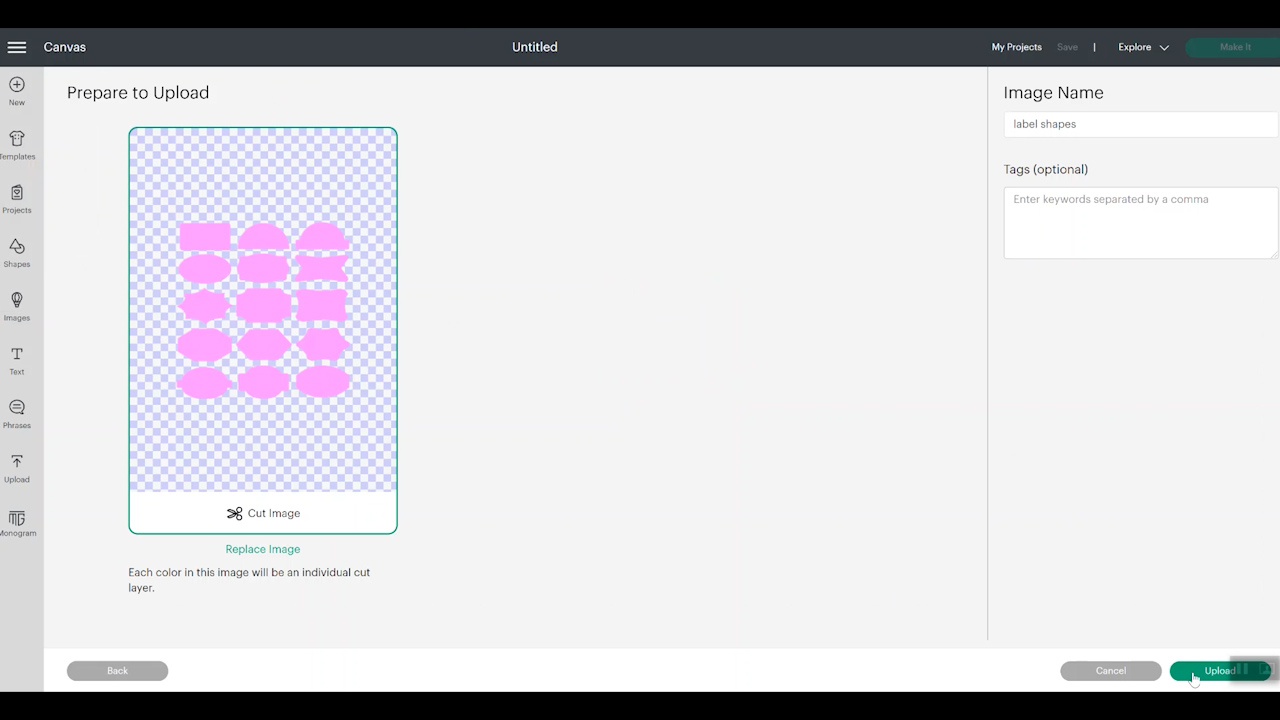
To make our labels, we're going to use the shapes file that you can get for free here. Open Design Space and click :New Project”. Click “Upload”, “Upload Image”, and then find the SVG file on your computer.
I am including all the file types just in case you have a different kind of cutter. For Cricut, you are looking for the SVG file. It may look like an HTML document on your computer, but it will upload fine.
Click the file and then “Open.” Make sure you've selected the Cut Image option and then check that the entire background is checkered. Finally, click “Upload.” Click the uploaded file, then click “Add to Canvas.”
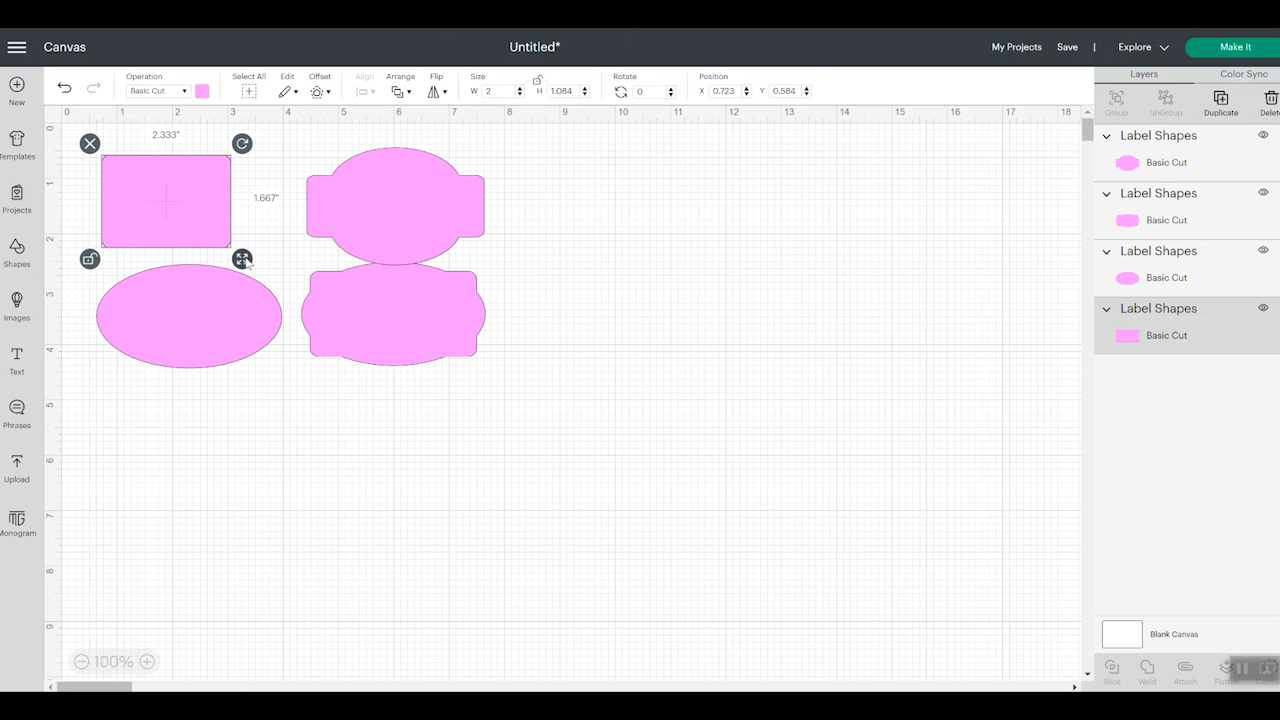
How To Select Individual Label Shapes
This file includes a large variety of different label shapes. If you don't want to cut out all of them, you can pick and choose the ones you do want to cut. In the layers panel, click “Ungroup” to ungroup each label into individual label shapes. Now you can delete the ones you don't want to use.
How To Resize Label Shapes
To resize a label, click an individual label, then either drag from a corner to resize or type your size in the top toolbar. You can even change the shape by unlocking the size tool. This will let you make them wider or taller, whichever you prefer.
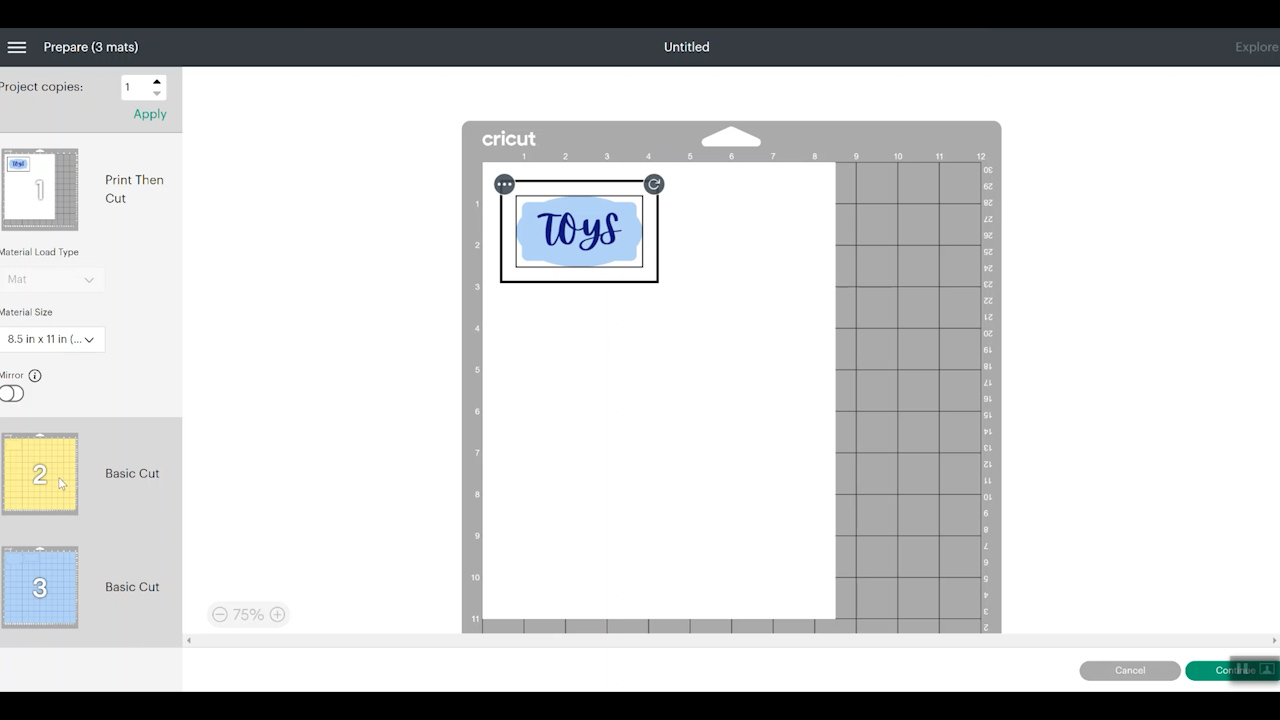
Once you have each label to the size you want, click “Make.” Depending on your machine, it might ask you a few questions. We are going to put this material on a mat, so we'll select that option and then click “Continue.”
How To Make Multiples Of Each Label
There are two ways to create duplicates of these labels. The easiest way is from the mat screen. At the top, adjust the project copies to the total number of labels you want.
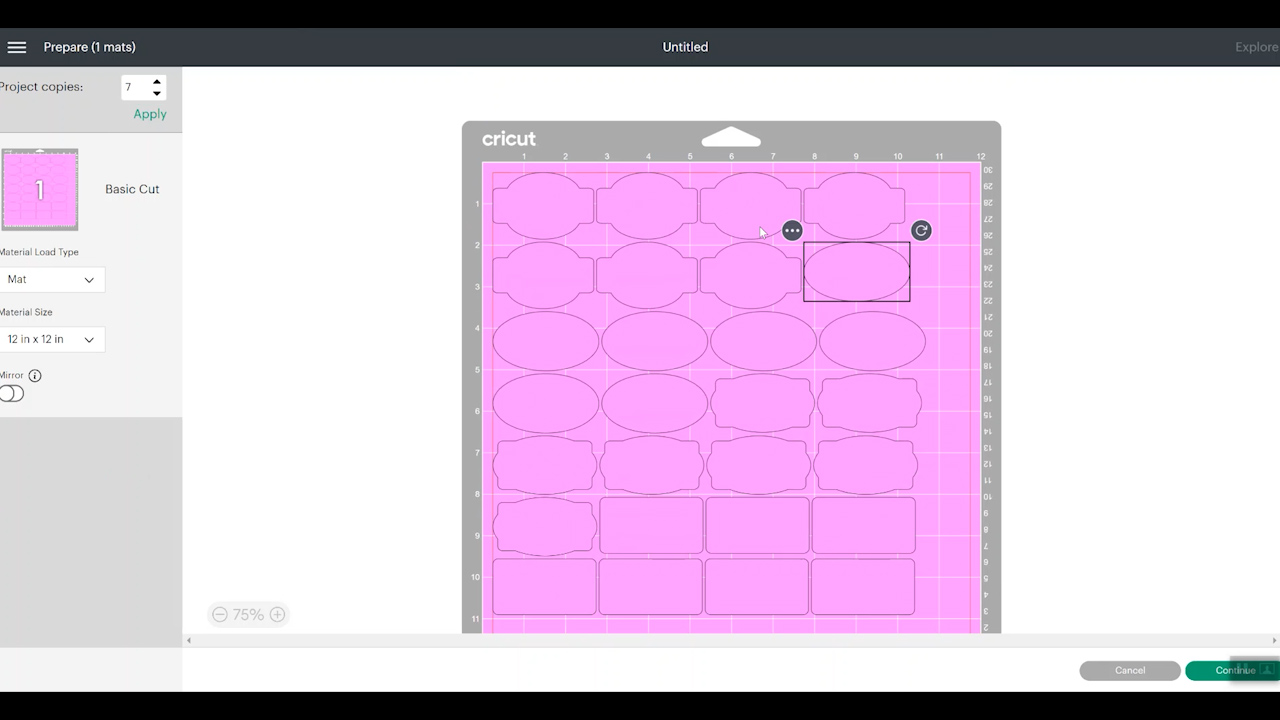
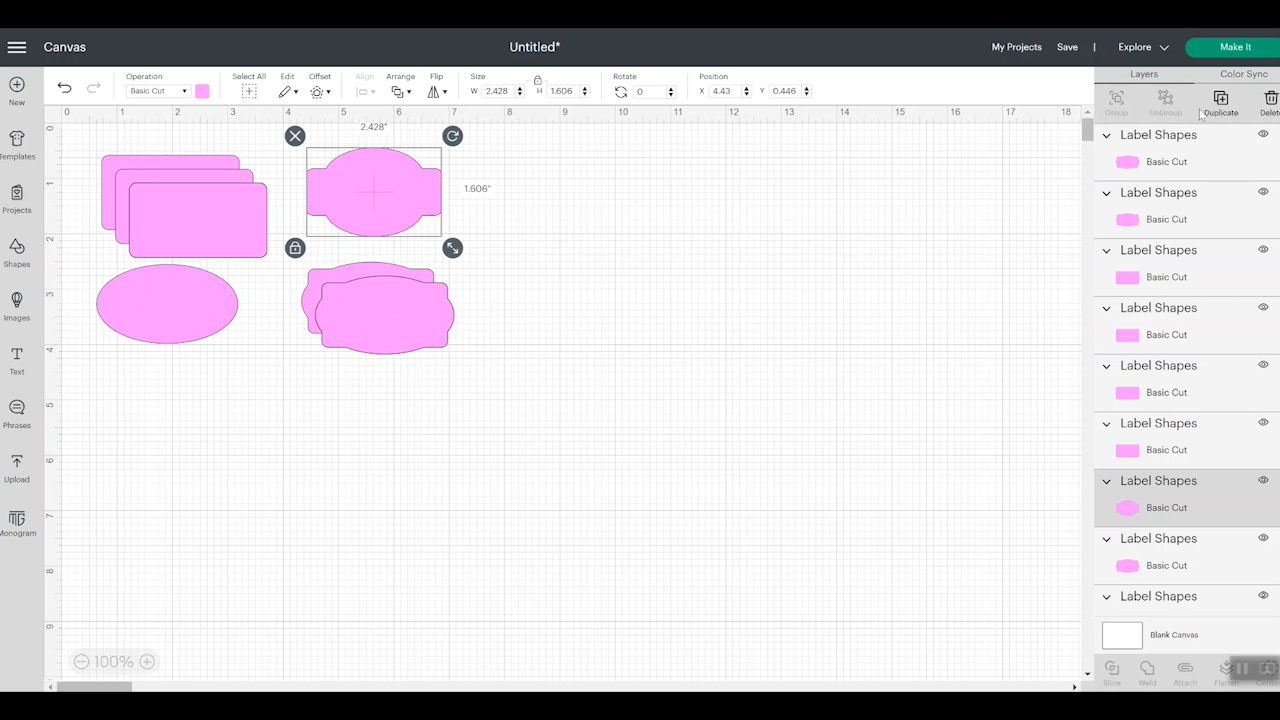
The other option is from the canvas screen. Click each label, then select “Duplicate” from the Layers Panel. This is the better option if you don't want the same number of each label.
Cutting Vinyl Labels
To cut out our vinyl labels, we'll need to connect our machine and select the material we're using.
If you're using an Explore machine, you'll need to turn your dial to “Custom.” You can see the full list of available materials on this screen.
For the chalkboard vinyl, we'll select Chalkboard Vinyl, and for the dry-erase vinyl, we'll choose Premium Vinyl.
How To Apply Vinyl To Cricut Mats
Your cutting mat will have a protective sheet covering the adhesive. Remove that protective sheet and apply the vinyl face-up on the mat.
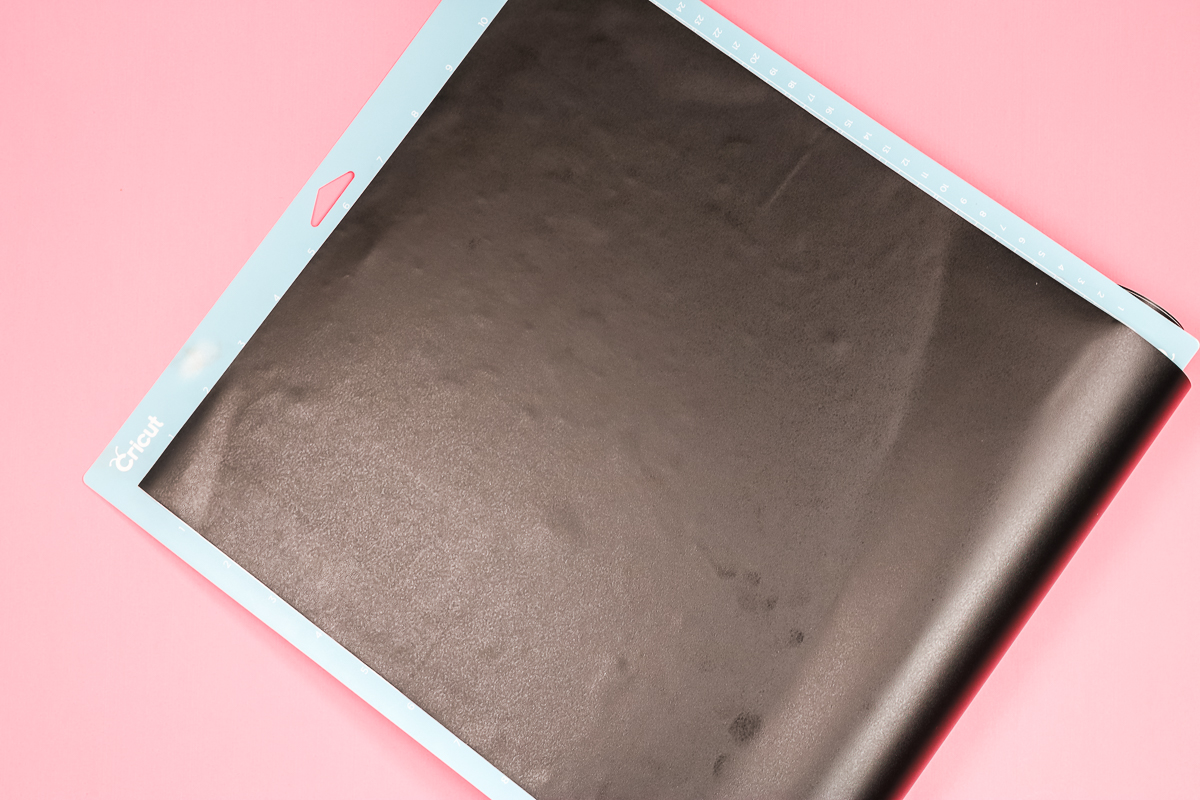
Smooth the material, making sure it is stuck down well over the entire mat. I'm using a 12×12 mat. Cricut does make 12×24 mats if you have more labels you want to cut at one time. Now that we have the material on the mat, let's cut out those labels.
What Blade Do I Use To Cut Vinyl?
To cut all these different label materials, we'll use the fine-point blade. Using the fine-point blade is what allows us to cut these materials with any Cricut machine.
Make sure the fine-point blade is installed in your machine, then load the mat and press the “Go” button to cut.
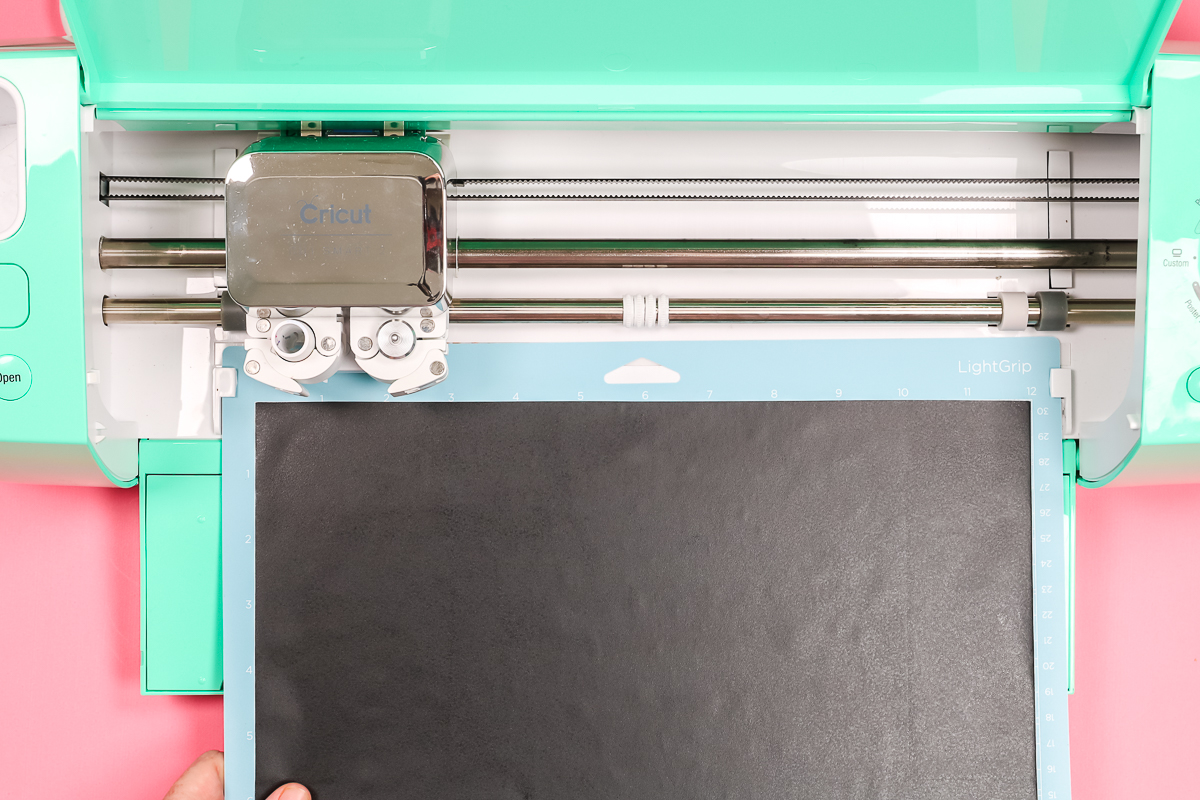
When your machine is done cutting, press the Unload button to remove the mat.
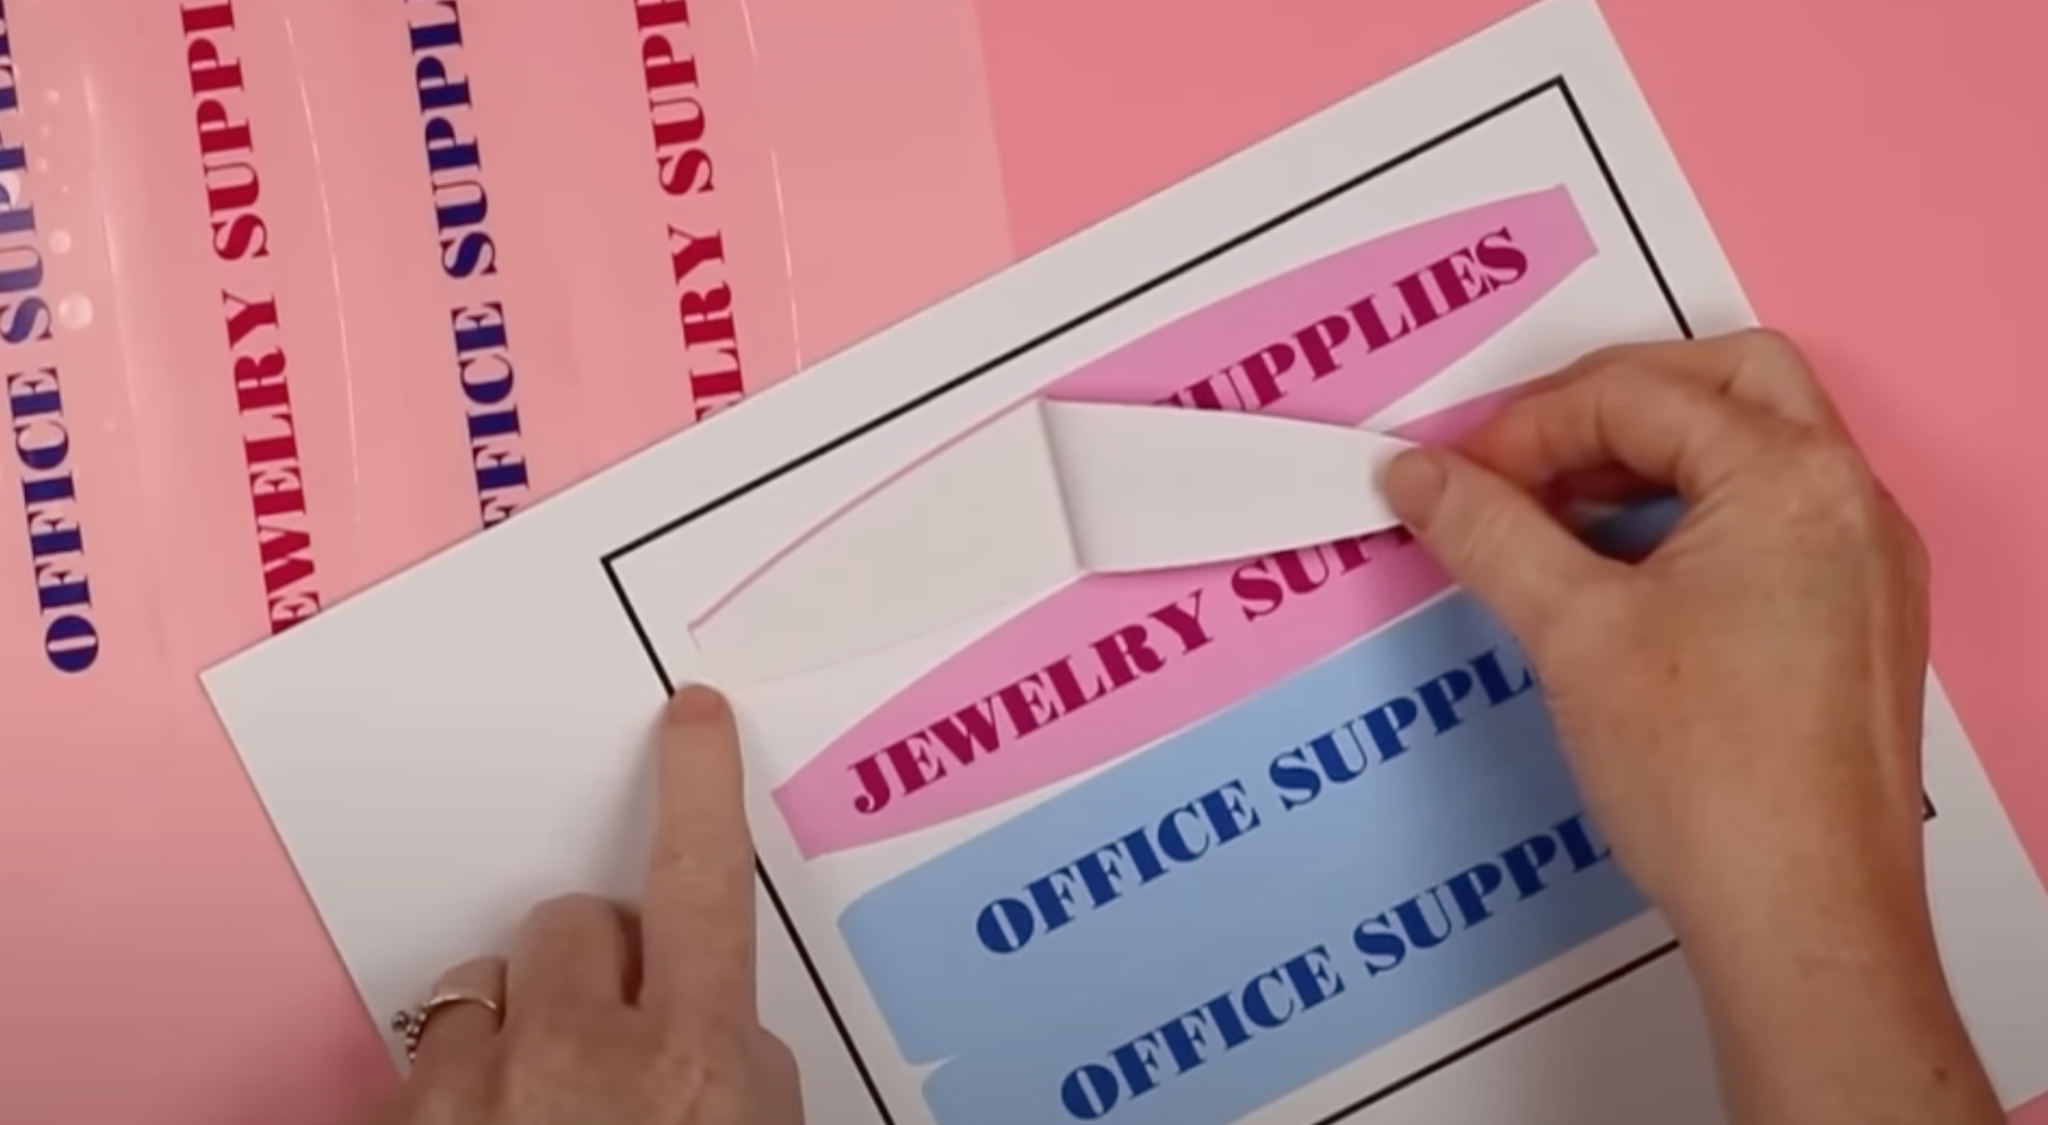
How To Weed Vinyl Labels Cut With A Cricut Machine
To weed vinyl labels cut with a Cricut machine, start at the upper outside corner and peel away all excess material. With vinyl, you can use a weeding tool to make it easier to lift that corner, but it's not required.
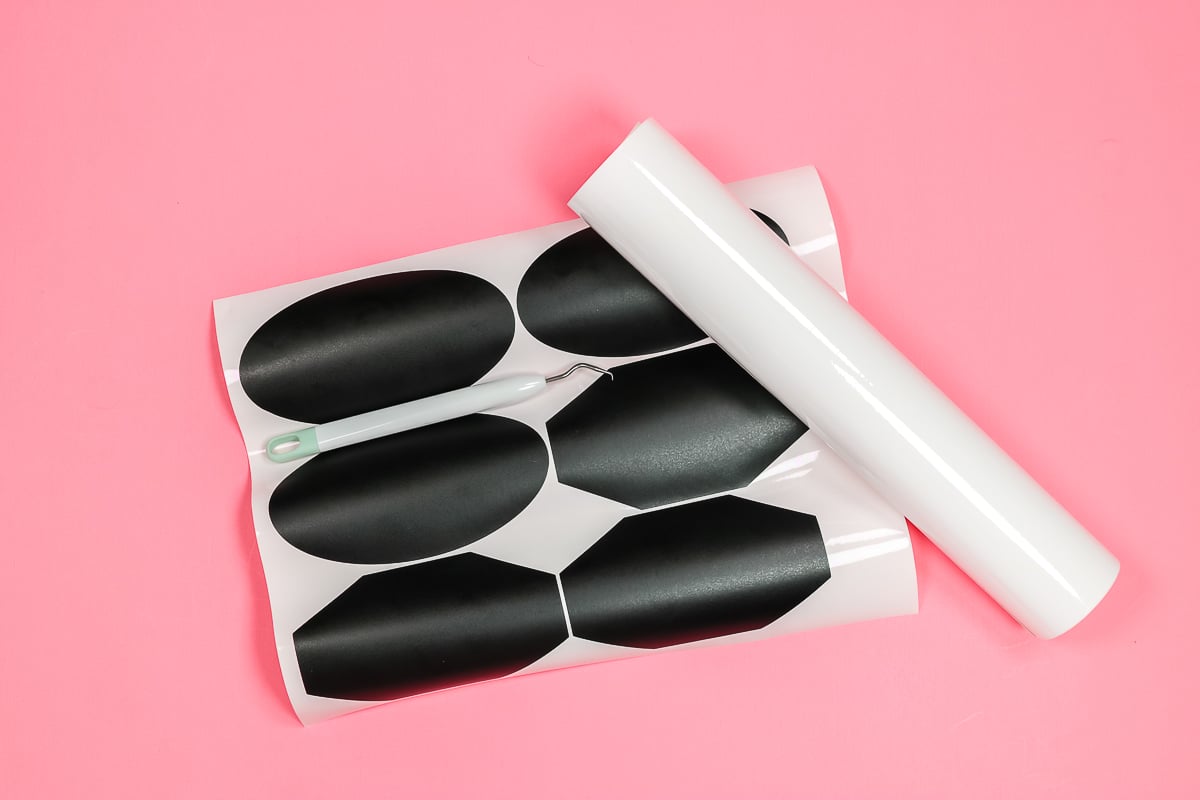
If you're cutting out an intricate label or have letters cut from the vinyl, you will want a weeding tool to reach into those small areas. Once you've peeled away all the excess vinyl, you'll have your vinyl label shapes.
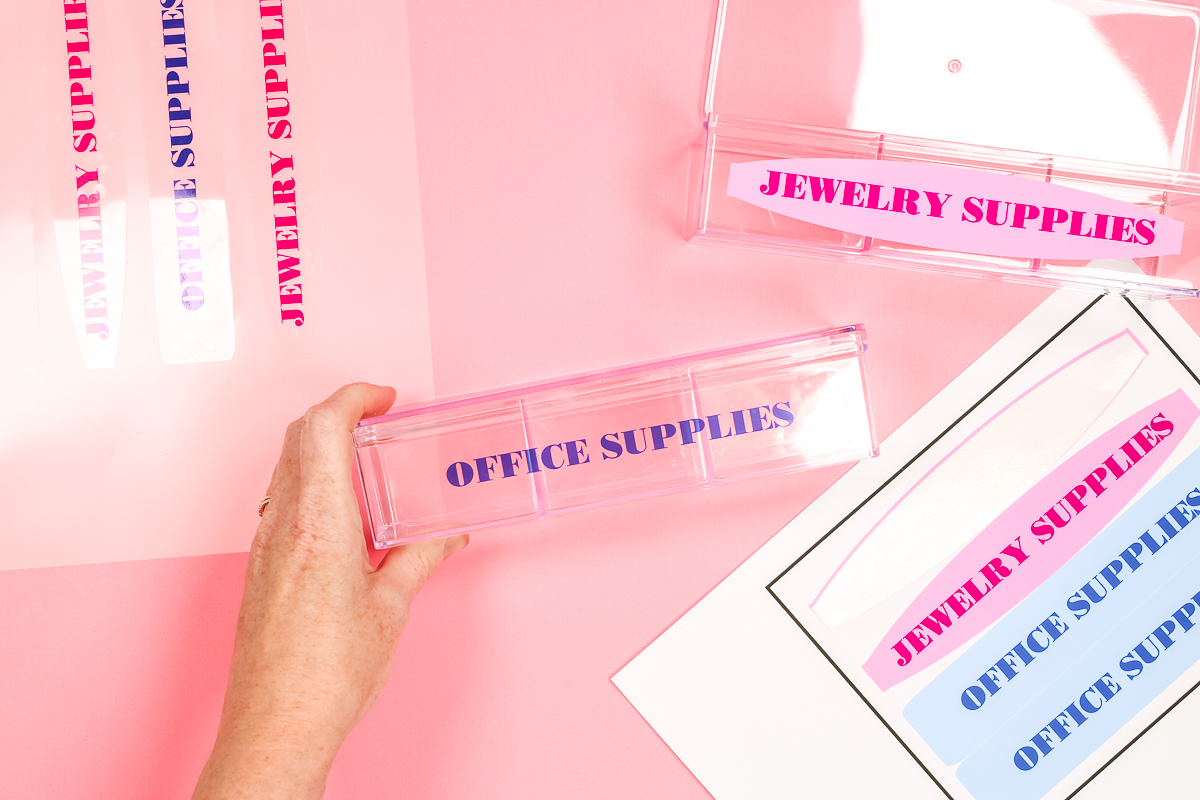
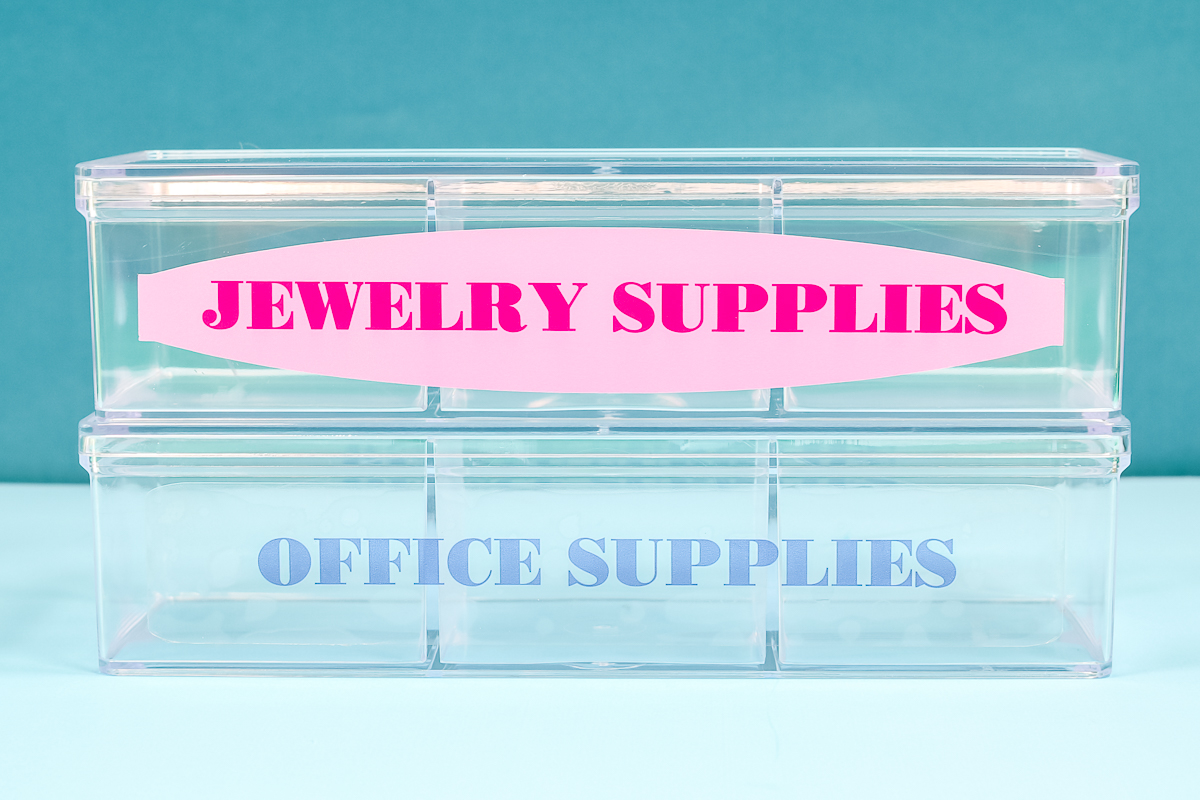
How To Apply Vinyl Labels
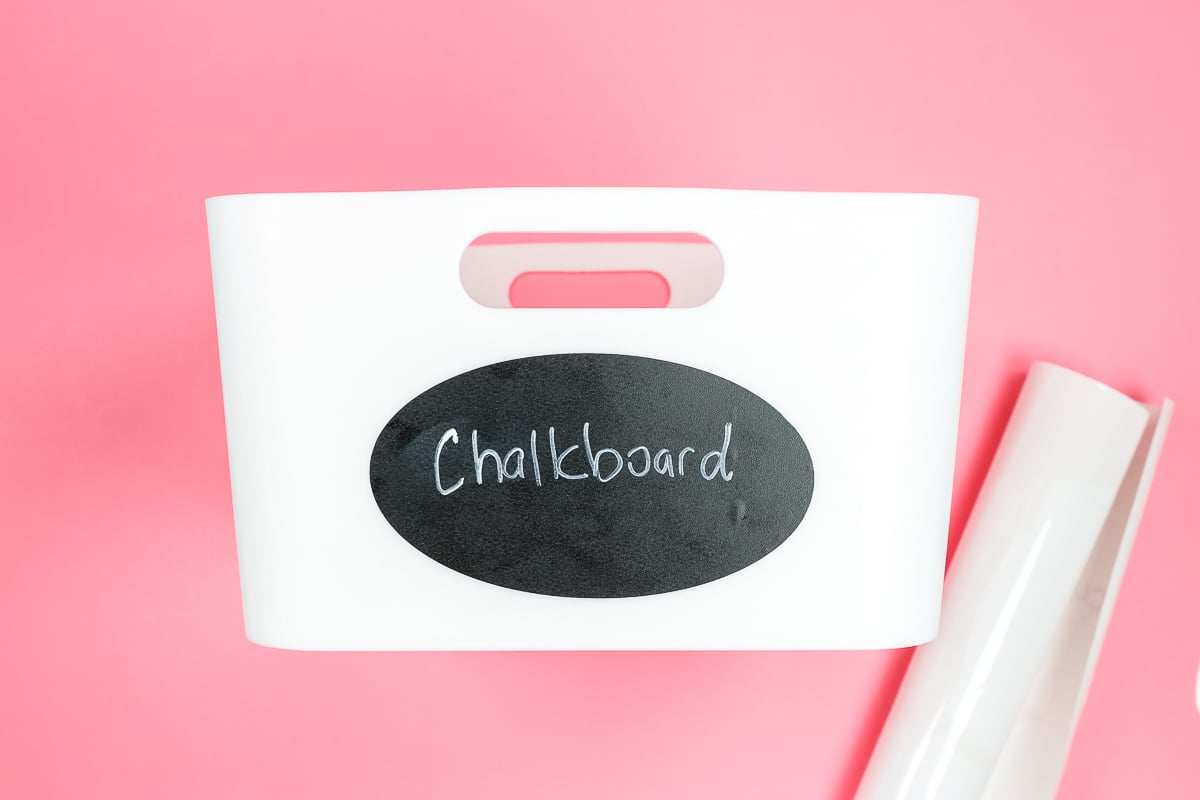
Vinyl labels are best used on a smooth, hard surface. You'll want to clean the surface with rubbing alcohol. Just make sure it's dry before applying the vinyl.
To apply vinyl labels, treat them like a sticker; no Transfer Tape is required. Just peel up the label from one end, then locate it on your surface and press it down. You can use a scraper tool to remove any bubbles.
NOTE: I recommend allowing your vinyl labels to cure for 72 hours before any heavy use for best results.
How Do I Write On Vinyl Labels?
Now that we have our labels applied, we can write on them.
For the chalkboard vinyl labels, I recommend using a chalk marker instead of regular chalk. With a chalk marker, once it dries, it's semi-permanent. You can still wipe it off with a damp cloth, but it won't come off just by brushing against it.
For the Dry Erase label, you can use a dry-erase marker OR a wet-erase marker. A dry-erase marker wipes off more easily, but a wet-erase marker dries and is slightly more permanent. It can still be erased with a damp cloth.
The type of marker or chalk will really depend on how much use your labels will get.
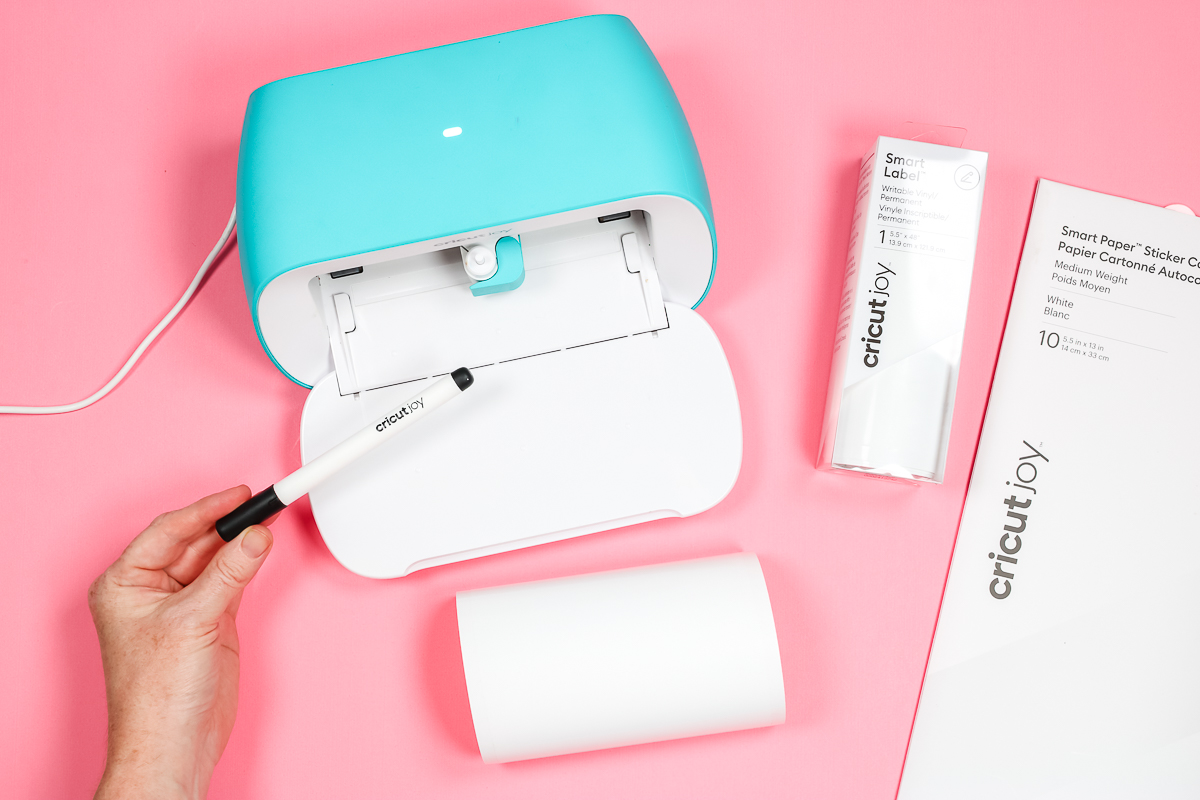
How To Use Pens To Create Labels With A Cricut Machine
For writable labels, I'll use Smart Label Permanent Writable Vinyl and Sticker Cardstock. I am using the Cricut Joy for these DIY labels, and both options don't require using a mat.
If you don't own a Joy, they sell these materials for use with Maker 3, Maker 4, and Explore 3 and Maker 4, matless, or you can place them on a mat and use the original Maker and other Explore machines.
NOTE: Friendly reminder: Cricut Joy uses pens and blades that are different from those on other Cricut machines, so make sure to select the right ones for your machine when purchasing.
How To Design Writable Labels In Design Space
If you've ever used your Cricut machine to draw/write, this process is very similar. If you haven't already uploaded the label file, follow the steps above and do that now. Select the type of labels you want to use and delete the rest.
Size the labels to the size you need, and then we'll add text. Whenever I'm writing with my Cricut machine, I like to have everything laid out at once on my canvas, especially if the writing pieces all go to one project or will be together in an area.
I am going to duplicate my label so I have as many copies of it on the canvas as I need, and they're all sized correctly.
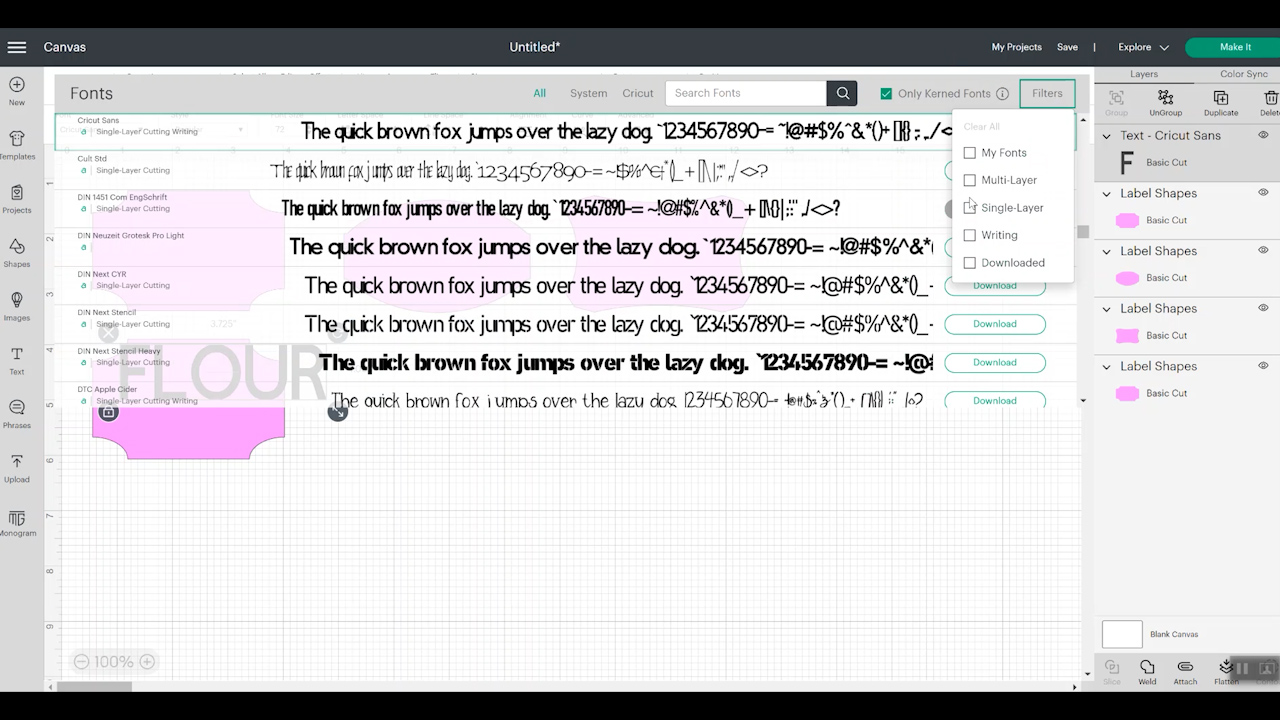
How To Find A Writing Font In Design Space
To begin, add a text box to your canvas. Type the word you want written, and then we can look at the font options. The best fonts for writing with pens are writing fonts.
When selecting our font, we want to filter to writing fonts. I like to use Cricut fonts for writing because they're easy to find under the writing filter. If you're using system fonts or fonts you've uploaded, you want to find a single-line font.
Once you have all the filters set up, you can choose a font you like. The fonts will look slightly different when added to the canvas and changed to a writing font. I'm selecting the font BFC Love Quinn.
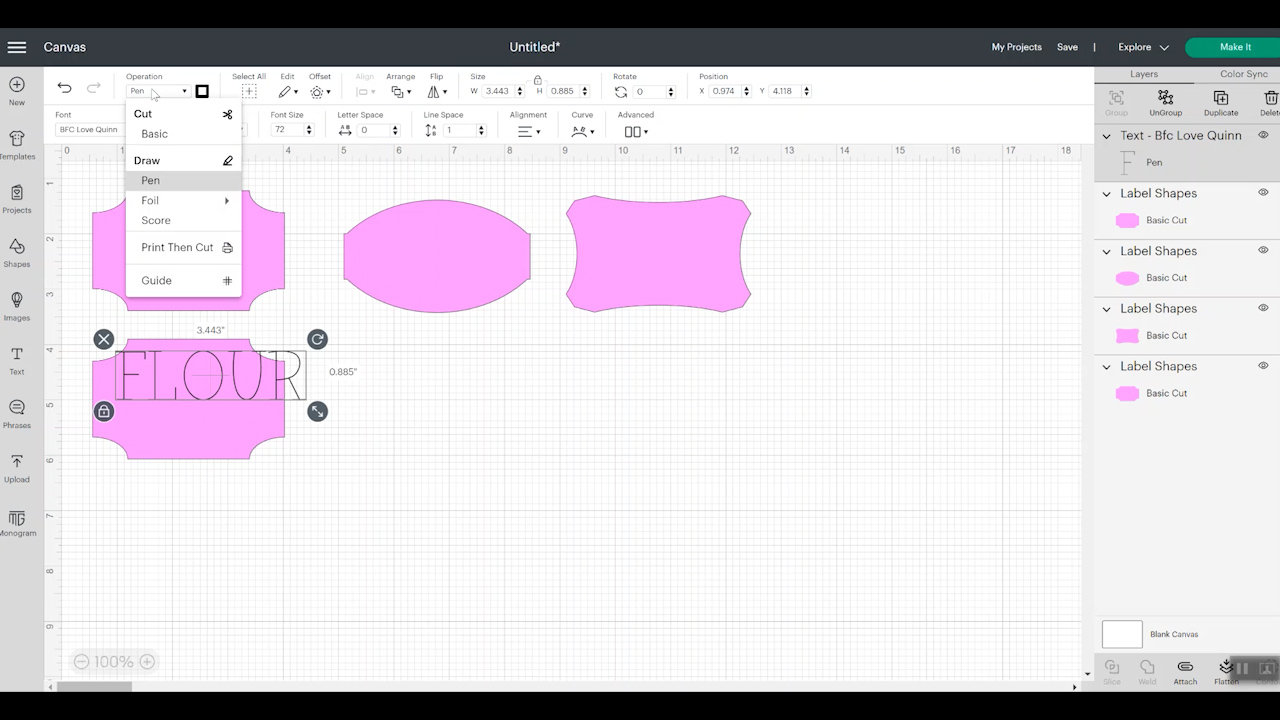
We want to change our Operation type to “Draw” and then select “Pen”. We then want to switch to “Writing.” Both of these options are in the top toolbar.
Once I have my font selected, I like to type out all of my labels and then decide on a font size. If your labels are going to be in the same area, you don't want to have a variety of different font sizes, and longer words may not fit your label the same as shorter words in the same font.
How To Check Font Size In Design Space
Up in the top toolbar, when working with text, you will see a font size option. This is the best way to ensure your font size stays the same. I don't recommend just adjusting the height and width because that can distort the font.
To check that your word fits on your label, select the layer with the word and the label, then in the top toolbar choose “Align” and “Center.”
Repeat this for each of your labels. If all the words fit with the font and font size you've selected, you're good to go. If they don't, repeat the resizing process, then align/center.
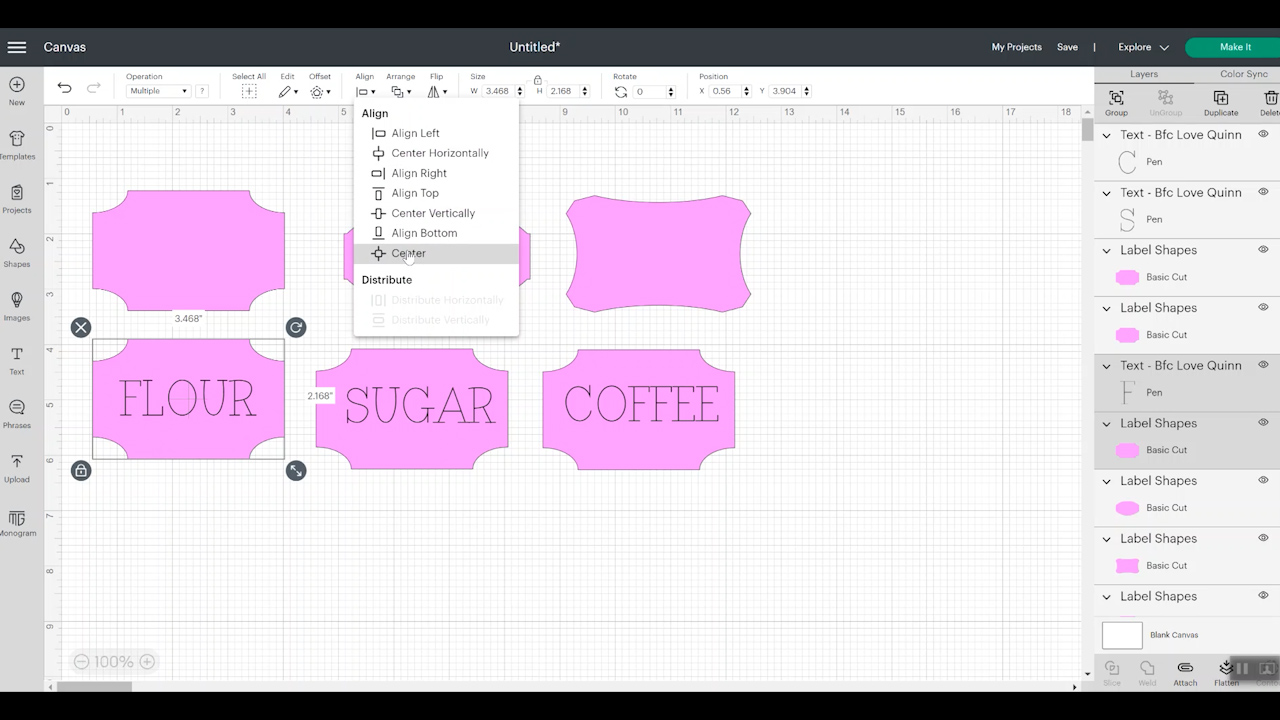
How To Make Sure Your Text Appears On Your Label
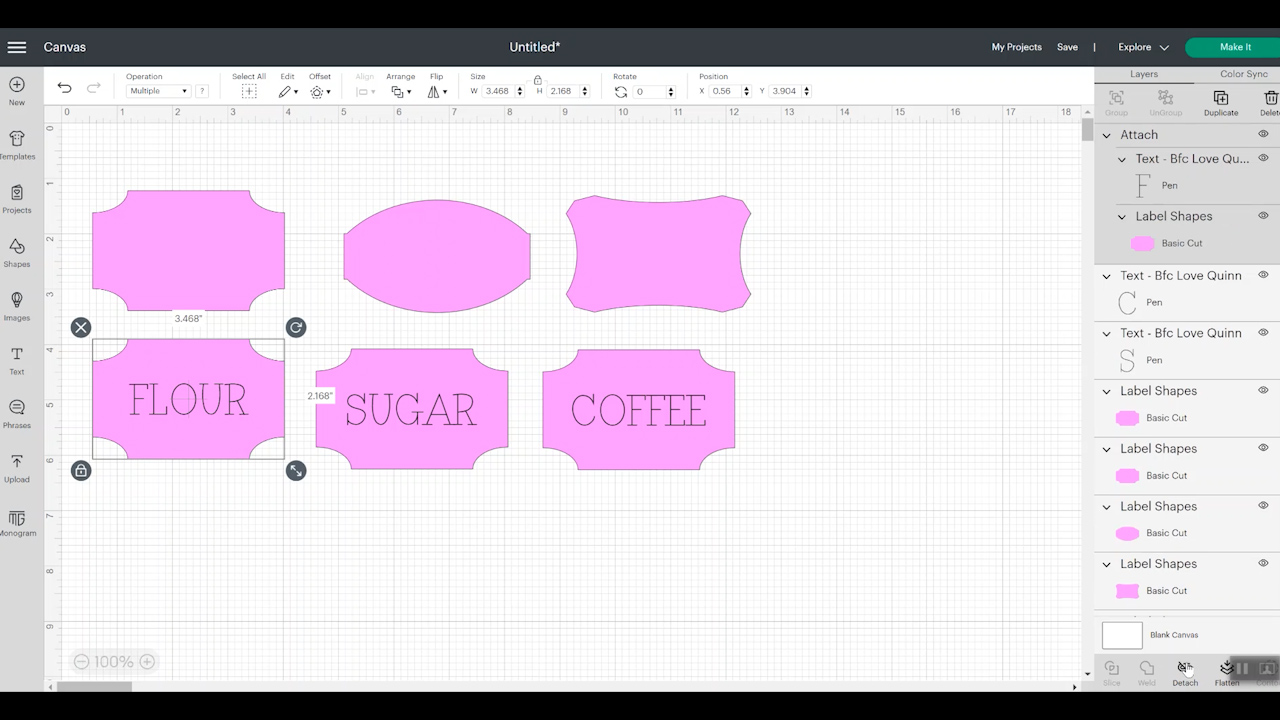
To make sure your text is written exactly where you set it on the canvas, select both the text and label, then attach them.
If you don't attach both layers to the mat screen, you'll see that your label is cutting out, and then your text is written in a different location. To ensure the writing is where you want it, attach both layers.
How To Draw And Cut With A Cricut Machine
Once you've confirmed that your design is set up as you want on the mat screen, select continue, then connect to your machine. Select the material you're using and then follow the steps on the screen.
NOTE: Cricut machines will always draw first.
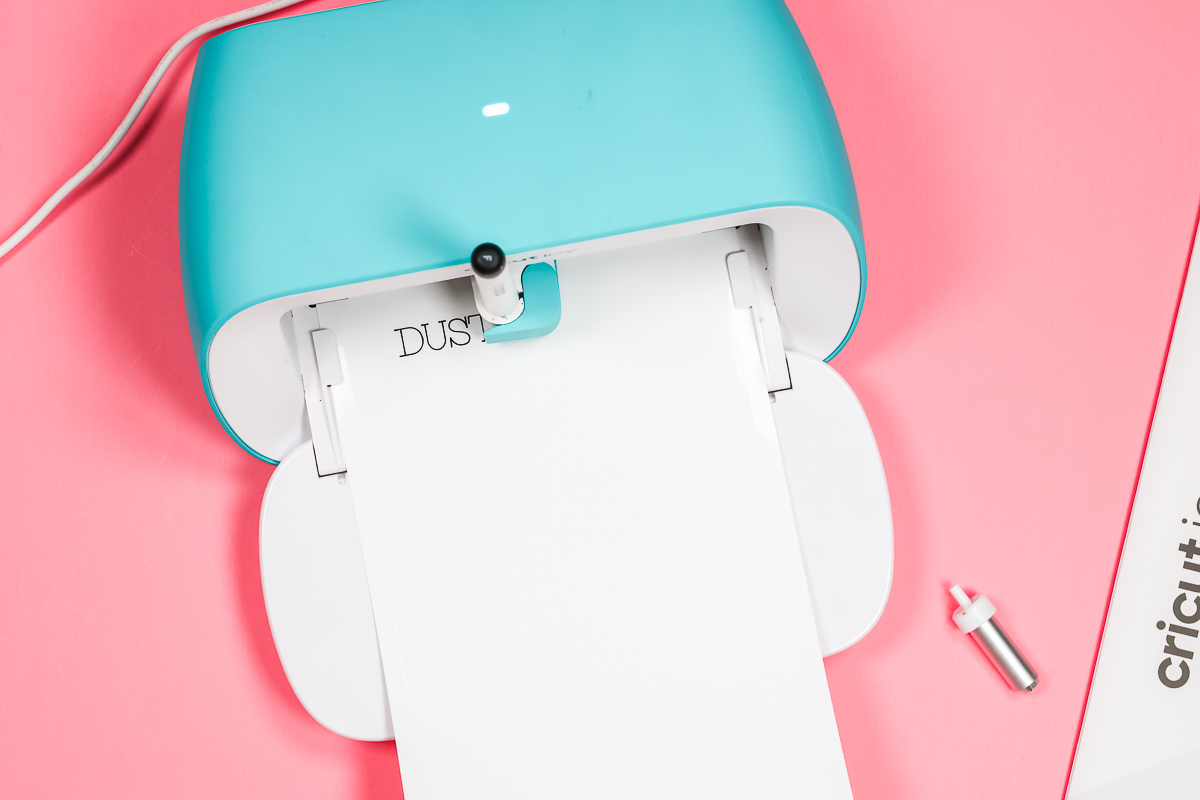
Maker machines and Explore machines have a clamp A and a clamp B. Your pen goes into clamp A, and the blade into clamp B. The Joy only has one clamp, and you would add your pen first, as prompted in Design Space. Once the machine is done writing, you'll remove the pen and add the blade.
Both Writable Vinyl and Sticker Cardstock will be loaded into your machine, face-up. If you're using a Cricut Mat, you'll add the material to the mat right side up. When cutting matless, you'll load the material right-side up into the machine.
Once the material is loaded, press “Go” to start the drawing portion. If you're using a Joy machine, Design Space will prompt you to swap the pen out for the blade. Add the blade, close the clamp, and press “Go” again.
If you're using Maker or Explore machines, your Cricut will automatically draw and cut. Once your machine is done drawing and cutting, press “Unload.”
How To Weed And Apply Writable Labels And Sticker Cardstock Labels
Both versions of writable labels are weeded in a similar manner to the vinyl labels we made before. Start in the upper corner and peel away all of the excess material.
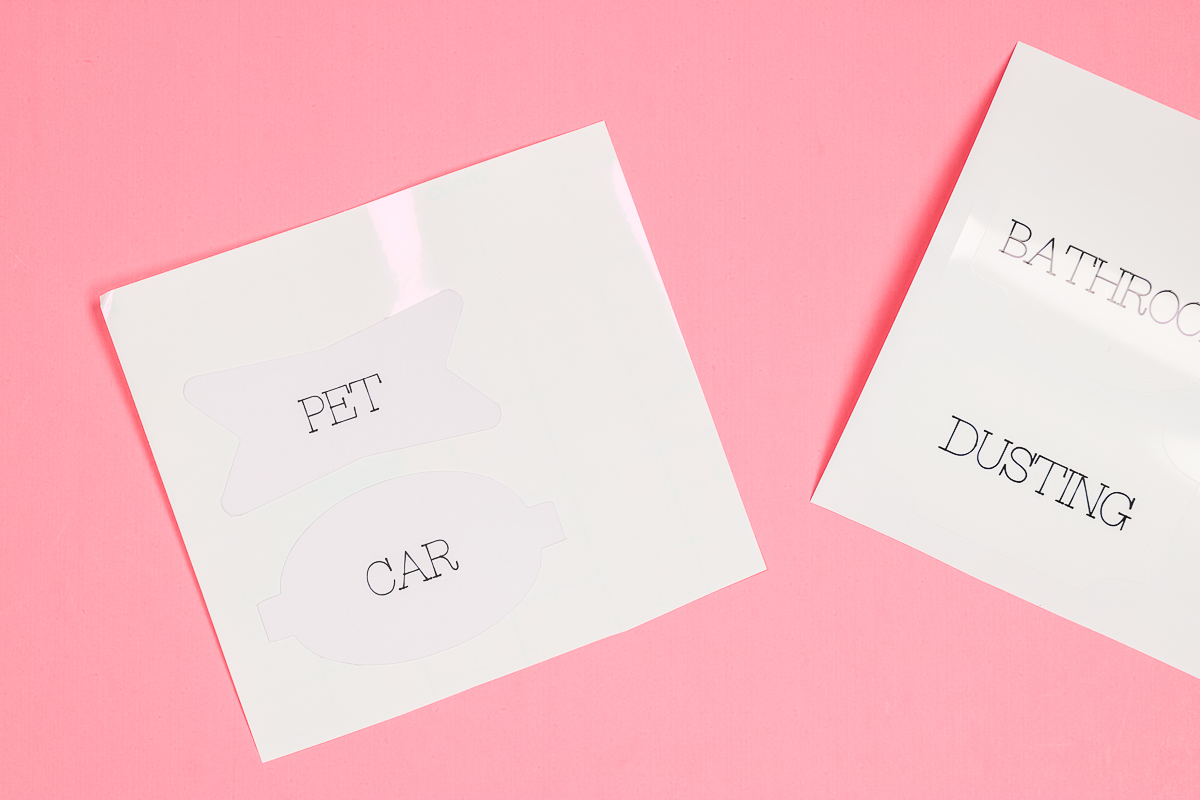
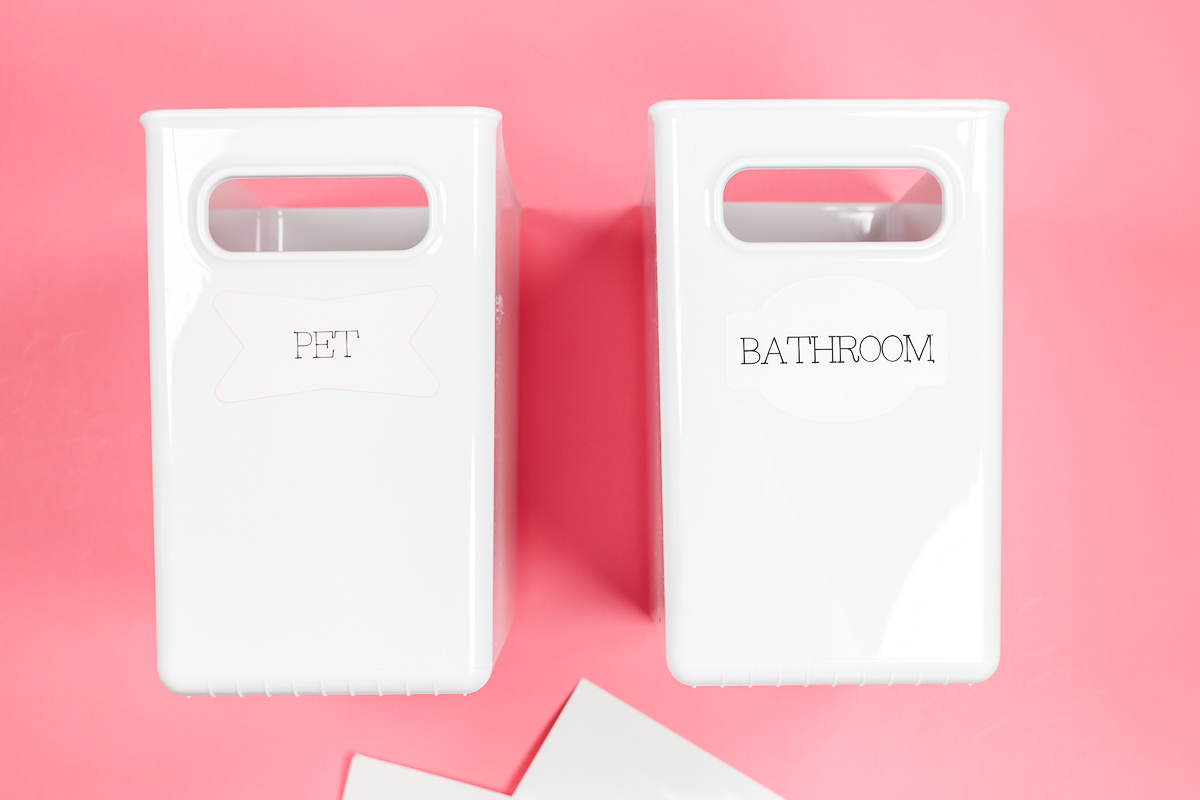
Both writable label options are adhesive labels. Applying them to hard surfaces is best. Choose a clean, dry hard surface, then place your label where you want it. Press it down well and allow it time to cure before heavy use.
Paper writable labels are available in various colors, and I am using white. Cricut pens also come in a wide range of colors, allowing you to personalize these labels to suit your needs.
How To Make Print-Then-Cut Labels
Last but not least, we have Print Then Cut DIY labels. If you have a home printer, you can use it with a Cricut machine. To make Print Then Cut labels, you need either a Maker or Explore series model or a Joy Xtra Cricut machine.
You will need Print Then-Cut label material, a Cricut machine, and a printer. I'm going to try printable vinyl and printable clear sticker paper. You can get a wide variety of printable vinyl and printable sticker paper. What you choose will depend on the look you're going for.

I thought I would use a white printable vinyl that I'm going to print with color, and then a clear version that I'm just going to add some text to. You'll also need a light grip mat to put your label material on, as well as an inkjet printer to print the labels.
NOTE: The products I'm using are specifically for inkjet printers; you can also find LaserJet printable vinyl and sticker papers.
How To Design Print-Then-Cut Labels In Design Space
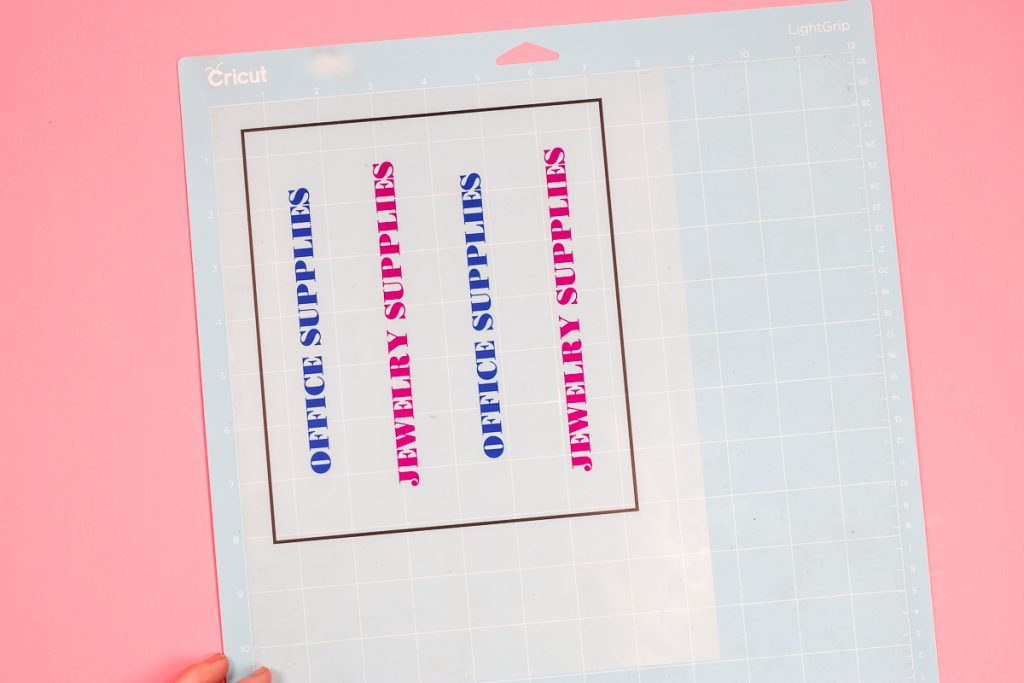
We're going to upload the label shapes the same way we did before. Then we can pick the label shapes that we want to use for our print-then-cut labels.
In all the other label options, it doesn't matter what color the labels are on the canvas screen, since they're just cut shapes. Because we're making a print-then-cut label, the color will matter. You will need to make this both the size and the color you would like it to be for your project.
You can change your label to any of the material color options here in Design Space, or you can click Advanced and type in a hex code. Can't find something you love? You can also pick colors along the rainbow slider to find something you like for your labels.
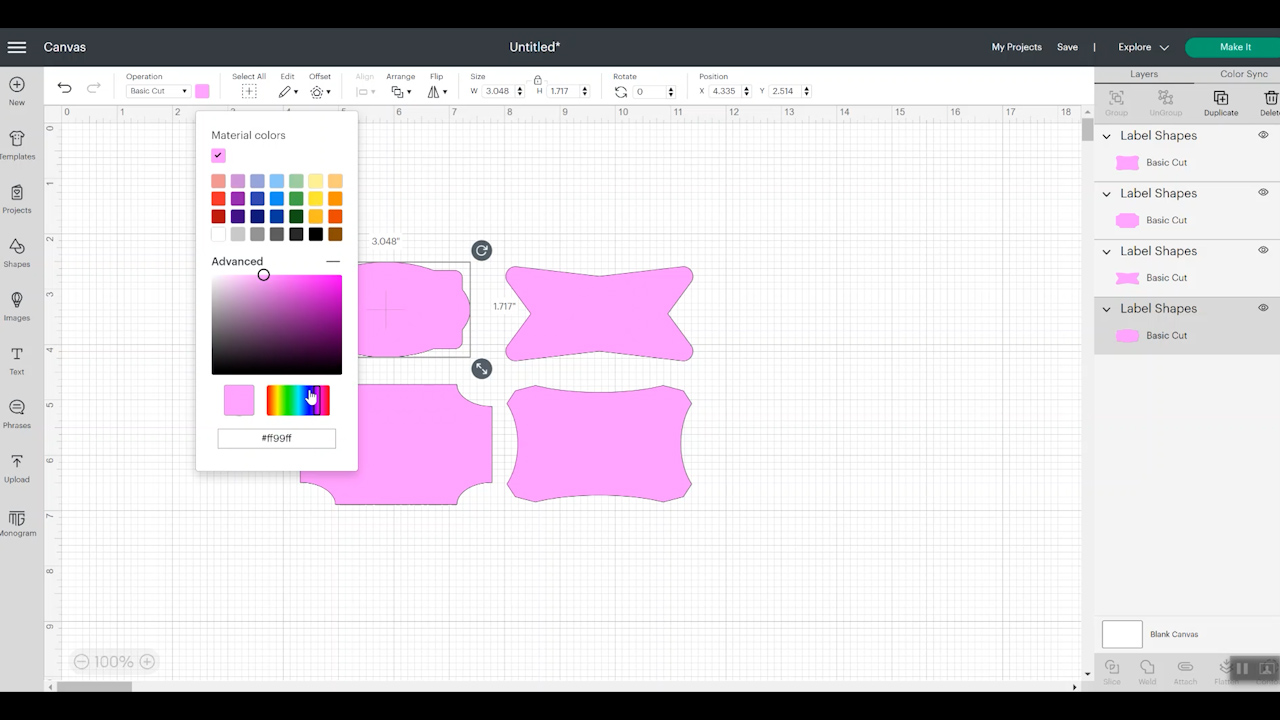
If you are using clear sticker paper and want the background of your label to be clear, make your label white. Printers don't actually print white, so your background will remain clear.
Once I pick the color I will see it up in the top toolbar. You can choose to make all the labels the same color, or you can make them different colors, and they will all print on the same page.
How To Add Text to Print-Then-Cut Labels
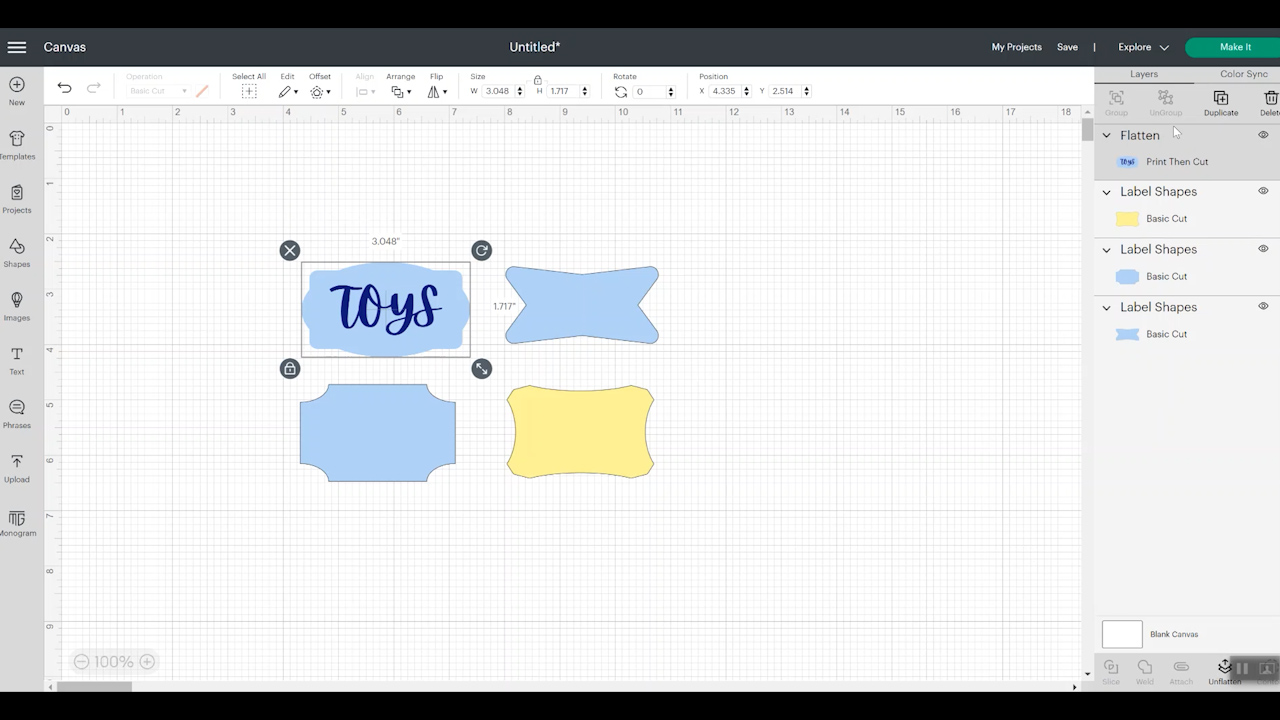
Once you have the size and color of your label, it's time to add text. To add the text, we'll do it similarly to how we did the writable text labels.
One of the main differences is that we don't need to filter our fonts. Because your printer will print the whole text, you can use any font: system fonts, uploaded fonts, Cricut fonts – they can all work with print then cut labels.
If you're using a script-style font, you will want to set it up the way you want it, then weld the text so it's one continuous word without breaks. Choose your font color the same way you did the label color, then select the label and text layer, and click “Align” and “Center.”
Once the label is laid out on the canvas, select both layers and click Flatten in the Layers Panel. You'll notice your design changes a little on the screen, and in the Layers Panel, it will say “Print Then Cut.” Your project is now ready to Print Then Cut!
How To Print Print-Then-Cut Labels
For the next step, we'll click “Make.” On the mat screen, you'll see your design, which will have a black box around it.
Why Is There A Black Box?
A black box appears around the design because that is how your Cricut machine knows where to cut. The black box is called a registration mark, and the sensor reads it to determine where to cut.
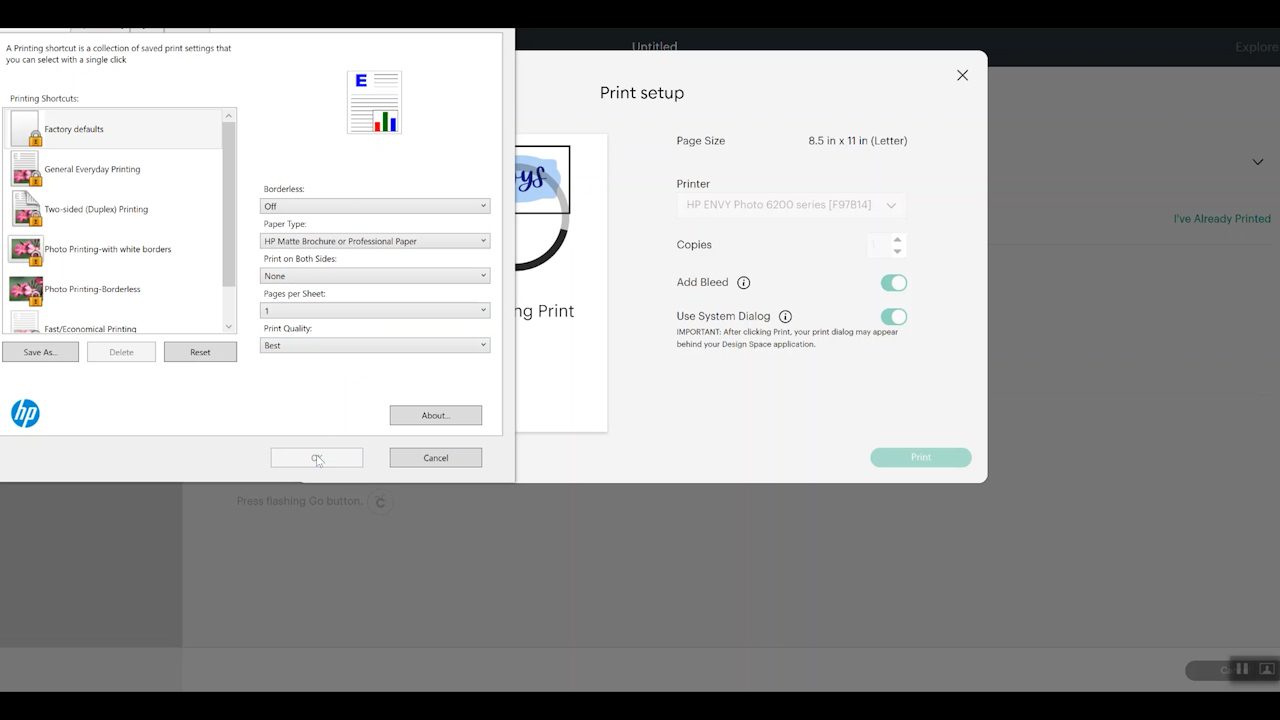
We'll select “Continue” and then click “Send to Printer.” Select the printer you'll use from the dropdown, and you can also change the number of copies you want printed.
What Does Add Bleed Do?
By selecting “add bleed,” the image extends beyond the label area. This way, if your cut is just a little off, no one will notice.
What Printer Setting Should I Use?
Printer settings can vary depending on your printer. I always click “Use System Dialogue” and then “Print.” Confirm again that the correct printer is selected, then click “Preferences.”
Personally, I set my print quality to the best and use a matte paper setting for printable vinyl. For the clear sticker paper, I'm choosing a glossy inkjet paper. You can also choose plain paper.
It just depends on your printer, so do a test first. The different print options will affect your print quality. Now we can click “OK” and print the labels.
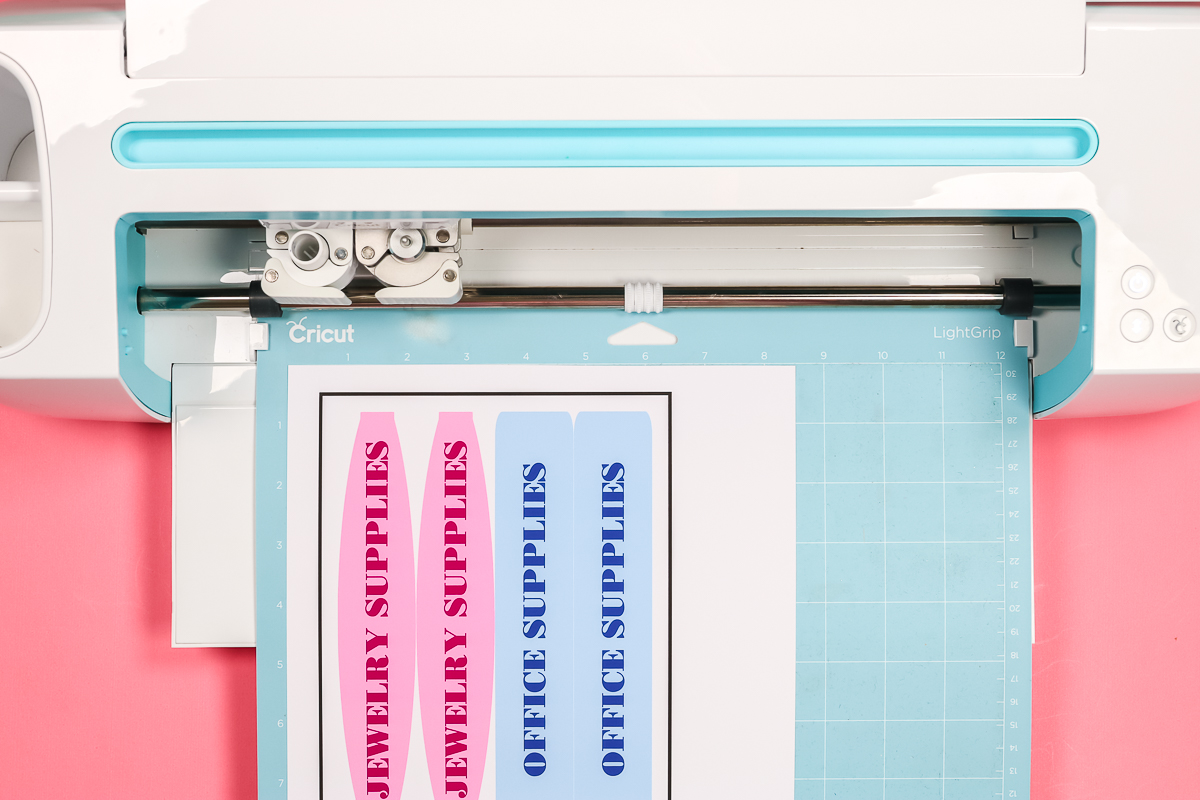
How To Cut Print Then Cut Labels
Once the labels are printed, it's time to cut them out. I always check to make sure my ink is dry. You can do this by gently touching the corner or the registration mark. If any ink appears on your finger, let it dry a little longer.
With the ink dry, add your printable material to a LightGrip Mat and make sure it's in the same orientation as it appears on your screen. Choose the printable material you're using, then select “Done.”
I am using my Maker for these labels. Maker machines and Explore 3 and 4 models do have a slightly stronger/more sensitive sensor that allows them to read registration marks on white or light-colored materials.
Load the mat into your machine and press Go to cut. First, your Cricut machine will look for the black box around the outside edge. Once it finds the registration box, it will begin to cut out the label. When the Cricut is finished cutting, you can unload the mat and see the finished labels.
How To Apply Print-Then-Cut Labels
With the printable labels, you can weed out all the excess or just peel off the label. This is a good example of why you would add bleed to a Print Then Cut project.
You can see a slight pink mark. You may see that there's more pink at the top than there is left at the bottom. That's because my Cricut machine is just slightly off when cutting.
When you use that add bleed option, the label is actually 100% perfect when you remove it. So that is a great option for making sure your print then cut labels turn out just the way you want.
You can add these labels to a container in the same way. I recommend these for hard-surface containers. Put them in place on a clean, dry surface, and press them down.
You can see the one that is not clear and the one that is. The clear option is really great for clear containers if you want a nice, clean look with your labels.
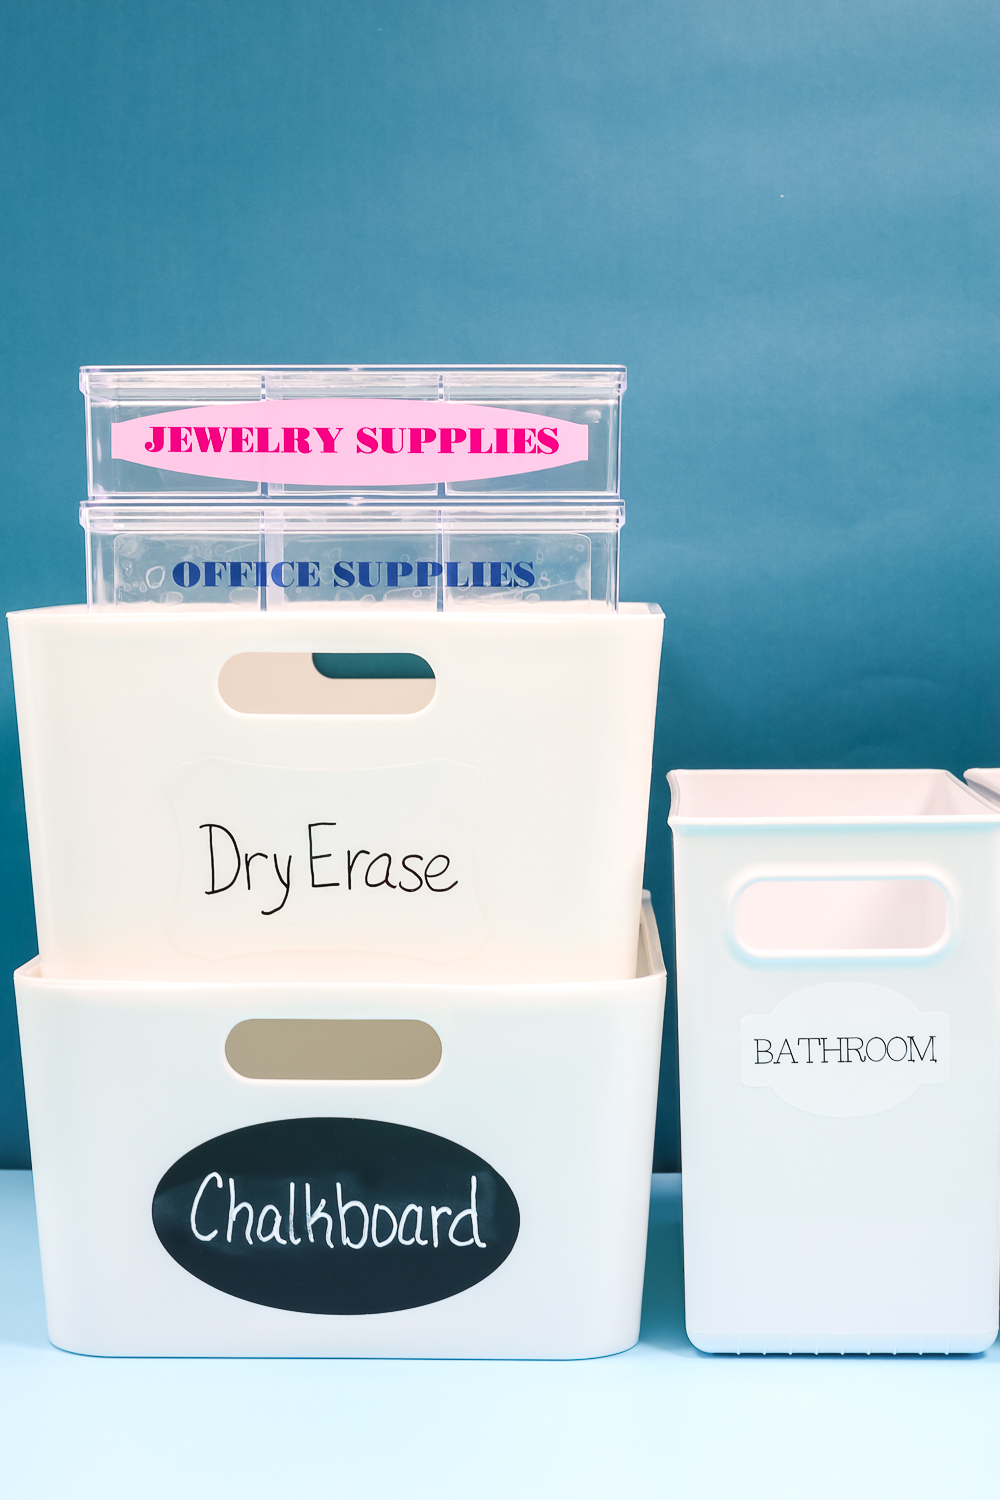
Which of These DIY Labels Should I Use?
I know I gave you a variety of different options. Let's chat about specific applications and labels that may work.
Semi-Permanent Options
I like using both chalkboard and dry-erase labels where I want a semi-permanent label. My craft room, for instance, is always being changed around. Sometimes I start a new craft and decide I no longer enjoy it, and I want the option to reuse the bins and labels.
The same could be true in classrooms and playrooms. Anywhere you foresee needing to change up the label regularly, I recommend chalkboard or dry-erase material.
Permanent Non-Waterproof Options
I do love the writeable labels I made. However, both versions of those are really not waterproof. The writeable labels I use in areas where they won't get wet. These are a more permanent solution, so I don't use them in areas where I anticipate needing to change things.
Waterproof Label Options
So what happens if you need a waterproof label? You can use Print Then Cut with a laminate or clear vinyl over the top.
You would Print Then Cut, just like I showed you before, but add a vinyl layer on top. They also make waterproof printable sticker paper, so that's another option for those wet areas.
You could also use your machine to write on just plain paper and put it inside a waterproof sleeve, so that's another option. This takes the writeable label option and changes it up: you write on plain paper and then slip it inside, like a plastic sleeve, to keep it away from moisture. So that's another option. Try this post for water-resistant options that work!
Difficulty When Making
The printable labels take a little bit longer to design, print, and run through your Cricut, so it takes a little bit longer to make.
That said, you can make them in all kinds of really cool colors and get really fancy with them. Colors, pictures, anything you can imagine, you can make in Cricut Design Space and print it. So printable labels are a great option for that. And as I said, you can make them waterproof as well, which is great for areas where you're gonna see moisture.
So hopefully this helps you understand how to make labels with your Cricut. I used 3 different types of Cricut machines to create a variety of labels.
You can literally make DIY labels with any Cricut machine!
FAQs About How To Make Labels
Here are answers to some of the most frequently asked questions I receive about making labels. If your question isn’t listed, feel free to drop it in the comments, and I’ll be happy to help!
Where Are The Links For The Labels?
You can get the links for the labels here!
Can You Use The Joy Product On The Maker 3?
You can use it on a mat, or they make Maker 3-sized materials. To learn more, check out my Cricut Smart Labels video!
Is Writable Vinyl The Same As Printable Vinyl?
No, they are two different things!
How Would You Print Color?
You would use a separate printer.
My Writing Is Not Good Because Of Arthritis. Is There A White Pen I Can Use On The Chalkboard Vinyl?
I have not actually tried any chalkboard markers in the Cricut. I have used a white marker on writable vinyl, and you can see that in my Cricut Smart Labels video!
5 More Cricut Label Ideas
Did you love learning how to make labels, and are now looking for more label ideas to make with your Cricut machine? Then check out the projects below!
- Cricut Labels: 3 Ways to Make Them
- Five Ways to Make Labels with Cricut Joy
- How to Make Writable Labels with the Cricut Joy
- DIY Pantry Labels on a Cricut Joy, Explore, or Maker!
- How to Make Organizer Labels with Your Cricut Machine